Mesh protection technology
Lightning protection rules are regulated at the legislative level. In particular, there are instructions from Rostechnadzor, a document called “Instructions for the installation of lightning protection of buildings and structures” (RD. 34.21.122-87) and other regulations.
The mesh system is a collection of metal conductors and down conductors, individually grounded. This method of lightning protection is considered the most effective, as it allows you to protect all structural elements of the house from lightning. The system is considered the most reliable compared to competitors.
However, the installation of such a lightning rod presents many difficulties. The disadvantages of the mesh system include its visibility, which worsens the external perception of the building.
The network consists of hot-dip galvanized steel rods with a diameter of 6 millimeters or more. The rods are laid out on the roof in the form of a grid. The pitch between the rods is selected based on the lightning protection category. The maximum step should not exceed 6 by 6 meters. If the recommended cell sizes are exceeded, it is necessary to distribute the available space into smaller areas.
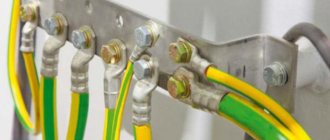
Connections are created using a welding machine or bolts. A bolted connection is preferable because it avoids damage to the galvanized surface, which reduces the likelihood of the material rusting. All protruding parts of conductive elements must have a galvanic connection with the grid. Non-conducting areas are equipped with additional receivers.
The lightning protection mesh on the roof can be laid both on top of the roofing material and under it. Most often, the mesh is placed on top of the roofing material. If the mesh is placed on top of the roofing material, it is recommended to use special holders (also known as gravity supports). In some cases, external installation is not possible (for example, with a complex roof configuration). In such situations, the lightning protection mesh is placed under the roof.
Note! Mesh protection is not compatible with combustible roofing materials. Otherwise, if the mesh is punctured, the roof will catch fire.
In previous years, the location of the mesh under the roof was considered more preferable, since the design spoiled the appearance of the house. However, now there is a large selection of modern materials that allow you to effectively camouflage the mesh. From a technical point of view, placing the mesh outside makes more sense.
How to make lightning protection with your own hands
For self-installation, use a standard design or develop it yourself based on regulatory documentation. Before starting work, you should calculate the consumption of materials and decide on the type of grounding. To drill holes for façade fastenings, you will need a hammer drill.
The main thing is to strictly follow the project and regulatory requirements during the work process. Otherwise, installation of the structure is not difficult. After all, the first lightning rod was made by Franklin back in the 18th century, literally “on his knees.”
Useful video on lightning protection devices in conclusion:
Did you manage to solve your problem using the recommendations from the article?
Yes!
45.56%
No. More answers required. I'll ask in the comments now.
38.06%
Partially. There are still questions. I'll write in the comments now.
16.39%
Voted: 360
Features of protection of flat roofs
The technology used to install lightning protection mesh on a flat roof is regulated by state standard RD 34.21.122-87. The regulation states that installation is advisable only on roofs with a slope of no more than 1 in 8. However, in reality, mesh systems are also installed on steeper slopes, since the decision on the need for installation is at the discretion of the customer.
Installation of the mesh system is possible using one of two methods:
- The first type of technology consists of laying a lightning protection mesh on the concrete base of the roof during the construction of the building. The mesh contains layers of coating consisting of fireproof materials that act as insulation, waterproofing and finishing material.
- The second method is used to create protection on flat roofs of private houses, garages, and country houses. In this case, the structural elements are placed on top of the roof and rest on holders.
The table below shows the cell sizes on flat roofs depending on the protection category.
What is a lightning protection mesh?
Based on their location on the roof, the lightning protection mesh is divided into two main types:
- On top of the roof
- Under roofing material
It consists of hot-dip galvanized steel rods with a diameter of 6 mm, located on the roof in the form of a grid, the pitch of which is selected depending on the lightning protection category (we’ll talk about this below).
As a rule, the mesh is placed on top of the roof, without going beyond its boundaries, but sometimes it happens that for some reason it is not possible to install it on top of the roof, for example, due to the design of the roof, then the lightning protection mesh is laid under the roofing material.
It is important to know! It is allowed to use lightning protection under the roofing material (under waterproofing, insulation, or even screed if the roof is flat), but only on the condition that all roofing material consists of non-combustible materials. In other words, if the mesh is broken, the entire roof should not catch fire.
Based on the above, we can conclude that placing a lightning protection mesh on top of the roof is more appropriate, especially since now there is a huge selection of materials that will in no way spoil the overall appearance of the roof.
Fireproof mesh
Fireproof bases include:
- concrete surfaces;
- galvanized roofing sheeting;
- sandwich panels;
- backfilling with gravel (used as a ballast substance in inversion roofs).
The installation scheme for lightning protection mesh on the roof is determined by the type of fireproof base:
- In the case of corrugated sheets without a polymer coating, installation is carried out across the corrugation. Steel rods are laid at a certain pitch and welded to the surface of the wave of profiled sheets. The frequency of welding seams is 1 meter. Instead of welding, bolted lightning protection mesh holders are often used. Such fasteners allow installation of any complexity.
- For concrete roofs, plastic holders are used, filled with concrete to weigh them down. Each holder contains from 12 to 17 kilograms of concrete (depending on its type). Thanks to the large weight, it is possible to achieve stability of the system and the ability to withstand powerful gusts of wind. Holders are available for sale without weighting, into which concrete is poured after installation on the roof. For low-rise buildings in areas with low wind activity, lightning protection mesh holders are offered with fixation with self-tapping screws or gluing to bitumen mastic.
- For gravel surfaces of ballast roofs, holders with and without concrete filler are used. As with concrete roofs, fixation with self-tapping screws and mastic is possible.
Note! The step for installing the clamp in all cases must be equal to a meter or exceed this distance.
Mesh-type lightning rods cannot be installed on roofs made of metal that is too thin (less than 4 millimeters). Such a layer of material will not protect against a lightning strike; there is a high probability of burning it.
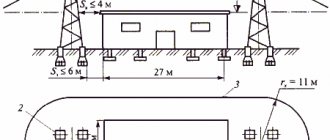
Application of lightning protection mesh on a flat roof
The most common way to protect a flat roof from lightning in our country is a lightning protection mesh. The mesh pitch should be no more than 12 m x 12 m and it should be located on or inside non-combustible bases. The use of mesh was intended to protect equipment located under a non-combustible roof. The use of a lightning protection mesh as a measure to prevent lightning strikes on the roof on which it is located is an ineffective measure. The mesh is capable of reliably protecting only the object that is located noticeably below it. This fact has been repeatedly confirmed using numerical modeling by the Energy Institute named after. G.M. Krzhizhanovsky.
Very often, during the construction of multi-story buildings, reinforced concrete slabs are used as roofing. They are covered with a solid layer of waterproofing, the flammability of which there is no doubt. Obviously, it also needs to be protected from lightning strikes. The lightning protection mesh itself is not able to provide at least some lightning protection for equipment installed on the roof, because is located below it.
As a result, the mesh only has the beneficial effect of distributing the lightning current along multiple paths, which in turn has a positive effect on the electromagnetic environment of the building. But nevertheless, the mesh continues to be used to “ensure compliance with regulations.” Maybe cable or rod lightning rods are more effective for modern buildings?
Mesh on a combustible base
Low-flammable surfaces are classified as combustible. Of course, flammable materials are not used in construction. Low-flammable materials include bitumen and bitumen-polymer waterproofing materials, polymer materials (so-called soft roofs).
To prevent direct contact of the lightning discharge with the combustible base, distance holders are used. Their essence is the presence of an air gap between the roof surface and the branch of the mesh protection, which allows you to create a sufficient distance for the spark to die out.
According to the rules specified in SO 153.3.2.2.4, the distance between the roof and the lightning protection mesh must exceed 10 centimeters. IEC instructions specify the need to use material insulation factors in calculations. The coefficients are denoted by the letters km.
Using vertical rods, insulation gaps are created. The rods are included in the set of remote holders. The holders are secured using plastic stands into which weighting concrete structures are installed. The wire is secured with a bushing.
Instructions for installing lightning protection mesh on the roof using spacer holders:
- We mark the working surface based on the requirements of the project. We install holders every meter along the lines corresponding to the grid cells. The greatest distance between the holders is 120 centimeters. The possibility of other distances is indicated by the manufacturer in the accompanying documentation. The project should be drawn up taking into account the fact that the areas for connecting branches to down conductors and down conductors to the grounding conductor should be of the smallest possible size. Sometimes the functionality of the branch is assigned to a metal parapet shield or other similar oblong metal elements.
- We shorten the fiberglass rods to the required size. By required we mean the length required to create air insulation.
- We mount plastic stands based on the markings. The center of the stands should correspond to the point on the marking. When creating roof protection from a polymer membrane, you need to place a rubber gasket under each stand. This will protect the coatings from mechanical damage after contact with heavy parts.
- We spread concrete filler on the supports.
- We install rods of the required size into the channels in the centers of the stands.
- The ends of the rods are equipped with fixing devices with bushings. They must be suitable for fastening wires with a cross-section of up to 8 millimeters.
- We install network branches for lightning protection. We snap the branches into the holder bushings.
Note! In the case of installing a lightning protection mesh on a pitched roof, the rods are laid out along the perimeter of the slopes and along the ridge. If the slopes are large and the cells are outside the permissible limits, they are reduced in accordance with the size of the roof.
Chimneys and antenna masts protruding above the roof must be connected for electrical contact with a lightning rod. To do this, you will need rod receivers or steel aprons. They are connected to down conductors using die clamps. In the same way, the edges of branches are joined to down conductors: this method is considered more convenient than a welding seam. In addition, this docking option allows you to complete the job faster.
Lightning protection mesh
Everyone knows that a metal spire rising above a gable roof protects the house from lightning. What if the building has a flat roof or there is no desire to erect additional structures over the building? The solution is to use a special mesh that performs the same role as a vertical lightning rod, but does not violate the aesthetics of the building’s exterior.
Features of lightning protection devices for flat roofs
The installation of lightning protection mesh for flat roofs is regulated by international regulations and state standard RD 34.21.122-87. It says that the possibility of its installation requires a roof slope of no more than 1 in 8, but in practice the mesh is installed at steeper slope angles. Installation of the mesh can be done in two ways, depending on the stage of construction.
First option
It consists of laying a mesh on the concrete base of the roof during the construction of a building. In this case, layers of coating are placed on top of the mesh, necessarily consisting of non-flammable components that act as insulation, waterproofing and the top coating itself.
Second option
It is used in the private sector for flat roofs of houses, garages and cottages. The mesh is mounted on top of the covering, while the structural elements rest on special supports that ensure reliable fixation.
Depending on the lightning protection category of the object, the following cell sizes and the distance between the current-carrying parts are selected:
| Category | Cell size (not less) | Distance between down conductors (no more) |
| I | 5x5 m | 10 m |
| II | 10x10 m | 10 m |
| III | 15x15 m | 15 m |
| IV | 20x20 m | 20 m |
Installation procedure for lightning protection mesh
The roof area, limited by the perimeter of the protected building, is divided into equal sections with rectangular shapes. The mesh is mounted from round metal conductors with a diameter of at least 6 mm, or strip steel with a cross section of 4x20 mm.
Straight sections of the grid are laid perpendicular to each other, forming, if possible, areas equal in area. An outlining conductor is installed along the perimeter of the roof.
At intersections, the mesh elements are connected to each other using electric welding or flat stock bolt clamps.
According to international standards, the pitch between grid cells above residential buildings should not exceed 12 m, above garages - 5 meters. For small garages and country houses, this parameter can be maintained when installing a mesh around the perimeter of the roof.
If there are towering superstructures in the form of pipes, antennas or other structures on flat roofs, the latter are additionally protected from lightning by vertical lightning rods.
Features of mesh designs on different surfaces
If there is a soft combustible roof, the mesh is laid on supports that provide a safe gap of at least 10 cm between the soft roof and the mesh. To counteract wind pressure, the stands are weighted or secured with adhesive tape.
The metal covering of a flat roof can be used as a lightning rod, provided that the joints are seamed and the sheet thickness is at least 4 mm.
The mesh is placed across the corrugation and welded to the protrusions every meter. If special clamps are available, the mesh is connected using bolted holders.
If the roof metal is thinner than 4 mm, the lightning protection mesh is mounted on special holders that provide a safe spark gap of at least 10 cm.
A roof made of metal profiled sheets or metal tiles is not suitable for receiving lightning discharges, given the poor conductivity of the polymer layer and the lack of reliable electrical contact between individual elements.
On a concrete surface or in the presence of a gravel fill, the mesh is fixed on holders at intervals of no more than 1.0 m.
On the roofs of residential buildings and other low buildings, weights up to 17 kg or fastening with self-tapping screws are used to fix the holders.
Laying down conductors
The location of down conductors and the order of their connection are regulated by a number of technical parameters:
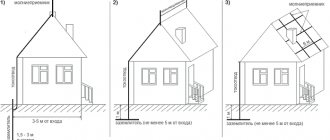
- the down conductor is laid along the shortest distance and connected to grounding;
- fastening is carried out at intervals of 1.0 m and 2.0 m, respectively, on horizontal and vertical sections;
- the location is selected along the walls along the corners of the building, where there is the least likelihood of people being present;
- the grid is connected to the grounding by two taps, the distance between which is allowed 25.0 m;
- It is possible to use drainpipes as current conductors if there is reliable electrical contact between their component parts and a reliable connection to the grounding circuit.
Connection of down conductors with branches
The installed lightning protection mesh is only the first task that should be performed when creating a protective system. Next, you need to make a connection to the ground loop. Ultimately, all currents entering the lightning rod must freely flow into the ground.
Instructions for connecting down conductors:
- The routes for down conductors must be designed in such a way as to achieve the shortest distance between the sections of connection to the receiver and the ground loop.
- Down conductors are attached to walls with flammable coatings using remote brackets. The distance between the wall and the conductor is 10 centimeters or more. Contact of the metal bracket with the wall is allowed.
- Fixation of down conductors on drainpipes is carried out with metal clamps.
- Down conductors can be made of round galvanized steel in brickwork or concrete walls.
- The distance between the fixation points of the sections horizontally is 1 meter, vertically - 2 meters.
- You cannot create loops in the laying path.
- When choosing a location for installing a down conductor, preference should be given to areas with a low probability of being visited by people.
Down conductor routes are created at the corners of buildings. The maximum allowable distance between tracks is 25 meters. The lower end of each down conductor is immersed in the ground. The conductor fragment at the site of entry into the ground should be wrapped with anti-corrosion material. Fastening to the ground electrode is carried out with bolts.