Why is this necessary?
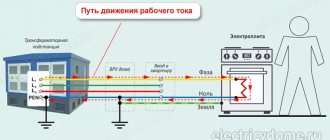
According to the definition, grounding is the intentional connection of non-current-carrying parts of electrical equipment to the ground (equivalent), which will become energized if the wiring is damaged. In such a situation, conditions are created so that the electric current has the opportunity to go into the ground.
The action of the protective circuit is based on the difference in resistance:
- human body – at least 1000 Ohm;
- ground electrode – no more than 10 Ohms.
Thus, in the event of a current leak, touching the conductive surface of the equipment will be safe.
How to make grounding yourself
When installing (or inspecting) a socket, pay attention to connecting the grounding tongue to the grounding system.
If electricians ignore the requirement to connect the socket to the protective circuit, it is enough to run an additional wire (or connect an existing one) to a special bus on the site with the distribution panel. It is not difficult to recognize such a bus by connecting it to the metal body of the electrical panel.
If you need to read the wiring diagram in the house for the TN-S or TN-CS systems, the following symbols are used:
- L – phase wire;
- N – zero element;
- PE – protective conductor.
In an old socket
The concept of an old socket is associated with the absence of an attachment point for the grounding conductor in the ceramic core.
In this case, the spring-loaded antennae on the sides of the plug connection socket cannot be detected. There are also no holes for the mustache output through the plastic socket cover. When installing a grounding loop in the house, the corresponding wire is wrapped and hidden in the socket. This method is used when connecting “non-dangerous” consumers - chandeliers, TV.
To correct the situation, it is enough to replace the socket core with a serial connection of the phase and neutral wires, the grounding cable to the spring-loaded contact point.
Without ground wire
In the absence of a standard grounding circuit, work on grounding the sockets will be more complex and require:
- installation of a ground electrode;
- laying the connecting wire.
When placing the ground electrode, a number of conditions are taken into account:
- The steel element is located in the ground no closer than 1 m to the surface (depending on the soil).
- It is allowed to use natural conductors as a grounding conductor - reinforcement of concrete structures, cable braiding.
- The grounding wire must be in a reliable sheath with a cross-section no less than that for the phase wire. The braid is yellow-green.
Cable installation should be entrusted to specialists from the energy supply organization. It may be necessary to replace the wiring throughout the apartment if it is worn out. After the work, the electricians will also take measurements in the area of possible current spreading over the surface of the earth. The permissible value is no more than 4 ohms.
Grounding connection options
When laying wires in an apartment, do this through a special distribution box with three pairs of contacts:
- for phase wire;
- for the neutral conductor;
- for the ground wire.
If a multipoint socket or switch is connected to the grounding system, then it is mandatory to install jumpers between the central terminals of each socket.
In general, the algorithm for grounding an outlet is as follows:
- Detection of five-wire riser and busbar.
- Determination of phase and neutral wires.
- Power outage.
- Fastening the phase, neutral and ground wires.
- Fixing the socket in the socket.
Upon completion of the work, it would be a good idea to test each of the connection points.
Grounding of apartments and private houses
You can ground the house yourself; fortunately, natural earth (soil) is in close proximity. It is enough to conduct an additional protective grounding wire with a cross-sectional area of 16 mm for aluminum or 10 mm for copper to all sockets in a private house and ground it near the distribution panel into the soil to a depth of at least 1.5 m. In rural areas, many people ground their residential building in this way way.
But it will not be possible to ground the apartment in this way. Well, where can I get natural soil on the fourth floor? Some “craftsmen” used metal elements of the centralized heating or gas supply system as grounding in old houses. But after a series of cases of electrocution of neighbors, small children, or explosions in the gas supply system, this practice was abandoned. Now grounding or grounding in the apartment is carried out only to the distribution panel.
How to make grounding in an apartment depends on the existing grounding in an apartment building. Grounding in apartment buildings is carried out according to three schemes:
- TN-S is a modern grounding method, prescribed by regulation since 1998;
- TN-CS – protective grounding cable is routed only to the distribution panel;
- TN-C - the neutral wire is used as grounding, which is grounded at the transformer substation, for example, grounding in Khrushchev is carried out according to this principle.
How to make grounding in an apartment if there is none? Before making grounding in an apartment with your own hands, you need to decide on a grounding scheme. To do this, you need to open the distribution panel on the staircase. If a five-core wire is carried along the riser, it is at least TN-CS, which means that the protective grounding wire only needs to be connected to the yellow-green protective wire.
Then you need to go to the distribution panel in the apartment, if the electricity meter is located on the staircase, then look at the wires leading from it to the apartment. If there are 3 wires and one of them is yellow-green, it means that the apartment uses a modern TN-S grounding scheme. In this case, you will not have to worry about how to properly ground.
Important! In large modern apartments with 3 or more rooms, two phases can be carried into the apartment, respectively, there will be more wires. The main thing is the presence of a wire with a yellow-green color. Anyway, before connecting a powerful electrical appliance that consumes more than 3.2 kW/h, check the grounding of the outlet. Perhaps an ungrounded tap was made some time after the house was put into operation.
If there is no protective ground wire in the general distribution panel, this is an old TN-C circuit. In this case, you can only ground the sockets. But, in the event of significant overloads or phase imbalance, which does not happen so rarely, the devices currently connected to the neutralized power supply may fail. The only way out, using the common funds of the residents of an apartment building or independently, is to change the entire wiring.
Hazardous work practices
When grounding, you should not resort to simplified methods of this type of protection:
- using a grounding wire;
- grounding through heating system pipes.
In the first case, if all electrical appliances are working properly, the neutral conductor is ready to act as a grounding conductor.
It is worth remembering the purpose of the residual current device.
If the design is in good working order, the owner of the electrical appliance will, at best, receive a tripping of the protective element due to a short circuit. However, if the grounding wire is damaged in any way, the phase voltage (220 V) will appear on the housing.
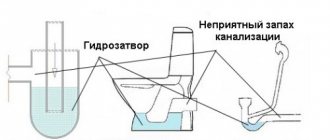
In the second case, the pipeline system will work until part of the pipe in one of the apartments in an apartment building is replaced with plastic analogues. Due to the fall out of the metal part of the heating system, the supplied current will endanger both you and your immediate neighbors.
How to connect an outlet without grounding
Sockets without grounding are widespread in our country, since previously they did not even think (regulatory documents did not require this) to install a separate grounding wire in residential buildings. In this case, all wiring is two-wire, where one conductor is L (phase), and the other is PEN (combined neutral and ground conductors). Below I want to tell you how to install an outdoor outlet without grounding. I see them often, as they are still in use today.
When do we need to install an outdoor socket without grounding?
- When the wiring to the outlet comes from outside, i.e. not hidden in the wall. There is no recess for the internal socket and therefore the only option is to mount it on the wall itself.
- When you want to install a new additional outlet in another corner of the room, but you don’t want to fine it, and there’s no tool or desire for this. Here you run the wire along the wall in a cable channel from the nearest outlet or junction box.
- When the socket is installed in a basement, barn, garage, storage room, etc.
That's sorted out. Go ahead.
How to install an outdoor outlet without grounding?
Today we will install the socket. Here she is.
Before installation, you must disassemble the socket to gain access to its contacts and be able to mount it on the wall. To do this, unscrew the two bolts from the outside that secure the housing to the base.
This is what awaits us inside.
There are only two contacts in a socket without grounding, to which we attach the phase (brown wire) and the PEN conductor (blue wire). Polarity doesn't matter here. The connected wires are inserted into the connectors on the right (this is only for the case under consideration, as the contacts in different sockets may be in different places) and tightened with two bolts as in the photo below.
Here I connect the wires by weight, i.e. when the socket is not yet fixed to the wall. It's more comfortable for me. It is more difficult to connect the wires to an installed socket, since you need to “bend” and adjust so that the wire fits exactly into the connector. Next, we attach the external socket to the wall. In my case, the surface is not concrete and I simply screwed it to the wall with self-tapping screws, but if the wall is concrete, then first mark the mounting points, drill holes and hammer in dowels (usually 6x40 mm).
It should turn out something like this.
Now we install the cover in place.
Yeah! We are in the way of a suitable wire. To prevent it from interfering, you need to cut an opening for it in the lid. This is done with a knife or side cutters in a place where there is a corresponding marking.
We put the cover with a cut-out opening for the wire in place, tighten the two fastening bolts, supply electricity to it and you can safely use it.
As you can see, installing an outdoor outlet without grounding is very simple.
If your home is grounded, then read: How to install an outdoor outlet with grounding?
Don't forget to smile:
How long does it take to insert a new light bulb to replace a burned out one in the State Duma? Answer: 5 months and 10 minutes. - 1 month for the adoption of the law on changing the light bulb, - 1 month for the approval of this law by the Federation Council, - 1 month for the President to consider it and veto it, - 1 month for the State Duma to overcome the Presidential veto, - 1 more a month for the President to sign the law and it comes into force, and 10 minutes for an electrician to twist a new light bulb.
Source
How to connect a switch-socket unit
Here's how to connect such a unit, which is now often used in apartments
- In this case, the cable connected to the unit must be five-core.
- Turn off the electricity in the apartment.
- Connect the phase to the right terminal of the socket and from the same terminal, remove a jumper to the switch terminal. The jumper is made from a piece of wire of the required cross-section (usually with a diameter of at least 2.5 mm).
- Connect the neutral wire to the left terminal located on the socket.
- Attach the ground wire to the bottom or center terminal of the outlet.
- And the output wire is connected to the second terminal of the switch, that is, the one that goes to the lighting fixtures (light bulbs).
- Cover the wires with a decorative protective panel of the unit.
This is how sockets are installed in the house. For more information on installing electrical outlets, read our article How to make an outlet.
There are also telephone sockets designed to connect a telephone set. For instructions on installing such sockets, read our article How to connect a telephone socket.
Why is a socket without grounding dangerous? How to solve this problem?
When you move to a new home, you start life with a clean slate. Gradually you inspect and master everything, turn on the electrical equipment, and don’t even think about what danger may lie in wait for you, because the sockets may not be grounded.
This is a common problem in secondary homes, especially in older homes with two-wire wiring. Soviet sockets were not grounded, and many continue to use them.
Why is lack of grounding dangerous?
All devices fail from time to time and the breakdowns are often invisible. The insulation on a phase may be damaged or the wire may “fall off”, touching the metal casing, which will be energized.
Imagine that you are touching it with your hand while standing on a wet floor. You will already get an electric shock, which can result in serious injuries or an accident. Moreover, the washing machine may even be turned off.
It’s worse when there is no grounding at all
There is a thunderstorm outside and then suddenly lightning strikes a power pole several hundred meters from your house. A super-powerful discharge passes through a wet pole into the ground, but due to the electromagnetic field, a powerful impulse will arise in the power lines.
A current discharge of thousands of amperes will penetrate the wires into the house and destroy all electronics plugged into outlets, even if they are not working at the time.
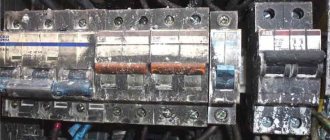
- Class B - removes discharge from 50kA to 100kA, placed in the panel of an apartment building;
- Class C - removes from 15 kA to 40 kA, installed in a staircase or access main switchboard;
- Class D - “cuts” discharges up to 15 kA, intended for residential panels.
Why is there no grounding in the house?
If you are moving into a Soviet-built apartment, do not be lazy to look at the entrance panel. There should be a PE bus connected with a yellow-green wire.
If not, you will have to lay the “ground” into the apartment individually. Alternatively, you can cooperate with your neighbors, collect money and take it to the entrance main switchboard. It will be much cheaper.
Why is grounding needed?
The instructions for any electrical appliance clearly state that it is prohibited to use it without grounding. The main purpose of grounding is to ensure stable operation of complex household devices and protect against electric shock.
According to the PUE clause 1.7.6, grounding is a deliberate connection of one of the elements of an electrical installation with a grounding loop. It is constructed with the purpose of draining currents of values that are damaging or not damaging to humans through the grounding protective conductor into the ground.
If earlier two-core electrical cables were laid in apartment buildings, today it is mandatory to use wiring consisting of three cores
In the outdated system, the “neutral” partially served as grounding. The zero was connected to the metal body of the device, and in case of overload it took over it.
The calculation was that if the load was exceeded, current would flow through one of the phases, resulting in a short circuit and, as a consequence, disconnection of a section of the network by an automatic circuit breaker or fuse. This solution simplified electrical installation work, but carried the risk of electric shock.
The legacy TN-C system does not have a protective earth conductor. For grounding in such cases, a PE bus is required in the apartment panel. If there is no grounding bus, then it is necessary to connect all the panels to each other and connect the entire group to the grounding system of the house - i.e. re-grounding
It is unacceptable to connect devices whose housing is made of metal without grounding. For example: a multicooker, microwave or electric stove. Indeed, if there is a short circuit, thinning or partial destruction of the insulation of the wires on the housing, a current breakdown may occur. If voltage hits a conductive element, the protective conductor will conduct it further to the ground.
No less dangerous is the use without grounding of devices that come into contact with water during operation, for example: a dishwasher or boiler.
The type and design of the grounding contact depends on the model. In sockets of American brands it is presented in the form of holes with side slots. For French analogues, this is an additional third pin.
According to the current rules, new buildings are provided with TN-S or TN-CS systems with a mandatory grounding protective conductor in single- and three-phase power supply systems
But most often you can find the German type of grounding sockets on sale. They are equipped with protruding metal parts on the sides.
The design of an electrical outlet with grounding assumes the presence of three contacts: “phase”, “zero” and “ground”. At the moment of switching on, in the first fractions of a second the grounding terminals come into contact, and after them the “phase” and “0” contacts are connected. This sequence guarantees complete protection.
Externally grounding sockets can be easily visually identified by the presence of an additional metal contact - the “grounding” terminal, necessary for connecting the wire directed from the electrical panel
How to check sockets
Even if you see a socket with grounding contacts, this does not mean that it is safe. It could have been installed by some hack electrician if he didn't have another one. This is a fairly common case.
To verify otherwise, you will have to take it apart and see what's inside. Turn off the power to the panel and unscrew the screw in the middle of the connector. Next, remove the case with the frame and look at how the contacts are connected.
The socket is connected with three wires: phase - brown or black, neutral - blue, and ground - yellow-green, leading to the side contacts.
If your connection diagram differs from the one above, then something is wrong. The lack of grounding in the wiring indicates that it will have to be redone. It is necessary to replace the two-wire cable with a three-wire one.
Creating a loop
Connecting sockets and connecting them is a job for a professional. If you do it without sufficient experience, you endanger your home. Due to the dishonesty of some performers, you cannot blindly trust the hired person - you need to at least know in general terms how to properly connect an outlet and how to connect two outlets. This will allow you to monitor the progress of the task.
We advise you to study - How to make a brick barbecue with your own hands
To properly connect 2 or more devices, you need to connect the wires in each socket as follows:
- They start from the last cell of the block, and connect the main cable to it. Each of the wires (phase, neutral and ground) is inserted into a special PPE cap and into it are two pieces of the same color. One is connected to the contact group, the other is a jumper, which is brought out into the next glass.
- Subsequent cells follow a similar pattern. The wired jumper is the power cable through which current will be transmitted.
Connecting two or more access points in this way guarantees a longer service life of the entire unit, since the main load passes through the cap connecting the wires.
Diagnostics of network grounding
It all depends on the condition of the metal circuit buried in the ground. If the wiring was done a long time ago, the metal has probably already been “eaten” by rust or the contact with the circuit has weakened.
Another common cause of malfunction is human negligence and shortsightedness. In order for a private house to be accepted into the Distribution Zone, the main thing is that there is a grounding input into the house, but in fact no one ever checks it, so a dummy was often made, an ordinary piece of cable was inserted into the panel, leading to nothing.
Checking with a pocket multimeter
You have examined the socket; all three contacts are connected correctly. Now turn on the voltage on the panel.
The check is needed to make sure that the phase and zero are connected correctly. An inattentive electrician could simply confuse them when connecting.
Take the most common multimeter and touch the red probe to the phase and the black probe to the neutral. Note the displayed data.
Move the black probe to the side contacts. If nothing is displayed on the screen or the difference between the data is too large, then you have a poor-quality grounding that needs to be redone.
This is a fairly cheap way to check. A new multimeter can be purchased from $15, and a test screwdriver for $1 is sold at any transition. Over time, they will come in handy more than once.
Verification using the traditional method
What happens if you ignore the malfunction?
Imagine that there is a leak on the body of an electrical appliance.
Grounding in a private house
To fully imagine how to connect a grounded outlet, you need to consider the entire process from start to finish, using the example of a private house, if there was no grounding wire there initially:
- Installation of a grounding loop. It consists of metal pins driven into the ground, connected at the top points by metal strips welded to them. The length of the pins is 1.5-2 meters, and the length of the metal strips, depending on the type of contour: triangle, ribbon, square or round. To install the circuit, you need to dig a trench 0.5 meters deep.
- Ground connection to the distribution panel. It is made with the same metal strip as for connecting the pins.
- Replacing two-wire wiring with three-wire. If it did not exist before, then it is imperative to install an RCD that guarantees a power outage when voltage appears on the grounding conductor.
- Installation of sockets.
What should the metal contour be like?
This is the most important part, since the resistance of the PE bus depends on its dimensions. Usually the circuit is made from a metal profile welded into a triangle or square with electrodes at the corners. The electrode is a metal rod driven into the soil or a piece of profile 30-50 cm long, connected to the circuit.
Each side of the contour should be up to 1 meter. It is important not to overdo it here, since the further the electrodes are from each other, the greater the resistance will be, which means the efficiency will decrease.
The welded triangle is buried at a depth of about 50-70 cm. Using a metal profile, grounding is brought to the house and brought to the surface. There, a PE conductor is welded or bolted to it, leading to the corresponding busbar in the panel.
- Weld more electrodes to the circuit;
- Take a longer ground electrode and drive it even deeper.
The larger the metal circuit, the longer it will last. Typically, corrosion “eats” the metal in at least 40-50 years. It all depends on soil moisture and oxygen saturation.
Why is there an RCD in the apartment?
How many RCDs are needed for complete protection?
It is recommended to install a fire protection rating of 100mA or more at the input. It will not always protect against impact, but it will eliminate a fire-hazardous leak.
A 30mA differential protection is required for socket groups. 30mA is the maximum safe discharge for the average adult. But children are more vulnerable to electricity, so install 10mA protection in children's rooms. Place the same on the bathroom, as water enhances the effect of the current.
- Input - 300mA;
- Socket groups - 30mA;
- Children's room - 10mA;
- Bathroom - 10mA.
- Type “AC” is the most common, reacts only to sinusoidal alternating current. Installed on simple electrical equipment without microcircuits and electronics;
- Type “A” - in addition to sinusoidal alternating current, it also responds to static and direct current. Installed on complex electronics with power supplies, transformers and microcircuits.
Why then grounding?
You are using a boiler, but during installation the insulation of the phase wire was accidentally damaged. And so, after a few years, it moved and the exposed part touched the body, which turned out to be under voltage. But everything works as before, the RCD does not react, since there is no obvious leakage yet - the housing is not grounded and the electricity has nowhere to go.
A week passes, and suddenly you decide to increase the water temperature. Accidentally swing the housing with your hand, and your body receives a safe (barely noticeable) discharge of 30 mA, after which the boiler suddenly turns off - a leak has occurred.
Imagine that instead of you, a child accidentally touched a damaged boiler (or other electrical appliance). A discharge of 30 mA would hardly cause serious injuries, but would result in a slight fright.
The RCD responded and saved lives, a week after the accident. In the new wiring, a leak would occur immediately upon breakdown, which would trigger the differential protection. You would have known about the breakdown immediately after it occurred and would have fixed it faster.
Grounding is another safety rope in case the differential protection does not work. Think about it, you are protected from electric shock by a small mechanical box in the panel (most likely made by the Chinese). It is too unreasonable to trust your life and health only to her.