Pravozhil.com > Housing and communal services issues > How to install electricity in a dacha - subtleties and nuances of connecting electricity
Many owners think about how to provide light to their dacha even at the stage of constructing a country house. Despite its apparent simplicity, supplying electricity to a dacha is a responsible, labor-intensive and costly process, with many subtleties and nuances.
This article will talk about the main stages of connecting electricity to a country house and the documents required for this. And also about the consequences of unauthorized connection of the power supply line to the house, alternative sources of electricity.
How to install light in a dacha
The procedure for carrying out electrification in a country house. What do you need to connect light in your dacha?
In order to connect electricity to a country house, its owner must:
- Submit an application and a list of required documents to the energy supply company (EC);
- Receive a contract for connecting the house from the EC. As well as technical conditions - a list of requirements that the applicant must fulfill on the territory of his site to connect the dacha to electricity;
- Within no more than 2 years, fulfill all technical requirements;
- Invite a representative of the EC to inspect the site to ensure that all requirements of the technical specifications are met with the signing of the corresponding act;
- Wait for the company’s specialists, who will connect the house to the nearest power line within 24 hours. The time it takes to connect a country house depends on the distance to the nearest power line. So, if it is no more than 300 m (for houses within the city) and 500 m (for a garden and dacha community located outside the city), then the connection will be made 3-6 months from the date of signing the act of fulfilling the requirements of the technical conditions. If the distance is greater than these values, the connection period increases to 1 year.
- Sign with the EC an act defining the ownership of certain connection components (cable, meters, supports, input panel) and the responsibility of the parties for them;
- Call a specialist to check, seal the electric meter, and take initial readings from it;
- Conclude an agreement with the EC for the electrification of the house.
Drawing up a connection agreement
In order for the agreement to be registered, in addition to the application, the future subscriber must provide the following documents to the network organization:
- a copy of your internal passport or a notarized power of attorney if a third party is involved in the registration;
- plan for the placement of energy-receiving equipment on the site (installation locations of poles, switchboards, cable route diagrams);
- title documents confirming that the citizen is the owner of the plot or can use it legally;
- a list of devices that will be connected to the emergency automation.
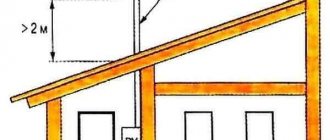
You can draw up plans for the placement of devices yourself, or order a company that will carry out installation work. If the distance from the nearest power grid support to the boundaries of the land plot is more than 25 meters, the owner must arrange the installation of poles at his own expense.
The layout plan for energy-receiving devices can be ordered through a third-party company in Balashikha, which will perform installation work, or done on your own.
After reviewing the application and submitted documents, the owner will be sent a draft contract and technical documentation, which he must sign within 30 days and return one copy to the office of the network organization. Donation of a house and land in Balashikha in 2021
Rules for preparing a package of documents
This package includes the following papers:
- identification document of the owner (passport). When performing work from a trusted person, a power of attorney certified by a notary is required;
- certificate of ownership of the land plot;
- a specially prepared drawing of the site indicating the nearest power line pole;
- diagram indicating the placement of technical equipment, gas and water pipes.
We recommend: Bathroom renovation: some nuances
Modern innovations allow you to use the Internet, print out a map of your site in Yandex or Google and mark the border of your site. Such formats are quite accessible for delivery to organizations. The standards require that if a post is located more than 25 meters from your boundary, it will be your responsibility to install an additional post.
If all standards are taken into account, you can safely begin connecting the site to electricity. Based on the collected documents, the regional power grid company issues technical specifications according to which the entire scope of work will be carried out.
Important: Decree of the Government of the Russian Federation No. 861 states that the regional organization under whose jurisdiction your land plot is located does not have the right to refuse to connect electricity to your land plot.
After submitting the papers within a month, the owner receives a technical specification where the following parameters are precisely indicated:
- network power, usually 16 kilowatts;
- list of electricity metering devices (electricity meters);
- input switch;
- installation of protective equipment;
- the presence of a sealed box in cases of external connection.
Technical instructions are the main document confirming the preparation of the design part.
If the owner does not have enough time, then it is possible to contact a specialized company that will solve for you all issues related to the preparation of permits.
Required documents
The list of documents required to submit an application is relatively small. The main ones are documents for ownership of the land where electricity will be supplied. If there is already a building that will be put into operation, then documents for it will also be required. To draw up technical specifications, a site plan will be required. A passport is also provided for personal identification. The application is written in the prescribed form according to the sample. At the same time, the user should know that without objective reasons, a network organization cannot refuse to accept an application in accordance with the adopted law, which guarantees the right of every citizen to freely connect to communications. This is the resolution as amended 334 of April 2009.
When submitting an application, it is better to prepare it in two copies. One of them is transferred to the relevant service, and a copy will serve as an insurance document, which remains with the applicant. This copy is marked with the registration number and date of receipt. On the one hand, this will be a reminder of when it is necessary to contact the company to obtain the necessary documents. On the other hand, if the contractor does nothing to connect the site within thirty days, then it will be possible to appeal his actions. A copy of the application will be a serious argument in resolving the dispute.
The procedure for technical connection
The technical connection procedure includes the following stages:
- Filing an application. Conclusion of an agreement on the implementation of TP (hereinafter referred to as the “TP agreement”).
- Fulfillment of technical conditions and execution of acts.
During the process of technological connection, the applicant is obliged to enter into an agreement ensuring the sale of electrical energy (power) on the retail market with an energy sales organization (supplier of last resort).
To carry out the technological connection procedure and to conclude an agreement ensuring the sale of electrical energy (power) on the retail market, the grid organization provides the possibility of electronic document management in the client’s Personal Account. If the applicant has chosen the method of exchanging documents in electronic form (or this is provided for in the TP Rules for this category of applicants), the network organization and the guaranteeing supplier sign the documents in electronic form using an enhanced qualified electronic signature and send them to the client’s Personal Account.
In accordance with paragraph 105 of the TP Rules, documents are prepared electronically for the following applicants:
- Individuals with power receiving devices up to 15 kW in reliability category 3
- Legal entities/individual entrepreneurs with power receiving devices up to 150 kW in reliability categories 2 and 3
These applicants must register in their Personal Account in order to receive documents drawn up during the TP process. If the applicant does not have a Personal Account, the network organization is obliged to register it and inform the applicant of the access procedure, including obtaining initial access to the personal account, registration and authorization of the applicant.
The applicant can obtain information about the TC process and the conclusion of an agreement ensuring the sale of electrical energy (power) on the retail market:
- Through the service “Client’s personal account on Portal-TP.rf”
- Through the Internet reception
- Call a single toll-free number 8-800-2501-220
List of required papers
Before installing light into a country house, the following documents must be submitted to the EC:
- Application to connect the house to the electrical network;
- The applicant’s passport or a notarized power of attorney issued by the owner of the dacha to another person;
- Documents certifying the applicant’s ownership of the house and plot;
- A plan diagram of the site with the house and the street on which the nearest power line is located;
- Electrical supply project, including calculation of the wiring requirements for external and internal installation.
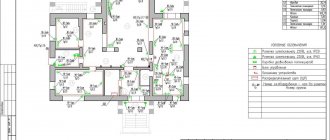
General information on installation of external and hidden wiring
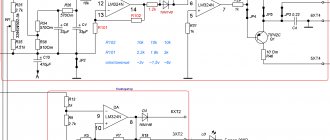
When installing electrical wiring in a house, the following condition must be met: a power cable must be connected to the common electrical panel. The electrical panel itself should contain groups of circuit breakers and a residual current device (it is better to entrust this type of work to an electrician.
Since working at high voltage is extremely dangerous, and there is also a chance of running into a fine). From the electrical panel, the wiring runs to residential and non-residential premises.
Reference. Initially, three phases, 0 and grounding are supplied to the machines. Next, phase, neutral and grounding are supplied to the sockets and switch. Three phases are needed to distribute the load.
Comment. For the bathroom and kitchen, the line should be drawn separately.
Each line is divided into two groups of wires, one goes to the sockets, the other goes to the sources.
Installation of hidden electrical wiring
You need to choose the correct cable cross-section size.
Comment. To select the desired section:
- Find out the maximum power in the electrical network;
- Calculate the power consumption of all electrical appliances that are or will be in the house.
Example: If the wiring in the room is made with 3x1.5 wire, then the maximum power of all devices that are used in this place should not exceed 4 kW.
Comment. It should be remembered that where the cable connects to each other, an additional 11-16 cm of length will be required!
According to the diagram, we make grooves (slots) for the wires using a hammer and a grinder with a diamond blade:
- We begin to run the wire from the machines to the sockets and switches. The depth of the groove is approximately 2-3 cm, width is 2-2.5 cm.
- Using a hammer drill and a circular saw, we cut out holes for sockets and switches:
- We cut the wires to the required lengths and make a cross-section;
- We lay the wires in the grooves;
We prepare the construction mixture. Dilute the dry mixture with water until a homogeneous mass is obtained and apply it to the wall with a spatula; after drying, remove all irregularities using a foam grater.
Installation of external wiring
Installation of external electrical wiring is carried out only if it is impossible to make hidden wiring.
The process of performing this type of work is practically no different from the previous one, except that the wires are not laid in grooves, but in a plastic cable channel.
Several mandatory rules when installing open wiring:
- The cable is laid only at right angles;
- The wires must not cross;
- The location of the cable from door jambs and window frames is at least 10 cm;
Installation of sockets and switches
Arrangement of elements:
- We place the switches to the left of the doorway at a height of 80-90 cm from the floor;
- Sockets should be located at a height of 30 cm from the floor;
- Wiring to sockets should be from below, to switches - from above.
We recommend: How to halve the cadastral value of a land plot - step-by-step instructions 2021
Basic actions:
- We connect the wires where the input and output points of boxes, switches, and sockets are located. This can be done by crimping or welding.
- If outdoor installation is carried out, then socket boxes made of non-conducting materials should be used. They need to be secured using screws, glue and self-tapping screws. Note. There is a rule for switches: they are installed in a phase wire break.
- We install installation boxes in the wall recesses, install sockets and switches in them. Note. In order to make recesses, special attachments for different wall materials are used, which are installed on the hammer drill. They come in different sizes. You should select the ones that are suitable specifically for your C. Installation boxes (distribution boxes) are needed to branch the wire (one end will go to the outlet or switch, the other further).
- We securely fix the junction box.
- We install the sockets ourselves. We insert the wires into the terminals and secure them carefully.
- We insert the socket into the installation box and secure it with screws using the mounting plate. An overhead socket is installed on top of the wall.
- Next, following the principle of installing sockets, we make switches.
Installation of an underground power supply line
Installation of an underground power line includes the following steps:
- Connecting a current-carrying cable;
- Laying a cable, inside fixed vertically on a pole, corrugated cable channel;
- Digging a trench 0.8 m deep with backfilling the bottom with a sand cushion 0.2 m thick;
- Laying a protective casing or polyethylene water pipe of suitable diameter in the trench;
- Laying the cable inside the casing (pipe);
- Bringing the protective casing with cable to the surface;
- Backfilling the trench with careful layer-by-layer compaction;
- Installation of the input panel and connection of the current-carrying cable to it;
- Installation of the grounding loop.
After the shield is connected to the current-carrying cable, it is connected to ground and an input wire is laid from it into the house.