Light in the country without electricity. Minimum electricity
Dina (FORUMHOUSE User):
– We are just starting to settle down at the dacha. They promise to install electricity within a year. I’m thinking about how to temporarily manage without electricity: cook food, connect a lamp, connect a laptop, I’m hoping for help from members of the forum.
– I lived in my dacha without electricity for 10 years. The food was cooked on a small two-burner gas stove, connected to a 5-liter cylinder.
By the way, another problem in the absence of electricity is the impossibility of storing perishable foods. After all, there is nowhere to connect the refrigerator. However, users of our site find a way out of any situation.
– If there is a well on the site, then food can be stored in it for a long time, after putting it in a sealed bag and lowering it into water.
This method can also be useful in case of a power outage in an already built cottage. You can also use a portable car refrigerator connected to the cigarette lighter.
In addition to the standard set for life without electricity - matches, candles and a battery-powered flashlight - there are other ways to ensure a minimum level of comfort in the country.
For example, using Arnifo's advice, you can make a stand-alone neon light. To do this, take a neon lamp and a converter from 12 volts to high voltage.
The system is connected to a battery, which is pre-charged by a car charger.
Due to the low level of energy consumption, such an ersatz lamp is enough for 100 hours of continuous operation, and the brightness of the light is quite enough to illuminate a room at night.
– Living without electricity is still a pleasure. That's why I put together a battery system for low-power consumers. We have enough to avoid sitting in the dark on the site.
Such a system is made like this: you take a power source - a car battery (you can even take it from a truck - more capacity and battery life) and a charger. The battery is used only for connecting low-power household appliances: a small TV, a lighting system that uses energy-saving light bulbs. The inconvenience is that the battery has to be recharged periodically. In addition, all electrical appliances must be designed for 12 volt DC power, or you will have to additionally install an inverter to convert DC from the battery into alternating current.
– Despite its simplicity and cheapness, the main problem of such a system is that you have to waste time charging the battery.
You also have to constantly think about what can be included and what cannot. You won't be able to use the electric kettle anymore. By the way, even in expensive autonomous power systems it is impossible to simultaneously turn on several powerful energy consumers.
I thought about alternative sources of power supply, for example a wind generator, but this is difficult and expensive, you need a high, expensive mast of 15-25 meters. And the winds in our region blow weakly.
You can learn how to choose a source of alternative energy from this article.
How to light a light bulb without electricity: simple and effective ways
The idea of receiving electrical energy from nowhere, or to be more precise, making a light bulb glow without the need to connect it to electrical wires has long been exciting human minds. This is no coincidence. In our country, electricity is often turned off, and prices for it have been inflated to such heights that you inevitably think about ways of lighting without the participation of nosy electricians. And if you don’t pay them, they can come and cut off the electricity at any time. And they don’t care what time of year it is, day or night, or whether there are small children in the house. This organization cares about nothing but its own enrichment.
So people are thinking about how to make a light bulb glow in case of emergency. They even came up with some ways. These are the ones that will be discussed in the article.
There is a lot of electricity around us. It literally surrounds us and is completely free. It's not clear why we don't use it at all. Perhaps we simply don’t know something about it, but most likely, we have long believed that there is simply no free electricity. After all, this is exactly what they drilled into us at school for a long time. And who hammered it in? Yes, everything comes from selfish electricity sellers.
The simplest and most effective scheme for obtaining free and alternative electricity can be assembled in a few minutes literally from what is found in the garage:
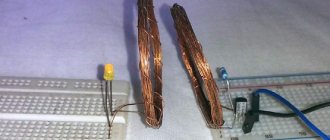
- First of all, you need to get two magnets, preferably larger ones;
- in addition to magnets, you need to get a diode bridge;
- Let's also prepare three pieces of multi-colored wire.
We wrap one of the magnets with wire. The remaining two wires will go to the second magnet. The main thing here is to adhere to the correct winding technology (you definitely need to make loops on both the yellow and white wires).
When soldering the wires, follow the markings on the diode bridge.
After the wires are soldered to the diode bridge, it will look something like what is shown in the photo. And the multi-colored color of the wires will not allow you to make a mistake.
All that remains is to solder the wires to the light bulb and use free natural electricity.
Source
Light in the gazebo. Lighting in the gazebo: types, ideas and photos of ready-made solutions
Lamps for the gazebo: requirements put forward for them and suitable options
— ease of installation;
- durable body;
— low capital costs for the purchase of lighting equipment;
— attractive design of the lampshade;
— easy operation process and quality guarantee from the manufacturer;
— minimal costs for servicing electrical appliances.
Decorative lighting for the gazebo
Lighting in the gazebo should be localized inside the building in such a way as not to illuminate the area outside it.
Typically, a single-lamp ceiling light is used for this. This creates uneven lighting. To solve this problem, lamps should be placed around the perimeter of the gazebo.
An example of successful highlighting of original design features using lighting
Security guarantees. It is necessary to exclude the possibility of direct light rays entering a person's eyes, otherwise blinding may occur for a short period of time, followed by a fall and injury. Excessive brightness of lamps should be avoided or the possibility of adjusting it should be provided. Modern technical means provide this opportunity.
In addition, it is recommended to use light of warm, yellowish shades, which is more comfortable for humans than light with a cold white shade.
If it is not technically possible to conduct electricity into the gazebo, the problem can be solved with the help of lamps powered by batteries or rechargeable batteries. If installed lamps may get water from external precipitation, it is necessary to choose waterproof lighting devices; this is usually indicated in the technical data sheet.
To make gazebo lamps you can use:
- old floor lamp;
- kitchen utensils, appliances;
- plastic containers, bottles;
- in principle, almost all old, unnecessary things can be used to create individually designed, almost exclusive, lamps.
Of course, to make a lamp, you will need invention, imagination, perseverance and skill in handling a number of simple tools.
Homemade lamps for the gazebo
For a simple lamp made from a glass bottle, you need to do the following:
- choose a bottle of an unusual shape, with a non-standard glass color;
- place multi-colored pieces of glass, transparent beads, etc. on the bottom;
- make a spiral from colored wire by winding it around a cylindrical rod;
- place all the parts inside the bottle;
- Glue a small LED flashlight (there is a huge selection of them now) into the neck of the vessel. Thus, we have a version of the lamp with an autonomous connection system.
Lamps made from glass jars.
When choosing this option, keep in mind that transparent glass does not diffuse light. With the help of these lamps you can give your gazebo any style you want.
Country style.
The jar is wrapped with rope, which is secured with glue.
Vintage style:
- fairly long strips of chintz fabric of various colors are cut out;
- cotton or guipure lace is made;
- these “outfits” are put on the jar and you get a lamp in the style of great-grandmother’s times.
Techno style:
- various radio components are taken from old radios and televisions;
- Copper wire is evenly wrapped around the entire jar;
- You can decorate the light source with LED cylindrical cones, which will enhance the refraction of the light flux, and the unusual lamp you make will look like an object forgotten by aliens.
Examples of lamps made from glass jars
Pop art style.
To do this, you will need multi-colored luminescent paints that cover the inner surface of the glass. During daylight hours, paints accumulate a supply of energy, which at night creates a wide variety of shades of colors.
Regardless of whether you organize the lighting yourself or by professionals, you should adhere to basic safety rules.
At night, the most illuminated place on the site should be the facade of the building
Illumination of the facade can be organized using wall lamps or ground spotlights aimed at the walls of the house
It is necessary to connect the lights to an autonomous energy source. This is due to frequent interruptions and power outages at dachas.
Lighting of a country house site must meet the following requirements:
- Wiring is installed exclusively according to rules that ensure safety for others. This means that automatic type switches, RCDs (necessary to eliminate the occurrence or the latter in the event of a short circuit) are required to be installed.
© 2021 MALIVICE.RU - information portal on construction and repair. Privacy Policy | About the author | DMCA Policy | Copyright Information This site uses cookies to store data. By continuing to use the site, you agree to work with these files.
How to light a light bulb without electricity?
The idea of receiving electrical energy from nowhere, or to be more precise, making a light bulb glow without the need to connect it to electrical wires has long been exciting human minds. This is no coincidence. In our country, electricity is often turned off, and prices for it have been inflated to such heights that you inevitably think about ways of lighting without the participation of nosy electricians. And if you don’t pay them, they can come and cut off the electricity at any time. And they don’t care what time of year it is, day or night, or whether there are small children in the house. This organization cares about nothing but its own enrichment.
So people are thinking about how to make a light bulb glow in case of emergency. They even came up with some ways. These are the ones that will be discussed in the article.
Scarecrow for the dacha with a lantern step by step instructions. Master class on creating a straw effigy
To begin, let's prepare the following materials and tools:
- two handles for rakes or two straight sticks (made of hazel or aspen);
- a couple of screws and a screwdriver;
- a bag of dry straw or hay;
- synthetic twine;
- scissors;
- headdress (preferably a hat);
- black marker;
- thick wire for attaching the hat;
- wide shirt, trousers or breeches.
The sequence of operations is as follows:
- First of all, let's deal with the frame.
To do this, connect the two prepared slats using screws. It is better to immediately sharpen the lower end of the vertical rail so that later it fits into the ground more easily. The slats for the future scarecrow are held together with screws - We create the volume of the torso using straw.
To do this, we twist the straw rope, intertwining it with twine, and secure it to a vertical rail. We also form the volume for future hands on the transverse rail. Two straw strands will give the future scarecrow volume - Forming the scarecrow's head.
To do this, we fill a white bag with straw and synthetic filler, and fix the resulting head on a vertical rail. The head can be made from a bag or a white pillowcase - Create the scarecrow's face.
Eyes, nose, mouth can be made from pieces of leather or fabric of the appropriate color, eyebrows and eyelashes can be glued on. A scarecrow's face doesn't have to have a scary expression. - We put a wide-brimmed hat on the scarecrow's head and secure it with wire.
A straw hat will make the scarecrow look human - We dress up the scarecrow in a shirt and pants.
Preference should be given to blue. We also stuff the pants with straw and attach them to the shirt with twine. - We decorate the scarecrow by adding scaring accessories. To prevent the scarecrow from being static, you can attach fluttering and rustling elements to the hat, sleeves, and belt:
- bottle cap beads;
- canned food cans fastened in pairs;
- CD belt.
Illumination with a Philippine lantern
In addition to the above methods of autonomous lighting of garage buildings, some car enthusiasts use the so-called “Filipino lantern”.
Popular articles Curly soap
Philippine lantern
This method makes it possible to organize free lighting in the garage. Moreover, it is quite possible to do it yourself. The Philippine lantern operates on the principle of light refraction. You can make such a lantern from an ordinary plastic bottle. At the same time, it can be used either entirely or cut out of a part. The algorithm for making a Filipino lantern with your own hands is as follows:
- take a transparent plastic bottle;
- The container is easy to wash and remove the colored label;
- We put a rectangular or round screen made of stainless steel or galvanized on it;
- Clean water is poured into the bottle. It needs to be diluted with bleach. This will prevent the liquid from blooming and, as a result, a drop in lighting intensity;
- the liquid is poured so that its level is three centimeters higher than the installed screen;
- Then such a bottle is mounted in the roof of the garage structure. The bottle itself must be mounted on a rigid base.
Installation of a Philippine lantern
If the roof was made of corrugated sheets, then simply cut a hole of the required diameter in a sheet of material. To minimize the risk of the roof leaking through the holes, all joints between the bottle and the roof must be well treated with silicone or sealant. You can use a Philippine lantern as additional autonomous lighting for the garage in those regions where the sun shines most of the year. To increase the level of illumination, you can install several of these homemade flashlights. In cloudy weather, such a design will produce such dim light that working with it will be life-threatening. In addition, it is worth noting that if the sequence of manufacturing the Philippine lantern is violated, the lighting inside the garage will also be poor.
Light in the country without electricity from potatoes. How to get electricity from potatoes
Free electricity from potatoes at home
Did you know that you can get free electricity from ordinary potatoes? They probably knew, because we all took a general chemistry course at school.
So, in this article we will try to figure out how to get electricity from potatoes at home in order to light an LED flashlight and other low-power electrical devices.
Is there electricity in potatoes?
To check and make sure that there is a small amount of electricity in a regular potato, use a regular multimeter. Take a large potato, wash it to remove dirt, and then insert the probes from the multimeter into the potatoes. After turning on the multimeter, you will see that the device shows several millivolts on the display.
The second experiment will show how to increase the electricity produced by potatoes. To do this, just stick a piece of copper wire into the potato on one side, and a small piece of aluminum on the other side. When the voltage is removed from the end of the wire and a piece of aluminum, its readings will increase to 3 Volts.
So where does the electricity come from in potatoes? In fact, everything is very simple, and potatoes contain a natural electrolyte in the form of dissolved acid and salt. Here it is advisable to note that not only potatoes can generate electricity, but also many citrus fruits, for example, lemon, orange, and some fruits, for example, apple.
If you place some galvanized contact in a lemon, then the electrodes will begin to pass through it, and through the copper contact they will be attracted. As a result, using potatoes, you can get free electricity. Let's look at the homemade craftsmen's website to see exactly how this can be done.
Free electricity from potatoes at home
Don't be confused by thinking that it is potatoes that generate electricity. If this were the case, then we would all suffer greatly when frying potatoes or preparing other delicacies from them. Electricity in potatoes is generated through a chemical process and some other elements, without which nothing would work.
First of all, these are: copper, zinc, acid. It is through the zinc that the electrodes leak. In potatoes there is a favorable environment successfully created by acids.
So, to assemble a potato battery, for educational purposes, of course, you will need the following consumables:
- Potato;
- Single core copper wire. It is better to choose as large a cable cross-section as possible;
- Zinc hardware. You can take, for example, galvanized nails or self-tapping screws. Wire will also work, but it is extremely important that it contains zinc.
We use a galvanized nail for the negative contact (anode), and a copper wire for the positive contact (cathode). Insert a galvanized nail on one side of the potato, and the end of a stripped copper wire on the other side.
Let's take voltage measurements and see a few millivolts on the multimeter display. To increase the voltage values, connect 2-3 potatoes in series - the voltage will increase to 1.5 Volts. This voltage is already enough to power the LED from a small flashlight.
Thus, you can get free electricity from potatoes. The more potatoes, the higher the voltage readings will be. By the way, you can raise them several more times by using not raw, but boiled potatoes, filling them with a housing from an old R20 battery or any other structure.
How to light a light bulb without electricity?
The idea of receiving electrical energy from nowhere, or to be more precise, making a light bulb glow without the need to connect it to electrical wires has long been exciting human minds. This is no coincidence. In our country, electricity is often turned off, and prices for it have been inflated to such heights that you inevitably think about ways of lighting without the participation of nosy electricians. And if you don’t pay them, they can come and cut off the electricity at any time. And they don’t care what time of year it is, day or night, or whether there are small children in the house. This organization cares about nothing but its own enrichment.
So people are thinking about how to make a light bulb glow in case of emergency. They even came up with some ways. These are the ones that will be discussed in the article.
No electricity? And it's not necessary! And the LED light will light up!
There is a lot of electricity around us. It literally surrounds us and is completely free. It's not clear why we don't use it at all. Perhaps we simply don’t know something about it, but most likely, we have long believed that there is simply no free electricity. After all, this is exactly what they drilled into us at school for a long time. And who hammered it in? Yes, everything comes from selfish electricity sellers.
The simplest and most effective scheme for obtaining free and alternative electricity can be assembled in a few minutes literally from what is found in the garage:
- First of all, you need to get two magnets, preferably larger ones;
- in addition to magnets, you need to get a diode bridge;
- Let's also prepare three pieces of multi-colored wire.
We wrap one of the magnets with wire. The remaining two wires will go to the second magnet. The main thing here is to adhere to the correct winding technology (you definitely need to make loops on both the yellow and white wires).
When soldering the wires, follow the markings on the diode bridge.
After the wires are soldered to the diode bridge, it will look something like what is shown in the photo. And the multi-colored color of the wires will not allow you to make a mistake.
All that remains is to solder the wires to the light bulb and use free natural electricity.
Potatoes are not for food, but for light
Probably, some of you have already done a similar experiment at school, when using only a potato tuber you generated electrical energy. Scientists from Israel have come to the conclusion that the power of electricity will be much greater if the potatoes are pre-boiled. The vegetable is distributed all over the world and thanks to research it has become clear that just one tuber can provide quite a sufficient amount of electricity for as long as thirty days.
To make the light bulb glow, you need to:
- boil four potatoes (don’t forget to cool them later);
- take four copper wires or coins of a similar metal;
- prepare a long cable;
- acquire four zinc wires or any zinc items;
- purchase an LED lamp with a power of no more than 2.5 W;
- take some paper clips.
To make the potatoes more stable, cut off one side of them. This way it will lie firmly on a plate or tray. We will place a copper and zinc element in each potato.
You need to try to separate both elements from each other at some distance. If you use coins, you need to prepare slots for them in advance. If alligator clips are available, attach them to each end of the cable. Alternatively, you can strip a small section of the cable on both sides and secure it with a paper clip.
If suddenly you don’t find a paper clip, you can simply get by with a cable stripped on both sides. We connect the copper element on each potato with the zinc element in the other, trying to maintain the same type of all connections. As a result, all the tubers will be connected by cable in a circle.
Now we connect the LED lamp to the common circuit. We simply take one of the wires that comes from the copper element, and instead of connecting it to the zinc element, we connect it to the lamp. We do the same with the wire from the zinc element of the neighboring tuber. Thus, we close the circuit. Logically, the lamp should start to light.
Causes
What should I do if the LED lamp glows when the switch is off? "RadioKot" is a forum dedicated to electronics, contains a lot of useful information on this topic. According to forum members, there may be several reasons for the weak light after switching off.
- Incorrect electrical wiring connection.
- The switch has neon lighting.
- The LED lamp turned out to be of poor quality.
- The LED lamp has additional options (slowly extinguishing lamp).
Popular articles Words for Victory Day on May 9
LED lamps are designed in such a way that their main job is constant voltage. There is a rectifier inside the device, which receives current. Sometimes it happens that after turning off the lamp burns dimly or flickers. Problems with wiring and poor quality of LEDs used are the main reasons for this phenomenon. If the device uses a resistor, it keeps the diodes glowing. Electricity accumulates in them, so even after turning off the lamps emit a weak light.
This happens when the backlit switch is open. In this case, the current to the lamp comes from the switch itself. It does not affect the network load. The current performs the function of charging the capacitor. When charging reaches a certain level, it flashes and turns off. Thus, the process proceeds in a circle, and short blinks occur in the lamp or LED strips.
If you don't want to experience flickering lights during or after a shutdown, choose the right lamp. Conscientious manufacturers always indicate instructions on the packaging, which indicate the operating principle of LED lighting devices and recommendations for correct operation. It is not advisable to use LED lamps together with backlit key switches, photocells, brightness controls, and timers. All this interferes with the operation of the product and causes periodic blinking.
Unfortunately, lighting fixtures are often counterfeited. When purchasing, try to carefully study the packaging in which the lamp is located. The cause of burning after switching off, as well as blinking, is sometimes due to incorrect installation. If this problem bothers you, try to fix it yourself. Check that the light bulb is screwed in securely (with the power off). Remember that the simultaneous use of switches with neon lights (they are needed to recognize their location) and LEDs is not recommended.