Currently, the air entry into a country house from the main section of the power line is almost always carried out with an insulated SIP wire.
The cable is used only for underground installation. Installation of SIP underground, even in a protective pipe, is prohibited.
In the old days, with air input, you only had to buy the cable itself or insulated wires of the required length, an electrician would come with pliers and connect it all to a comb or gander within half an hour.
Installation of SIP, with all its advantages, is associated with certain difficulties and its own technological features.
You most likely won’t connect it yourself, but it’s still worth knowing the main points that need to be checked when working as an electrician.
Selection of fittings
The first step is to decide on the material. As mentioned above, one cable is no longer enough.
You will have to purchase a bunch of fittings, each of which has its own designation. Even electricians themselves are often confused about the nomenclature.
The air inlet consists of three main components:
- connection “node” on the support
- SIP
- connection “node” on the facade of the house
The summary table of fittings for purchase when connecting a three-phase 380V SIP input is as follows:
Mistake #1
Buy fittings designed specifically for the subscriber branch, and not for the main VLI.
Connection specifications usually specify universal clamps, brackets and tape. They can make both taps and mount the main VLI. You don't need this.
If the input is single-phase (220V), and not three-phase, then it will require another anchor for two wires and only 4 pieces of branch piercing clamps.
What you need to buy for single-phase SIP input:
Detailed labeling for each item, broken down by manufacturer, will be given below in separate plates.
Laying wire through the air
This is the most popular and seemingly simple way to bring electricity into the house. There are advantages and disadvantages of this method of organizing input.
Advantages of an overhead line:
- Installation speed . Tensioning the bushing from the support to the insulators on the house takes no more than 40 minutes. In this case, the overhead line, which powers other houses on the street, will be turned off for no more than 10 minutes (it is necessary to connect the phase and neutral wires to the line), so the neighbors will not have time to express dissatisfaction due to the lack of light.
- Easy to maintain . The wire itself does not require maintenance unless it breaks due to a fallen tree or ice. If this happens, its repair will take relatively little time. Please note that it may be necessary to clean and tighten the contacts on the wire from time to time if the connection is made with regular twisting and not with piercing insulators (nuts).
- Relatively cheap . On average, 1 m of 4x16 SIP wire costs 60 - 70 rubles. For input, assuming a distance from the support to the wall of the house of 10 m, you will need about 13 m of wire (additional 3 m for installation in the panel and reserve in case of repair), which will be approximately 900 - 1000 rubles plus 1000 rubles for the installer to hook up the wire for a support, about 2000 rubles . This is several times cheaper than laying a cable, which costs on average 120 rubles per 1 m (AVBbShv cable).
Disadvantages of an overhead line:
- Exposure to environmental factors . Unlike a cable in the ground, an “overhead” wire is exposed to ultraviolet radiation, which affects the condition of the insulation, wind loads, lightning, icing and falling trees, which simply tear the wires. If it breaks from a support or at a connection near the house, then it’s no big deal, as it can be quickly repaired without twists. And if the wire breaks in the middle of the span, then in order to avoid voltage losses due to twists, the entire wire will have to be replaced, and this is an additional considerable expense.
- Obtaining permission to install a support . This may be required if the distance from the support closest to you to the entrance to the house is more than 25 m. Then, in order to avoid sagging of the wire, you will need to install an additional support, the installation of which on average costs 15,000 - 20,000 rubles, depending on the region of residence and the distance of the installation organization from yours country house. Connecting the overhead line to the house is carried out according to the following scheme:
- Lack of aesthetics. For many owners of country houses, the aesthetics of the electrical network is a key factor. Hanging wires spoil the appearance, while a buried cable is nowhere to be seen.
- They can be a nuisance in the yard. Many owners additionally route wires through the air, connecting a shed, workshop or garage. If you have large-sized agricultural machinery, then there is a possibility of breaking the wires by snagging them. In this case, you will have to route the wires in armored sleeves along the fence or walls, or lay the cable underground.
What kind of SIP is needed to connect a house?
Which SIP wire should I use? The best option is SIP-4 (4*16) with three-phase input 380V or SIP-4 (2*16) with single-phase 220V.
How SIP-1,2,3,4,5 differ from each other, read in a separate article.
Mistake #2
No suspension cables are required here.
It’s not for nothing that the wire is called self-supporting.
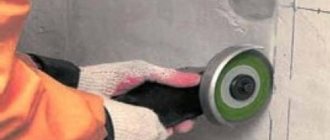
Some examples of input cable protection
The best protection for the input cable is its insulation and the method of laying it in a place where no one can reach it. This can be a method of laying underground or by air. To prevent the harmful effects of natural conditions, the conductor can be laid in a special PVC pipe, but few do this, due to the significant increase in the cost of the structure.
To protect the wire in the wall, it is best to use a metal pipe. A replacement for metal can be PVC, which has a more affordable price.
Connecting SIP on the facade of the house
On the facade, the SIP is attached to the same bracket as on the support. On wooden structures, fastening can be done through wood grouse screws or self-tapping screws for joists and slats.
On concrete and brick - through a wedge anchor or anchor bolt.
If the facade is already finished with finishing material and you don’t want to spoil it with numerous holes, use a hook-screw instead of a bracket.
You drill the wall in just one place and screw this hook there.
An anchor clamp with wires clings to it.
Mistake #13
Do not choose anchors with increased destructive load here.
The principle here is the same as with the yoke.
Laying cables in the ground
Laying cables, like overhead power lines, has its pros and cons.
Pros of a cable line:
- Aesthetics . Laying cables allows you to avoid unnecessary wires and at the same time beautifully landscape the territory of your home.
- Reliability and durability . If all technological processes are followed, including correct connection of the cable to the overhead line on the pole, installation in a PVC pipe and protection of the cable from moisture, the cable can serve its owner without repair or revision for up to 30 - 40 years. It is also not afraid of external environmental factors, since it is buried in the ground.
- Cost-effective when the support distance is large from the house . Although on average the cost of a cable is more expensive than an overhead wire, however, if the overhead line is far from the house, you will not have to obtain permission to install an additional support and pay money for it. Digging a trench and laying cables in this case will cost much less, and you can do it yourself, without resorting to the services of installers (except for connecting the panel to the support).
Disadvantages of a cable line:
- Danger of theft . Unfortunately, in Russia, hunters for non-ferrous metals have not yet been canceled. The cable coming down from the support is visible to the naked eye, so the section from the support to the fence can be dug up and stolen. Of course, this does not happen all the time, but there have been cases.
- Obtaining permission to dig if there are underground communications nearby. If a gas or water pipe is buried near your house, then you will need to invite a representative of Gorgaz or Vodokanal to coordinate the digging of a trench. This takes additional time and you will have to pay for the visit of a representative of the relevant service.
- Laying time. Digging a trench, laying a pipe and pulling a cable along it takes many times longer than stretching the input with a self-supporting insulated wire.
- Total cost of installed cable. If the overhead line does not require additional support, then laying the cable line will cost more. If it is necessary to lay the same 13 m of AVBbShv 4x16 cable (for clarity, we take it as for an overhead line) in a plastic corrugated pipe with a diameter of 110 mm (costs on average 100 rubles per 1 m), provided that you dig a trench yourself, then the cost of installation will be: (13 *120) + (13*100) = 2860 rubles
It is worth considering that you will need to pay the installer about another 1000 rubles for connecting the cable in the panel (or on the support). The total cost will be about 4,000 rubles , which is more expensive than pulling an overhead line.
. If a breakdown occurs in the cable somewhere in the middle (not at the inputs), then you will have to dig out the entire buried structure, which takes a lot of time and creates a lot of problems (especially in winter). Also, no objects can be built in the cable laying areas - again for reasons of future repairs.
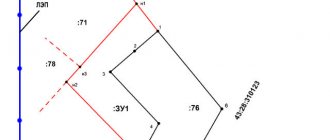
Difficulty of repair- The need to draw up a drawing . Since the cable line is not visible to the eye, it is necessary to draw up a detailed drawing so that in 20 - 30 years, when your children or grandchildren live in the house (or you sell it), no one accidentally stumbles upon the cable when they dig a trench under the foundation extension or garage. Also, a drawing is needed for repairs so that you know where to dig.
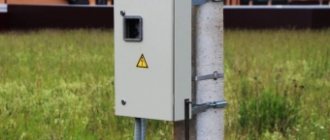
Entry into the accounting cabinet
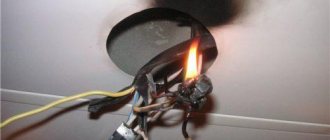
The main question when installing on a facade is where and how to connect SIP? You can, of course, enter the wire directly into the distribution cabinet, but then a headache arises with laying SIP along the facade and, most importantly, with connecting the aluminum conductor to the input circuit breaker.
SIP is a multi-core wire, and according to GOST, such contact connections require the mandatory use of a tip. Without it, in a year you will see a picture like this.
Read how this problem is solved in a separate article.
Spoiler: the simplest and most convenient option in this case is crimping the SIP core with aluminum pin lugs NShA 16-14. Or even better NSHAL (tinned aluminum pin tip).
EKF has these in stock.
Mistake #14
Do not insert SIP aluminum conductors directly into the meter.
In a year or two, the terminals on it will burn out and you will need a new meter.
Moreover, the PUE says that a switching device must be installed in front of the meter.
Many people mount a distribution box high on the facade, in which the wires are actually disconnected and the transition to a copper cable occurs. However, it all looks cumbersome and ugly.
In addition, it is advisable to place a metal box on a wooden base rather than a plastic one. Over the years, plastic dries out and falls apart.
But metal is not a gift at all. Over time, it begins to rust and dirty streaks from it spread across the facade.
Underground (trench) electricity input
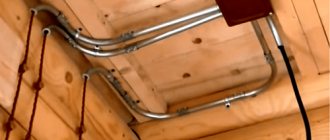
Another way to introduce electricity into a wooden house is underground, through a trench.
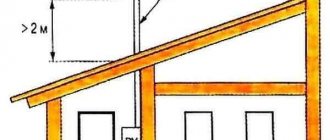
Inputting electricity into a wooden house through a trench
In this case, the cable is lowered along a pole inside a steel pipe; its height must be at least 2 m from the ground level. Then, from the pillar to the entrance to the house, a trench is dug. Its depth:
- 0.7 meters, when laying the cable in a plastic or asbestos pipe or under the protection of a brick (concrete) slab
- 1 m - without protection.
The power cable also enters the house in a metal pipe. It can be passed through the foundation (strip), but not under it. The second option is to raise the pipe along the wall by at least 2 meters, and at this height pass it through the wall, also in a metal pipe.
Method of wiring electrical wiring through an external wooden wall
When connecting underground to a pole, it is recommended to use a power cable with copper conductors in reinforced insulation, preferably armored. With a power consumption of less than 15 kW, there are no restrictions on the cross-section of copper conductors, but most often they use a VBBShV cable with a conductor of 10 square millimeters.
All this work - right down to connecting power to the electric meter and sealing it - must be carried out by a special organization. Independent connection is prohibited, and even threatens with fines: an agreed project and a certain level of clearance are required. But you can choose the type of connection, and then do all the other work on installing electrical wiring in the house yourself.