Original solutions
It is not necessary for everyone to know how to make the correct twist using non-standard solutions, but in some cases it is precisely this knowledge that helps to cope with the work.
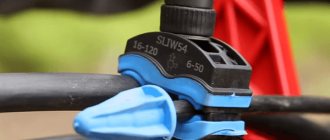
For example, how to properly make a twist in which it is necessary to connect not two or three wires, but several dozen pairs? For this purpose, a special mechanical device is used - manual press equipment. This press twists both stranded and single-core wires of the same metal. Sometimes, on the contrary, it is necessary to decide how to properly twist for low-current installations: power cords, LEDs, telephones, etc. For this, special connectors are used, which are plastic caps for twisting wires, inside of which there is a metal alloy plate in a special solution. This is a hydrophobic gel that prevents rust and protects the contact from oxidation and moisture.
If you find an error, please select a piece of text and press Ctrl+Enter
.
Types of twists. Errors when twisting
Firstly, remember that wires come in aluminum and copper. Copper wires are divided into monocore (one solid core) and multicore (flexible).
Monocores are used for stationary connection of equipment. Once I laid it under the plaster, behind the drywall and forgot about them. There is no longer any need to move or bend such wiring.
Multi-core cables are used for mobile devices or temporary connection of electrical equipment. Where wiring constantly needs to be moved from place to place, its location must be changed. These are home carriers, household appliances plugged into sockets. They are also used in the assembly of switchboards, where there is a shortage of free space, and the conductors have to be significantly bent in order to be inserted into the terminals of the devices.
Let's first consider how to properly twist wires from a single core. The process here is not complicated and is known to everyone. Take two wires, strip them at the ends and begin to twist each other.
The main features and rules in this process:
- wires must be made of the same material (copper or aluminum)
- strip the core at least 3-4 cm, thereby increasing the useful contact area
- wires are laid parallel to each other
- both wires must be twisted evenly together
- When twisting, use some pliers to hold the place where you start stripping the insulation, and use the other to twist at the end. The insulated parts of the conductors must not be twisted together.
- the number of turns that should end up being five or more
Twists of aluminum and copper wires are performed in the same way. The difference is that you can unscrew and tighten copper ones several times, and aluminum ones 1-2 times. After which they will break off.
What if you need to twist more than two wires, say 4-5? The process is no different:
- slowly twist the wires with your hands, only giving them the shape of the future twist
- take two pliers and, holding the twist at first, tighten the wires at the end
- the length of the stripped areas should also be 3-4cm
There are situations when it is necessary for the twist to take up as little space as possible. Either there is not enough space in the junction box, or it must then be pulled through a narrow hole. In this case, the technology is slightly different.
- place the stripped wire strands crosswise in the middle of the stripping area
- and begin to twist them so that the ends after folding are equidistant from each other
In terms of quality and reliability, such twists are inferior to conventional ones.
Various twist options
Unprofessional connection. This is a twisting of a stranded wire with a solid one. This type of connection is not provided for by the rules, and if such a connection of wires is discovered by the selection committee, the facility will simply not be accepted for operation.
However, twisting is still used and here you need to know how to properly twist stranded wires. It is often used in emergency cases when it is not possible to make a professional connection and the service life of such a connection will be short. And yet, twisting can be temporarily used only for open wiring, so that you can always inspect the connection point.
Bad wire connection
Why can't you connect wires by twisting? The fact is that when twisting, unreliable contact is created. When load currents pass through the twisting, the twisting area heats up, and this increases the transition resistance at the connection point. This in turn contributes to even greater heating. Thus, the temperature at the connection point rises to dangerous levels, which can cause a fire. In addition, a violation of contact leads to the appearance of a spark at the twisting point, which can also cause a fire. Therefore, in order to achieve good contact, it is recommended to twist wires with a cross-section of up to 4 mm2. Learn more about color coding of wires.
There are several types of twists. When twisting, it is necessary to achieve good electrical contact, as well as create mechanical tensile strength. Before you start connecting the wires, they should be prepared. Wire preparation is carried out in the following sequence:
- The insulation is removed from the wire at the junction. The insulation is removed in such a way as not to damage the wire core. If a cut appears on the wire core, it may break at this point;
- the exposed area of the wire is degreased. To do this, wipe it with a rag soaked in acetone;
- to create good contact, the degreased section of the wire is sanded with sandpaper to a metallic shine;
- After connection, the wire insulation must be restored. Insulating tape or heat-shrinkable tubing can be used for this.
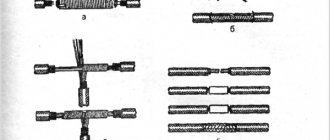
In practice, several types of twists are used:
- simple parallel twist. This is the simplest and most common type of connection. With good parallel twisting at the junction, good contact quality can be achieved, but the mechanical tensile forces will be minimal. This twist may become loose if vibration occurs. To properly perform such twisting, it is necessary that each wire wraps around each other. In this case, there must be at least three turns;
- "winding" method. This method is used if it is necessary to branch a wire from the main line. To do this, the insulation of the wire is removed at the branch section, and the branch wire is connected to the bare area by winding;
Connecting the wire to the main
- bandage twist. This type of twisting is often used when connecting two or more single-core wires. When using bandage twisting, an additional conductor made of the same material as the wire cores is used. First, a simple parallel twist is performed, and then a bandage of an additional conductor is applied to this place. The bandage increases the mechanical tensile strength at the junction;
- connection of stranded and solid wire. This type is the most common and simplest; first, a simple twist is performed, and then clamped;
Connection of stranded and solid copper wire
other various connection options.
In detail, about methods of connecting single-core wires https://sdelalremont.ru/nadezhnye-sposoby-soedineniya-elektricheskix-provodov.html
The need for a reliable connection
Poor contacts become the main cause of fires.
First of all, you need to understand why it is so important to pay attention to the reliability of the connection of conductors. Even the PUE give recommendations on the choice of connection method and strictly prohibit twisting of wires.
Consequences of incorrectly connected conductors:
- Fire. A poor-quality contact has a high contact resistance. This leads to heating, which can later lead to a fire.
- Damage to wiring. Due to high resistance, the conductor heats up faster. As a result, the insulation may melt and the contact itself may collapse. Damage to the insulating layer may result in electric shock.
- Short circuit. It also depends on the value of the contact resistance.
High contact resistance leads to negative consequences. Therefore, it is important to reduce it, for which permitted methods of connecting multi-core conductors are used.
Twist
You can make a twist in one of three ways:
- simple twist;
- bandage;
- twisting with a groove.
The first method is most often used in everyday life. The correct choice of tool and the use of PPE caps allows for good contact.
This method is used to connect the ends in the junction box.
Band twisting is used to make connections for large diameter wires. To ensure a strong connection of aluminum cores, groove twisting is used.
If the connection technology in the junction box is carried out accurately, then the contact can serve for a long time and reliably.
All of the listed types of twisting require a certain skill in operation.
When the wire cross-section is 6 square meters or higher, PPE caps are not used in the junction box.
To strengthen the bandage twist, soldering is used. Technological instructions do not allow simple twisting of aluminum and copper wires.
Such connections can be made after preliminary tinning of the copper.
All of the above methods are used to connect multi-core cables and wires. All operations in the junction box must be done carefully. Especially in the case when there are more than three cores in the cable.
If it is necessary to make an additional tap on a certain section of the line, then all actions are performed according to a standard and familiar scheme.
To reliably twist aluminum wires, an electrician requires theoretical training and practical skills.
With enough experience, he can quickly complete any connection. In this case, the place of twisting must be cleaned. Aluminum oxide has insulating properties.
If the contact at the twisting point gets hot, then most likely the stripping of the aluminum wire was not done properly. It's no secret that all operations need to be done correctly.
This law strictly applies in electrical engineering. The fitter must have good tools and an exam on the rules of operating electrical installations - he must pass it within a certain time frame.
Methods for connecting wires or cables to each other
The junction of two conductors must meet the following requirements:
- reliability;
- mechanical strength.
These conditions can also be met when connecting conductors without soldering.
Crimping
This method requires special equipment. Crimping of wires with sleeves is carried out for both copper and aluminum wires of different diameters. Depending on the cross-section and material, the sleeve is selected.
Crimping algorithm:
- stripping of insulation;
- stripping wires to bare metal;
- the wires need to be twisted and inserted into the sleeve;
- the conductors are crimped using special pliers.
Selection of a sleeve causes major difficulties. An incorrectly selected diameter will not ensure reliable contact.
Bolted connection
Bolts, nuts and several washers are used for contact. The connection point turns out to be reliable, but the structure itself takes up a lot of space and is inconvenient to install.
The connection order is as follows:
- stripping of insulation;
- the stripped part is laid in the form of a loop with a diameter equal to the cross-section of the bolt;
- a washer is put on the bolt, then one of the conductors, another washer, a second conductor and a third washer;
- the structure is tightened with a nut.
Using a bolt, you can connect several wires. The nut is tightened not only by hand, but also by a wrench.
Terminal blocks
The terminal block is a contact plate in a polymer or carbolite housing. With their help, any user can connect wires. The connection occurs in several stages:
- stripping the insulation by 5-7 mm;
- removal of oxide film;
- installing conductors in sockets opposite each other;
- fixation with bolts.
Pros - you can connect cables of different diameters. Disadvantages - you can only connect 2 wires.
Types of terminal blocks for multi-core and single-core cables
There are 5 main types of terminal blocks:
- knife and pin;
- screw;
- clamping and self-clamping;
- cap-shaped;
- "walnut" type clamps.
The first type is rarely used; they are not designed for high currents and have an open design. Screw terminals provide reliable contact but are not suitable for connecting multi-core cables. Clamp terminal blocks are the most convenient devices to use; their installation does not require special equipment. Cap-type devices are also often used, but unlike clamping devices, caps can be used repeatedly. "Nut" is practically not used.
Terminals in junction box (copper or metal)
Terminals are the most common connection method in a junction box. They are cheap, easy to install, provide reliable contact fixation and can be used to connect copper and aluminum. Flaws:
- cheap devices are of low quality;
- Only 2 wires can be connected;
- Not suitable for stranded wires.
Self-clamping terminal blocks WAGO
There are 2 types of Vago terminal blocks used:
- With a flat spring mechanism - they are also called disposable, since reuse is impossible. Inside there is a plate with spring petals. When installing the conductor, the petal is pressed out and the wire is clamped.
- With lever mechanism. This is the best connector option. The stripped conductor is inserted into the terminal and the lever is clamped. Re-installation is possible.
With proper use, Vago terminal blocks last 25-30 years.
Using Tips
For connection, 2 types of tips and sleeves are used:
- in the first, the connection is made inside the product;
- in the second, two electrical wires are terminated with different tips.
The connection inside the sleeve or tip is strong and reliable. There are also special sleeves for connecting copper and aluminum wires.
Soldering of electrical wiring lugs
The tips are connected to the wiring using a press. If it is not there, contact can be ensured by soldering.
The electrical wire and the tip inside are tinned, the stripped cable is inserted inside.
The entire structure on the contact must be wrapped with fiberglass tape and heated with a burner until the tin melts.
Terminals
Terminal blocks for connecting wires provide one undeniable advantage: they can connect cores of different metals. Both here and in other articles, we have repeatedly reminded that twisting aluminum and copper wires together is prohibited. The resulting galvanic couple will result in corrosive processes and destruction of the connection
And it doesn’t matter how much current flows at the connection. Late or early, the twist will still start to heat up. The way out of this situation is precisely the terminals
Terminals are the way out of this situation.
Terminal block
The simplest and cheapest solution is polyethylene terminal blocks. They are not very expensive and are sold in every electrical goods store.
The polyethylene frame is designed for several cells, inside each there is a brass tube (sleeve). The ends of the connected wires must be inserted into this sleeve and clamped with two screws. It is very convenient that as many cells are cut from the block as it is necessary to connect pairs of wires, for example, in one junction box.
But not everything is so smooth, there are also disadvantages. At room conditions, aluminum begins to flow under screw pressure. You will have to periodically inspect the terminal blocks and tighten the contacts where the aluminum conductors are fixed. If this is not done in a timely manner, the aluminum core in the terminal block will become loose, lose reliable contact, and, as a result, spark and heat up, which can result in a fire. Such problems do not arise with copper conductors, but it would not be superfluous to periodically inspect their contacts.
Terminal blocks are not intended for connecting stranded wires. If stranded wires are clamped into such connecting terminals, then when tightening the screw under pressure, the thin wires may partially break, which will lead to overheating.
In cases where it becomes necessary to clamp stranded wires into a terminal block, it is imperative to use auxiliary pin lugs
It is very important to choose the correct diameter so that the wire does not jump out later. The stranded wire must be inserted into the lug, crimped using pliers and secured in the terminal block. As a result of all of the above, the terminal block is an ideal option for single-core copper wires
With aluminum and stranded ones you will have to comply with a number of additional measures and requirements
As a result of all of the above, the terminal block is an ideal option for single-core copper wires. With aluminum and stranded ones you will have to comply with a number of additional measures and requirements.
How to use terminal blocks is shown in this video:
Terminals on plastic blocks
Another very convenient wire connector is a terminal on plastic blocks. This option differs from terminal blocks in that it has a smooth metal clamp. The clamping surface has a recess for the wire, so there is no pressure on the wire from the screw being tightened. Therefore, such terminals are suitable for connecting any wires.
Everything about these clamps is extremely simple. The ends of the wires are stripped and placed between the contact and pressure plates.
Such terminals are additionally equipped with a transparent plastic cover, which can be removed if necessary.
Self-clamping terminals
Wiring installation using such terminals is simple and quick.
The wire must be inserted into the hole to the very end. There it is automatically fixed using a pressure plate, which presses the wire to the tinned busbar. Thanks to the material from which the pressure plate is made, the clamping force does not weaken and is maintained all the time.
The internal tinned busbar is made in the form of a copper plate. Both copper and aluminum wires can be fixed in self-clamping terminals. These terminals are disposable.
And if you want clamps for connecting reusable wires, then use terminal blocks with levers. They lifted the lever and inserted the wire into the hole, then fixed it there by pressing it back. If necessary, the lever rises again and the wire protrudes.
Try to choose clamps from a manufacturer that has proven itself well. WAGO clamps have especially positive characteristics and reviews.
The advantages and disadvantages are described in this video:
Self-clamping terminal blocks WAGO
In addition to terminal blocks with bolts, there are also terminal blocks with clamps. They are more expensive than usual, but they allow the connection to be made much faster, especially in connection with the new requirements of the PUE and the ban on twisting.
The most famous manufacturer of such terminal blocks is WAGO. Each terminal is a separate device with several holes for connecting wires, each of which is inserted into a separate wire. Depending on the version, it connects from 2 to 8 conductors. Some types are filled inside with conductive paste for better contact.
They are available for both detachable and permanent connections.
The stripped wire is simply inserted into the terminals for a permanent connection and spring tendrils fix the wire inside. Only hard (single-core) wire can be used.
In plug-in terminals, the wire is clamped using a folding lever and a spring clamp, making it easy to connect and disconnect wires.
Since the wires do not touch each other, the terminals allow you to connect wires of different sections, single-core to stranded, copper to aluminum.
This method of connecting conductors has proven to work best at low currents and is most widespread in lighting networks. These terminals are small in size and easily fit into adapter boxes.
Stranded wires
Twisting of stranded electrical wires can be done in different ways.
Parallel twist
The simplest method is parallel twisting, when both stripped wires are placed crosswise on top of each other at the place where the insulation was stripped and twisted at the same time. Such a connection provides reliable contact, but it will poorly tolerate the applied tensile force and vibration.
This method is best used for copper wires, when one of them is monolithic and the other is stranded. A monolithic wire needs to be stripped of insulation a little more than a stranded wire. After twisting, an additional bend is made from the remaining copper monolithic tail in the direction of twisting, due to this the connection is more reliable. This method is also suitable for twisting aluminum conductors with different cross-sections.
Another advantage of parallel twisting is that it can be used to connect more than two wires at the same time.
Serial twisting
With the sequential method, each connected wire is wound onto another. The reliability and contact of such a connection will be optimal, but this twist can only be used for two wires, no more.
Place the stripped wires crosswise on top of each other approximately in the middle of the exposed area and begin to twist. One wire goes around another wire, and wrap the second wire around the first in the same way.
Bandage twist
Stranded wires can be connected together using the bandage twist method. In this case, the connected conductors are stripped to the same length and applied parallel to each other. In this position, they are fixed with a third wire, which is tightly wound onto the bare surface of the connected conductors.
Please note that using such twisting you can connect hard stranded wires, but you must use a soft (flexible) wire as a fixing wire. The tighter you wind the fixing wire, the more reliable the contact connection will be.
More than two conductors can be connected using bandage twisting.
Why contact connections must be made correctly
First of all, let's look at what the requirements for high-quality contact connections are related to. It is not without reason that clause 2.1.21 of the PUE separately stipulates methods for connecting wires, and allows only screw or bolt clamps, crimping, welding or soldering.
- This is primarily due to the fact that these types of connections can provide the required level of durability and reliability of the connection. After all, any electrician will tell you that more than 90% of all damage occurs at contact connections, and that is why so much attention is paid to them.
- After all, what is a poor-quality contact connection is a connection that has a high contact resistance. And since we have resistance, this means heating.
- As we remember from the physics course, any conductor in a heated state has greater resistance than a conductor with a lower temperature. Therefore, an avalanche-like process results. A poor-quality contact connection causes the conductor to heat up and its resistance increases even more. As a result, it heats up even more until it reaches the point where it simply melts.
- As a result, our main task is to ensure minimum resistance between the two conductors being connected. This is achieved by ensuring the proper area of contact between the two conductors, as well as by ensuring the maximum possible contact between them.
- Let's immediately look at why we will not consider the question of how to twist single-core wires or their multi-core counterparts. Indeed, with the right approach, and through twisting, it is possible to ensure a sufficient area of contact and compression of the conductors with each other.
- The fact is that in any case, the contact connection will be subject to temperature influences. That is, it will heat up and cool down. And as we know, heating leads to expansion of materials, and cooling, accordingly, to contraction. As a result, our contact connection, which is not fixed by any third element, can quickly become of insufficient quality.
Note! Surely each of you can give dozens and hundreds of examples where twisting has lasted for decades, and even now looks better than screw or bolt connections. But, as they say, exceptions to the rule only confirm the rule itself. According to statistics, twisted joints are damaged much more often than other types of joints.
Soldering as a reliable alternative to twisting
The closest alternative to twisting, which is prohibited for electrical installation, is to connect wires using the soldering method. It requires special tools and consumables, but provides absolute electrical contact.
You will need an electric soldering iron with a power of 60–100 W, a stand and tweezers (pliers). The soldering iron tip should be cleaned of scale, sharpened, having first selected the most suitable shape of the tip in the form of a spatula, and the body of the device should be connected to the ground wire. Among the “consumables” you will need POS-40, POS-60 solder from tin and lead, rosin as a flux. You can use solder wire with rosin placed inside the structure.
If you need to solder steel, brass or aluminum, you will need a special soldering acid.
- The wires stripped of insulation should be tinned, for which the tips heated with a soldering iron are placed in a piece of rosin; they should be covered with a brown-transparent layer of flux.
- We place the tip of the soldering iron tip into the solder, grab a drop of molten solder and evenly process the wires one by one, turning and moving along the tip blade.
- Attach or twist the wires together, securing them motionless. Warm up with the tip for 2–5 s. Treat the areas to be soldered with a layer of solder, allowing the drop to spread over the surfaces. Turn over the wires to be connected and repeat the operation on the reverse side.
- After cooling, the soldering joints are insulated in the same way as twisting. In some compounds, they are pre-treated with a brush dipped in alcohol and coated with varnish.
Types of electrical wire connections
There are about a dozen ways to connect wires. In general, they can be divided into two groups: those that require special equipment or specific skills and those that can be successfully used by any home craftsman - they do not require any special skills.
Don't know how to connect two wires? Choose the most suitable method
The first group includes:
- Soldering. When connecting wires of small diameter in the amount of 2-3 pieces, this is a very reliable method. True, it requires a soldering iron and some skills in using it.
- Welding. You need a welding machine and special electrodes. But the contact is reliable - the conductors are fused into a monolith.
- Crimping with sleeves. You need sleeves and special pliers. The sleeves are selected according to certain rules that you need to know. The connection is reliable, but it will have to be cut to re-seal.
All these methods of connecting wires are performed mainly by specialists. If you have skills in handling a soldering iron or welding machine, after practicing on unnecessary scraps, you can make them yourself.
Some methods of connecting wires are more popular, others less so.
Methods of connecting wires that do not require any specific skills are becoming increasingly popular. Their advantage is quick installation and reliable connection. Disadvantage - you need “connectors” - terminal blocks, clamps, bolts. Some of them cost quite a lot of money (Wago terminal blocks, for example), although there are also inexpensive options - screw terminal blocks.
So here are ways to connect wires that are easy to implement:
- Terminal blocks. They are characterized by ease of installation and low price. To connect the wires, you only need a screwdriver. Disadvantage: The bolted connection may become loose over time.
- Wago type spring clamps. Very simple installation, easy but quite high cost. Another drawback is the large number of fakes.
- PPE caps. Quick installation, good contact, can be installed several times. The disadvantage is that there are many low quality products.
- Bolted connection. Reliable connection at low cost. Typically used when converting from aluminum to copper. Disadvantage: bulky and inconvenient.
There are two opposing opinions among professionals. Some believe that new methods of connecting wires - clamps - are the best solution, as they speed up installation without compromising the quality of the connection. Others say that the springs will eventually weaken and contact will deteriorate. In this matter, the choice is yours.
Connection of flexible and rigid wires
Typically, conductors of the same type are connected. But sometimes a connection between a flexible and a rigid wire is required, which is carried out in compliance with some nuances.
First, cut the cable so that its end is tapered. The rigid wire needs to be melted and a loop made at its end. A thin wire is passed through the loop made and wrapped around the rigid cable. The resulting connection must be treated with solder and reliably insulated. A similar method is suitable for aluminum conductors.
Splicing stranded wires without twisting
Stranded wires can be spliced in the same way as single-core wires. But there is a more advanced method, in which the connection is more accurate. First you need to adjust the lengths of the wires with a shift of a couple of centimeters and strip the ends to a length of 5-8 mm.
Fluff the slightly cleaned areas of the pair to be joined and insert the resulting “panicles” into each other. In order for the conductors to take a neat shape, they need to be tied together with a thin wire before soldering. Then lubricate with soldering varnish and solder with solder.
All conductors are soldered. We clean the soldering areas with sandpaper and insulate them. We attach one strip of electrical tape on both sides along the conductors and wind a couple more layers.
This is what the connection looks like after covering it with insulating tape. You can further improve the appearance if you use a file to sharpen the solder joints on the insulation side of adjacent conductors.
The strength of connected stranded wires without twisting by soldering is very high, as the video clearly demonstrates. As you can see, the connection can withstand the weight of the monitor 15 kg without deformation.
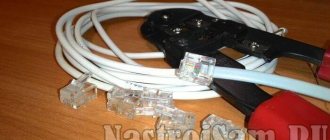
Connecting wires with a diameter of less than 1 mm by twisting
Let's consider twisting thin conductors using the example of splicing twisted pair cables for computer networks. For twisting, thin conductors are stripped of insulation for a length of thirty diameters with a shift relative to adjacent conductors and then twisted in the same way as thick ones. The conductors must wrap each other at least 5 times. Then the twists are bent in half with tweezers. This technique increases mechanical strength and reduces the physical size of the twist.
As you can see, all eight conductors are connected by twisting with a shift, which makes it possible to do without isolating each of them separately.
All that remains is to tuck the conductors into the cable sheath. Before refueling, to make it more convenient, you can tighten the conductors with a roll of insulating tape.
All that remains is to secure the cable sheath with insulating tape and the twist connection is complete.
The technology of splicing twisted pair cables is discussed in a separate article, “Lengthening twisted pair cables.”
Connecting copper wires in any combination by soldering
When connecting and repairing electrical appliances, you have to lengthen and connect wires with different cross-sections in almost any combination. Let's consider the case of connecting two stranded conductors with different cross-sections and number of cores. One wire has 6 conductors with a diameter of 0.1 mm, and the second has 12 conductors with a diameter of 0.3 mm. Such thin wires cannot be reliably connected with simple twisting.
With the shift, you need to remove the insulation from the conductors. The wires are tinned with solder, and then the smaller gauge wire is wound around the larger gauge wire. It is enough to wind a few turns. The twisting area is soldered with solder. If a direct connection of wires is required, the thinner wire is bent and then the connection is insulated.
Using the same technology, a thin stranded wire is connected to a single-core wire with a larger cross-section.
As is obvious, using the technology described above, you can connect any copper wires of any electrical circuits. At the same time, we must not forget that the permissible current strength will be determined by the cross-section of the thinnest wire.
Soldering. Connecting wires by soldering.
Soldering is a method of joining metals using another, more fusible metal. Compared to welding, soldering is simpler and more affordable. It does not require expensive equipment, is less fire hazardous, and the skills needed to perform good quality soldering will require more modest skills than when making a welded joint. It should be noted that the metal surface in air is usually quickly covered with an oxide film, so it must be cleaned before soldering. But the cleaned surface can quickly oxidize again. To avoid this, chemicals are applied to the treated areas - fluxes, which increase the fluidity of the molten solder. This makes the soldering stronger.
Soldering is also the best way to terminate copper strands into a ring - the soldered ring is evenly coated with solder. In this case, all wires must completely fit into the monolithic part of the ring, and its diameter must correspond to the diameter of the screw clamp.
The process of soldering wires and cable cores consists of covering the heated ends of the connected wires with molten tin-lead solder, which after hardening provides mechanical strength and high electrical conductivity of the permanent connection. The soldering must be smooth, without pores, dirt, sagging, sharp bulges of solder, or foreign inclusions.
To solder copper conductors of small cross-sections, use solder tubes filled with rosin, or a solution of rosin in alcohol, which is applied to the joint before soldering.
To create a high-quality soldered contact connection, the wire (cable) cores must be thoroughly tinned, and then twisted and crimped. The quality of the soldered contact largely depends on correct twisting.
After soldering, the contact connection is protected by several layers of insulating tape or heat shrink tubing. Instead of insulating tape, the soldered contact connection can be protected with an insulating cap (PPE). Before this, it is advisable to coat the finished joint with a moisture-resistant varnish.
Heating of parts and solder is carried out with a special tool called a soldering iron. A prerequisite for creating a reliable connection using soldering is the same temperature of the surfaces being soldered. The ratio of the temperature of the soldering iron tip and the melting temperature is of great importance for the quality of soldering. Naturally, this can only be achieved with the help of a properly selected tool.
Soldering irons vary in design and power. To perform household electrical work, a conventional electric rod soldering iron with a power of 20-40 W is quite sufficient. It is advisable that it be equipped with a temperature regulator (with a temperature sensor) or at least a power regulator.
Experienced electricians often use an original method for soldering. In the working rod of a powerful soldering iron (at least 100 W), a hole with a diameter of 6-7 mm and a depth of 25-30 mm is drilled and filled with solder. In a heated state, such a soldering iron is a small tin bath, which allows you to quickly and efficiently solder several multi-core connections. Before soldering, a small amount of rosin is thrown into the bath, which prevents the appearance of an oxide film on the surface of the conductor. The further soldering process involves lowering the twisted connection into such an improvised bath.
Tips that will be useful to you
If you want to be sure of the quality of the connection you made, we recommend that you familiarize yourself with the following recommendations:
- Have you twisted the wires, but the twisting does not seem reliable to you? Use soldering or welding! Such a connection will simply become unbreakable and you definitely won’t have to worry about the quality of contact between the cores. By the way, this option is most acceptable when the wire cores have a large cross-section.
- Use terminals, for example - WAGO. They will not only provide a reliable connection, but will also allow you to make it much faster. Which is also very convenient - using terminals it is quite possible to connect several wires, both with different sections, and even made from different metals. The contact will be more reliable than ever. Terminals are also an excellent option for connecting wires in a chandelier or outlet.
- Use PPE clamps. Their task is not only to make the connection reliable, but also to increase its security. In addition, such PPE caps are not at all expensive.
- Did you twist the wires together? Don't rush to hide the connection in a junction box! Let the new electrical circuit unit operate for some time. After this, you will need to check the temperature of the wires where they are connected. If you feel that the wires are heating up, you should definitely redo the twisting!
Use these tips, they will definitely not interfere with you when performing any electrical work where there is a need to connect wires to each other
What is important to pay attention to is that the above methods do not make the twist waterproof. So if you are planning to fasten the conductors in the wall under a layer of plaster (and without a box), be sure to insulate the joints with cambrics
Welding fastening
To create the most reliable connection of the conductors after twisting, they are additionally secured by welding. The technology for making such a contact is very similar to soldering, only here a welding machine is used instead of a soldering iron.
In terms of quality and reliability, the welding method fully meets all regulatory requirements for creating electrical contact.
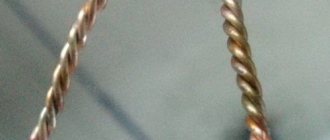
When creating a connection by welding, the conductors are twisted and their tip is welded. The resulting metal ball provides a very reliable connection of the wires. At the same time, reliability is due not only to the creation of high electrical characteristics, but also mechanical ones.
The main disadvantage of this type of wire connection is the presence of a welding machine and devices for such work. In addition, it is necessary to strictly adhere to the rules of working at height and fire safety.
Sequence of welding wires:
- We strip the conductors from insulation by 60-70 mm.
- We clean the cores mechanically (sandpaper).
- We twist the wires, and its length must be at least 50 mm.
- We fix the welding grounding contact on top of the twist.
- Lightly touch the bottom of the twist with the electrode. Wire welding occurs very quickly.
- After the contact ball has cooled, we insulate it.
As a result of such actions, an almost solid conductor is obtained, and the contact node will have the lowest transition resistance.