The further operation of the dishwasher depends on the quality of the connection and installation. Therefore, it is important not only to follow the manufacturer’s recommendations, but also to select high-quality components. The faucet for the dishwasher is of great importance. The ease of use of the PMM depends on its type. In this publication we will tell you what types of cranes there are and which one is suitable for installing equipment.
Types of taps for connecting to water supply
To connect the dishwasher to the water supply system, you need to prepare not only tools, but also components. You will need a built-in faucet, but what type will need to be figured out.
You have to choose from four options:
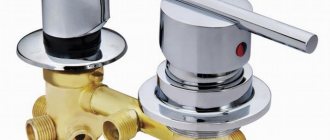
The through tee with mixer is chosen by users in 98% of cases. It is simple and easy to install. It has a standard ½-inch female thread for connecting to the water supply outlet and the same male thread for connecting the faucet. The third thread is a little larger - ¾ inch. Which is convenient for connecting the dishwasher communications.
How to choose the right tap for water supply to a dishwasher?
If you decide to give preference to a tee tap, then listen to our recommendations for choosing an element. A correctly selected part will be convenient and reliable to use in the kitchen.
- Choose products made from bronze or brass. They are more durable than plastic substitutes.
- Pay attention to the condition of the thread. Any damage will affect the quality of the connection.
- The ball shut-off mechanism is more reliable than the lever. It is less clogged with salt deposits that build up on the hole and joints over time. But it's up to you to decide.
Important! When purchasing, twist the faucet shut-off mechanism. In the event of an emergency, you will need to quickly shut off the flow without wasting time.
Which built-in faucet to choose depends on the connection diagram. If, in addition to the dishwasher, you plan to connect another piece of equipment, then it makes sense to choose a product with four outlets.
Features of connecting a dishwasher
Depending on where the dishwasher is placed in the kitchen, you will need additional accessories. Make sure the inlet hose included is the correct length. It should not be installed under tension. If the component is short, buy a replacement.
Make sure you have fum tape to insulate the connections. The most popular connection scheme with a tee tap is through the mixer taps.
How to do the work:
- close the water inlet valve;
- disconnect the mixer hose from the connection using a wrench;
- remove the old seal if present;
- Wind a new winding tape (fum tape) onto the threaded connection;
- screw on the tee;
- connect the mixer to one outlet;
- to the other - a flow filter. It will additionally purify the water from impurities of potassium and magnesium, making it softer;
- Connect the PMM inlet hose to the filter outlet;
Important! When installing a hose with the Aquastop system, look in advance at how it will be positioned. Its body is quite voluminous, so it does not always fit between the wall and the dishwasher.
- Connect the other end of the hose to the dishwasher body. The plastic nut has its own seal, so no additional winding is required.
Check the connection for tightness. Set the faucet valve to the closed position and open the water supply. Carefully inspect the connections for leaks. If necessary, tighten the nuts.
Keep in mind that using a tee is convenient when organizing one water intake point. If you additionally want to install a washing machine, then such a device will not work.
Connecting household appliances to the water supply is a task that is feasible for the average user. Buy quality components and materials. This way you will protect the dishwasher from leaks and further repairs.
Today, the popularity of dishwashers (hereinafter also referred to as dishwashers, PMM) is growing: more and more people are installing them in their kitchens. But not all owners know how to connect a dishwasher to communications.
Of course, you can call a specialist who, for a fee, will connect the new equipment to the electrical network, water supply and sewerage. But owners who have a minimum set of tools and certain skills can connect the dishwasher to the water supply and sewer system themselves. The connection is carried out in several stages, including preparatory stages. Let's take a closer look at them.
Do you need hot water PMM?
The temperature of the liquid in the PMM tank depends on the selected mode. What kind of water the dishwasher washes with is included in the algorithms. The temperature level in the water supply may exceed the permissible program norm, which can lead to damage to the sensor and other mechanisms.
Read also: Compressor check valve gasket
You can watch the process of connecting the PMM with your own hands in this video
Reviews and additional recommendations on how to connect equipment are located under the video.
After such careful preparation, you will cope with the task without any problems. Don't forget to run test mode and check communications for leaks. Good luck!
Connecting a dishwasher to water supply and sewerage is a feasible task for every person. But for this you will have to follow clear rules for installing and connecting communications. This will help you save 1.5-2.5 thousand rubles and have confidence in quality and reliability.
Choosing a location
You need to choose the location of the equipment before purchasing the PMM. If you decide to build a dishwasher into your kitchen furniture, you need to know the dimensions of the corresponding niche. It can be located under the countertop, cooking panel or under the sink .
The place to install the dishwasher should be close to the sink , which is already connected to the water supply and sewerage system. If the distance to communications exceeds 1.5 meters, problems may arise in the operation of the device.
Make sure that there is an electrical outlet . Since the dishwasher consumes quite a lot of electricity, it is dangerous to use an extension cord to operate the PMM, especially if several devices will be connected to it.
Electricity supply
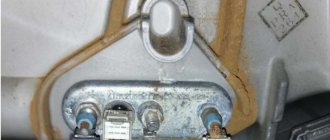
The main power in the dishwasher is consumed by a tubular electric heater (hereinafter also referred to as heating element), which heats the water to the desired temperature. During its operation, the PMM consumes from 2 to 3 kW of electricity. You can find out about this from the technical documentation or see this parameter on a sticker located on the machine body (see photo below).
In accordance with these indicators, the outlet must withstand a current of at least 16 A. Moreover, it must be located in a place to which there is easy access. There are two placement options: slightly above the furniture countertop (in the case of a built-in PMM) or in an adjacent niche, while the distance to the sink should be at least 0.5 m (due to possible water ingress). One more rule must be observed: the outlet should be located no further than 1 m from the dishwasher.
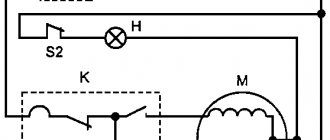
The ideal layout of communications is shown in the figure below, where:
- PMM housing.
- Area of connection to the electrical network.
- The area where the PMM connects to the water supply system.
- Drainage area.
A dedicated line must go to the outlet from the distribution panel. If it is not laid, and the apartment has already been renovated, run the wire along the wall and cover it with a decorative box. At the same time, the appearance of the interior will not be affected. The same line can be used to connect a washing machine, provided that it does not turn on at the same time as the PMM.
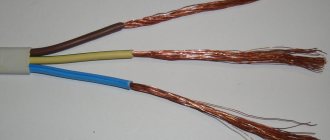
For installation, you need to use a cable with stranded copper conductors (for example, brand VVG-nG-Ls) with a cross-section of 2.5 mm 2. A residual current device (hereinafter also referred to as RCD) must be present, along with circuit breakers that operate at a current of 16 A. By the way, RCDs and circuit breakers can be replaced with one differential circuit breaker.
The need to install these devices is due to the fact that there is a danger of a short circuit in the electrical network with water and electric shock to people.
Parameters of the protective device: 25 A, shutdown current - 10 mA. You can use an RCD with 16 A and 30 mA leakage current. The connection is performed in the same way for PMMs of a wide variety of brands: Bosch, Siemens, Electrolux, Indesit, Whirpool and others.
Instructions for connecting to the water supply
As a rule, flexible hoses from pipes with hot and cold water go to the mixer tap located in the sink. That is why the most convenient way to connect the PMM is located in the place where such a hose is connected to the water main. Otherwise, you will have to make a tap into the pipe using a tee or a manifold with two bends and taps. When connecting a flexible hose to a water supply, a tee with a shut-off valve must be installed under the sink.
A shut-off valve in the tee is necessary so that you can quickly stop the water supply in case of an emergency. Since most PMM models only require cold water, one tee will be required.
For work, you should prepare the following tools and materials:
- a tee with a built-in faucet, made of brass or bronze, with a thread diameter of 3/4 inch (this diameter is suitable in most cases);
- inlet coarse filter (if one is not included in the dishwasher kit);
- fluoroplastic sealing tape (FUM tape);
- adjustable wrenches;
- sharp knife.
If the kitchen already has a washing machine or plans to install one, the tee should be replaced with a manifold with two outlets with the same diameter (3/4 inch) and two shut-off valves (see photo above). In addition, some PMM models are equipped with inlet hoses that are too short, a little more than a meter long. If this length is not enough, you will have to buy a new hose from a specialized store.
To properly connect the dishwasher to the water supply with your own hands, the work should be done step by step, in several stages:
- Shut off the water supply to the apartment.
- Disconnect the flexible hose supplying cold water to the faucet from the water supply pipe.
- Connect the water pipe to the inlet of the tee or splitter by first winding FUM tape onto the thread.
- Connect the outlet of the tee or manifold to a flexible hose going to the mixer. Don't forget to use FUM tape.
- Connect the filter and dishwasher inlet hose to one of the side outlets.
- If you have a washing machine, connect its inlet hose to the second outlet of the splitter.
- Check the tightness of all connections by supplying water to the main line.
This completes the connection of the dishwasher to the water.
Sometimes the situation does not allow installing a PMM near the sink. In this case, you have to crash into the water pipe. If it is made of metal-plastic, there will be no difficulties. It is necessary to cut out a piece of pipe and install a tee or manifold with press fittings in its place to ensure a reliable connection.
There is no need to cut the metal pipe - just put a clamp with an outlet on top and drill a hole in the pipe through the outlet. This connection is also reliable.
Connecting the water supply
Most dishwashers are designed to work with water up to +250C from a cold water tap. However, some models can also be connected to hot water supply. This point should be looked at in the instructions for the purchased equipment. But in any case, the connection process is the same, only the pipe (DHW or cold water) changes.
Step-by-step instructions for connecting a dishwasher
Connecting the dishwasher to the internal water supply is done:
- under the kitchen sink faucet;
- in the toilet to the outlet from the riser.
The first option is preferable; it is easier and faster to install. Plus the second is not always possible due to the limited length of the existing water hose that comes with the PMM kit.
Features of connecting the dishwasher to the water supply
The existing outlet from the machine may not be enough to properly connect the dishwasher to the riser located in the bathroom. And this hose cannot be made additionally as flexible. Another nuance when choosing the second method is the need to drill a hole in the wall between the kitchen and the toilet. But this is extra work and dirt.
Through the mixer and water supply pipes
If the distance between the water supply point and the equipment is large, then it is better to lay a new plastic pipeline. Otherwise, the technology for connecting the dishwasher to the water supply is the same in both cases.
Required pipe sizes and standards for connecting a dishwasher
The process of connecting the PMM to a water pipeline is as follows:
- The hose (pipe) located there is unscrewed from the mixer or riser pipe.
- A tee with a shut-off valve on the branch to the dishwasher is installed in this place.
- The outlet from the dishwasher and the previously removed hose (shortened pipe) are connected to the tee.
If, in addition to the dishwasher, you also need to connect a washing machine and a water purification filter, then instead of a tee it is better to use a manifold with several branch pipes. In this case, each branch will have its own tap, so that, if necessary, you can disconnect a separate device from the water supply. And don’t forget about using FUM tape or tow. All hoses now have rubber gaskets, but additional sealing directly on the threads would not hurt.
Taps and tees for connecting a dishwasher
The tee can also be cut directly into the water pipe running under the kitchen sink. But this method is quite complicated, especially if the pipeline is steel. It will be a little easier with a plastic analogue. However, the easiest and most reliable way is to connect to a mixer or riser.
Video
After watching the video, you can learn more about how to connect a dishwasher yourself:
Electronic engineer with many years of experience. For several years he was involved in organizing the repair of household appliances, including washing machines. Loves sport fishing, water tourism and travel.
Found a mistake? Select it and click the buttons:
In the 19th century, washing ladies' toilets took a lot of time. The dresses were first ripped open, and then each part was washed and dried separately so that the fabric did not become deformed. After washing, the clothes were sewn again.
For washing small items on the road or in a hotel, it is convenient to use a regular plastic bag. Socks or tights are kneaded inside a tied bag along with water and a small amount of detergent. This method allows you to pre-soak things and wash them without damaging the fabric or wasting a lot of powder and water.
There are a variety of balls that are used in the washing machine. Antistatic ones will prevent the fabric from sticking to the body after washing, balls with special loops will “comb” the lint and prevent the appearance of pills, and silicone ones with pimples will prevent fluff from matting when washing outerwear.
The expression “soap opera” (“soap”) did not arise by chance. The very first series and shows that had a female audience were broadcast on television at a time when housewives did cleaning, ironing and laundry. In addition, to attract female viewers to the screens, commercials for detergents: soaps and powders were often played on air.
There is a washing machine “for bachelors”. Linen washed in such a unit does not need to be ironed at all! The thing is that the device does not have a drum: some things can be placed inside the container directly on hangers (for example, jackets and shirts), and smaller things (for example, underwear and socks) can be placed on special shelves.
History knows the fact that a kitten fell into the drum of a washing machine and, after going through a full wash cycle on the “Wool” program, got out of the unit unharmed. The only trouble for the pet was an allergy to washing powder.
The first officially patented washing machine was made of wood and was a box with a frame, half filled with wooden balls. Laundry for washing and detergent were loaded inside and the frame was moved using a lever, which, in turn, made the balls move and grind the laundry.
Astronauts, while in Earth orbit, solve the problem of dirty things using an original method. Clothes are dropped from the spacecraft and burn up in the upper atmosphere.
Washing machines have something to do with the origin of the expression “money laundering.” In the 1930s, American gangsters used a network of laundries as a cover for their illegal activities. By passing off the proceeds of crime as proceeds from cleaning clothes, they turned “dirty” money into “clean” money.
Correctly and securely connecting the dishwasher to the water supply is very important, especially if you live on the top floor of an apartment building. To organize the connection of the “iron assistant” conscientiously, it is necessary not only to select the correct connection diagram, but also the appropriate components, in particular a tap, tee, couplings, clamps, etc. There are no trifles in such a matter; a small leak formed due to a weak connection can result in expensive repairs in your neighbors’ apartment at your expense.
Features of connecting a portable dishwasher
Having purchased a portable appliance, the question will definitely arise of how to install a dishwasher of this type. In this case, everything is much easier, because the dishwasher circuit is simpler. Its advantages:
- There is no need to search and select a niche, set it clearly according to the level. In such a device, adjustment is extremely simple, and the tabletop is often even.
- The socket for a dishwasher can be a regular kitchen one, without the need to install an additional one; of course, it must be “Euro” with grounding.
- There are no problems with draining water from such a dishwasher. The hose simply drops into the sink, in this case it will not fly out anywhere, and this arrangement does not affect the pump or its proper operation.
- The drain will flow by gravity, which will relieve the pump.
- Installing a countertop dishwasher does not require any intervention at all in the existing sewer system.
The process of connecting a dishwasher is quite simple, you just need to perform all actions carefully and clearly according to the instructions.
Thought you bought a dishwasher and could use it right away? What about installation and connection of equipment? Many people think about calling a professional to carry out the work. Don’t rush to spend money - we’ll tell you how to properly connect your dishwasher to the water supply.
Read also: Homemade frame for a mini tractor
Which faucet to choose: general recommendations
Let's start with the fact that when organizing the connection of the dishwasher to the water supply through a mixer or bypass, you need to think not only about the quality of the taps, but also all components without exception, including hoses, the pipes themselves and those elements that ensure the normal functioning of the plumbing system. Most often, when connecting a dishwasher, craftsmen use a so-called tee, which has a built-in faucet, in other words, a tee faucet. There are general recommendations for purchasing such a crane.
- Do not buy a tee tap (or another type of tap) made of plastic or silumin. Nowadays there are both brass and bronze taps on sale - they are much better and will last longer.
- When buying a tee tap, check the integrity of its thread. Even the slightest chips and gouges on the edge of the thread should alert you.
- Pay attention to the water shut-off mechanism. Experts say that it is better to take a faucet with a ball-type shut-off mechanism, as it is much more durable and reliable.
- The appearance of the faucet does not matter, because it will be hidden, but ease of use plays an important role. If the tap has an inconvenient shut-off valve, you will not be able to quickly turn off the water in the event of an accident and, as a result, minimize the damage. Therefore, before purchasing, inspect the faucet, turn its valve, make sure that it turns easily and conveniently.
Note! The ball-type water shut-off mechanism lasts longer because it is less susceptible to the mineral deposits in the water that settle on its interior over time.
What type of faucet you will have to choose will depend on the developed connection diagram for the dishwasher. In our opinion, the simpler the diagram, the better, but there are all sorts of situations, so we decided to look at possible connection diagrams a little later, but first, let’s talk about the types of taps and other components that can be used in this case.
Connection procedure
To complete all stages efficiently, you need to know their correct sequence, have all the tools, materials and shut-off valves available. The procedure for installing the dishwasher is as follows:
- Connecting the dishwasher to the sewer.
- Connecting the water hose.
- Connection to a Euro socket with grounding.
- Test run.
- Installation in a prepared place.
In the instructions you can find an option where the water supply is connected first, and then the connection to the sewer - but this order is extremely inconvenient.
Note! Before connecting the dishwasher with your own hands, you need to give it time to stand in the installation room for at least 24 hours, and only then begin work.
Tools, fittings, consumables
A stock of all necessary materials for connection is the key to proper work. Among the tools for proper installation, you need:
- Screwdriver.
- Pliers.
- Adjustable wrench.
- Consumables – fum tape.
- Drain siphon for connecting a dishwasher.
- ¾ inch tee. You need to use metal-plastic, bronze, brass. There are cheap silumin ones on sale, but they break very quickly, literally falling into pieces.
- Coarse filter. You can connect the machine without it, but it is unlikely to work for a long time, since the device depends on the quality of the water. If its breakdown occurs during the warranty period, you will still have to pay for repairs, because all installation rules were not followed.
- Ball valve.
- Hank connecting pipe.
Read also: Edge router Makita RT 0700cx3
Possible difficulties
The installation instructions presented are suitable for most dishwashers, but some examples, including well-known brands, have their own specific process. Namely:
- The Bosch dishwasher must be carefully connected to the water supply, as it is picky about the location of the sealing gaskets. If you install them incorrectly (on the wrong side), then after just a few cycles the dishwasher will begin to leak. This is because Bosch has a rather sensitive valve responsible for the water supply; a flow filter is required.
- Siemens are the most unpretentious in connection, but an important aspect is the correct preparation of the niche for installation. The option of how to connect a dishwasher to the sewer and water supply system is described in detail in the instructions; you don’t need to invent anything.
- As for the Electrolux brand, their dishwashers are very sensitive to the angle of inclination. When setting the device level, a difference of more than 2% should not be allowed. To achieve such accuracy you need a building level.
To ensure smooth drainage of the dishwasher, the following requirements must be met:
- The upper bend - it will not allow sewage from the sink into the dishwasher, a kind of check valve.
- The lower elbow - it creates a water seal, similar to what is in any sink or toilet. The dishwasher is connected for the purpose of washing dishes in it; there is no need for sewer odors inside the enclosed space of the appliance. In order for the water seal to retain odors well, the lower elbow must be deep and its bend extremely short.
The solution to draining the drain into the sink is not the best in this case. The first reason is spontaneous sliding off the side of the sink. Another problem is the increased operation of the dishwasher pump, which will lead to its rapid wear. He will have to pump wastewater to a height that is too high for him.
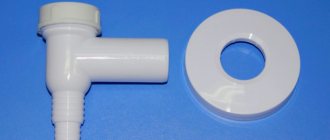
To make the connection convenient and suitable for technical aspects, it is best to use a dishwasher siphon, which is installed under the sink.
Important! The drain hose for a dishwasher is often included in the kit; it is highly undesirable to increase its length by adding additional parts.
The procedure for connecting the drain for a dishwasher:
- Connect the drain hose to the dishwasher.
- Remove the plug from the siphon that closes the “entrance”.
- Connect the drain hose to the siphon. A rubber seal or clamp must be used.
- Check the connections for tightness.
The diagram for connecting a dishwasher to a sewer is extremely simple; the main thing is to maintain the height of the insertion, otherwise you can quickly damage it.
The water supply hose must be connected correctly, otherwise the dishwasher will not work. The question may arise as to which water to connect to: cold or hot. Answer option 2:
- To cold, if energy costs for heating water are not important.
- Go hot if you want to save money. This is the option recommended by the manufacturers.
But connecting a dishwasher to hot water is not as straightforward as it seems. The first important point is its quality; if it is from a centralized city network, then the quality of hot water is worse than that of cold water. The second point is that you can safely use hot water only if it comes out of a boiler that has a filter and is regularly cleaned.
The dishwasher connection diagram is as follows:
- Turn off the water.
- Disconnect the henka from the cold pipe, remove the old fum tape.
- Connect the tee. Water for washing and a pipe from the dishwasher will be connected to it. Be sure to install a ball valve between the supply pipe and the tee.
- Be sure to use fum tape to seal the joints.
- Check for leaks by turning on the water.
Note! The amount of fum tape should be sufficient, no more and no less than needed. It will take approximately 10-15 turns around the thread.