05/17/201606/26/2016 master
Today, many people prefer to live not in cramped apartment buildings, but in private houses. When choosing this type of home, you need to remember that there are certain nuances here that relate to both the exterior design of the house and the interior decoration. Particular attention should be paid to the outdoor lighting system and the selection of suitable lamps.
When installing an outdoor lighting system, you must remember that according to the requirements of the Electrical Installation Rules (ELR), such lamps must be grounded. The PUE requirements are the first thing a person who decides to install such lighting devices on their site should know. Today's article will tell you about everything that is important to know when creating a street type of lighting and its further grounding.
System Features
An outdoor lighting system is a very important component in any locality, as well as on a private plot. Especially if it is rather large in size. Street lighting created using special types of lamps is required to perform the following functions:
- creating the required level of illumination for the visiting part;
- sidewalk lighting;
- ensuring the required level of illumination in the territory, near fences and other barriers (for private houses);
- creation of a unified lighting and signaling system. A motion sensor and other elements of security systems are used here.
Note! A unified lighting and alarm system is very often used for private cottages and summer cottages.
Road lighting
In order for outdoor lamps to work efficiently and for a long period of time, it is necessary to follow the requirements of the PUE. In this case, protective grounding of lamps is of great importance. To make proper grounding, you need to clearly understand this whole process. Therefore, a big role here is given to the protective function of outdoor lighting elements.
Note! For street meetings, any type of lamps and different power sources can be used. However, they must meet certain requirements to work outdoors.
Most often, outdoor lamps are installed on metal or reinforced concrete supports that stretch along roads and mourning roads. Recently, metal poles have been increasingly used to organize outdoor lighting. This is due to the following advantages of these types of supports:
- Possibility of use in different climatic zones;
- such supports can withstand large static loads;
- have a beautiful and aesthetic appearance;
- service life is longer than that of reinforced concrete structures;
Note! Metal outdoor lighting poles can last up to 75 years! Of course, provided that they, like the lamps installed on them, have high-quality grounding, carried out according to the standards established by the PUE.
- versatility. Any street type lamps can be installed on them.
Metal supports on roads
When using lamps on metal supports, you need to know that their improper protective grounding (or, moreover, its absence) can lead to serious electrical injuries to a person who simply touches the support. And since such structures are installed throughout the city, not only adults, but also children can suffer.
Checking with a voltmeter
For another check of the ground bus, you will need to purchase a voltmeter with an arrow or an electronic one. Here we need a simple device.
Testing with a voltmeter is considered reliable, because the device measures voltage, current, and resistance. Therefore, it will come in handy if you constantly have to perform such actions.
The voltmeter is placed in a convenient bag-case that can be hung on your shoulder while checking
Checking grounding using a pointer voltmeter looks like this:
- Switch the appropriate voltage mode.
- Set the measuring range to 700 V.
- Connect the terminals of the device to the contacts of the selected socket.
- Record the obtained values.
- Connect one terminal to the grounding contactor.
- Now connect the other terminal to the contactors one by one.
- The resulting values should again be written down.
The final values will need to be compared after verification. If the numbers obtained after two checks are greater than what was in the fourth step, then you don’t have to worry - the tire is functioning. If these readings do not differ, most likely there is no “ ground ”.
According to the experience of many users, another device is considered convenient - an electronic voltmeter. After all, it immediately displays the resulting value in numbers. However, experienced professionals do not recommend using it because it is inferior in accuracy.
Readings are displayed on the screen
Voltmeter prices
Voltmeter
The method of using a pointer and electronic voltmeter is no different. In the second case, you will also need to connect the terminals to the contactors. The only difference is in the way the indicator is derived.
Video - How to check grounding in a private house
What to consider
When using outdoor lighting on metal supports, grounding plays a key role in ensuring the safe operation of lamps. And this part of the PUE is regulated. When installing external lighting, you need to rely on the following points of the PUE:
Grounding the luminaire
- on all types of lamps used in outdoor lighting systems, protective grounding is mandatory and there are no exceptions;
- Grounding is organized using special grounding devices. These devices are designed for re-grounding, as well as protection against lightning surges and grounding of electrical equipment (luminaires) that will be mined on supports;
- the resistance that the grounding device must have is no more than 30 Ohms;
- Protective grounding for metal housings of local lighting lamps with voltages above 50 V involves the use of protective conductors. They are attached to the metal structure on which the lamp was installed. And a reliable electrical connection must be created for the bracket and the housing;
- for lamps, as well as for supports, grounding against atmospheric voltage is necessary;
- the total spreading resistance for grounding conductors (of any type) using reused PEN conductors should be within the range of no more than 5, 10 and 20 Ohms (depending on the line voltage).
PUE standards are developed for different situations, but have more or less universal application.
Helpful information
Grounding lamps, like supports, is one of the stages of installing outdoor lighting. Installation of grounding is the most important and mandatory stage in the installation of an external lighting system. The installation of this system itself has several stages.
Note! In order to properly ground the lamps to the support structure, it is necessary to strictly adhere to the rules and regulations that are prescribed in the PUE. This will avoid breakdown in the insulation of the power cable and prevent electrical injury.
Outdoor lighting installation
According to established instructions developed for the arrangement of grounding networks, all metal supports, without exception, that are elements of an external lighting system are subject to mandatory grounding. The principle of grounding is that if there is a violation of the insulation of the electrical wiring of the lamps, the electric current begins to flow into the ground. As a result, a voltage distribution will occur in the area where the electric current spreads, which will become harmless to humans. The voltage distribution depends on the resistivity of the soil, as well as the placement of ground electrodes on the supports of the street lighting system.
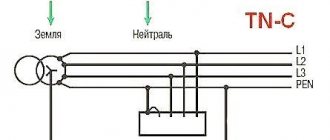
Is grounding necessary for lighting: what is specified in the PUE?
The latest edition of the PUE in paragraph 7.1.36 states the following:
It follows from this that when installing a chandelier or lamp in an apartment, a three-core cable must be connected to it, one core of which will be the ground. Grounding must continuously come from the shield. If we connect a lamp through a plug (for example, a sconce), then it is enough that the socket is grounded.
However, you need to be honest here - almost all old apartments have a two-wire network, and there is no grounding conductor connected to the chandelier. And the chandelier itself does not have a grounding contact (modern devices already have a third contact for connecting the grounding). Replacing a two-wire network with a three-wire one (for single-phase networks) is often not possible (too expensive or you don’t want to spoil the repair). How to protect yourself in this case?
Connection options
Grounding device
First option. If street lighting and luminaires are installed in networks that have an insulated neutral, grounding of metal structural elements (reinforcement of supports with a hook, pins, etc.) occurs using special grounding devices. They consist of the grounding conductor itself, as well as grounding conductors.
Grounding electrodes are special elements made of metal. They are placed in the ground. Grounding conductors can be in the form of vertical rods or horizontal steel strips. When installing vertical grounding conductors, they should be placed in the ground to a significant depth (up to 3 meters). As a result of installation, the upper part of this rod should be located at a distance of 0.5 meters from the soil plane. The same depth is used when installing horizontal steel strips. Such ground electrodes are often used in rocky soils. But grounding conductors are used to connect grounding conductors. They must have a minimum diameter of 6 mm. Grounding conductors and grounding conductors are connected to each other by welding. The place of such a connection must be painted. Second option. There are situations when outdoor lighting and luminaires need to be installed in networks with a grounded neutral. Then all metal structural elements (pins, hooks, fittings, etc.) should be grounded by connecting them to the neutral working wire. This lamp connection is usually carried out using a special bolt, which is welded to the support.
Grounded lamp on a pole
Grounding for lamps placed on metal supports to create street lighting with cable power is carried out using the following methods:
- in networks where there is an insulated neutral, a metal sheath should be used for the cable. The connection here occurs to the grounding screw on the luminaire body through a protective conductor;
- in networks where there is a grounded neutral, a neutral conductor is used. It is connected to the cable sheath. The luminaire body is connected through a special grounded screw and a PE conductor.
These methods are suitable for connecting all types of lamps. After all electrical installation work has been carried out, it is imperative to measure the resistance of the installed grounding device. To do this you need to use a special device. According to its indicators, the resistance should not be higher than 50 Ohms. Compliance with resistance indicators is especially important for open areas that are located away from buildings. This is due to the fact that such outdoor lighting poles very often become the site of lightning strikes. And here, without grounding, overvoltage may occur throughout the entire network. And this, in turn, can lead to various serious consequences.
Is grounding necessary for the chandelier? How to do it?
When designing an apartment's electrical network and installing a chandelier, it is necessary to take into account many important points and resolve several issues. One of them is grounding. This operation is not used so rarely, and for each individual case there is an answer with an explanation to the question of whether it is worth grounding the chandelier.
What is grounding
First of all, it is worth understanding what grounding is. The scientific formulation is limited to the fact that this is a procedure for connecting any electrical appliance to a grounding device. On the plan and in practice, everything looks quite simple: the “ground” (i.e. soil) will attract electric current to itself, reducing the network load.
This way you can achieve a lower voltage - otherwise a person will only be able to touch the chandelier once. The ground electrode itself will be located in the ground, which will act as a conductor for the current. The quality of the established connection is determined by calculating the resistance to current flow. This indicator can be improved by increasing the area on which the grounding electrodes are located or reducing the soil resistance in a separate area.
Is it worth grounding a chandelier?
Firstly, not all chandeliers (and, in principle, lighting sources) can be grounded, but only those that have a metal casing. The wiring connected to them is made using modern technologies and should be well protected. It is worth connecting the ground electrode for safety - it does not matter whether the room is dry or wet.
Connecting the “earth” is necessary in a new or reconstructed house, but it will not be superfluous for an old building either. By “closing” the chandelier, you can secure the room - since the voltage in the electrical network will decrease, the room will be completely safe. There is one more nuance - compatibility with automated fire protection systems. If such a system is connected, be sure to ground it.
Preparing to connect the ground to the chandelier
It is important to devote enough time to the preparatory stage - to collect the necessary tools, and also to prepare thoroughly. The tools you will need when grounding a chandelier include:
- A stepladder is a fairly high and strong support that will not wobble under your feet. You can find an analogue;
- A millimeter is a device that measures the voltage and resistance of an electrical circuit, as well as current;
- Knife – for adjusting the length of wires;
- Pliers;
- Indicator screwdriver - you should lean it against the points you are going to touch to make sure there is no current;
- Phillips and flat head screwdriver;
- Insulating tape;
- Pencil;
- Wire terminals.
After this, you should carefully read the diagram that comes with the chandelier. This diagram will show all the branches, the order in which the wires are connected, and the connection to the switch. For example, if three different wires are connected to a chandelier, it is described in detail how the outputs are divided and how the lamps are connected.
The situation is different with grounding: the diagram may not contain information about the corresponding PE type wire (it is yellow-green). The other two - L (phase, brown or white) and N (zero, blue), will be marked and marked, which will make the procedure for installing the chandelier extremely simple.
The procedure for grounding a chandelier
In order to connect the “ground” to a chandelier that is already installed, carry out the following steps as reconnaissance:
- Remove the light bulbs. Bare the outgoing wires.
- Set the dial mode on the multimeter.
- One probe should lie on the side contacts of the light bulb socket, and the second probe should be passed alternately along the protected ends. If you hear a signal, then there is a zero terminal in place. This conductor must be marked with a marker.
- Next, place the probe to the central contact of the cartridge. Also “ring” the remaining signals to mark the phase.
- The first probe is for the phase, the second is for the middle contacts. If the signal comes from all cartridges, the lamp is single-circuit, then the third wire can be used for grounding.
- If there is no sound, then the device is double-circuit, the second wire is “phase”.
When installing, the grounding steps for ceiling lights should be as follows:
- Find the ground symbol on the back of the lamp housing.
- Use an indicator screwdriver to determine phase and zero. The phase will cause the screwdriver to “light up”.
- Install the grounding wire ring onto the core and secure with a nut.
- The third wire (yellow-green) is insulated. This is how grounding is performed, the main task of which is to “block” the current path through the metal body of the lamp.
- Connect all three wires to the “horns” - this is the name given to the wires coming out of the ceiling.
Visual instructions for installing the “ground” for a chandelier are shown in the video: