In apartment buildings, outlet locations are one of the main sources of extraneous noise. This problem is typical for large-panel high-rise buildings, where electrical points of adjacent apartments are mounted in through holes in wall panels. This drawback can be eliminated without moving the outlet by soundproofing it.
You can get rid of acoustic noise that penetrates from neighboring rooms through the installation sites of electrical points in various ways:
- by replacing the socket with an overhead one;
- by installing a soundproof socket box;
- using a soundproof box;
- soundproofing the existing socket hole with special materials.
Removing the socket for soundproofing
The use of overhead sockets does not require a mounting hole in the wall, which is the main reason for the passage of extraneous sounds. The outlet of the electrical wiring is sealed, and the socket box is screwed to the wall with self-tapping screws. Overhead options are widely available for sale at an affordable price, but have a specific appearance and may not fit into the design of the room.
Soundproof socket boxes (inserts like “SoundGuard” or “TichoBlock”) are a square or rectangular block about 50 mm thick with cutouts for installing sockets. The frame of the socket box is made of multilayer cellular cardboard, which is filled with quartz sand and silicone filler. Such socket boxes provide a high level of noise insulation, but require careful installation. The cost of a SoundGuard soundproofing insert with a socket for one socket is about 1,500 rubles.
Specialized soundproofing boxes for installing sockets are cylindrical in shape and have the following dimensions:
- diameter from 65 to 70 mm;
- depth from 45 to 65 mm.
They are made of non-flammable materials that provide sound insulation at a level of 36 - 38 dB. Such solutions, predominantly foreign-made (for example, LeGrand, France) are expensive and are not widely used in the domestic market.
A more acceptable method of eliminating noise penetrating through electrical points is to fill the hole behind the socket box with various building materials. The choice of specific soundproofing technology depends on the thickness and material of the wall.
Traditional means for sealing rosette niches are mortar, gypsum plaster, alabaster or putty. However, there are more technologically advanced solutions that provide effective sound insulation with less labor:
- basalt wool and basalt cardboard;
- drywall;
- soundproof vibration-absorbing membranes;
- loaded vinyl.
Basalt wool and cardboard
Basalt (stone) wool is a fibrous sheet made by melting basalt rock and then pressing it. Basalt wool is durable, chemically inert and non-flammable. The fiber structure of the material provides reliable protection from extraneous noise. There are options for basalt wool with an additional foil layer. The material is produced in the form of slabs and rolls with a thickness of 20 to 200 mm. The products of the following manufacturers are popular:
Basalt cardboard is a sheet material 5–10 mm thick made of stone fiber with hydrophobic and binding additives. Basalt cardboard is a common material for the industrial production of sound-absorbing panels. The material is not subject to ignition: the sintering temperature of the fibers is 1100°C, so it can be used without restrictions in the area of any heating devices and electrical wiring.
The best soundproofing effect is achieved by using several layers of basalt cardboard with layers of gypsum fiber sheet.
Soundproofing methods
There are three ways to soundproof sockets and junction boxes:
- Transfer.
- Replace the built-in one with an overhead one.
- Use specialized materials and means for sound insulation without transfer.
Let's look at the main methods and what materials can be used to soundproof sockets in an apartment from neighbors.
Basalt wool and cardboard
Basalt (stone) wool is a fibrous sheet made by melting basalt rock and then pressing it. Basalt wool is durable, chemically inert and non-flammable. The fiber structure of the material provides reliable protection from extraneous noise. There are options for basalt wool with an additional foil layer. The material is produced in the form of slabs and rolls with a thickness of 20 to 200 mm. The products of the following manufacturers are popular:
- Rockwool;
- Knauf;
- TechnoNikol.
Basalt cardboard is a sheet material 5–10 mm thick made of stone fiber with hydrophobic and binding additives. Basalt cardboard is a common material for the industrial production of sound-absorbing panels. The material is not subject to ignition: the sintering temperature of the fibers is 1100°C, so it can be used without restrictions in the area of any heating devices and electrical wiring.
The best soundproofing effect is achieved by using several layers of basalt cardboard with layers of gypsum fiber sheet.
Soundproofing an outlet using a solution
The density of the mortar is similar to concrete. You can take a handful of the prepared mixture, dilute it in water, and in several steps create a reliable cement bridge between the boxes. But first, you need to install some kind of thin hard lining made of cardboard or plastic into the depth of the hole, otherwise the water will cause a short circuit in the neighbors’ network.
The solution is cheap and effective, but long-term. Even alabaster mortar needs several hours to harden.
Corrugated cardboard is a material that is always at hand in the form of packing boxes. The thickness of three-layer corrugated cardboard is 1.1 – 3.4 mm, five-layer – 5.5 – 7.0 mm. Corrugated cardboard is quite fireproof: its combustion temperature is 258°C. This is the easiest and free solution to the problem.
As a solution for soundproofing an outlet, you can use a cement or gypsum mixture, as well as a mixture of alabaster and water.
- Using a circular knife or scissors, cut 3-4 circles with a diameter 1 mm smaller than the hole in the wall. The total thickness of the cardboard/plastic spacers should be at least 5mm less than the gap between the sockets.
- Insert the circles into the depth of the rosette niche. You can fix them along the edge with silicone high-temperature (up to +300°C) sealant.
- Prepare a solution in a volume of approximately 1/2 cup, coat the washer and the walls of the hole.
- Thread the ends of the wire into the mounting socket.
- Place the glass in the hole.
- After the solution has dried, insert and clamp the ends of the wires into the socket terminals.
- Bend the wires so that the block fits evenly in the box.
- Secure the socket in the socket box with screws and adjust it to the level.
- Install the trim panel.
Don't miss: Black mold in the bathroom: how to get rid of fungus, review of products
Soundproofing membranes
Builders consider membranes to be an excellent soundproofing material. This is a polymer roll material with a thickness of 2-13 mm. This layer has a sound insulation index Rw of 28 dB. On several layers the indicator increases. For comparison, for mineral wool 50 mm Rw = 52 dB, for foam concrete 200 mm Rw = 43 dB.
For insulation, cut several circles from the membrane. They do not need to be fastened together, but rather laid one at a time. The elastic, semi-rigid material is held in place by itself.
Plasterboard and gypsum fiber sheets
Sheet plasterboard (GKL) consists of a layer of gypsum with organic additives and humectants, which is glued to a cardboard base. To soundproof sockets, plasterboard coated with a special fire-resistant compound is used.
Gypsum fiber sheet (GVL) is a composite material made of gypsum and cellulose fibers, pressed into a homogeneous structure. The GVL surface is sanded and treated with moisture-resistant impregnations. GVL is resistant to fire without additional coatings.
Both types of material are easy to process and install, and are also environmentally friendly. The most common sheets are 10 - 12 mm thick. Due to the dense structure of gypsum boards and gypsum fiber boards they provide reliable noise insulation.
Membrane materials
Soundproofing membranes based on mineral filler with a polymer binder provide reliable protection against extraneous noise. The most famous varieties include:
- "Texound";
- "Front acoustic";
- "SoundGuard".
The membranes are made of elastic and flexible material that is resistant to fire. To create a comfortable acoustic atmosphere in a room, a membrane layer 3–5 cm thick is sufficient. Membranes can be used either as an independent solution or in conjunction with other soundproofing materials.
Loaded Vinyl
Loaded vinyl is a flexible and elastic soundproofing material based on barium sulfate.
With a canvas thickness of within 3 mm, it is characterized by significant mass (about 5 kg per m2). Loaded vinyl is non-flammable, moisture resistant and can stretch almost twice as long without damage. Laying vinyl in two layers, with a total thickness of about 6 mm, provides complete protection against unwanted sounds.
Plasterboard and gypsum fiber sheets
Sheet plasterboard (GKL) consists of a layer of gypsum with organic additives and humectants, which is glued to a cardboard base. To soundproof sockets, plasterboard coated with a special fire-resistant compound is used.
Gypsum fiber sheet (GVL) is a composite material made of gypsum and cellulose fibers, pressed into a homogeneous structure. The GVL surface is sanded and treated with moisture-resistant impregnations. GVL is resistant to fire without additional coatings.
Both types of material are easy to process and install, and are also environmentally friendly. The most common sheets are 10 - 12 mm thick. Due to the dense structure of gypsum boards and gypsum fiber boards they provide reliable noise insulation.
Membrane materials
Soundproofing membranes based on mineral filler with a polymer binder provide reliable protection against extraneous noise. The most famous varieties include:
The membranes are made of elastic and flexible material that is resistant to fire. To create a comfortable acoustic atmosphere in a room, a membrane layer 3–5 cm thick is sufficient. Membranes can be used either as an independent solution or in conjunction with other soundproofing materials.
Soundproofing sockets in the apartment
Soundproofing of sockets in an apartment is carried out as follows:
- on the landing, the switch of the electrical panel is turned off to eliminate the possibility of electric shock during repairs;
- the decorative lining of the outlet is removed;
- use a screwdriver to unscrew the screw fasteners;
- the socket body with attached wires is removed from the wall;
- the electrical wiring is disconnected from the outlet and taken to the side;
- the plastic socket box is dismantled (if any);
- the installation niche is cleared of construction debris.
The hole is then insulated with the selected material. When carrying out work, it is necessary to ensure that the free space in the wall is densely filled and the joints and cracks are reliably sealed. When soundproofing a through niche, you must be careful not to damage or short circuit the electrical wiring of the neighboring apartment.
Before reinstalling the socket, it is recommended to check the condition of the wires and, if necessary, restore their insulation. If the work was carried out using mortar or plaster, you should wait until the composition has completely dried before turning on the power supply to avoid a short circuit.
Features of installation of sound insulation
The source of noise in modern or old houses is the holes made when installing sockets. You can verify this by raising your ear to them. The reason for this phenomenon is the way of wiring in houses and installation of sockets. According to approved standards, multi-apartment buildings provide for the creation of through holes in the walls for the subsequent installation of sockets in two adjacent apartments at once. Soundproofing pads in this case are used in 5% of cases.
That is why the homeowner in the future is faced with increased audibility in the apartment. Carrying out soundproofing work will help correct the deficiency, which you can do yourself, following the advice.
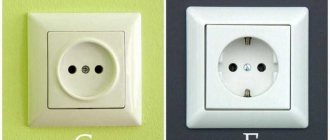
Surface-mounted socket - standard option for apartment buildings
Why do you need soundproofing of sockets?
Soundproofing sockets is necessary in order to:
- reduce sounds and noise;
- avoid the penetration of tobacco smoke into the room;
- establish air circulation;
- prevent unpleasant odors from entering;
- reduce the concentration of allergens in the room.
Microbes also penetrate into the apartment or adjacent rooms in private houses through through holes. Carrying out work on installing soundproofing materials will reduce negative manifestations.
Work methods
Soundproofing work can be carried out in three ways:
- move the built-in socket (you will need to find the optimal location);
- install a surface-mounted socket (or replace a previously built-in one with a surface-mounted one);
- install a soundproofing layer under an existing outlet without replacing or moving it.
The relocation of the socket is also carried out during renovation work - this method is optimal for new buildings. It is used when changing the existing space - zoning a room or remodeling it. Relocating the sockets allows for improved ergonomics and increased comfort.
How to install the overlay element
Installing a surface-mounted socket allows you to hide its main part, including the wires, deep in the wall. Only a decorative overlay will be visible on the surface, in which there will be no holes. The necessary work requires certain knowledge in electrical engineering, but can achieve a reduction in noise and other negative phenomena by 70%.
In order to create an overhead socket, it is enough to drill holes next to the existing one, create a recess in the wall that is suitable in size, lay the wire and cover it with an overlay. An external socket is installed in houses with open wiring; it is often used in dachas and cottages.
The body of such an outlet stands out a little (the cover is not at the same level with the wall), so this method is not suitable for modern interiors.
In the event that repair work is not included in the planned number, or it is necessary to maintain the budget, the optimal solution would be to use the method of laying a soundproofing layer under existing sockets. To carry out the work you will need:
- disconnect the power socket;
- remove the box from the slot;
- lay a layer of soundproofing material into the hole;
- install the box and socket in their original place.
If a person does not have electrical knowledge, it is better to entrust such work to professionals.
This is what a socket box looks like
Methods for soundproofing sockets
The problem is solved in one of three ways:
- Moving the built-in socket to another location.
- Replacing a built-in socket with a surface-mounted one.
- Laying soundproofing material under an existing outlet.
The first option is realized by itself when the apartment is being renovated. By zoning and optimizing space, owners move electrical points from standard ones to places more convenient for connecting household appliances.
Built-in, internal or hidden is a socket recessed into the wall. Only the overlay decorative and protective panel remains on the surface. Built-in sockets are used when installing hidden wiring. They look neater, but their installation is labor-intensive. You can move the built-in socket by drilling a new hole next to the old one and punching a groove for the wire.
An overhead or external socket is mounted on top of the wall under exposed wiring. Its body rises by 5 cm, which is not always acceptable in a modern interior.
If repairs are not expected, it is more practical and cheaper to soundproof an existing internal outlet. The operation does not take much time or labor. The socket and box are removed from the socket, soundproofing material is placed in the hole, and everything is returned to its place.
If you have little understanding of electromechanics, do not do the installation work yourself! Call a professional electrician from the housing office or a specialized company.
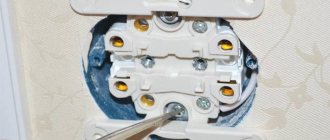
First you need to remove the socket.
Peculiarities
The production of reinforced concrete slabs involves the formation of loose cracks to simplify the work of electrical installation workers. Repairmen connect several power cables to them. They connect a couple of hidden sockets in neighboring apartments. Sometimes they don’t bother themselves with basic soundproofing installations.
Tenants need to eliminate this imperfection of a standard building on their own, otherwise their comfort will steadily deteriorate and not always only with noise from the neighbors. Through the air flow, bad odors, allergens, tobacco smoke, and microbes are constantly drawn into the apartment. You can do soundproofing of sockets yourself or use the services of specialists.
Upon closer examination, it turns out that the problem is solved in one of the following ways:
- moving the built-in electrical outlet to a more suitable place;
- changing the built-in socket to a surface-mounted one;
- laying a soundproofing base under the socket.
Hidden, internal or built-in is a socket that is built into the wall. On the outside there is only an overhead decorative and protective console. Built-in sockets are used when dismantling hidden wiring. Grooving them is a labor-intensive task, although they look neater. You can move a hidden outlet by drilling another hole next to the old one and making a groove for the wire.
The overhead socket is fixed on top of the wall surface for external wiring. Its mini-body rises by 5 cm, but this is not always necessary in new buildings. When repairs are not expected, it is more profitable and cheaper to soundproof an existing hidden electrical outlet. This is not as difficult to do as it seems: the socket and box are removed from the socket hole, a soundproofing base is placed in the gap, and the structure is installed in place.
Removing the built-in socket
- Coordinate your intentions with your neighbors. If they are not very careful owners, you can inadvertently knock out their socket, cause a short circuit, and suffer from the voltage of their network.
- Turn off the power supply to the apartment at the distribution board or meter.
- Use an indicator screwdriver or multimeter to check the voltage in the network. Theoretically, it shouldn't exist. But no one guarantees that the builders correctly supplied the power cable to the apartment.
- Remove the trim panel.
- Loosen the two screws holding the adjustable arms.
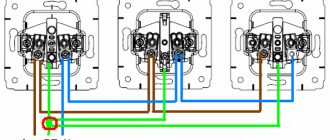
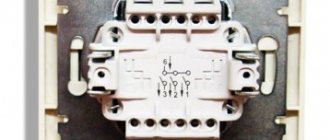
- Remove the socket mechanism. You will see two or three pairs of wires with the ends clamped into terminals. The power cable usually comes out of the top of the wall.
- Loosen the screws on the terminals and remove the socket block. Insulate the ends.
- An electrical or installation box in the shape of a glass will open in front of you. Old boxes were made of 0.4 mm metal, modern ones are made of plastic. Remove the box.
- Shining a flashlight, you will see the neighbor's outlet box. If you find mortar build-ups, clean them up and remove all debris and dust.
The preparatory work is completed. Let's start soundproofing the hole.
Soundproofing built-in socket
Reinforced concrete slabs for panel houses have a thickness of 12-16 cm. Your legal depth of immersion in the rosette hole is 6-8 cm, 4-5 cm of which will be occupied by the installation box. If your neighbor agrees that you have the right to fill half of it with insulation, you will be given an extra space of 2-8 cm deep.
When it comes to material for soundproofing an outlet, many home craftsmen first think about polyurethane foam. It is strictly forbidden to use it because:
- Blown out on your part, it will penetrate into your neighbors' outlets. This is unlikely to make them happy.
- She's flammable. If the contacts in your or your neighbor's outlet spark, the dry polyurethane foam will burn out. Even the red fireproof foam is rated for temperatures up to +90°C.
- Foam protects well from drafts, but has low soundproofing properties.
Causes
Let's start with the fact that when installing hidden electrical wiring and installing built-in electrical installation products, you drill holes with a crown. In any case, this makes the wall thinner and leads to a deterioration in the soundproofing properties of the walls and partitions in the apartment.
Particular discomfort is caused by poor sound insulation in the bedroom if this room borders on neighbors.
What are the reasons for strong audibility in high-rise buildings? In Khrushchev and panel houses of other years of construction, the design of the panels provides for the presence of channels for wires and through holes for installing sockets and switches. They are needed to speed up the construction process and reduce operations when performing electrical work.
For your information, the thickness of the slabs is usually 12-16 cm, which means that you have a permissible depth for installation of electrical installation products and sound insulation of 6-8 cm.
It so happens that there is a small window from your apartment to your neighbors - that’s where the sound comes from, and in bad cases the wind also blows, an unpleasant odor is heard, bacteria enters, and so on.
In private homes, problems arise with street noise - barking dogs, passing cars, etc. And the need to soundproof sockets arises when soundproofing walls and ceilings, in particular when subsequently covering the walls with plasterboard.
Soundproofing with socket relocation
If you are replacing a built-in outlet with a surface-mounted one, be patient. It will take several days to do everything right. You will have to fill the vacated niche with the solution in several steps, wait until the area dries, and only then screw in a new socket.
If you want the moved socket to also be hidden, you will have to punch a hole in the concrete for the wiring and drill out a niche for the socket.
What methods and materials to use for soundproofing inter-apartment outlets depends on the circumstances and capabilities of the owner. Solving the problem requires minimal money and time. But it’s difficult to do without electrical installation knowledge and skills.
By analogy with internal sockets, you can soundproof the installation box with wiring throughout the apartment. Usually it is located right under the ceiling in the middle of a wall shared with its neighbors. But here the participation of a professional electrician is necessary. Without it, it is easy to mix up the wires and connect the wrong ends.
It is unlikely that the domestic construction industry will change the production technology of wall panels in the near future. And despite the fact that the quality of installation work is increasing every year, residents should, if possible, immediately after moving in, soundproof the outlet openings as part of measures to improve and adjust the apartment to their needs.
In the video below you can see the process of soundproofing an outlet using the Texaund soundproofing membrane: