What determines the choice of installation method for lamps?
Installation of a ceiling chandelier
Installation of lighting devices is a simple process. Even a person who has never worked with electricity can figure out the basics and get the job done. The main thing is to carefully and carefully follow all the steps and follow safety precautions.
Lighting devices vary in different ways. They can be mounted on different surfaces (walls, ceilings, placed on a table or floor), built-in or external. The complexity of the process depends on all these points.
The easiest products to install are wall-mounted overhead lamps. They are securely attached to the walls using fasteners (usually dowels). When installing, it is important to consider the wire size. Its length should be such that the lighting device can be powered from the nearest outlet.
Ceiling products are somewhat more difficult to install. Before installing a ceiling lamp on the ceiling, you need to hang a special fastening element. For hanging models, this is a hook that is placed in the mounting box. Metal platforms on which the chandelier is attached are also actively used.
If built-in lamps are used, you need to make a hole in the canvas in advance to fix them.
Methods for attaching ceiling lights
All ceiling lamps are divided into pendant, surface-mounted and recessed. And their method of attachment to the ceiling surface is different (see Attaching a chandelier to a suspended ceiling with your own hands).
Hanging on a hook
In previous years, this was almost the only way to install ceiling lights. Because most of them were suspended, and no one knew anything about built-in ones . In each room in the apartment, there was a hole in the center of the ceiling, from which wires and a metal hook were peeking out, mounted in the ceilings. The lamp or chandelier was hung on this hook.
Hook in the ceiling
This mounting method is still relevant today for pendant lamps on a metal rod or cord . After connecting the power wires to the lamp, the hole with a hook in the ceiling is closed with a decorative chandelier base.
If your apartment does not have such hooks, or they are located in the wrong place, you can install them yourself.
- Drill a hole in the ceiling with a hammer drill. It should be located in close proximity to the outlet of the power cable.
- Hammer a plastic dowel into the hole.
- Screw a threaded hook into the dowel.
Attention! If the lamp is heavy and massive, use an anchor hook instead of a dowel.
Anchor hook and chandelier mounting diagram
- Before you assemble the light and hang it in place, wrap several layers of electrical tape or PVC pipe around the hook. This is necessary to prevent the hook from contacting the metal elements of the lamp.
If you already have a suspended ceiling installed, then you will first have to drill a round hole in it with a drill with a special bit, and then drill through it into the ceiling to install a hook (see Office ceiling lamps: types and methods of fastening). In this case, the diameter of the crown must be less than the diameter of the decorative glass of the lamp, and the hook must be long enough to pass through the space behind the suspended ceiling and be securely fixed in the ceiling.
Advice. If the lamp is small and light, then the ceiling lamp can be installed on a suspended ceiling using a butterfly hook, the “wings” of which open behind the surface of the ceiling and hold it securely.
Butterfly hook
Mounting on a bar or cross
Most modern ceiling lights are mounted on a bar, cross or other flat base with special mounting bolts.
Installation of the lamp to the ceiling occurs according to the following scheme:
Scheme of fastening to the bar
- The fastening strip is applied to the ceiling in a given location . Marks are placed on its surface through the mounting holes.
- Depending on the material of the ceiling, holes are drilled in it using a drill or hammer drill according to the marks.
- The fastening strip is attached to the ceiling with dowel nails.
- Before installing ceiling lamps to the strip, they are connected to the electrical network by connecting the wires.
- The lamp is placed on bolts mounted into the bar and secured with decorative nuts. In this case, both the wires and the bar itself are hidden by the lamp base .
The final stage of attaching the chandelier
As for mounting on a suspended or suspended ceiling, special embedded elements made of metal profiles or wooden bars are pre-installed underneath them (see Ceiling made of timber: imitating a wooden house in a city apartment). If this is not done, then in most cases installing the lamp to the ceiling will become impossible.
For reference. You can attach the lamp to a strip on a plasterboard ceiling if you get into a metal frame. A regular magnet will help you find it. And the suspended ceiling can be partially dismantled to install mortgages.
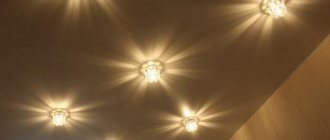
Mounting recessed luminaires
Spotlights have become very popular recently. They came to us along with suspended ceilings and allowed us to more competently solve the issue of lighting in each room . Each such lamp gives a little light, but their advantage is that there can be any number of points on the ceiling, and they can be located in any way.
If you are interested in how to correctly calculate the number of ceiling lamps, then focus on the following rule: per 1 square meter of the room there should be one lamp with a power of 20 W (see Ceiling chandeliers for the hallway: rules for selection and design). If the lamp has a power of 60 W, it is easy to calculate that it will be enough for 3 sq.m.
Attention! This rule works if you calculate the number of spotlights only. If, in addition to them, there are other light sources in the room, their number can be reduced.
The location of the lamps is planned before the installation of the suspended ceiling begins . Wires are pulled to the attachment points, and if the ceiling is suspended, then fastening rings are installed at the specified points.
Preparation for installation of a stretch ceiling with built-in lamps
When the new ceiling is installed, the installation of ceiling lights is as follows:
- According to the previously made plan for placing the lamps, mark their installation points on the ceiling.
- Take a drill with a bit of the appropriate diameter, place the drill bit on the mark and drill a round hole in the surface. Don't forget that it should be slightly smaller than the decorative outer part of the lamp.
Advice. It is better to make holes in a plasterboard ceiling before starting puttying and finishing work.
- Connect the terminals of the lamp to the wires and check its operation by turning on the light.
- Pressing the spring latches upward, push the lamp into the ceiling.
Installation of a spotlight
Lamps are built into a suspended ceiling in the same way, but the holes in it are not drilled, but cut with a knife inside a specially glued heat-resistant ring.
Preparatory work
Installation work on installing lamps is carried out before wallpapering begins.
Most electrical installation work is carried out even before wallpapering and decorative plaster are laid. The master must do the following manipulations:
- Select a lighting device in advance. It is important to consider the microclimate of the room and its purpose. You should buy devices that are protected from moisture for the bathroom; ordinary lamps and chandeliers are suitable for the living room and bedroom. At the same stage, the types of lighting devices are selected. These can be incandescent, halogen, LED or fluorescent lamps.
- Select a location for installing the lighting device. It depends on the purpose of the lamp, its size, type of room, ability to connect to a power point and other indicators.
- Cut channels for laying cables to the installation site.
You should also make a calculation in advance of the number of lamps for the room. It depends on the area of the room, its purpose and other parameters.
What types of lamp mounts are there?
What kind of lamps exist?
If we consider the classification of lamps according to the method of mounting, we can divide them into wall-mounted, ceiling-mounted, ceiling-wall-mounted and built-in.
The biggest difference is in the methods of mounting ceiling chandeliers. The reason for this is different types of ceilings, and, as a result, radically different installation processes. Concrete ceiling fastenings
In most modern apartments, the chandelier must be mounted on a concrete ceiling. This type of ceiling still remains the most common, because it is much easier to deal with - no unnecessary actions are needed, as with the installation of a suspended ceiling, and it has much less chance of being damaged and destroyed.
Chandeliers are attached to the concrete ceiling
:
- Using a hook or wire built in at the time of construction. The chandelier body is connected to a hook coming out of the ceiling, the wires are connected and decorated with a plastic cap that covers and protects the connection area.
- Built-in hooks with various mechanisms. To install the simplest of them, you need to drill a hole in the ceiling, install a plastic or wooden dowel into it, and then screw a hook into it. This design is used for relatively lightweight lamps. More massive ones are installed using anchor hooks equipped with various kinds of thrust mechanisms. The process of installing them eliminates the use of a dowel; a hole is made in the ceiling, the diameter of which allows the stop mechanism to be fully accommodated, after which the chandelier is hung on a hook.
- Mounting strips are metal plates that are screwed into the ceiling and ensure a tight fit of the chandelier. They support more weight than hooks, are easier to attach, and look neater. The body of the strip has holes designed specifically for attaching the chandelier body through them.
- The cross strip is a reinforced type of mounting strip, the fastening mechanism is in no way different from it, but can withstand chandeliers several times more massive.
Fastenings for stretch ceilings
In the case of a suspended ceiling, one has to resort to the use of various transitional structures, because the strength of the canvas itself is clearly insufficient to support the weight of the chandelier.
The main part of the mechanism is attached to the main ceiling, after which its dimensions can be adjusted depending on the gap between the concrete and the stretch ceiling. In order to connect the mechanism to the chandelier, a hole is made in the stretch ceiling using a special ring protecting the material, wires are pulled from the hole and connected to the chandelier.
Wall lights
For wall lamps the situation is much simpler - most often they are simply mounted on dowels through mounting holes in the housing.
Wall-ceiling lamps are characterized by the fact that they contain both types of fastening - an excellent option for those who have not yet fully decided on the location of the lamp, or for those who want to equip both the walls and the ceiling with the same devices.
Different types of mounting are very different from each other, so when purchasing, double check whether the lamp is suitable for your type of ceiling.
Installation of various types of fasteners
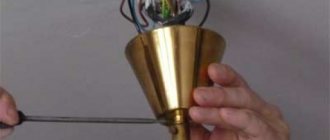
Installing a hook for a chandelier
Since ceiling mounts are the most difficult, they need to be dealt with more carefully.
There are situations when there is no installation box for wall lamps in a room. You can attach a metal plate to the surface in the following ways:
- Screw the plate to the ceiling using self-tapping screws onto a wooden block. The beam must be placed in the hole in the ceiling.
- Make several holes on the ceiling surface. They need to be positioned so that they line up with the holes on the mounting plate. When the holes are made, you need to attach the plate to the ceiling and secure it with dowels.
The hook on which the chandelier is suspended can be attached using similar methods.
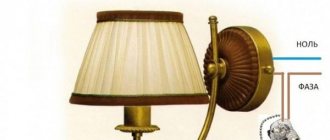
Wall lights
Devices are connected to the wall depending on the circuit used. They can be divided into two groups - with a toggle switch built into the body and with an external switch. The first category includes decorative structures in the form of wall sconces and ceiling lamps installed in furniture. The second type includes products for lighting auxiliary rooms (pantry, corridor, hallway, kitchen). The main advantage of such devices is ease of installation and dismantling.
Algorithm for installing wall lighting:
- Marking mounting points on the wall. To do this, you need to attach the case to the wall and make marks where the fasteners will be.
- Fixing the lamp. It is done using dowels or on a bracket or other supporting structure. The second method is suitable for massive structures.
- Installing the light bulb into the socket.
- Functionality check.
The correct placement of the lamp depends on the accuracy of the marking of the rear part. Usually there is a small gap on the mounts, thanks to which the position can be adjusted if the location is chosen with a slight discrepancy.
Next the wires are connected. Zero always goes directly, and phase goes through the switch, if a model with a switch is selected. Before connecting the wires, you should check what a particular core is responsible for. This can be done using an indicator screwdriver or a multimeter.
Connecting built-in luminaires
Laying the cable of spotlights under a suspended ceiling
The technology for installing built-in luminaires differs from classic wall and ceiling lamps in the presence of an additional power supply. It also plays a protective role.
Installation of recessed luminaires is carried out as follows:
- Determining the installation location. Creating a wiring diagram and power supply.
- Laying cables.
- Cutting a hole in a suspended or stretch ceiling of a certain diameter for a lamp.
- Pulling wires through the hole.
- Connecting wires and installing lamps in the mounting hole.
- Functionality check.
Massive structures are attached to a steel slatted frame before the ceiling tiles are assembled. Then the lamp is dismantled, leaving a transitional mount in its place. When the plasterboard or MDF boards are laid, mark the position of the body on the canvas, make a corresponding hole and make further connections.
Main types of mounting ceiling lights
Hook
Hook mounting is the most reliable, and therefore the most popular option for attaching a lighting fixture to the ceiling. It is quite easy to do: you need to make a hole of the required diameter in the concrete base of the ceiling, then screw a hook into it, on which the chandelier will be hung.
Hook fastenings for lamps can also be used in rooms with suspended ceilings. Here, the holding mechanism is a dowel and a screw, which has a special hook instead of a head. Such a screw should be fixed as tightly as possible to the ceiling. After installing the holding mechanism, the wires of the lamp are connected to the power source, and the chandelier itself is hung with an “eye” on the mounted hook.
Among the advantages of this installation method are the ease of replacing one lamp with another and the possibility of placing devices with large weight and dimensions on the ceiling. In addition, all the wires powering the light source are perfectly hidden in the glass of the chandelier.
There is only one drawback to mounting it on a hook - there is no way to install the chandelier this way close to the ceiling panel. This is critical mainly for rooms with low ceilings, but in principle it is not advisable to place hanging chandeliers in them. Such lighting devices “steal” too much free space, and are simply inconvenient for everyday use if they are placed too low above the heads of the room users.
Mounting strip
This installation method involves mounting the lamp close to the ceiling panel. To do this, a special metal strip is screwed to the ceiling with several screws, after which the wires and switch are connected. The lamp itself is installed in slots made on the strip; the wiring and fastening elements are covered with a decorative box.
Lamps and chandeliers mounted on a strip on suspended ceilings are attached to the ceiling surface using wooden blocks. They are inserted behind the decorative fabric and screwed directly to the concrete slab so that the lamp mount is flush with the suspended ceiling. Next, the chandelier is mounted in the standard way.
The “on-bar” type of installation is more complex compared to hook mounting, but it makes it possible to place the chandelier directly on the ceiling, that is, to save room space. This method has significant disadvantages, including the complexity of replacing lamps and a larger area for installing fasteners compared to hook fastening.
Cross bar
The cross-mounted strip is used mainly for installing heavy and large-sized ceiling lamps. The essence of this method is the same as that of mounting on a standard strip.
The only difference is in the design of the planks themselves: the cross version has four fixation points, the regular version has only two.
Installation of lamps using a cross strip on suspended ceilings can be done in two ways:
- through the hole for mounting the entire “cross”. This method is relevant for devices, almost the entire structure of which will be “recessed” into the ceiling sheet (otherwise the concrete slab, wiring and fasteners will be visible through the hole);
- through five small holes, four of which are intended for fixation points along the beams of the bar and one central one for connecting wiring. This method is suitable for most types of ceiling lamps.
Attaching a chandelier to a cross bar is a reliable, but rather labor-intensive installation method. When choosing this installation option, you need to remember that changing entire lamps in the future will be quite problematic.
Preparing the lighting fixture for installation
Before installing the lamp, you need to carefully check it for the level of build quality. If the bolted connections are weak, they must be tightened. Cartridges, contacts and connections to conductors must also be inspected and corrected if necessary. If chips, burnt parts, or debris are found, the part should be disassembled and replaced with a new and functional one. It is dangerous to use a product with defects.
It is recommended to purchase wall lighting and components for them only in professional stores. Otherwise, there is a risk of buying counterfeit products that will not meet the declared characteristics. To save energy, it is better to buy and install energy-saving lamps. These include fluorescent and LED devices.
Safety precautions
Carefulness when working with electrical networks is the basis of safety precautions. To maintain health and life, you must follow the following rules:
- All work is carried out only with the power turned off. It can be turned off at the input switchboard.
- You need to make sure that there is no current on the wires. This can be done using an indicator. If residual voltage is detected, you need to wait until the residual current passes. If the voltage is detected during repeated checks, you should contact an electrician.
- To work, the technician will need personal protective equipment - dielectric gloves and goggles.
- When installing the lamp on the ceiling, you will need a stable ladder or stepladder.
- You need to prepare an autonomous light source in advance. This could be a battery-powered flashlight or an external light source.
- All tools must be in good working order and have insulated handles.
Compliance with the following simple rules will help the master to protect himself and not get damaged by electric shock.