After installing the border frame, the installation of the tile covering can be considered complete. The curb, also known as curb stone, can be purchased at the construction market and installed independently. The work is not technically difficult, so it can be considered a type of outdoor activity. Our specialists offer the correct technology for installing curbs, which is characterized by the absence of shrinkage and deformation.
Advantages of a self-made curb
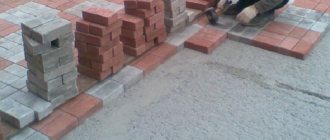
The range of curb products is not rich. Decorative design leaves much to be desired. This is one of the reasons why home craftsmen prefer to make road or garden curbs of any section and any color at home.
For this purpose, dry construction mixtures are purchased that give the finished products the desired properties. In this case, moisture - frost resistance. Products are dyed in bulk by adding alkali-resistant dyes to the working solution. Such decor is more expensive, but the laid curb will not require periodic updating of the protective paintwork decor.
The vibration-pressed curb, which was initially designed for use in difficult conditions of high humidity and temperature changes, differs for the better. According to manufacturers, the service life of such materials, like paving stones, is at least 30 years.
Step-by-step instructions for installing borders yourself
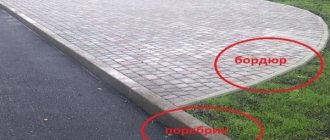
Before laying the curb for paving slabs with your own hands, you need to mark and lay a trench. The surface is leveled using pegs and a cord - they are used to build a line for installing the front side of the curb
It is important to consider that the front side of the curb should be turned towards the covering
Marking the future sidewalk and laying trenches for curbs
The location of the soil and concrete base must be marked on the pegs.
- The pegs are driven into the ground and the cord is pulled at the height of the top edge of the curb.
- Next, they dig a trench, making its depth such that after installing the curb, its edge rises 2-3 cm above the surface of the soil and the coating - this will prevent dirt from getting on the tiles.
- The width of the trench needs to include the width of the curb, as well as a small margin of 4-5 cm on each side.
- The soil at the bottom of the trench must be thoroughly compacted. For example, a vibrating plate, if its width matches the width of the trench.
- Laying geotextiles with a density of at least 160 g/cm2 on the ground is not mandatory, but a highly recommended procedure. Geotextiles will prevent the mixing of soil and crushed stone, which will significantly extend the service life of sidewalk curbs.
The base is prepared, the actual laying of the garden border begins.
DIY border laying technology
A crushed stone cushion is poured onto the geotextile. Crushed stone is taken in fractions of 20-40 mm. If the groundwater level is low, then screenings or coarse sand can be used instead of crushed stone. The crushed stone or sand cushion should be 10-15 cm thick (after compaction)
Please note that after compaction, the thickness of the crushed stone cushion is reduced by about a quarter. Construction of a concrete pad. How to prepare a solution for installing borders? 1 part of M400 cement and 3-4 parts of sand are thoroughly mixed with the addition of a very small amount of water. You can also prepare a concrete solution by mixing 1 part cement, 2 parts sand and 2-3 parts fine crushed stone. Concrete mixture or cement-sand mortar for laying curbs is poured 5-7 cm thick at the bottom of the trench, but not all at once, but as the curb stone is installed. Next, a sidewalk or garden border is laid on the concrete mixture cushion.
The border is settled to the desired level, marked with a cord. It is necessary that the top surface of the curb is flush with the stretched cord. To deepen the curb, use a rubber mallet. You can also use wood, but rubber is more durable, reliable and more delicate. Do not use a metal hammer or vibrating plate to settle the curb - these tools can ruin the curb, leaving behind cracks and chips. After the curb is installed and leveled, a castle made of concrete or cement-sand mixture 5-7 cm thick and 8-10 cm high is laid on both sides of it. A gap of no more than 5 mm is allowed between curb stones. The seams between the curb stones are carefully filled with sand-cement mixture. After the concrete has hardened, the free space between the edge of the trench and the curb stone is filled with sand or crushed stone. The backfill is carefully but carefully compacted and sprinkled with soil or fertile soil on top.
If you follow this technology for installing sidewalk curbs with your own hands, the risks that the curbs will move when the soil heaves are very unlikely.
Table: Comparison of curb and curb sizes
| Parameter | Curb | Lawn block | Road block |
| Length, mm | 500–1 000 | 500 | 1000 |
| Width, mm | 45/50/80 | 70 | 300/450 |
| Height, mm | 200/210 | 211 | 150/180 |
Why should you seek the help of specialists?
Installing a curb
– this is a fairly popular service from construction companies that are engaged in landscaping, which is why you should give preference to the work of professionals rather than trying to do everything yourself.
Firstly, the selected borders may have different dimensions, and the weight of one part can reach 100 kg. This indicates that it is quite difficult to lift and move them on your own. Construction crews use specialized equipment for this, which reduces the risk of injury during the installation process. In addition, all blocks are securely fixed during transportation, so the likelihood of accidental falls is much lower than if workers manually carried the parts.
Secondly, the laying of curbs must be carried out according to a special algorithm using high-quality reliable materials: sand, gravel, cement. At home, it is not always possible to make the correct solution yourself.
Thirdly, it is worth taking care not only that the structures are securely fastened, but also about their visual condition. To do this, levels are used, and the remaining seams after the concrete has hardened are rubbed with a special mixture.
We master the list of preparatory work
To arrange a border frame around the perimeter of a tiled surface or paving stones, you need to perform a sequence of simple steps.
- Excavation.
The depth of the excavation is determined by the volume of the compacted crushed stone cushion. A well-compacted, durable base completely eliminates shrinkage and deformation of the curb structure during operation. - The upper edge of the curb stone
is set at the same level with the tiles or mounted with a certain excess. This difference does not affect the strength and durability of the structure. - under the crushed stone fill
. This component of the system eliminates the mixing of crushed stone with soil, the formation of internal voids and deformation of the structure as a whole. - Crushed stone is reliably compacted
over the entire area. Its surface serves as the basis for a layer of sand. - Dry sand
should be moistened, otherwise it will be impossible to compact it. The fine fraction of the fill allows you to achieve high accuracy in setting the curb in level or maintaining the slope.
At this point, the preparatory work is considered completed.
Next, the installation of curbs and curb stones is carried out according to the standard scheme. To control the horizontal laying of curbstones, you will need a building level. During the installation process, it is not advisable to hit the curb with a sledgehammer or drop the material. Concrete is a fragile material, so even in a reinforced version, the curb can crack.
Another method of installing a curb frame involves laying the curb on a concrete solution. The gaps between the curb and the walls of the excavation are also concreted. The increased sole area increases the resistance of the structure to perceived static and dynamic loads.
Work order
Before installing the border with your own hands, lay a trench. The technology for installing a structural element involves the arrangement of a crushed stone and sand-cement base, and a concrete pad. The choice of option depends on the requirements for the design. Installation of the curb includes a preparatory stage of work, which consists of marking the laying line and determining the installation depth. Excavation work includes surface leveling and trenching. Depending on the chosen installation method, the base is laid. After laying the structural elements, they are secured and the joints are sealed.
To accurately align the stones, use a cord that is stretched between the stakes. The depth of the trench depends on the size of the side element and the estimated height above the level of the laid sheet.
At entrances, the structural element is laid to a greater depth; when constructing a road curb, the ledge is equal to the height of the stone. The size of the trench when laying should be equal to the width of the curb with the addition of 5-7 cm. A large trench is laid for the road element.
Recommendations from our experts
If the curb is installed before laying the purchased paving slabs, you can start compacting the base no earlier than a couple of days later. During this time, the curb structure will finally settle down. The likelihood of cracks or damage to joint seals will be significantly reduced.
If you have any questions about how to properly install curbstones and curbs, or how to paving with tiles or paving stones, dial the number +7
. Our specialists will advise and help with calculating the amount of materials completely free of charge, and to order professional installation, just fill out the form below. Make your yard and life comfortable!
Installation technology
When designing a paving area, you should take into account the following nuances:
- perfectly flat areas are extremely rare; users additionally create uneven landscapes to increase the aesthetic value of the design;
- shaped concrete paving elements are a waterproof coating, from the surface of which rainwater and flood runoff are drained by specially made slopes;
Slopes for gravity runoff of sediments.
- the curb is located along the perimeter of the pedestrian zone, barbecue area, and serves as a riser for stairs inside the retaining walls that are used to terrac the area;
- the curb is much higher than the paving slabs, you need to dig trenches for it;
- curbs are installed on sand concrete.
Therefore, first, the cords are tightened on their own, taking into account the gravity slopes and trenches are torn off to bury the curb stone, concrete is mixed at the rate of 1 bucket per curb 1 m long.
Leveling and making slopes
In contrast to finding the top point of the floor when finishing premises, the technology for dividing the area is significantly modified:
- there is no attempt to level the existing landscape in a general plane;
- the slopes of paving slabs and curbs replicate the elevation changes of the area;
- on narrow paths only longitudinal slopes are created; on wide paths and platforms, transverse slopes are added to them;
- runoff is collected in point storm inlets or linear storm drainage trays located along the edge of the shaped paving elements;
Marking the area with cords.
After installing the cast-offs, cords are pulled over them along the outer perimeter, taking into account the width of the curb of 8 cm. The upper edge of the curb should not protrude above the paving stones, unless this is provided for in a special design.
Important! The slope of a gravity drain is 2 - 4 degrees; for blind areas it can increase to a maximum of 7 degrees if they are not used as sidewalks.
When marking paving stone stairs and low retaining walls made from curbs, installation of pegs or cast-offs is necessary for each step separately. To reduce cutting waste and the number of FEM trims, the width of the path should be adjusted to the size of the paving slabs.
Curb steps.
Trench and underlying layer
Since concrete products are prohibited from being installed on a fertile layer, which can sag after the organic matter contained in it rots, it is removed entirely from the paving area. The depth of the resulting pit is usually greater than the thickness of the paving stones, but less than the vertical dimension of the curb. Therefore, you need to perform several steps:
- fill the bottom of the pit with sand at a low ground level or crushed stone on wet soil, leaving 8 - 10 cm to the ground level (5 cm contact layer of sand or gravel on which the tiles are laid, plus the thickness of the tiles themselves);
- deepen the pit around the perimeter with trenches to the size of the curb, a 2 cm layer of sand concrete on which it is installed, and the underlying layer under it (15 - 20 cm).
Non-metallic material must be compacted using an area vibrator (vibrating plate) or a manual tamper. It is not recommended to spill sand with a bucket/hose; it is better to moisten it generously before placing it in the ground.
Advice! To make it convenient for the craftsman to place the curb stone and fix it with concrete along the outer or inner edge, the trenches should be twice as wide as the curb (4 cm in each direction).
With a slight increase in the construction budget, you can dramatically increase the service life of the structure if you line the bottom of the pit with non-woven material (dornite, geotextile), which prevents mutual mixing of non-metallic material with the soil and the germination of weed roots.
Installing a garden border
The classic technology for installing concrete curbs is as follows:
- making a bed - plastic sand concrete is laid on the underlying layer, leveled with a trowel for a maximum of 2 - 3 elements;
- installation of the curb - the exposed stone is settled on the concrete with a rubber mallet;
- lateral fixation - concrete is applied to the laid curb with a trowel from the outside and inside to form a slight widening in its lower third in height.
The curbs are installed along the cord close to each other. The cutting is carried out with a special tool - a guillotine or an angle grinder with equipment for concrete (diamond, abrasive).
Guillotine for splitting curbs.
Types of sidewalk curbs
These include concrete curbs and side stones made using vibrocasting and vibrocompression.
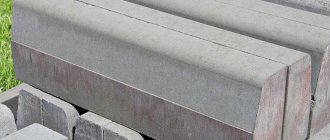
Concrete curbs
Curbs are widely used in the construction of highways: they separate the roadway from the pedestrian one. Curbs are made in accordance with GOST, by pressing or casting.
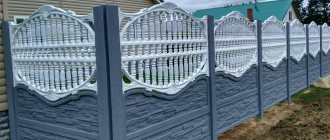
Vibro-molded curbs
Manufactured by casting, such products have a curved geometry due to the use of liquid concrete mortar. The air remaining in the solution is not expelled, as a result of which the finished product has a porous structure and is easily destroyed. Such side stones are cheaper than curb stones made by vibration pressing, but have no other colors except gray, and the reinforcing frame makes it difficult to install fences if they are cut.
Currently reading: How to choose the right brand of concrete?
Vibropressed curb
Manufacturing technology allows you to get a smooth surface. According to technical indicators, vibration-pressed side stones have reduced moisture absorption, strength and wear resistance. The stamping method allows you to obtain a large number of finished products with different colors.
Vibropressed curbs
Vibro-molded curbs
Concrete curbs
What is the difference between vibration-pressed and vibration-cast curbs?
First of all, products differ in the production method. Vibrocompression involves the production of products on a large scale and therefore uses vibration installations. And vibro-cast curbs are made manually.
| Type of border | Specifications | Appearance |
| Vibrocast | Heavy weight, low frost resistance and performance indicators. As a result of the pores, cracks and chips quickly form, which leads to rapid destruction of the side. | The surface is porous, unaesthetic gray in color, and rough joints remain after installation. Difficulty in installation when making turns - the reinforcement is difficult to cut without damaging the overall appearance of the product. |
| Vibropressed | Compact and relatively light weight, smooth surface, absence of pores, good performance due to high strength and frost resistance. | Smooth surface without pores, aesthetic appearance, wide range of colors, can be used for decorating corners. |
Installing a curb on sand-cement mixture or concrete
On soils prone to heaving, the curb stone should be installed on a backfill of sand and crushed stone, on top of which a layer of concrete is laid, and the curb is laid in it. With this installation, curbs stand for years without problems. The procedure is as follows:
- Using pegs installed in key places and laces stretched between them, markings are made.
- According to the markings made, a trench is dug. The width should be such that there is a distance of 10-15 cm on each side on the sides of the installed stone. The depth is chosen so that the layer of compacted crushed stone at the bottom is at least 10 cm, at least 5 cm of sand-cement mortar on top, and the curb stone itself rises above the surface of the path by at least a few centimeters (how much specifically depends on your desire).
Installing a border: diagram - The bottom of the trench is ready to be leveled and compacted (when using a vibrating plate, the width of the trench is made according to the width of the slab).
- Lay a layer of geotextile with a density of at least 160 g/m². This layer is needed to ensure that sand and crushed stone do not mix with the soil. It increases the lifespan of the curb and reduces the likelihood of shifts during spring heaving.
- A layer of coarse sand or crushed stone of large or medium fraction (20-40 mm) is poured. The minimum layer is 10 cm, the optimal layer is 15 cm. The crushed stone is compacted.
- A thick solution is mixed from sand (3-4 parts) and cement (1 part) (very little water, just enough to stir). It is laid 5-7 cm thick (preferably 7 cm) on crushed stone.
Carrying out work on installing curbs and curbs - A curb stone is laid on the concrete and leveled (to the horizon or with a slope - depending on the geology of the site).
- A castle made of sand-cement mixture 5-7 cm thick and about 10 cm high is laid around the fragment installed and positioned in the desired position.
- After the concrete has set, the remaining free space between the installed curb and the edge of the trench is filled with sand or crushed stone, compacted, and sprinkled with soil on top.
If you follow this technology for installing a curb stone, the likelihood that it will move during heaving is very low.