Types of concrete blocks
At the time of production, the technology of vibrocompression of concrete mixture is used. The main ingredient for the binder is cement. The following can act as fillers:
- gravel,
- crushed stone,
- slag or granite screenings,
- broken brick or glass,
- expanded clay
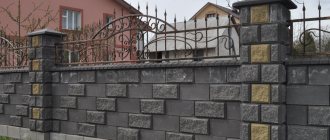
A fence made of concrete blocks is an excellent solution for a country house. This design has a wide variety. The blocks differ in color, decor, size, etc. Let's look at the main types of building materials presented.
Types of blocks
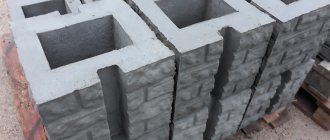
This kind of material is found in several variations. First of all, there are two main groups of products: solid, hollow. For the construction of fencing, the second option is more often used, because it is characterized by a number of advantages: the presence of cavities through which communications or poles can pass; lighter weight, which allows you to install the fence without the involvement of assistants.
In comparison, reinforced concrete panels cannot be lifted on your own; for this you need to use special equipment.
Based on external characteristics, there are two types of blocks:
In the first case, the product is much more attractive, since it has a coating on the outside: stone or plaster. The smooth-walled analogue is usually made in gray and requires additional finishing after installing the fence. Aesthetic appeal makes decorative blocks much more expensive.
There is one more difference - in shape (rectangular, U-, L- and U-shaped). Such a variety of materials makes it possible to construct non-standard fence designs.
In addition to the differences mentioned above, one can also distinguish a difference in the composition of the mixture.
- gravel;
- crushed stone;
- slag;
- broken glass, crumbs of brick or concrete;
- expanded clay, etc.
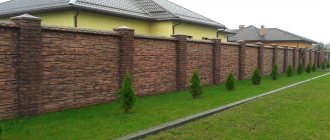
Decorative blocks
Raw clay and concrete are used in production. It is often made with imitation of natural stone. Before installation, it requires installation of a strip foundation. The blocks themselves should be laid on the solution. Installation of fences made from decorative blocks is considered an easy process - it does not take much time compared to the construction of other fences.
The main advantages include:
- fire safety,
- moisture resistance,
- noise suppression,
- not afraid of mechanical damage.
In order for the fence to be reliable, you will need to take into account several nuances during installation:
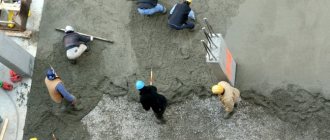
- When laying out the area where the foundation will be located, use a cord to mark the frame with sand.
- Then the formwork is installed and a concrete mixture is prepared, which must then be poured into the structure.
- Compact, level the surface and wait until the concrete solution has completely hardened.
- Next, you need to make the mixture using a concrete mixer for masonry. Decorative blocks intended for fence posts will be installed on it.
- Then the joints are opened and a cornice is made on top using tiles.
If you are building a fence from decorative hollow blocks, then for the reliability of the structure you should use reinforcement in the foundation.
Ragged Stone
Blocks made to resemble stone include cement, sand, fillers, dyes and additives. During production, high pressure and vibration are used. This makes for excellent performance. The presented building material perfectly imitates natural stone. The blocks themselves come in two shapes; they can be angular or straight. Among the main advantages are:
- Quick installation. The blocks have the same dimensions and are light in weight, which significantly speeds up the installation process.
- Low price of material.
- High strength. The product is not afraid of frost, humidity, fire and guarantees a long service life.
- They do not require maintenance and are easy to repair.
- Nice appearance.
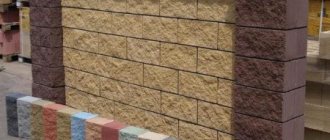
Splitter decorative blocks
Splitter decorative concrete blocks intended for fences are hollow bricks. Externally, this building material looks like a block that has been sawn into two parts. The product is approximately seven times larger than a simple brick, which makes installation much easier. By its external characteristics it is almost impossible to distinguish it from natural stone.
Main advantages of the design:
- not afraid of temperature changes,
- not exposed to moisture,
- a large number of textures and colors are presented, which allows you to choose a fence to suit any landscape design,
- low cost,
- environmental friendliness,
- simple installation,
- does not require finishing work.
How to build a fence from decorative blocks
When looking for an inexpensive and easy way to decorate a stone fence, pay attention to hollow decorative blocks. In this article, the RMNT website will talk about the features of working with this material and methods of constructing decorative masonry that do not require the skills of a professional mason.
- What are decorative blocks?
- Supporting fence system
- Starting row device
- Rules for laying decorative blocks
- Video on the topic
Laying concrete block fencing
How is installation done? Initially, it is necessary to place pillars from these blocks where there are already pipes or fittings removed from the foundation. If the selected blocks do not have grooves, then after about 3-4 rows a reinforcing mesh is laid, which must first be released from the column.
The cement solution should be made using sand with a ratio of 1 to 4. Then the concrete blocks are installed on the foundation.
Remember to tie the seams in the same way as when working with brick. Make sure the material is vertical and horizontal, use a special level for construction.
The material is laid using rustic jointing. The mortar joint should have a thickness of no more than 1.5 cm and no less than 1 cm. Concrete mortar is used to secure the fence to the foundation.
Laying decorative concrete blocks for a fence
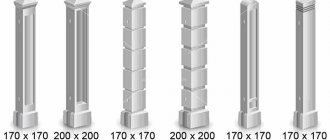
Note that all further activities are carried out with a building level so that the structure is perfectly level. The first stage is the construction of pillars.
- Hollow blocks are “strung” onto the support posts installed earlier, and a solution is poured inside, filling the space and enhancing the strength of the masonry.
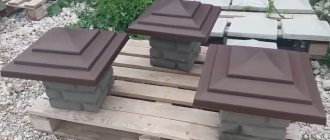
- Covers are placed on top of each post to protect from precipitation and decorate the fence.
- The spans are being installed. If the client wants to have a solid fence, then the concrete blocks are laid in rows with the seams bandaged. They are pressed into the cement mortar using sliding movements. It is also permissible to use tile adhesive for exterior use.
- A protective gable cornice made of sheet metal is installed on the top final row.
Laying the foundation
Long service life depends entirely on how the foundation was made. Initially, you need to mark the area, drive in pegs and stretch the cord, and draw the boundaries with chalk. Dig a ditch so that it is at least 40 centimeters wide. It is important that the ditch is wider than the masonry itself. The depth depends on your soil. For example, if the soil on the site is quite wet, then you need to dig 20 cm more, starting from freezing. For ordinary soil that is not subject to heaving, a depth of 70 cm is sufficient.
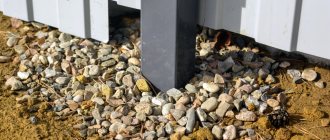
After compaction, lay out drainage layers using crushed stone and sand. Add water to the ingredients and start clotting again. Lay roofing material on top, which will serve as a waterproofing layer.
Prepare a concrete solution. Mix cement, crushed stone, sand in proportions of 1 to 5 to 3. Add a little water to make the mixture homogeneous.
Pour the prepared solution onto the bottom so that the cement layer is approximately 10 centimeters thick. Wait for it to harden and place formwork with spacers, which will control the desired shape.
Construction of a fence
Once you've prepared your foundation, you'll want to consider adding security and safety with fencing reinforcement. In its production, four longitudinal rods are used, having vertical and transverse pins.
- Complete the frame with vertical outlets from reinforcement. The elements must fit into the masonry of blocks intended for columns and fences. To do this, it is recommended to install reinforcing mesh after every 3 rows of laid blocks.
- Make sure that the outlets are approximately 15 cm higher than the foundations. Attach the racks made from a profile pipe to the finished frame. Don't forget to control verticality. The racks will act as a supporting structure.
- To fasten the elements together, prepare a mixture of cement and sand in a ratio of 1 to 4. Then you can begin laying out the blocks, fastening them with cement mortar. The process is carried out in the same way as in the case of brickwork.
- Fence blocks are laid with rustic jointing. The seam should be up to one and a half centimeters thick.
- Pour the concrete mixture into the formwork and compact it with a crowbar. Make sure there are no air bubbles left. Unfasten the support after a week. Treat with bitumen mastic and cover the vertical structural elements with roofing felt. Fill the empty area located between the foundation and the ditch with earth and compact it.
Step-by-step construction of aerated concrete fence with your own hands
We will analyze step by step how to build a fence from aerated concrete blocks for a summer cottage or a private house.
For high-quality creation, you must first draw up a diagram of the future fence and calculate the consumption of materials. To simplify the calculations, we recommend using a construction calculator.
Photo: solid fence with brick pillars
Materials, tools
For construction you will need:
A detailed list of materials and tools depends on the type of base chosen, as well as on whether the fence will be completely solid, made of blocks or combined with other materials (corrugated board, wood, metal).
Foundation arrangement
Despite the light weight of the blocks, the fencing is still oversized in size and requires reinforcement in the form of a strong, durable foundation.
Depending on the soil, the following types are recommended:
Photo: installation of a strip foundation for fencing the territory
In some cases, it is possible to install a columnar foundation when the fence does not bear a large load. For example, the supports are made of aerated concrete blocks, and the sections are made of wood or corrugated board.
You can learn about the methods of laying this type of foundation from the article: “Concreting fence posts.”
Installation of pillars
Often performed at the stage of foundation construction. The evenness and durability of the entire structure depends on the verticality of the mounted supports.
Popular rack types:
- round profile pipes with a diameter of 10 cm, wall thickness 3 cm;
- pipes with a square section 80*80*3 mm;
- screw piles with a monolithic grillage.
Metal supports must be coated with anti-corrosion compounds. It is better to treat the lower part with bitumen mastic. The distance between the pillars is from 2 to 3 m.
It is recommended to seal the top of the supports with lids to prevent water and debris from getting inside.
Laying work can be started after the foundation and supports have completely hardened, no earlier than 7–14 days.
The process of laying aerated blocks
At the initial stage, it is necessary to lay aerated concrete pillars around the metal supports. Dressing is carried out in one and a half blocks using cement-sand mortar. The layout is carried out so that the first and all subsequent rows of blocks go there.
The voids in the columns between the blocks and the metal pipe are filled with liquid concrete.
If necessary, elements are cut to the required size.
The rest of the laying process looks like this:
- A 20 mm cement mortar is applied on top of the foundation.
- The first row of blocks is laid out. Each element is tapped with a rubber mallet. To check horizontality, the cord is pulled.
- Reinforcement is carried out in rows 1 and 3. To do this, it is better to take a rod with a diameter of 6 mm and stretch it between the fence posts.
Photo: reinforcement of masonry blocks made of cellular concrete
In the case where solid aerated concrete is used for laying the fence, you can do without installing pillars, but it is important to reinforce every 2-3 rows of blocks.
Finishing the finished fence
If the main material of the structure is standard aerated concrete, then finishing is a mandatory stage of construction. This will not only give the product aesthetics, but also perform a protective function.
Installation of expanded clay concrete blocks
Prepare the concrete mixture. Experts recommend using the M400 brand or higher. Mix cement and sand in a ratio of 1 to 3. It is better to prepare the mixture periodically, that is, in small portions. It is better if it is subjected to constant stirring. This will prevent delamination and hardening.
Before installing a fence made of expanded clay concrete blocks, you need to take care of waterproofing the foundation. Use glass insulation or roofing felt. Attach this building material with a thin layer of cement.
To prevent installation from being interrupted, prepare in advance the required number of blocks cut with a grinder. Stretch a cord between the future corners of the fence and hang plumb lines that will serve as a direct guide for the masonry. Then:
- Apply a 2-centimeter layer of cement mortar and place one block. Don't forget to press it down on top and remove any excess mixture around the edges. Make sure that the thickness of the seams is not more than 10 centimeters. The first row is much harder than the subsequent ones. This is due to the fact that the builder will have to constantly monitor the evenness of the masonry.
- Continue building blocks, holding them together with mortar. When using slotted elements with a transverse arrangement of voids, lay them out in butted rows. Make sure the masonry is perfectly level. Use plumbs and a building level.
- After the first row you need to install pillars. They must be installed after every 5 blocks. This way you will create strength for the future fence. Fill the first row of blocks and places where there is reinforcement with the mixture, which should be pierced into all filled levels. In addition, the solution should be applied to all vertical rows near the posts. This will significantly extend the service life.
- After 3-5 rows, use reinforcement mesh. It is worth noting that the expanded clay concrete material is easy to cut, which makes laying easier. The reinforcement process can be carried out using vertical rods.
At the end, you need to paint the fence or use facing materials. This is required to provide protection from moisture, because... expanded clay concrete quickly absorbs moisture, which has a detrimental effect on its strength.
Advantages and disadvantages of concrete blocks
Let us list the main advantages of concrete blocks:
- Installation is not particularly difficult, so you can do it yourself with minimal construction skills.
- A concrete fence is a permanent structure that will last a very long time.
- The maximum level of reliability is ensured.
- The material is not subject to rotting, deterioration, destruction and corrosion.
- Concrete is resistant to sunlight, precipitation and frost.
- You can make the structure easier if you make a fence from expanded clay concrete blocks.
- Possibility of use for the construction of decorative products.
- Concrete surfaces easily undergo various types of finishing.
- The fence has no gaps.
- The height of the fence can be any.
Among the disadvantages are:
- The need to manufacture a powerful foundation capable of supporting the weight of a heavy concrete fence.
- The cost of concrete products is relatively high, especially decorative ones.
- To give the finished fence an aesthetic appearance, it is advisable to finish it. This incurs additional costs for materials and specialist services.
Combination
Kermazi concrete is an excellent solution for the construction of a combined fence. You can lay out 5 rows of blocks, create columns, and then use corrugated sheets, forged structures, or other fencing. There are many options for filling the fence.
Remember that if you decide to install a combined fence, then before moving to another material, lay the final row with the holes down. It is important that the surface is flat, without depressions. Then install the partition blocks in approximately two rows.
Upon completion of installation work, the columns should be closed with special covers made of plastic or metal. If you prefer a solid fence, then cover the walls with parapets and finials. This will protect the masonry from bad weather and give the structure a pleasant appearance.
Permanent address of the article