What is a track light?
Track lighting is a structure consisting of special rails (tires) to which lamps are attached. The lamps do not have rigid fastening elements, so they can move. Installation is carried out in any plane - on the ceiling or wall. This type of product looks harmonious in modern interiors.
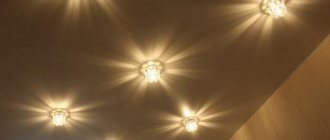
Track lamps in a loft style interior
More details!
One system can consist of luminaires of various characteristics and styles, equipped with different types of lamps. This does not make installation any more complicated, only the operating conditions differ. The procedure for placing the system on a surface depends on the type of rail, surface properties and installation method.
Scope of application
The task of any lighting system is to provide complete and high-quality lighting of the room.
It is important to consider that in a house or apartment, lamps can play not only the main, but also an additional (decorative) role.
And if in apartments and houses the level of illumination, which can be adjusted using dimmers, still comes first, then in entertainment complexes, shopping malls and cultural institutions, proper lighting plays a key role. This is where track lights come to the rescue.
In general, such structures are used in the following premises:
- Exhibition and sales halls;
- Cafeterias, bars, restaurants;
- Offices;
- Rooms in a house or apartment. Here such devices perform the function of additional lighting. Most often they are used when decorating the interior of a bedroom, living room or kitchen;
- Entertainment establishments (clubs).
Track systems have also found application in museums, shops, supermarkets and many other premises.
The use of such structures allows you to draw the attention of visitors to certain areas and draw attention to specific offers or products. That's why track lights on busbars are increasingly found in retail spaces
Read on the topic - what lighting standards exist in rooms
That's why track lights on busbars are becoming more common in retail spaces. Read on the topic - what lighting standards exist in premises.
Related Posts
- Emergency lighting
- How to calculate how many lumens are needed per square meter in an apartment or other room
- Illuminance unit
- Spotlights in kitchen design: advantages and disadvantages, options for spotlights, how to choose the right one
- Proper lighting in the bathroom: design techniques + safety standards
- How to install light in a steam room?
- DIY installation and connection of the lamp
- Staircase lighting in a private house: 35 photos
- DIY garage lighting
- How to properly connect a backlit spotlight?
- Lighting for a private home
- Selecting and installing lighting for kitchen cabinets
- Main types and parameters of outdoor lighting control cabinets
- DIY LED phytolamp for seedlings
- Installing lamps in a suspended ceiling: 6 ways
- How to choose the right light sensor, description and classification
- LED lamps: warm light or cold, what’s the difference?
- How to place spotlights on a suspended ceiling: optimal distance and examples of diagrams
- Which ceiling lighting is better?
- Dimmer for 220 volt LED lamps: do-it-yourself operation and connection features
- Organizing proper lighting in a greenhouse: lamp placement diagrams and practical tips on how to install optimal lighting for greenhouses (95 photos)
- How to install sconces correctly: step-by-step instructions and installation tips
- Fluorescent lamps: parameters, device, circuit, pros and cons compared to others
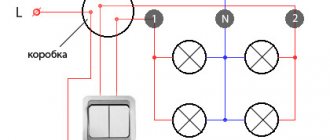
- Options for connecting two light bulbs to one switch
- What is illumination, color temperature, light brightness: calculation and illumination standards
Read with this
- Emergency lighting
- How to calculate how many lumens are needed per square meter in an apartment or other room
- Illuminance unit
- Spotlights in kitchen design: advantages and disadvantages, options for spotlights, how to choose the right one
- Proper lighting in the bathroom: design techniques + safety standards
- How to install light in a steam room?
- DIY installation and connection of the lamp
- Staircase lighting in a private house: 35 photos
- DIY garage lighting
- How to properly connect a backlit spotlight?
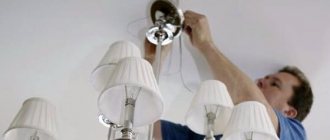
Direct installation of a track light on the ceiling
The process of surface-mounted installation of the system consists of several sequential steps:
1. At the first stage of work, the location of the busbars is determined, the desired connection option and a “drawing” made up of rails are schematically represented. The wiring is prepared and installed on the ceiling or wall, and the most appropriate mounting method is assessed - built-in, surface-mounted or suspended.
2. Thanks to the connectors, the system can have different lengths, be located straight or at an angle. If the standard tire length is too long, you can prepare it yourself. At home, the track is cut using a hacksaw (the material for making rails is most often aluminum).
3. After the preparatory stage, marking of the attachment points is made. Each tire has special holes for self-tapping screws. If they are not there, holes are drilled in the rail in the places where the screws will be installed.
4. Power is supplied from the edge of the bus where the terminal block is installed.
5. On the opposite edge, for the purpose of safety and protection of the busbar, a special plug is placed (supplied or purchased separately), which protects exposed conductive elements.
6. Power supply occurs in the standard way. Remove the cover from the connector and connect the wires.
7. Then tighten the support screw and finally fix the electrical wires. The connector is closed, 220 V is supplied to the bus.
Installation features
Installing and connecting track lighting systems is a fairly simple process that you can do yourself.
The luminaire is easy to install thanks to the busbar. In this case, it is necessary to decide in advance on the fastening used for this. After all, in order to install a track spotlight, for example, on a suspended ceiling, you will need certain brackets, and connecting lamps to a suspended ceiling will require special chains or cables.
The installation of this lighting system can be divided into the following stages:
Installation of the busbar itself
. There are several nuances here. When assembling the suspension system, the busbar will have to be mounted on the floor. Installation of an overhead or built-in track system is possible directly on the ceiling. To cut the busbar, which can be from 1 to 4 meters long, you can use a regular hacksaw. Installation of the lighting “base” may require the use of internal joints or rotary corners (depending on the linearity of the structure). The elements are connected to each other by simple snapping, as shown in the diagram below.
If the installation of a busbar involves the use of cables, then you should take care of special brackets that serve as connectors for the busbar with cables. The cables can be from 1 to 5 meters long; cutting them and adjusting them is not difficult. Connecting the overhead track requires screwing the busbar to the ceiling using self-tapping screws into pre-made connectors at intervals of 20 cm.
Connecting spotlights
. Connecting a track light to an already assembled busbar is quite easy. This process consists of snapping the spotlights themselves into the busbar and then securing them at the base near the busbar rail using rotating elements. The lamp (on the adapter) is equipped with a switch (wheel or rotary element), which must be used if the lamp does not light up when the system is turned on. Thanks to this mechanism, the spotlight is connected to one specific power phase (only in 3-phase busbars).
You can also learn how to connect a lighting device on a track in these videos:
If you plan to install a controlled busbar, which involves the use of LED track lamps with control, then the installation of such a system will be similar to conventional 3-phase and 1-phase busbars. However, connecting controllable track lighting requires a controller pin. It is recommended to connect it to a sensor control system for light levels and color temperature of light.
A track spotlight can also be an addition to ready-made systems. In this case, all that is required is to combine the busbars of 2 lamps by connecting them in series and then connecting them to the electrical network. The connection diagram of such a system assumes the correct distribution of the load level between the lamps.
That's all I wanted to tell you about installing and connecting track lights with your own hands. As you can see, installation is not difficult!
It will be interesting to read:
- How to make lighting in the house
- How to pay less for electricity
- DIY installation of spotlights
2.1. How to install a track light in a concrete and plasterboard ceiling
For placement on concrete and drywall surfaces, the steps are as follows:
1. After preparatory measures and markings, holes are made in the ceiling and dowels are inserted.
2. Determined with the length of the suspension. To do this, take one of the cables and cut off its excess part. Based on the finished example, the rest are prepared. You need to align the remaining cables very carefully to avoid a difference in their length.
3. Pass one end of the cable through the plate for fastening to the rail, the other is tied to a self-tapping screw.
4. The self-tapping screw is screwed into the dowel.
5. The fastening plates are inserted into the grooves of the tire and fixed.
6. Connect the power wires to the bus by opening the terminal block cover. After connection, close the lid.
After connection, close the lid.
2.2. Installation of track in Armstrong ceilings
Placement on an Armstrong-type ceiling surface is carried out as follows:
1. At the location of the track, remove the tiles from the ceiling. The tire itself does not have much weight, but the entire structure, with installed lamps, is quite heavy. Therefore, the busbar is always attached to the main ceiling.
2. Markings are made on the ceiling for the cables, holes are drilled and dowels are inserted into them.
3. Take a plumb line and mark the places where the cables pass through the tile, make through holes in the tile (2-3 mm in diameter).
4. Measure out the required part of the cable and cut off the excess - the sample is ready! Based on its length, other cables are prepared.
5. Pass a cable through the tile and fix it in the tire.
The suspension is passed through the plate so that the plate hangs securely on the ball. You need to make sure in advance that the ball is strong, will not come off, is securely fixed in place and does not pass through the hole.
6. The second end of the cable is tied to a self-tapping screw. The mounting plate is inserted into the grooves of the tire and secured with a screw. Next, repeat point 6 of the previous section (connect the busbar to the wires).
Two hangers are used to install rails 0.5 - 3 meters long. If the length of the rails is more than 3 meters, it is better to use a third cable to prevent the structure from sagging in the center.
How to connect the rails to each other
The rails are connected to each other through special connectors. Power cables are inserted into them, after which the individual tracks are connected into a single structure. Connectors are linear, angular, X-shaped, T-shaped, flexible:
Angled connector for connecting sections at an angle of 90° | T-connector |
X-shaped connector for connecting four sections into one system | The connector is flexible, used to connect tracks at different heights |
What the finished structure looks like is graphically displayed in this example:
Connection diagram for lamps on the track
The busbar connection is carried out according to the following schemes:
| Conventional busbar | Controlled busbar |
If you plan to install a large structure (several tracks along the entire surface of the ceiling with a dozen or more lamps), the busbar can be connected to three phases. Thus, different light sources will be turned on from different switches. This is convenient for large office spaces, while for living rooms, in most cases, a single-phase connection is sufficient.
Prices for installation of track lights
The average cost of installing track lights is 300 rubles
The average cost of work is based on the proposed prices of registered craftsmen. Prices vary based on the experience and qualifications of the craftsman, the cost of materials, and the complexity of the work. Most masters provide discounts, for example, when ordering several services or a large volume of work. You can find out exactly how much it costs to install track lights by contacting our specialists.
Installation prices
| LED Track Light Installation | from 200 rub/piece. |
| Installation of fluorescent track lamp | from 220 rub/piece. |
| Installing a halogen track light | from 230 RUR/pcs. |
People still order with this service
| Dismantling of lamps | from 150 rub/piece. |
| Installation of a pendant chandelier | from 400 rub/pcs. |
| Installing a simple chandelier | from 470 RUR/pcs. |
| Installation of a large chandelier | from 970 RUR/pcs. |
| LED chandelier installation | from 630 RUR/pcs. |
| Installing a chandelier on a suspended ceiling | from 580 RUR/pcs. |
| Installation of LED strip | from 150 rub/linear meter |
| Installation of switches | from 150 rub/piece. |
| Installation of sockets | from 200 rub/piece. |
| Cabling | from 30 rub/linear meter |
All prices for Electrical installation work
How to connect a lamp to a busbar
After installing the busbar, connect the spotlights. They are equipped with clamps that make it convenient to hang and remove the spotlights from the rails. To connect the lamp, the clamp is switched to the off state (indicated “OFF” or “0”).
Having decided on the installation location, the base is inserted into the busbar connector, and the clamp is rotated 90 degrees. That's all, the system is ready to go!
Should you trust the installation of track lighting systems to professionals?
Despite the apparent simplicity of connecting lighting systems, there are a number of difficulties that may arise for a person who decides to independently connect the track installation to the power supply. These are, first of all, difficulties with the correct connection of electricity, fastening of suspensions and drawing up a connecting structure.
Our company’s team of professionals will install electrical equipment, including track lighting installations at an affordable price.
How to move a spotlight on a tire
With tracks, you can change the position of light sources at any time, thereby illuminating certain areas of the room. But we do not recommend moving them along the busbar without disconnecting from the network. Firstly, this will not be easy to do, since the spotlight is in a fixed state. Secondly, this can loosen the mount to the ceiling, or even damage the adapter.
Track lamps in an industrial style interior
More details!
In order to change the location of the spotlight, first turn off its power (position “OFF” or “0” on the adapter). Then turn the lock 90 degrees and remove the lamp. At the new location, the adapter is inserted into the track and the lock is turned.
Changing the rotation angle is also recommended when the power is off. To avoid damaging the device, it is important to remember that the rotation angle around its axis is limited to 350 degrees (or less, depending on the model), and the tilt angle is limited by the length of the cable that connects the lamp to the adapter.
Connecting busbars to each other
The buses are connected to each other in several ways, depending on the final configuration of the track lighting installation and the location of the power supply.
The first method is to extend the busbar using a central connector. To do this you need:
- Place the central connector between the tracks and remove the cover from it.
- Connect the electrical cable to the contact group.
- Connect the busbars to each other by inserting the central connector at both ends.
- Tighten the mounting screws.
The corner connectors are connected in a similar way. In order to extend the length of the busbar without using a connector, conventional connectors are used.