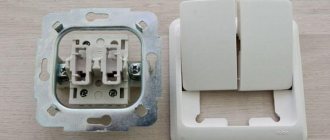
Stages of installation of spotlights
The connection process comes down to the sequential implementation of the following steps:
Stages of connecting a spotlight.
- design and layout;
- laying and pulling cables to installation sites;
- making holes and connecting;
- connection testing.
Such a detailed breakdown into stages is due to the fact that part of the work must be performed when forming the ceiling covering.
The location of the lamps is planned before covering it with finishing material, that is, during the installation of the frame.
Design takes on special meaning when there are several levels near the ceiling. In this case, it is necessary to provide wiring to the mounting points of the lamps at each level, taking into account the distribution of the luminous flux. Lamps that are located within the same level must form one single circuit.
When planning the number of spotlights that will provide the required illumination of the space, it is necessary to take into account that the distance from the wall to them should be no more than 60 cm, and the distance between centers should be 25-30 cm. In this case, the lamp should be no less than 30 cm from the frame cm. If the lamp is placed closer to the frame, then its installation at the final stage may be difficult.
The device of the lamp.
The presence and location of other lighting fixtures in the room affects the final number of fixtures. The spotlight can be equipped with a rotating mechanism, with which the direction of the light flow can be changed. Therefore, they can be diverted when using several lamps at the same time.
The wiring is laid during the installation of the frame. It is placed in special boxes or fixed on it in such a way that when making holes for spots, it is not difficult to get out. If it is not possible to select locations for installing spotlights during the installation of the frame, then you can lay the cable to only 1 lamp. And connect each subsequent spotlight to the previous one, stretching the wire already in the mounted ceiling covering. But this method of laying wiring somewhat violates safety regulations, since the wires remain lying directly on the surface of the suspended ceiling.
The cable, when laid along a frame or in protective boxes, can be used with 2 or 3 cores. The loop for attaching each spotlight is left 10-15 cm in size. It is attached to the frame near the location of the spotlight using a plastic tie. But the fastening should not be tight, so as not to cause difficulties when dismantling it during final connection.
Drilling holes for each spotlight is carried out upon completion of the ceiling installation. Proper design of spots placement allows you to avoid their location on metal frame elements. In addition, if the spotlight is located at the joint between the sheathing sheets, then it should be moved or the sheets redistributed so that the joint is moved to the required distance.
Connection diagram for several groups of lamps.
The holes are drilled with a drill with a special attachment - a hole saw, the central drill of which is installed in the center of the lamp location. A perfectly even circle is formed, which avoids unnecessary gaps. The diameter of such a saw should be 3-4 mm smaller than the corresponding external size of the lamp, but 3-4 mm larger than the internal dimensions.
After all the holes are drilled, you need to remove the loop of wire that was left for attaching the spot. If such loops have not been made or the wiring for each spotlight is not connected, then it is necessary to stretch the cable to them. Pulling the wire must begin from the outermost lamp, gradually moving further along the line of their installation. This can be done using a hook, which is made of strong wire.
Installation of recessed lamps
The method of installing such ceiling lamps, which are called recessed, is somewhat different. It should be noted that this type of light source is installed only on suspended ceilings and in specially made holes.
These holes are made during installation of the suspended ceiling. At the same time, wiring is supplied to the holes. From the very beginning you need to prepare a screwdriver, terminals for connecting wires, and a knife for stripping wires.
Installation depends on the design features. Some designs involve rigidly fixing the chamber to the body. In this case, you need to pull the wire out through the hole, clean the ends of this cable and connect it through the terminal block to the lamp itself.
This lighting fixture has spring clamps. They need to be pulled up and the device inserted into the hole. Next, the clamps are released. The lamp will fall into place. After that, all that remains is to screw in the light bulb.
If you need to dismantle this ceiling lamp, then you need to pull it down. The clamps will create some resistance, but it won't be much. The main goal is to pull the device out of the hole.
If the design of the recessed lamp provides for fastening the socket to the body thanks to a leash made of two wires, then before installing the body into the hole, you need to secure the light bulb itself.
Helpful advice: in cases where halogen light bulbs are used, care must be taken to ensure that the light bulb does not come into contact with bare hands. Otherwise the lamp will be damaged.
As you can see, the installation procedure for any ceiling lamp is very simple. However, in order for there to be light in the room, you not only need to install the ceiling lamp correctly, but you also need to know how to connect it correctly.
The main feature when connecting is that there should always be a switch. To make it convenient to use, it is mounted on the wall. The general connection sequence is as follows:
- The power cable is connected to the switch.
- A cable is led from the switch to the lamp.
It is worth saying that the connection of these wires should be made at the stage of installing the ceiling lamp. A prerequisite for installing and connecting the lamp is to turn off the current in the home electrical network.
Modern ceiling lights may have lamps that operate at different voltage levels, that is, 220 or 12 volts. It is this feature that is the reason that the connection of ceiling lamps is carried out according to different schemes.
How to install spotlights yourself
If we consider in more detail the installation method of these lighting devices, it should be noted that in order to connect them during the manufacturing process of finishing structures, supply wires must be laid with a reserve (200 - 300 mm) for the convenience of further switching. For electrical safety, the conductors must be threaded through a special corrugation and not come into direct contact with the metal elements of the frame (which can damage the insulation).
In the places where the spotlight is supposed to be installed, holes are made into which the devices will subsequently be installed. Here everything depends on the type of spotlight, so the size and type of mounting hole (round, square, triangular) must comply with the manufacturer’s recommendations (usually indicated in the product data sheet).
Holes can be cut using a knife, file, or milling bit (clamped into the chuck of an electric drill), and it is recommended to do this procedure in stages. First, the hole itself is made, and then a finer adjustment is made using a file, sandpaper, or knife so that the lamp body fits tightly into the prepared hole. If the spotlight is planned to be mounted in suspended ceilings, then it is necessary to provide a protective ring on the front surface of the material. (We recommend reading about how to install spotlights in suspended ceilings in the following material: https://domgvozdem.ru/index.php/elektrika/262-ustanovka-svetilnikov-v-natyazhnykh-potolkakh)
The connection diagram for spotlights is quite simple and involves switching devices to cable cores at three points (phase, neutral, ground). Moreover, the correct electrical connection can be checked using the corresponding indicators on the terminal block of the spotlight (L, N, PE - respectively).
In general, luminaires must be connected to each other in a parallel circuit, when each subsequent device is connected by a loop from the previous one (from phase to phase, from zero to zero, etc.). Moreover, any number of branches and with any number of lamps can be connected in this way. Limitations may only apply to the total power consumption of lighting systems.
After the lamp is connected to the appropriate conductors, it is recessed into a pre-prepared hole and fixed in it using special spring-loaded brackets.
How to install spotlights: step-by-step instructions
Like many other types of work, the installation of spotlights in drywall begins with markings - the placement diagram of spotlights, copied or saved in some other way, is transferred to the ceiling structure, and holes of the required diameter are drilled in accordance with the received marks. For these purposes, use a special crown mounted on a drill or screwdriver - you must drill carefully so as not to damage the wires with the crown.
When the mounting holes are ready, the wires previously hidden under the ceiling are taken out and the loops are cut. After that, the resulting two ends of the cable are bifurcated - you need to separate the individual wires and clean them of external insulation. This is done with a knife or a special tool.
DIY installation of spotlights
The next step is to strip the ends of the four separate wires. If the installation of spotlights (or rather, their connection) is carried out using terminals, then a small section of the wire (approximately 5-7mm) must be removed from the insulation. If you plan to twist, then it is better to strip the longer end, since long twists do not get very hot and do not pose any danger, even if they are not soldered.
How to install spotlights with your own hands - master class
The stripped ends are twisted in pairs, observing the color of the wires - blue must be connected to blue, and brown to brown. If the installation of spotlights in drywall involves grounding, then under no circumstances should it be abandoned. In this case, the wiring must be done with a three-core wire - green or yellow wires must also be twisted, observing the color scheme. The twists must be pulled tightly with pliers.
Installation of spotlights in drywall photo
Well, then everything is simple - we take the lamp and connect it to the twisted wires. The main thing here is not to confuse the grounding wire coming out of the lamp. The different colors of the wires will help in this matter - the yellow or green wire must be connected to the corresponding wire of the electrical wiring. You don’t have to worry about the other two - one lamp wire to one twist, the other to the remaining one.
Connecting spotlights photo
Particular attention must be paid to the insulation of the twists - the electrical tape must be wound tightly and in several layers
DIY installation of spotlights
The spotlight connected in this way can only be inserted into the mounting hole
If you pay attention to the back side of the lamp, you will see two releases - they are tightened by hand and, after the lamp is slightly inserted into the hole, they are released. Then the spotlight itself takes the position it needs and is securely fixed in the mounting hole
Installation of spotlights in drywall photo
At the final stage of work, a light bulb is installed in the lamp.
DIY installation of spotlights
That's it, now you can get down from the stepladder, turn on the power supply and enjoy the work done.
As you already understand, installing spotlights is not only easy, but also simple. There is no need to call a qualified electrician for these purposes, and you can do it yourself.
Author of the article Dmitry Vorokhov
How to find “power” for a lamp?
A pressing issue for people who want to install a spotlight on their own is the source of power supply for the lamp. The most relevant options (by popularity) are:
- Power socket;
- General lighting switch;
- The actual distribution board.
The last option is used extremely rarely, as it is extremely expensive and not optimal. A similar solution is resorted to in cases where increased power consumption is implied. Modern LED spotlights are devices that are economical.
If you plan to conduct wiring from the switch, then make sure that the connection is made before the “cut-off” mechanism. If you do the opposite, the lamp will turn on and off together with the lamp or chandelier. Of course, in some cases such a solution is justified, but such tasks are rare.
If your budget allows, then choose the so-called. “smart” spotlights that can be controlled using a remote control or even from a smartphone or any other personal device. Such solutions are becoming increasingly popular, but few people know about them yet.
Connection diagram
If the owner of the house conducts electricity with his own hands, then before connecting the ceiling lamps, he must provide in advance places for all lighting devices and only then begin the connection. The choice of location and wiring diagram depend on the following factors:
- room size;
- planning;
- furniture installation.
If the ceilings in the house are high, you can connect not a ceiling lamp, but a hanging one. Typically, there is one way to connect ceiling lights. To do this, it is enough to connect the appropriate wires, insulate them, then install special devices on the ceiling that are included with the lamp. And it’s a completely different matter if the question concerns connecting ceiling spotlights.
Today, manufacturers offer a variety of lighting devices, the connection of which is not much different from a chandelier in terms of complexity. The most popular option is considered to be a spotlight, which not only provides good lighting, but is also economical in energy consumption. Such a lamp requires the use of different lamps, although the most preferred are LED lamps, which are more efficient and significantly save energy.
To connect spotlights, not one circuit can be used, but several different options, such as:
- sequential connection diagram - in this case, the connection of lamps in the suspended ceiling is carried out only on one wire, that is, in this case, the connection is made in a row for several individual lamps: the advantage of such a scheme is the ease of installation, and the disadvantage is the need to connect rectifiers in the circuit, since otherwise In this case, the voltage is supplied unevenly and the light bulbs begin to burn out one after another;
- The second scheme for connecting spotlights on suspended or suspended ceilings is that each lamp is connected to its own separate wire coming from the junction box: in this case, a rectifier is also required, but the safety and reliability of such a connection is much higher.
Installation of point light sources
The connection diagram for recessed luminaires in a suspended ceiling is not complicated. You can even install spotlights yourself. When choosing a circuit for installing such devices, it is necessary to take into account that the length of the electrical wiring between them and the current transformer should not exceed 2 meters.
To install lamps of this type in a suspended ceiling, proceed as follows:
- First of all, lay the electrical wiring.
- Next, mark the ceiling surface.
- A drill is used to make a hole in the canvas. If the recessed lamp is square in shape, you can use a jigsaw.
- The cable is pulled into the hole made, but before doing this, it must be de-energized.
- Then the cable is taken out.
- The lamp is connected to the cable.
- The installed lighting fixture must be fixed in the hole made. To do this, use spring clamps, which are located on the body of the light source.
- At the final stage of installing a spotlight in suspended ceilings, a light bulb is inserted into it and a decorative ring is put on.
Installation of spot and LED lighting
The connection diagram for spotlights is also not particularly difficult. When installing, maintain a distance (minimum 10 cm) between the base and suspended ceiling covering.
Proper installation of lighting fixtures will cover all wiring connections. The housings will not be visible.
Point ceiling devices require a certain voltage. For this, several transformers are used, which reduce the voltage and do not affect the ceiling sheet.
Connection:
- simple installation - several light bulbs running separately are connected to one wire. To prevent light bulbs from burning out, take care of the rectifiers in the circuit;
- another option. From the distribution box there is a connection via a separate wire to each light bulb. In this case, a rectifier is not needed.
Connecting LED ceiling lights does not require any special skills. The installation is not difficult to do yourself.
LED ceiling lighting fixtures differ from other options in that the LEDs are mounted directly into the lamp body. If the light bulb stops working, then it will not be possible to replace it - you need to completely replace the failed lamp.
To connect LED lights on the ceiling, you need to calculate their number and determine the location on the ceiling. The diagram should show how to connect light bulbs in a suspended ceiling. Choose light bulbs based on wattage.
Connecting LEDs cannot be called easy. How to do it:
- make holes in the hanging panel for LED connectors;
- after connecting the wires, secure them with dowels to the base surface;
- The connection of all lamps must be carried out with a stranded wire and according to the diagram. The wires must be soldered before installing the suspended covering;
- After connecting to the network, secure the LEDs to the ceiling by snapping them into place.
Make sure that the bulbs do not get too hot. Otherwise, the ceiling canvas may be damaged.
Types and types of recessed lamps
There are different types of recessed luminaires: fixed and rotating.
Ceilings, in turn, are divided into suspended (rack, tension, plasterboard) and concrete.
The type of lamps used for lighting also matters. The fact is that each type is characterized by a certain level of immersion in the ceiling.
- Incandescent lamp - up to 12 cm. But at present this type can be considered obsolete and practically not used for spot lighting.
- Halogen lamp – 6 cm.
- LED lamp - to a depth of 2 cm.
- Fluorescent lamp - at least 8 cm deep.
Recessed LED lamps are very original and easy to use, but their functionality should be taken into account.
The number of lamps should be calculated in such a way that they are sufficient for good lighting.
If necessary, it is not at all difficult to replace the lamp in the lamp with a model of a different type, for example, a halogen one with an LED one. There is no need to change the depth of the insert.
Installation with ceiling hook
Typically, a hook for securing lighting fixtures is installed during construction work. In this case, before hanging the chandelier on the ceiling, you need to check its strength.
Mounting hook
To check, for some time a load corresponding to the weight of or slightly heavier than the chandelier is suspended from the installed hook. If the attached load has not shifted, you can safely hang the chandelier in place. If the fastening hook has moved, or even fallen out, you can carry out the installation work yourself.
Testing the hook with the weight of a chandelier
To do this you need:
- use a puncher to make the required hole (if it does not already exist);
- a properly selected metal anchor or a folding spring dowel with a ring is inserted into it. It should fit snugly against the inner surface of the drilled hole;
- It is enough to screw a strong self-tapping hook into a wooden ceiling.
Read: DIY ceiling lighting
This is the simplest method that describes how to attach a chandelier to the ceiling.
Schematic mounting of the holding element
If the ceiling is finished with plasterboard or a tension fabric is installed, the work of attaching the chandelier to the hook may become more complicated.
Plasterboard sheets are quite durable, so a small lamp can be mounted directly onto the material itself, but it is worth considering small nuances:
the weight of the attached lighting device should not exceed 6 kg; It is worth paying attention to the fact that when replacing lamps, you can damage the sheets or accidentally touch a low-hanging lamp with your hand.
If this has not been done, then you can hang the chandelier on a spring dowel or a special butterfly installed in a drilled hole. The dowel will need to be tightened with a special nut, and the butterfly spacer will need to be tightened with a self-tapping screw until it clicks. All fasteners must be equipped with a pin or hook to which the chandelier is attached.
One of the options for mounting a chandelier if the ceiling is made of plasterboard
When installing a stretch ceiling, you must take care in advance of how to secure the lamp. It must be remembered that a stretched canvas cannot serve as a fastening base for a chandelier. When installing a suspended ceiling, workers, before cutting a hole for attaching a lamp, glue a thermal ring in advance. If this is not done, then it will be impossible to hang the chandelier from the ceiling, since the stretched fabric will tear. Connecting wires are routed through the cut hole.
With this option, you first need to hang the chandelier on a hook, and then connect the electrical wires, after which the attachment point is covered with a decorative cap of the lamp.
Mounting diagram for suspended ceiling
Built-in lamps - installation
Before you begin the installation, you should sketch out its detailed plan:
- An important characteristic is the required level of illumination, which is determined using special calculations. To do this, the estimated number of lamps is multiplied by the known power of the lamp, then the resulting number
divisible by twenty. Through such calculations, we find out the surface area that the device is able to illuminate with high quality. - You must take into account all the lighting fixtures (light sources) available in the room - both the main chandelier and additional fixtures: floor lamps, sconces, etc.
- We determine the future location of the lamps on the surface of the walls and ceiling. It can be linear, figured, point. You can make a skillful imitation of a real starry sky.
- Based on the above, we purchase the required number of selected lamps.
Before purchasing a lamp, you should not cut a hole in the ceiling for it. It may well not be similar to the dimensions of the device indicated in the annotation.
It is best if the arrangement of lighting and installation of suspended ceilings is carried out approximately simultaneously.
Electric installation work
The most important and mandatory part of the work is the installation and connection of electrical wires.
What is the sequence of operations?
First you need to draw a diagram on which the transformer, all intended lamps, and leads to the switches should be marked.- We select the optimally suitable type of wiring. It must be well insulated and waterproof. VVG or ShVVP models, often used specifically for connection, are well suited for this purpose. They are able to withstand temperatures up to 35 degrees and humidity levels up to 98 percent. These are the most suitable characteristics for our climate. Such wiring is also suitable for placement in the bathroom, where the humidity is often extremely high: it successfully withstands it.
- The network is mounted under a plasterboard or suspended ceiling.
Connecting a halogen lamp
Chandeliers with halogen-type lamps do not always operate from a 220 V alternating voltage network - these can be products designed for an alternating voltage of 6, 12 or 24 V. Therefore, in the second case, a step-down transformer will be needed.
Sometimes the manufacturer in each model of a lighting device operating on halogen lamps builds in special transformers to reduce the current.
In this case, the circuit is already assembled and all that remains is to install it. 2 cables remain unused, which are connected to the ceiling wiring, and the connection is made arbitrarily.
The diagram shows the principle of connecting a chandelier with an electronic transformer. This variation of the lamp has a controller unit. On the back of its case there is a connection plan. In the diagram: PE – ground, N – zero, L – phase
Chandeliers, which include a remote control, can be of various modifications: with halogen, LED or incandescent lamps.
There are also models of combined type. This device is complicated by the presence of a radio control unit. Essentially, this controller is a wireless device that is controlled via a remote control or a standard key switch.
Connecting such a lighting device is carried out similarly to the previous model, however, another wire will be added here, the thinnest of all.
This is an antenna through which the communicating actions of the remote control and controller are reproduced. It remains unchanged inside the glass of the chandelier.
Materials and accessories
To install and connect spotlights, you will need the following materials and tools:
- long nose pliers;
- construction tape;
- stationery knife;
- a regular screwdriver and with an indicator;
- wire stripper;
- wire VVgng 3x1.5 mm2;
- perforated mounting tape;
- electrical clamps;
- perforator;
- thermal rings;
- dowels
Making an embed for a lamp
Embeds for spotlights
At the very beginning of the installation of lamps, a mortgage is made. There are ready-made products for such purposes:
- universal;
- for a specific diameter.
In universal products, a hole is cut in accordance with the diameter of the lantern. After that, still below, the body is fitted to it in order to avoid sudden problems when stretching the ceiling fabric.
The largest distance between the bottom edge of the profile and the base ceiling is measured. This is necessary in order to cut the perforated tape to the required length.
Next, you need to bend the cut paper tape, giving it a U-shape. The dimensions directly depend on the diameter of the lamps used. Next, the tape is attached to the mortgage using small self-tapping screws (“bugs”).
After assembly, the entire structure is attached to the main ceiling. Holes are drilled using a hammer drill, according to the previously made markings, and the embedded platform is screwed using dowels.
Connecting the cable
Wiring for spot lighting
The supply cable for the VVGng marking is laid before stretching the fabric in accordance with the route for placing the light points. The minimum cable cross-section is 1.5 mm2. It is impossible to use less even with light loads.
At the location of the lighting device, it is necessary to leave a supply of cable in the form of a small loop (this will be cut later). This loop should go down to a level of at least 10 cm from the finished ceiling.
Terminal blocks and piercing clamps
The cable loop is cut in half, the protective insulation of 10 mm is removed from the wires and they are connected back through the terminal block. The remaining free terminal will serve to connect the power cable from the light spot itself. This type of connection is called parallel.
If you use piercing clamps instead of terminal blocks, you do not need to cut the cable loop. When using them, only the upper protective sheath is removed from the cable, the internal conductors remain intact. They must be inserted into the piercing clamp, into its upper part, and the device must be snapped into place. Integrated knives automatically pierce the insulating layer, forming a reliable contact. The wires to the light spot are connected to the bottom of the clamp using the same method.
Installation of thermal ring
The thermal ring protects the ceiling from overheating and allows you to carefully cut a hole for the lamp
After connecting the cables, you need to place a thermal ring of the required diameter on the canvas, using special glue for this. These rings are made of heat-resistant plastic. It is able to withstand temperatures up to +90 degrees for a short time.
The thermal ring has two main functions:
- protection of the canvas from the temperature effects of lighting devices;
- mechanical protection - before making a hole in a suspended ceiling for a spotlight, be sure to glue a thermal ring; it will not allow the fabric to separate at the cut points.
The glue is applied evenly around the entire perimeter of the ring. There should be no un-glued areas. There is no need to move your finger along the ring while pressing it to the ceiling; due to the glue, it may move to the side. A simple squeeze is enough.
Then, using a stationery knife, the canvas is carefully pierced and a hole is cut inside the ring.
Rules for installing lamps in suspended ceilings
The installation of spotlights in the bathroom will have general principles for attaching ceiling-type lighting fixtures with the work carried out in the living room. However, given the increased humidity of the room, it is logical that specific nuances arise. Let's consider what is needed to carry out high-quality installation of lamps in suspended ceilings.
Materials and accessories
Tools and material that you will need to install mortgages and connect spotlights:
- pliers, or better yet, narrow “platypus”
- roulette
- cable VVGng-Ls 3*1.5mm2
- electrician knife
- stationery knife
- indicator screwdriver
- punched paper tape 12*0.7mm or rigid adjustable stand
- Wago clamps
- thermal ring
- screwdriver
- hammer drill
- dowel-nails
Calculation of the required quantity
Installation of lamps in suspended and suspended ceilings is carried out when the power supply to the room lighting system is turned off through the apartment panel. Make sure that children or unauthorized persons do not have access to it during work. To fix the lighting element, the following methods are used:
- fix the mounting adapter to the base ceiling. Its thickness corresponds to the width of the gap between the decorative canvas and the ceiling slab. It is fixed on the base plate, and then the selected chandelier is suspended from it;
- as an alternative, there can be a special extended hook that will support the weight of the chandelier after installing the canvas.
Hook for a chandelier Platform for a lamp
This principle also applies when installing lamps in a plasterboard ceiling. Initially, the location of lighting devices is planned, electrical wiring is installed, checked and tested for operating efficiency. Otherwise, it is necessary to dismantle the decorative ceiling. It is a mistake to think that the installation of the ceiling is primary - it’s the other way around.
It is recommended to purchase devices of the same type to organize lighting of one type. When choosing, it is determined that the installation of lamps in suspended ceilings is carried out on the basis that each light source is directed vertically downwards and covers an area of about 1.5-2 m2. Based on the area of the room, it is enough to simply calculate the required number of lamps. In addition, the efficiency of different lamps differs, so carefully read the characteristics of the equipment being installed.
If the design solution involves not only lighting, but illumination of the ceiling in any color, then LEDs will be added to the lamps. These are modern energy-saving analogues of the usual halogen and incandescent lamps. They are more expensive, but at the same time they have a long service life and do not create the flicker effect, which is so harmful to eye health. The number of LEDs must be calculated based on the technical characteristics offered by a specific manufacturer.
Options for placing lamps on the ceiling
Marking
When using a level, you can first make all the marks below, and then use a laser to transfer these points directly to the ceiling.
When marking on the floor, it is convenient to work not with a tape measure, but with a pre-made template. For example, a piece of plinth or plastic cable channel, cut to a certain length corresponding to the distance between the light points.
To avoid damaging the floor covering, use paper tape.
After stretching the canvas, thanks to the marks on the floor surface, it will be very easy to transfer all these fastening points to the finished ceiling.
The main thing is to maintain a minimum distance from the edge of the hole in the PVC film and baguette.
It should be at least 2.5-3cm.
Making an embed for a lamp
First, prepare a mortgage. There are ready-made mounting platforms for installing lamps in suspended ceilings. They are:
- universal
- for a specific diameter
If you have a universal one, then cut a hole in it according to the diameter of the lamp.
After this, be sure to try on the body for it below, so that later, after stretching the ceiling, unexpected problems do not arise.
Next, check the greatest distance from the base (main) ceiling to the lower level of the profile. This is necessary to cut the punched paper tape to the required size.
measuring the distance from the base ceiling
measuring the distance on the platform
Then you bend this same tape, giving it a U-shape (the size depends on the diameter of your lamp):
After which, it needs to be secured using so-called “bugs” on the mortgage. “Bedbugs” are mini screws 3.5*11mm
If the design of the lamp does not provide for such fastening with self-tapping screws, then simply pass the tape through special slots under the embed and bend it at the required height.
Instead of tape, you can use an adjustable stand.
It is of course more rigid in design, but not so universal.
Some people cut off a small piece of tape, 3 holes long, and bend it to create an additional fastening for the power wire.
You can't do that. You can easily damage the cable sheath. It is better to use a plastic clamp for this purpose.
After assembly, all that remains is to secure the entire structure of the mortgage to the base ceiling.
Use a hammer drill to drill a hole in pre-marked areas and use dowel nails to screw the mortgage to the ceiling.
Installing adjustable stands
As a preparatory stage, the embedded elements are installed, mounting racks with the possibility of regulation. The lamps will be fixed to them.
The adjustable spotlight rack includes:
- a plastic ring, the diameter inside of which is equal to the landing diameter of the spotlight;
- 2 guide elements, with the help of which the height of the light source is adjusted.
The lamp, which we see inserted into the hole of the stretched decorative fabric, is actually mounted on the main ceiling. When installing the mortgages, position them so that the lamp body does not interfere with the installation of the PVC sheet in the future. Screws and dowels are used to secure the posts to the concrete base of the base slab.
Adjustable Stand Installation Diagram
Methods for attaching a chandelier
The last point mentioned, fastening methods, is the most important for the correct installation of the chandelier on a ceiling covered with film.
Since chandeliers can have several types of fastening, you need to immediately decide on the fastening in order to carry out the preparatory work correctly.
At the moment, three methods of fastening a chandelier are used.
The first - fastening to a mounting hook is the simplest and most common.
It can be used for many lighting devices and can provide both small and fairly large chandeliers.
The second method is fastening to a mounting plate. A small wooden beam is used as a mounting strip, which is attached to the main ceiling, and a chandelier is already attached to it.
Usually used for not very large chandeliers.
The last method is usually used for large chandeliers that have significant weight - mounting on a cross-shaped bar.
How to attach a chandelier to a suspended ceiling with a hook
After a pass-through hole has been made on the decorative trim to access the rough ceiling, you can try to install a regular hook. To do this, we use a hammer drill with an 8-10 mm impact drill. We punch a hole to a depth of at least 4 cm. Carefully blow the dust out of the hole, insert the sleeve and screw the anchor hook to the level of the stretch ceiling.
This method has an unpleasant feature: setting the hook at the desired height is very difficult, so most often the decorative overlay ends up being pressed a little harder to the surface of the stretch ceiling. As a result, after a couple of months a circular dent forms on the decorative ceiling. If you need to replace the chandelier with some other lamp, then traces from the previous device will be clearly visible on the ceiling.
Therefore, before placing the chandelier on the hook, it is necessary to accurately measure the height of the suspension so that the decorative cap is installed on the ceiling without gaps, but does not cut into the elastic panel.
How to hang a chandelier on a suspended ceiling using a mounting strip
Hanging a lamp with a hook is considered a reliable, but not always convenient and justified way. For example, modern chandeliers and ceiling fixtures often use special mounting strips for fixation and suspension. Instead of one standard hinge, the design of the lamp has a round or elongated mounting profile, as well as a counter strip that must be mounted on the concrete ceiling using dowels.
What looks simple for a concrete ceiling turns into a serious puzzle in the version with tension cladding. Even if you make a hole in the cladding, it is almost impossible to secure the mounting strip to the slab. In this case, you have to either increase the size of the hole to match the dimensions of the fastener, or use the option of an embedded block. The latter method turns out to be less labor-intensive, and in addition, there is no need to cut huge holes in the tension fabric.
In order to fix the chandelier using a standard mounting strip, it is enough to punch holes in the plate with a puncher, as in the previous case.
Next, we use a long dowel, 100-120 mm, and a small plastic sleeve, which can be made from a ¾-inch piece of polypropylene pipe.
Installation of the chandelier is carried out in the following order:
- We drill three holes in the mounting strip, one in the center according to the diameter of the dowel, two at the edges, according to the size of the mounting strip fasteners;
- We place a plug under the dowel into the hole punched in the concrete;
- We install a plastic sleeve over the hole in the concrete slab, place a wooden block with a previously attached strip behind the suspended ceiling and secure the entire structure with a long self-tapping screw.
All that remains is to adjust and trim the height of the plastic sleeve so that the mounting strip is located exactly at the level of the stretch ceiling. Next, we connect the wiring and fasten the chandelier to the mounting plate using standard screws and nuts.
How to attach a chandelier to a suspended ceiling using a cross-shaped strip
Ceiling lamps and chandeliers with a wide suspension base are becoming more and more fashionable. As a rule, these are models with a very large base. It is difficult to secure such a structure on one hook or even a mounting plate with two fixation points. Therefore, it is necessary to use an additional device in the form of a cross bar.
This is essentially an upgraded, slightly larger double mounting strip.
There are two ways to attach a chandelier to a cross-shaped adapter:
- Cut holes in the suspended ceiling for installing the entire cross;
- Make five holes for the adapter attachment points, along four beams and one central one for wiring.
The first option for installing a chandelier is not particularly popular, unless the apartment owners want to recess the entire structure of the lamp deep into the stretch ceiling.
The second method is much simpler. To attach the chandelier, it is necessary to transfer the markings of the position of the holes to the canvas, glue the adapter rings, cut out the holes and install plastic bushings, and secure the “cross” to the tension decor.
How to hang a chandelier from a suspended ceiling using a butterfly dowel
One of the most popular modern types of fasteners is called a butterfly or spreading dowel. Its general structure is shown in the diagram below. The butterfly is ideal for mounting any chandeliers and lamps on plasterboard ceilings.
Butterfly dowels can also be used for suspended ceilings. But only under one condition - if before installing the decorative canvas on the rough ceiling, a hanging loop was made and installed. One of the options for such an intermediate fastening is shown in the photo below.
This method of installing chandeliers is used if several types of lamps are to be installed in the room. In this situation, it is quite difficult to accurately mark and indicate the attachment point. Therefore, they attach a small wooden board on soft perforated tapes, to which the chandelier will later be suspended using a dowel.
After the suspended ceilings have been installed and the passage hole has been cut, you will only need to adjust and adjust the height of the platform, drill holes for installing dowels, insert a spacer sleeve and tighten the fasteners.
Connecting the cable
The VVGng-LS 3*1.5mm2 power cable must be laid in advance along the luminaire location route.
You cannot use any kind of wires and cords, such as SHVVP, as home lighting wiring. The approved brand is VVGnG-Ls, or NYM. In this case, select the minimum permissible cross-section of group cable lines to be at least 1.5 mm2 . No 2*0.75mm2! Even if your load is very small.
In the place where the light spot will be located, leave a supply of cable in the form of a loop (it will need to be cut later).
This loop should hang at least 10-15cm from the already stretched fabric or the lower edge of the embed.
Placement of spotlights
Carry out the necessary electrical installation work - to each point where you plan to place the device you need to stretch and secure a cable. After the preparation is completed, the suspended ceiling is installed. Now we proceed to the final stage - we install the lamps in the decorative fabric.
A mounting profile in the shape of a circle is glued directly onto the PVC film in pre-designated places where the fixing brackets were previously installed. A hole is cut in the canvas along the inner contour where the lamp will be inserted in the future. You need to cut carefully and clearly, otherwise defects in the blade may occur during installation.
Next, the mounting posts are placed at the same level with the ceiling canvas. To do this, adjusting screws are used. Electrical conductors are led out through the hole. Carefully connect the wires and connect the lighting fixtures. It is better to use a terminal block for connection. Before installation, place the thermal insulation ring included in the kit on the lamp body. It will prevent overheating of the tension fabric and will protect the lamp from contact with PVC film.
If you are thinking about how to make lighting in the bathroom, then follow the proposed algorithm. The light in the bathroom should be bright enough, but not hurt your eyes. In addition to lamps, you can decorate the ceiling relief with LED strip. When running the cable, keep in mind that the lighting fixtures should be located at a distance from previously installed heaters and showers to prevent water and steam from entering. Does the light come on from outside or inside the bathroom? Decide in advance on additional electrical work.
Wiring for lighting fixtures should be done before installing the tension fabric. Cuts are made in the tension fabric through which the wires are released. Installation of a spotlight
Installing a chandelier on a suspended ceiling
The work of installing a chandelier on a suspended ceiling is more labor-intensive due to the processing characteristics of the material from which the ceiling is made. Our specialists will carefully prepare holes for installation so as not to damage the integrity of the canvas.