Stabilizer selection
In the on-board network of the car, the operating power is approximately 13 V, while most LEDs are suitable for 12 V. Therefore, they usually install a voltage stabilizer, the output of which is 12 V. Thus, normal conditions are provided for the operation of lighting equipment without emergency situations and premature failure.
At this stage, amateurs are faced with the problem of choice: many designs have been published, but not all work well. You need to choose one that is worthy of your favorite vehicle and, in addition:
- will actually work;
- will ensure the safety and security of lighting equipment.
Integral stabilizer
The devices are assembled using small-sized microcircuits capable of operating at an input voltage of up to 26-30 V, delivering a constant 12-volt current of up to 1 Ampere. A special feature of these radio components is the presence of 3 legs - “input”, “output” and “adjustment”. The latter is used to connect an adjustment resistor, which is used to adjust the microcircuit and prevent it from overloading.
More convenient and reliable equalizers assembled on the basis of stabilizing microcircuits are gradually replacing analogues assembled on discrete elements.
The simplest DIY voltage stabilizer
If you have no desire to buy a ready-made device, then it’s worth learning how to make a simple stabilizer yourself. It is difficult to make a pulse stabilizer in a car with your own hands. That is why it is worth taking a closer look at the selection of amateur circuits and designs of linear voltage stabilizers. The simplest and most common version of a stabilizer consists of a ready-made microcircuit and a resistor (resistance).
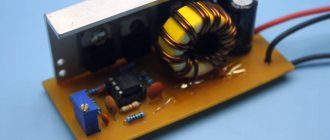
The easiest way to make a current stabilizer for LEDs with your own hands is on the LM317 chip. The assembly of parts (see figure below) is carried out on a perforated panel or a universal printed circuit board.
The device allows you to maintain a uniform glow and completely eliminate the blinking of light bulbs.
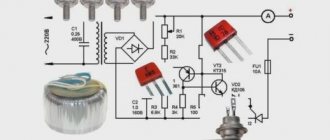
Scheme of a 5 ampere power supply with a voltage regulator from 1.5 to 12 V.
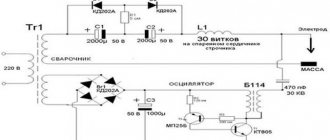
To assemble such a device yourself, you will need the following parts:
- plateau size 35*20 mm;
- chip LD1084;
- RS407 diode bridge or any small diode for reverse current;
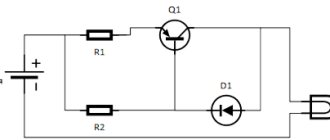
- a power supply consisting of a transistor and two resistances. Designed to turn off the rings when the high or low beam is turned on.
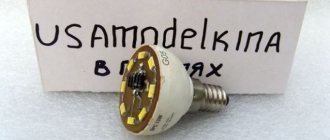
In this case, the LEDs (3 pcs.) are connected in series with a current-limiting resistor that equalizes the current. This set, in turn, is connected in parallel to the next similar set of LEDs.
Voltage stabilizer for LED lamps in cars
So, why do marker bulbs, LED bulbs or other LED bulbs that are in the car burn out so quickly, because they use a regular current-limiting resistor as a driver.
As a rule, LED lighting devices with a power of 10 W and above already use a high-quality pulse stabilizer - the driver does not suffer from such a disease, unlike large, cheap LED lamps.
First, these light bulbs begin to flicker, that is, these are already the first signs of crystal degradation, and then they simply burn out. On average, a simple LED light bulb has a lifespan of one year, sometimes less, sometimes a little more.
Why is this happening?
And this happens because this current-limiting resistor is calculated using a specialized formula (there are many such calculators online on the Internet) and is connected to the appropriate voltage.
And here the manufacturer does a very clever thing: on some sockets it says 12 volts, that is, the current-limiting resistor for this light bulb is designed for 12 volts. And in a car circuit, as we know, the voltage is not only 12 volts, but also reaches 14.5 volts. That is, from this we conclude that an LED light bulb at 12 volts is already operating at maximum power, and already more than 12 volts there is severe wear on the LED crystal, in a word, severe overload.
So, how can we make sure that they don’t burn out? I, too, was tired of changing them at one time, so I decided to study this issue thoroughly and make a converter in which the LED light bulb became almost eternal.
Of course, there are converters on Ali Express that are already designed for these purposes,
but there is one BUT... they produce high-frequency pulse noise, but this is inherent in all switching power supplies. This gives a lot of interference, for example, when using FM modulators, especially when listening to the radio, and even just interference into the speaker system. From this point of view, you should try to fill your car with switching power supplies as little as possible.
Therefore, we will make a linear stabilizer with a fixed voltage, which has great advantages. The first advantage is that it costs mere pennies compared to impulse ones. Secondly , the stabilizer is linear and does not produce any interference or high-frequency interference at all.
Stabilizer for LEDs on the L7812 chip in cars
The current stabilizer for LEDs can be assembled on the basis of a 3-pin DC voltage regulator (L7812 series). The mounted device is perfect for powering both LED strips and individual light bulbs in a car.
Required components to assemble such a circuit:
- chip L7812;
- capacitor 330 uF 16 V;
- capacitor 100 uF 16 V;
- 1 ampere rectifier diode (1N4001, for example, or a similar Schottky diode);
- wires;
- heat shrink 3 mm.
There can actually be many options.
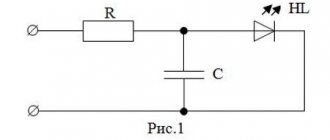
DIY simple linear current stabilizers for LEDs
It is known that the brightness of an LED depends very much on the current flowing through it. At the same time, the LED current depends very sharply on the supply voltage. This results in noticeable brightness ripples even with slight power instability.
But ripple is not scary; what’s much worse is that the slightest increase in the supply voltage can lead to such a strong increase in the current through the LEDs that they simply burn out.
To prevent this, LEDs (especially powerful ones) are usually powered through special circuits - drivers, which are essentially current stabilizers. This article will discuss circuits of simple current stabilizers for LEDs (on transistors or common microcircuits).
Connection diagram based on LM2940CT-12.0
The stabilizer body can be made of almost any material except wood. When using more than ten LEDs, it is recommended to attach an aluminum radiator to the stabilizer.
Maybe someone has tried it and will say that you can easily do without unnecessary troubles by directly connecting the LEDs. But in this case, the latter will be in unfavorable conditions most of the time, and therefore will not last long or will burn out altogether. But tuning expensive cars results in a fairly large sum.
As for the described schemes, their main advantage is simplicity. Manufacturing does not require any special skills or abilities. However, if the circuit is too complex, then assembling it with your own hands becomes unreasonable.
Types of stabilizers
According to the method of limiting the current, there are two types of devices:
- Linear;
- Pulse.
A linear stabilizer operates on the principle of a voltage divider. It releases a current of a given parameter, dissipating the excess in the form of heat. The operating principle of such a device can be compared to a watering can equipped with an additional drain hole.
Advantages
How to avoid 3 mistakes when soldering a circuit
- Before starting all soldering work, be sure to select the most suitable soldering machine for assembling the microcircuit. The old one lying at home or in the garage is suitable only for experienced people, but a beginner will ruin the board, unable to cope with the power. The most suitable voltage range for connecting boards and wiring is 15-30 watts. We don’t use more power, otherwise the board will burn out and you’ll have to start all over again with new parts.
- Before you start connecting parts by soldering, make sure that the circuit is well cleaned. For high-quality processing, a simple composition is used - any soap is mixed with clean water. Afterwards, a clean napkin is dipped into the prepared solution and the board is wiped very efficiently over the entire surface. If there are traces of soap left on the metal, wipe them off carefully with a dry cloth. Quite dense deposits are often noticed on boards. To get rid of them, you will have to go to an electrical store and buy a special cleaning composition. The sellers will tell you everything you need. We process the area until a slight metallic sheen appears.
- We place the contacts on the board in the correct sequence - first we work with small resistors, and then move on to large parts. If you first attach all the large parts, then the small parts will become very inconvenient to attach - large components will get in the way.
Don't neglect the advice. They will allow you to create a better connection, and hence the durability of the stabilizer.
TOP 3 soldering irons for circuit boards
To simplify the work of soldering the stabilizer, it is advisable to buy a high-quality soldering iron. The stores have units from good and trusted manufacturers that you should pay attention to:
- Ersa is a German company. The product is very good and reliable, but expensive, and therefore not everyone can afford it for their home.
- Chinese company Quick. The quality is excellent and the price is reasonable.
- Luckey. The most budget option. Do not leave the device turned on unattended - it may cause a fire.
A 10 W soldering iron is enough to make a simple microboard. When purchasing, examine the handle - it should not heat up quickly. Wood is an ideal option. Plastic will quickly become hot, hard rubber is heavy, and therefore difficult to work with small parts.
It is advisable to choose a tip made of copper - it is easy to clean off carbon deposits after work. The stings come in different shapes and are sold in sets. This will not be useful for a beginner, but experienced people will find it convenient to use attachments of different configurations.
Voltage stabilizers for cars
You may also like…
Disc size fret grant p14
08.08.2019
How to set up 2nd generation gas
08.08.2019