0
6303
26.10.2015
Installing a lightning rod at your summer cottage is an important condition for staying safe during bad weather. Discharges of electric current of enormous power in the presence of a lightning rod do not affect the structure of the house and other elements located in the protection zone. However, do not think that a lightning rod prevents lightning strikes. Things are different. It becomes a conductor for discharging the discharge from the house, diverting a current of up to 100 thousand amperes into the ground electrode.
What it is
In fact, a lightning rod for a home is a kind of security system, the operation of which consists of three stages:
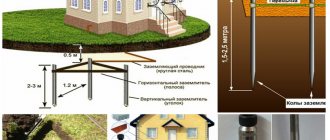
Accordingly, the lightning rod itself structurally consists of three parts:
That is, when lightning strikes the roof of a house, the following happens: the lightning rod receiver receives a charge of electricity, the down conductor redirects it to the side, and the ground electrode “calms” it into the soil of the area next to the house.
Lightning rod in a private house
The design is quite simple, so it is not so difficult to do it yourself, but there is one nuance that must be taken into account - the type of roofing material with which the roof is covered.
The simplest type of lightning rod is a steel rod installed at the highest point of the roof of the house. A metal wire is welded to the rod, which runs down the wall. The second end of the wire is welded to a metal sheet buried in the ground.
It is easy and very inexpensive to make such a lightning rod for a country house Of course, you need to take into account the type of roof, or rather, the nuances in the design of a lightning strike safety system, which depend on the roofing material:
- metal - for such roofs the length of the lightning rod receiver must be more than one meter;
- slate and related materials - a “lying” lightning rod is more effective - that is, along the “ridge” you need to place a thick metal cable to which the tap is soldered, just like to a vertical column;
- tiles - you can use a simple classic type of construction, or you can place a mesh lightning rod - this is a square or rectangle made of metal with the same metal mesh, located above the roof at a height of about a meter on wooden posts, a branch is soldered to it.
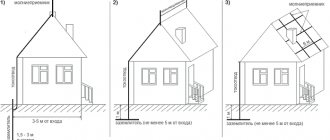
Whatever lightning rod , in a private house you also need to take into account such a point as the location of the ground electrode. The sheet of metal or block should be as far as possible from the entrance and other parts of the site.
Grounding the lightning receiver
Which are often walked on. Also, it should not be located close to the foundation; the distance from the wall should be no less than a meter. The depth to which the ground electrode is buried is ideally 3-4 meters, the minimum depth is 2 meters.
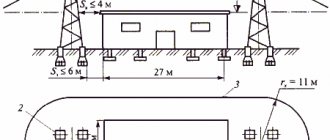
Calculation of the protective zone
For each building it is necessary to calculate the lightning rod, since each configuration is capable of providing a protective zone of various sizes. The parameters of this zone can be calculated independently, taking into account the features and dimensions of the country house.
A single rod forms a protective zone, which in geometry is close to a cone with an apex angle of approximately 45°. The top of this cone will be at the highest point of the lightning rod. In a cable-type lightning rod, the protection zone has a more complex geometry, in which the cable serves as an edge, and each rod forms its own cone.
The protective zone of a single rod can be calculated using the following formula:
R = 1.732 * h,
where R is the radius of the zone above the highest point of the house, h is the distance from the highest point of the house to the peak of the lightning rod.
To find out if the rod height is sufficient to protect a certain area at ground level, you can use the following calculation. Let's say the height of the cone will be denoted ho, the radius on the ground - Ro, the height of the building - hx, the radius at the level of the building height - Rx, the height of the rod - h. Then, taking into account the height of the existing lightning rod and the height of the house, the unknown values will be calculated using the formulas:
ho= 0.92*h,
Ro=1.5*h,
Rx= 1.5*(h-hx/0.92).
In practice, the calculations look like this: if the rod has a length of 10 m, then the radius of the protection zone on the ground will be 1.5 * 10 = 15 m, the remaining parameters are calculated similarly.
To calculate the required length of the rod, you can use the same formulas, substituting the desired radius of the protective zone into them. In the case of complex geometry of the lightning rod, you need to draw a graphic model of the house and the lightning rod and calculate the protection zone geometrically.
The height of the lightning rod should not exceed 12 m, therefore, if it is not possible to meet these restrictions using a single rod, it is recommended to use several masts to expand the protective zone.
Why is it needed?
The lightning rod in the photo often looks rather unattractive and many “actively under construction” townspeople believe that it is quite possible to do without it. If a serious construction organization is engaged in the construction of a country house. The lightning rod still appears on the roof, but when building it yourself, it is very often neglected.
At the same time, to say that people do not understand why a dacha lightning rod is wrong; many simply believe that such a protection system is necessary in areas with frequent thunderstorms, somewhere closer to the south, and so on. This is partly true, the further north the area is, the less active lightning is during a thunderstorm, and, accordingly, the less likely it is to strike a house.
House lightning rod diagram
It is also a very common opinion that lightning rods attract lightning strikes, like an iron magnet. And there is part of the truth in this too - these structures actually “attract” lightning, without this quality they simply would not be able to function. However, they “attract” it only in cases when a discharge of electricity with a power of at least 200 amperes is already flying towards the building.
Lightning rod control
To ensure sufficiently effective operation of the lightning rod, the condition of the latter must be periodically monitored. Control consists of a thorough inspection of the above-ground part and, in particular, the contact points and measuring the spreading resistance of the ground electrodes. For ordinary structures, periodic monitoring should be carried out every 3-5 years, and for especially critical structures - before each thunderstorm season.
It must be borne in mind that lightning rods are intended only for protection against ordinary line lightning. Meanwhile, there are a number of cases where even well-protected structures were struck by ball lightning. Ball lightning penetrated through open windows, doors, and small holes in walls and often caused significant destruction inside buildings. The physical nature of ball lightning is currently not yet fully understood and sufficiently effective methods of protection against it have not been developed. However, the fact that ball lightning apparently does not have the ability to pierce wooden walls, window glass, etc., gives reason to assume that a dense wire mesh that completely encloses the protected object (for example, an explosives warehouse) may be an effective means and against penetration of ball lightning into such a structure
How to make it yourself
Now it is very fashionable to do everything on your own that is possible and impossible, so when thinking about safety during a thunderstorm, the first thing that comes to mind for many people is the question of how to build a lightning rod with your own hands .
Although independent actions in construction are not always justified, acceptable and, in principle, not always economical, with regard to lightning rods this approach is completely correct.
There is absolutely nothing complicated about how to make a lightning rod
- an iron rod with a cross-section of at least 15-20 mm, or a piece of pipe, the minimum length of the vertical rod is 25 cm, but the length of the “receiver” must be higher than all antennas or any other objects on the roof;
- wooden supports with which the rod will be secured;
- metal wire, very thick, with a cross-section of at least 5-6 mm, of sufficient length;
- grounding metal sheet, bar, pipe - whatever you like, but the most suitable is still a flat metal plate;
- welding machine and everything that may be needed for welding;
- construction metal staples and hammer;
- shovel.
From the above, the principle of installation of the structure is clear - a vertical receiver rod is attached to the roof, a wire is welded to it, which is lowered along the wall, secured with brackets, then its end is welded to a grounding plate, which is buried in the ground.
Attention should be paid to two points - the receiver and all other elements should not be rusty to the point of holes or completely dilapidated; in addition, the welding should be of very high quality, so that when a lightning strikes, the wire does not fly away from the receiver rod.
The role of the grounding conductor should also not be underestimated. This part of the structure should have the least possible resistance, that is, to put it simply, it should accept the flow of electricity and “give” it to the ground. In dry, sandy soils, it is more advisable to install vertical pipes or bars for grounding, and in wet loams - flat horizontal plates.
Ready-made prices
Now you can buy absolutely everything, including a lightning rod . The price of lightning protection systems, which is what these structures are called in store catalogs, depends on the complexity of the product and the manufacturer.
Many stores offer not only entire kits, but also individual elements needed for the structure - masts, mounting brackets, grounding conductors, and so on.
Cable lightning protection
Prices for shock-receiving rods, which are called masts on the price tags, vary from 400 to 1,300 rubles. Prices for holders for conductive wire range from 78 to 120 rubles. The cost of copper wire holders is on average 200-300 rubles.
The cost of the mast starts from 4,000 and can reach up to 109,000 rubles. On average, the cost of a complete set of lightning protection systems ranges from 12,000 to 168,000 rubles, excluding the cost of installation work.
Lightning rod device
The lightning rod consists of three parts: a lightning rod, a down conductor and a grounding conductor.
Lightning rod
Something that takes a lightning strike. In private construction, lightning rods are usually used either in the form of pins installed above the highest point of the building, or in the form of cables stretched over the ridge. There is also lightning protection in the form of a mesh, but it is used mainly in lightning rod systems of apartment buildings.
Metal pins Copper is considered the best material for making lightning rods, but they are often made of steel. To prevent the rod from burning out upon contact with lightning, it is necessary to select its cross-section correctly. For copper products this is 35 mm² (Ø about 7 mm), for steel - 70 mm² (Ø 9.5 mm). It is recommended to use rods from 0.5 to 2 m in length.
Lightning rod in the form of a pin
Cable lightning protection is considered a more effective solution, since such a design can protect a large area. A cable with a cross-section of at least 35 mm² is pulled between two posts fixed to the roof ridge. Secure it with bolt clamps. If the cable is very long and sags, an additional stand is installed in the middle.
Cable lightning protection on a thatched roof
After installing the lightning rod, regardless of its type, it is necessary to organize a down conductor .
Down conductor
The task of the down conductor is to conduct lightning to the grounding device. It consists of copper, aluminum or galvanized steel wire Ø 6-8 mm. To connect to the lightning rod, bolt clamps, cable ties, and metal terminals are used. And for connection to grounding, welding or brazing should be used.
Lightning rods are attached to gutters with special holders
The down conductor is secured every meter with a special plastic or metal holder. The bends of the down conductor should be smooth, and their number during installation should be kept to a minimum.
Ground electrode
The last element of the lightning rod is the ground electrode. It is he who diverts the lightning that has entered the lightning rod and is carried by the down conductor into the ground.
The last element of the lightning rod is the ground electrode
It is necessary to install a grounding electrode in places remote from the porch and walkways. Usually they choose a place near the fence.
Grounding conductors are also different. For outbuildings, the simplest grounding device is most often made: non-relief steel reinforcement is driven into the ground to a depth of 0.8-1 m at some distance from the house. To protect houses, a delta or linear ground loop is usually used.
When using the linear method, a trench is dug and a frame made of a steel strip 40 mm wide and 4 mm thick is installed in it. The triangular frame is made of steel corners 40x40 mm and 5 mm thick. It is also buried in the ground, but the trench under it is made triangular. Some craftsmen advise pouring mineral salts into trenches to increase the electrical conductivity of the ground electrode. However, you should be careful with this method, as salt can damage plant roots.
All you can do is wish that your house will never be struck by lightning, but you already know how to make a lightning rod.
Manufacturing of lightning rods
The easiest way is to make a medium-sized structure. Non-professionals can also try to make a lightning rod, as indicated in the instructions, after carefully studying the information on its creation. The easiest way is to make a lightning rod that is placed on the roof. The advantage will be that there is no need for additional support.
Do not attach the pin directly in the middle of the roof. It is better to use the already specified formula, which will help determine the final location.
The ground electrode must be placed in such a way that in the event of a thunderstorm there is no crowd of people near it. It is better to choose a place that will be a couple of meters from the house. By placing a flower bed there or simply putting up a fence, you will be able to make the area visually attractive and ensure maximum safety.
It will be useful to read: “Thunderstorm: rules of survival.”
It is possible to create a lightning rod at your dacha with your own hands, the design of which meets all safety requirements, but it is better to consult with a specialist who will tell you his vision of this issue. The design of a lightning rod in a private house, made by yourself, must also be agreed upon with local government authorities. In addition, after completing the installation, it is better to go to the local branches of the Ministry of Emergency Situations so that they can witness the work done.
Since the device is made of metal, it may be susceptible to environmental influences. A lightning rod for a home is also susceptible to corrosion - to prevent its appearance and spread, periodically inspect the device. Even at the installation stage, immediately treat the bolts and connections with special products.
The grounding and especially its circuit should be checked for integrity every 2 years. This will allow you to monitor how good the condition of the structure is and whether it has received any damage. Systematic independent control is the key to stable and long-lasting operation of lightning protection.
Making lightning rods yourself requires proper knowledge in the field of installation of the structure. First of all, calculate the parameters of the site and the area of the residential building. Consultation with professionals or advice from people who have already done the installation will help you understand the specifics. It is important to know not only how to make a lightning rod in the house, but also how to install it correctly.