- before plaster
- after plastering
- combined method
A priori, electricians consider the following option to be the most correct. Is this really so and are there any exceptions? Let's consider in detail all of the arguments for and against.
Layer of plaster
Among professionals, it is believed that electrical installation before plastering work was invented by lazy and greedy electricians. They are lazy, because it is much easier for them to haphazardly throw cable routes along the surface of the walls before plastering and not waste time on grooves.
Some even self-confidently convince you that you will save a lot by doing this, you should under no circumstances trench this wall, and they will bring up a lot of other arguments. However, modern installation involves the consumption of a very large amount of cable, and if you don’t cut it, then in the end it will all result in a thick layer of solution.
Which ultimately will result in more significant financial costs than passing one or two grooves to the socket block.
At the same time, take into account the costs not only of additional material (cement, mortar), but also take into account the increase in labor costs, and, accordingly, the payment of labor to plasterers. Therefore, it is much cheaper to pay for grooves and their subsequent sealing than to increase the thickness of the walls by several centimeters.
At the moment, only a greedy electrician cannot afford to buy a wall chaser and an industrial vacuum cleaner and work as a professional electrician.
If you are just a beginning builder and you really don’t have money for expensive and high-quality models from Hilti, Bosch or DeWalt, or you only need to make furrows in your own apartment and nowhere else, then you can get by with one universal attachment for the Mechanic Air Duster grinder.
If you want to completely get rid of dust 100%, use a household vacuum cleaner wisely and you will be happy.
The nozzle almost completely replaces a professional tool and performs dust removal functions even without a vacuum cleaner. You can check the current price and order it for home delivery here.
Coordination of teams of electricians and plasterers
Coordinating the work of different teams is a headache for any foreman or customer. Here the “ electrician or plaster ” dilemma is especially acute.
When choosing a method for installing electrical wiring before plastering work, the procedure will look like this:
- Electricians run cables along the ceiling, install junction boxes, and connect electrical wiring to switches and sockets. Please note that at this stage the wiring is not yet serviceable;
- Then the finishing craftsmen begin to work, plastering the walls;
- Then the electricians get to work again, whose task now is to align the socket boxes and install the panel;
- The master finishers appear again and do the final finishing;
- After them, the electrician appears again and installs sockets and switches.
Now let’s look at the procedure if you choose the method of installing electrical wiring after plastering work:
- Finishing masters perform rough plastering work;
- A team of electricians simultaneously ditch, lay the wiring and put it into operation;
- The walls are being finished;
- Electricians install sockets and switches. By the way, the installation of sockets and switches, if the client does not mind, can be carried out in the previous stage of work.
Thus, the second method is much more practical and more controllable, unlike the first.
The possibility of accidental damage to electrical wiring during plastering work is also completely eliminated. Such damage can cause undesirable consequences, including redoing all construction work with a new one, which will require both additional time and additional cash injections, which is highly undesirable.
Cable damage
After electricians, drywall workers most often enter the site. And if the walls are plastered between these two teams, then the plasterboard workers simply cannot see where the routes are, and they simply interrupt them.
There is no so-called trace readability in this case.
In addition, the wire loops turn out to be very wide and it is difficult for both gypsum plasterboard and suspended ceiling craftsmen to find a place to attach the profiles, so as not to damage the wiring hidden under the mortar.
In this case, your machine may start working only after all repairs have been completed, including finishing. Since initially it was only the insulation that was damaged, and not the current-carrying core itself.
The problem, of course, can always be solved by using executive circuits or additional photographic recording of finished routes on the same smartphone. If this was not done in due time, then you will have to look for hidden wiring yourself, using various options.
Oxidation of wire connections
When plastering, a huge amount of water is used. And if the electrician is done before, then moisture may well reach the junctions of the copper cable cores in the socket boxes. Subsequently, this will lead to oxidation and destruction of contacts, and may result in their burnout.
There are many ways to seal the junction box to prevent moisture and wet solution from getting there, but not all of them help.
The cheapest and most accessible is sealing with ordinary masking tape.
Another simple method is to make end caps from cardboard boxes. Take a crown to match the diameter of the socket box and cut yourself as many covers as necessary.
In this case, it is better to insert 2 pieces at once into the socket box itself. You can also make such plugs from sandwich panels.
Electrical before plastering - possible problems
#1. Cable damage
If electrical work is carried out before finishing work, then after the electricians complete the installation of the wiring, the wall is plastered, and then the drywall workers appear. Accordingly, the latter have no idea where exactly the electrical wiring runs, and they often damage it.
#2. Changing wall sizes
As a rule, construction work is carried out according to the project. By the way, the project does not say anything about plaster or electrical first. During finishing work, the dimensions of the walls are subject to change, not critical, but still sufficient for the furniture, made specifically to order, to slightly block access to sockets or switches. In some cases, due to the strong curvature of the wall surface, the dimensions are reduced to 10 centimeters.
#3. Installation of socket boxes
Installing a socket box before finishing work is the most thankless task you can think of. Usually the socket box is installed on a flat surface and then covered. In this case, there is no flat surface. To install it, you will need to calculate by eye the approximate thickness of the future plaster layer; having guessed this distance, you can install the socket box. But it is impossible to guess this distance: the socket box will either turn out to be too recessed into the wall, or, on the contrary, it will stick out unsightly.
Although the situation with an overly recessed socket can still be saved. Special screws (25-30 mm) and special mounting rings are used. You can do without rings, just mount the socket box on long self-tapping screws, but there is a danger that the socket box will then fall through, so it is better to use mounting rings. Such rings, along with self-tapping screws, will allow you to extend the structure to the required level.
Tip: to prevent solution, moisture, etc. from getting into the junction box during repairs, plugs should be used. They can be made with your own hands, for example from sandwich panels, or cut from an ordinary cardboard box.
Installation of socket boxes and accessories
It is almost impossible to correctly install the socket boxes before plastering, if you yourself, in addition to electrical work, will not also be involved in finishing work in the future. You simply won’t have a flat plane on which to place the socket box and cover it flush with it.
When you do it by eye with an approximate calculation of the plaster layer, errors and inaccuracies are bound to arise due to a “littered” wall or incorrectly chosen installation depth.
If you end up with recessed socket boxes even by 3-5mm, there seems to be nothing critical here. Everything is solved with the help of longer self-tapping screws 25-30mm and spacer rings or extensions for junction boxes.
But it’s a completely different matter when the edge sticks out the same 5mm.
How to do it cheaper and more correctly
In recent years, electrical wiring has been installed using a combined method, what is the first thing to do in this case?
In an apartment or house with bare walls, cables are laid along the ceiling or along the subfloor if it will later be covered with screed. In most cases in 2021, ceilings are made of tension or plasterboard.
Grooves are made to raise a cable from the floor or lower it from the ceiling to an outlet, switch or lamp. Cable lines are secured in corrugation with clips or clamps. As a result, we can draw an unambiguous conclusion:
Plumbing, electrical, Internet and other networks, all other utilities and structures are done before plastering. After installation of all of the above, finishing work is carried out.
Finally, we recommend viewing useful videos on the topic, which clearly discuss this issue:
Triggering of RCD protection
It is very inconvenient for the plasterers themselves to work on walls that are literally strewn with wires. If the sections of wires for switches and sockets can somehow be hidden by twisting them into a spiral, then the leads for sconces or half a meter of solid television or Internet cable, which are left specifically for direct connection, cannot be hidden anywhere.
Moreover, some of them may be live! Plastering with wet mortar can end very badly. It’s good if you have a differential circuit breaker or an RCD on this line and it will work.
This will save you from electric shock, but you will need to look for this damage and the reason for the protection to operate, or wait until everything is dry to continue working.
Electrician before plastering - advantages
Are there any arguments for doing all the wiring before plastering? Of course there are, but there are not many of them. Some craftsmen make a not entirely correct comparison with laying electrical wires along the floor and then pouring screed.
This is justified by the fact that when installing a cable in the floor, you do not cut a screed to lay the corrugated wires there. Accordingly, there should be a similar approach to the walls.
We will consider slightly different arguments.
- wall reinforcement with mesh
In some situations, during plastering work, to prevent the formation of cracks, reinforcement with a special mesh is used.
So, when gating, you will simply cut this entire mesh into pieces. And all the work done before, roughly speaking, will go down the drain.
- SNiP standards
Not a single edition of the PUE today provides clear instructions on how it should be done correctly, and whether wiring can be done after plastering or, better yet, before. However, not so long ago, an updated set of rules was released that directly affects plastering work.
It states that when finishing work begins, electrical and plumbing must already be completed, tested, inspected and working properly. It turns out that from the point of view of building regulations, it is most correct to do the electrical work before plastering.
Here is this set of rules SP 71.13330.2017 () and clause 7.1.5 from it:
However, firstly, we should not forget that all such joint ventures are more of a recommendation nature and even here there is no clear prohibition on doing exactly this and not otherwise.
Secondly, one can find fault in the wording of clause 7.1.5 with such a concept as “finishing work”. It is not entirely clear whether this includes the plaster itself or whether all the work afterwards is meant – puttying, painting.
Therefore, if you ultimately do not violate the final quality, then here too you can deviate from these recommendations.
- wall alignment
Another argument in favor of DO work is the unevenness of the walls. Plaster has a certain fraction, i.e. minimum thickness and when laying ready-made grooves, you will almost never get an ideal surface. This is where “trace readability” comes from.
If you need a result close to the original wall (before gating), this will lead to additional putty, primer, and sanding. And this work of bringing the surface to an ideal state can be very labor-intensive and financially expensive.
And when cutting grooves for cables, these same grooves have to be cleaned with a hammer drill or a chisel. As a result of unnecessary vibration in nearby places, the finishing layer begins to peel off or crack.
And this imposes even more responsibility for electricians on this type of work.
Why is electrician AFTER plastering more profitable?
For a more complete understanding of the benefits of carrying out electrical wiring work after plastering work, read the following points:
- 1. Time saving
- 2. Saving money
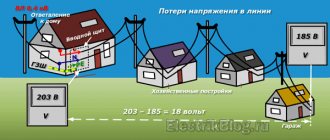
Let's explain with simple examples. According to the same regulatory requirements, the depth of the electrical cable must be no less than 1 centimeter.
Since in some places the thickness of the plaster layer is slightly less than 1 centimeter, yellow characteristic stripes may appear on your wallpaper, caused by the fact that the electrical wiring runs quite close to the surface of the wall and, as a result of natural heating, spoils your interior. To prevent this from happening, it is better to trench a ready-made layer of plaster to the required depth than to take it and mess up out of the blue.
Again, let's take the minimum thickness of the plaster layer to be one centimeter. If you lay the electrical wiring before performing plastering work, you will have to add an additional half-centimeter that occurs when laying the cable in order to compensate for the distance from the wall surface to the cable itself. Naturally, these half centimeters should not stick out from the wall, so you will have to level the entire wall. Let's calculate how much such “leveling” will cost us.
For example, let's take a room with an area of 45 square meters. The standard ceiling height is 2.7 meters. The total area of the walls is 76 m2. The number of points on the walls is 25 pieces. The number of grooves (technical channels for electrical wiring) is 10 pieces. It turns out that the total length of the groove will be 20 linear meters (10*2).
1 linear meter of brick/plaster grooves costs about 100 rubles. Accordingly, all grooves will cost 2000 rubles.
The average consumption of plaster per 1 square meter, with a plaster layer thickness of half a centimeter, will be about 5 kilograms. The average cost of plaster, for example, the “Volma LAYER” brand is 30 kilograms - 300 rubles. It turns out that 1 kilogram of plaster mixture will cost about 10 rubles.
The cost of 5 kilograms will be 50 rubles. Now we multiply 76 square meters (the area of the leveled surface) by 50 rubles, we get 3800 rubles, which is 1800 rubles more than the groove. Do not forget that making grooves will be much faster in time than plastering the entire surface of the wall with an additional 5 millimeters.
By the way, some electrical wiring crews offer free work on sealing the grooves as a bonus after completing the work.
Combined method
After looking at the whole thing and comparing the results, some began to use a combined method.
This is when routes are laid before plastering work, and socket boxes and distribution boxes are installed after. There is also a method when socket boxes are placed together with beacons according to their level.
First, the beacons were placed, all the boxes were mounted on them, and then everything was primed in one plane. However, even here at intermediate stages you can encounter problems.
Due to the fact that the socket box will not be completely recessed into the wall, it may begin to be turned inside out by the rigid VVGnG cables passing through it. At the same time, they get out of the situation as best they can. Screw on screws or dowels.
Some craftsmen even cut off the back wall of the junction box and place it on the front side, passing a bundle of wires through the inlet.
It's not worth doing this. Thus, you violate the rigidity of the entire structure, not to mention the IP protection levels.
The combined method is a kind of average option. What is called neither ours nor yours.
Highly specialized electrical specialists categorically reject it, as well as the DO options.
But builders involved in complex renovations often use it. A larger number of site visits and additional coordination of work hours do not frighten them. Do everything to them anyway.