Marking (tracing) the electrical wiring of the apartment on the floor
Let me remind you that according to the rules, hidden electrical wiring is done on the floor in electrical corrugation or pipe wiring. First, the locations for installing sockets are marked, and the wiring of power sockets is done on the floor. The pipes are laid according to the electrical diagram; the paths of the loops may intersect. Scoring of floor slabs is PROHIBITED.
What is important to consider
Before marking for electrical wiring, take into account one very important nuance - if renovations in the house are just beginning, and you want to mark the places where cable lines are laid, a significant error may occur in the future for the following reasons:
- Raising the floor. For example, after installing the wiring, you decide to additionally make an electric heated floor using a heating cable. In this case, the floor will rise by no less than 10 cm (including tiles). If you have already made a groove for the socket at a height of 30 cm (the minimum height that is recommended), then after installing the heated floors this height will be reduced to 20 cm.
- Lowering the ceiling. The opposite situation is that after you have removed the wire to connect the chandelier (as a rule, 15 cm is left in reserve), you decide to make a suspended ceiling. The result is that you will have to extend the wire to connect the chandelier, which is not very good.
In addition to these two common situations, sometimes a decision is made to line the walls with a rough finish with plasterboard or move the refrigerator to another location. All this must be taken into account before marking the electrical wiring in the apartment, because later corrections can be quite labor-intensive.
Marking, tracing the electrical wiring of the apartment on the walls
To mark electrical wiring on walls, try to adhere to the following rules:
- The route lines must run parallel to the walls or floor (ceiling);
- Step back 15-20 cm from the ceiling;
- Retreat window slopes and door jambs by 10 -15 cm;
- retreat the corners of the room by 10 cm;
- The height of the rosettes is 50 – 70 cm;
- switch level 90 cm;
- The height of the switch in the children's room is 1.5 meters.
I would like to add that the rules proposed above, although prescribed in SNiP, are advisory in nature for a private apartment. However, I will explain why such rules exist.
Standardization of electrical wiring routing was primarily created for the convenience of its repair. This is, firstly. Secondly, if you mark the routes according to these rules, you will know where your electrical cables go and will not drill through them when hanging anything. Also, there will be no need to be clever and no need to “bother” and think about how to find hidden electrical wiring, since the routes will be known.
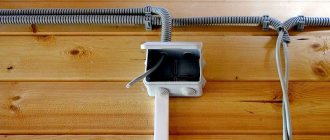
When tracing open wiring, be guided by the aesthetic appearance of the future wiring, because it will be visible.
Related articles: Open electrical wiring in an apartment
Note: The routing rules listed above do not need to be applied to ceiling wiring. There is only one rule - the shorter the fine, the better.
One more issue remains, the routing of electrical wiring in hollow partition structures and suspended plasterboard ceilings.
What do you need to consider?
Before marking walls for electrical wiring, you will need to take into account a number of nuances. A slight error may occur due to the following reasons:
- Raising the floor. If you have already marked the wiring and decided to raise the floor, then this will not be correct. As a result of installing a heated floor, its height can rise by 10 cm. If the groove was already made at a height of 30 cm, then after installation the height will be reduced to 20 cm.
- Lowering the floor. This situation can be considered the opposite. This includes the fact that you have already managed to remove the wire for the chandelier and after that you decided to make a suspended ceiling. As a result, you will need to extend the wire by several centimeters.
These are not all the situations that can affect the installation of electrical wiring. Correcting such processes is considered quite labor-intensive.
Basic requirements for marking electrical wiring
When marking electrical wiring, be sure to take into account existing standards for the distances of wiring elements from pipelines and the floor, door and window openings. In this case, the specifics of the room should also be taken into account.
Marking can be done in two ways:
- First, mark the locations for all future wiring elements - lamps and household appliances. They do this in every room. After this, they move on to marking the main sections that go to the electrical panel;
- markings begin from the electricity metering panel, after which they move to all other rooms of the house.
In each room, they first mark the places where switches, sockets, lamps and household appliances will be installed, and select a place for the junction box. It represents the source of voltage supply for each room. It is permissible to mark directly on the walls and ceiling the places where electrical equipment will be placed.
Marking the direction of the open electrical wiring route
Installation work
in the second stage, electrical installation is carried out in completed premises.
Electrical installation work usually begins with the installation of an input distribution device
, separate panels, etc., to which the electrical wiring is connected.
After the installation locations
of the switchgear, electrical receivers
(
sockets, switches
) and other devices have been determined and marked:
- determine directions
- select locations and mark electrical routes
.
Direction of electrical wiring routes
is specified
by the electrical installation diagram
and is determined
by the placement of electrical equipment
in the room.
At the same time, alternately mark the places where the electrical wiring route is attached.
in the following order:
- places for fastening rollers and supports at the beginning and end
of each straight section of the route; - then on the branches of the route
; - at passages
through walls and ceilings; - at the bypass furrows
of the route; - at the turning angles
of the route; - transition of wiring
to other spatial positions.
READ ALSO: How to install hidden electrical wiring in a house, installation technology
Electrical wiring routes
must be placed in such a way as to avoid the possibility of mechanical and other damage
to electrical networks
.
For this purpose, open pipeless electrical wiring
is usually located at a considerable
height of at least 2-2.5 m
from the clean floor of premises and service areas.
Posting routes
at the same time they are placed in strictly
horizontal and vertical
directions or
parallel to
the architectural outlines of the premises.
ATTENTION! Parallel wiring should be avoided
and their intersections with communication networks.
Routes of laid electrical wiring
along the walls of premises they are usually placed in the upper sections of the walls at a distance of
100-200 mm
from the lines where the walls meet the floors.
And if there are cornices - at a distance of 50-100 mm below the cornices
.
Options for installing open wiring
with the laying of
wires and cables
indoors are shown in Fig. 2-1.
At the same time, they mark through holes
,
hidden grooves
and other
openings
for laying wires through walls and ceilings and bypassing obstacles.
For the convenience of subsequent punching work, the external outlines and dimensions of nests, passages
, etc. are drawn in the required places.
Open wiring
- these are power and lighting electrical wiring (
DC and AC voltage
up
to 1 kV
), which are a set of wires and cables (with all related insulating, supporting and protective parts and structures), laid motionless on the surfaces of walls, ceilings, trusses, beams and other building structures inside buildings and structures.
To open wiring
This also includes
external electrical wiring
with the laying of wires and cables along the outer walls of buildings and structures, between them, under canopies, throughout courtyards and garden plots,
on supports
with three to four
spans of up to 25 m
each, outside streets, roads, etc.
Selecting wires and wiring protection for an apartment
How to choose protective equipment for electrical wiring
Wiring in an apartment requires the installation of an RCD. Residual current devices will protect electrical wiring and the owner from short circuits and leakage currents.
They are selected based on the following:
- In the bathroom, an RCD should be used that can withstand current up to 30mA class A.
- For a group of sockets, a 25A type B circuit breaker is required, as well as a 30mA RCD.
- The lighting line must be equipped with a 10-16A type B circuit breaker.
Differential automatic for wiring
How to choose wires for electrical wiring
Before installing electrical wiring in the apartment, you need to purchase high-quality wires. Copper wire is best for wiring because it is more flexible, less brittle, and conducts current better.
Its installation is more convenient compared to its aluminum counterpart.
In an apartment, as a rule, they use a 2-3-core VVG or VVG NG wire, having a cross-section of at least 2.5 sq. mm for sockets and 1.5 sq. mm for lighting.
For sockets to which you plan to connect high-power devices, the wire cross-section should be increased to 4 sq. mm.
Wiring cables
You can learn more clearly about the technique of wiring electrical wiring from the thematic video. We recommend that you carefully observe safety measures during the installation process, use protective equipment, and if you do not have the proper experience, seek help from experienced electricians.
Marking the electrical wiring route on rollers and insulators
For open wiring
with the laying of wires
on rollers,
the routes are marked depending on:
- from the accepted scheme for installing end connection points
(board, sockets, lamps), - directions of postings,
- the total number and cross-section of wires
installed on the route.
For postings
, mounted
on single rollers
, as well as for
wires on rollers
mounted on strips and fasteners, the main single-line marking lines are marked on building surfaces, passing through the centers
of the fastening holes of the rollers
(Fig. 2 option “a-c”),
strips
(Fig. Option 2 “d”) and fastening
shanks of fasteners
(Fig. 2 option “d”).
Options for marking electrical wiring routes
and its fastenings
on rollers and insulators
on building structures are shown in Fig. 2.
When laying wires on strips and brackets with three or more rollers,
markings are performed by marking two marking lines on a horizontal route, passing through the centers of the mounting
holes in the strips and the legs of the staples
(Fig. 2, option “d”).
READ ALSO: UAKI-E device: where is it used?
Marking branches and turns
up and down,
transitions of wiring to the ceiling
and to other spatial positions -
on vertical routes, electrical wiring
is performed in the same way.
Places for installing insulating supports
on branches (Table 1 clause 1.1-1.8.),
corners and turns
(Table 1 clause 9.2)
of electrical wiring routes
(Fig. 2 option “e”) - are determined by the intersections of horizontal and vertical marking lines according to the given dimensions in table. 1.
Distances between the axes of wires laid on insulators
(depending
on their cross-section
) must exactly correspond to the given dimensions in Table 1, clauses 2.1-2.4.
NOTE: Axial distances between adjacent conductors
when
laying electrical wiring in parallel together
with wires
of different cross-sections,
they must correspond to
the size of the wiring
with a
cross-
section of wires.
Places for attaching individual rollers
, as well as
strips, fasteners and brackets
with rollers installed on them are marked on the route by drawing short transverse lines on the main lines of marking electrical wiring.
NOTE: Rollers and support structures
depending on their size and
cross-section of wires
, they are located from architectural landmarks (contact lines between walls and ceilings, cornices, ledges, etc.), as well as from passages, grooves, devices and devices at certain distances according to Table 1, clause 9.1.
Next, mark the installation sites for intermediate rollers and supports.
on the electrical wiring route, placing them symmetrically and at equal distances, but
not more than the distances
indicated in Table 1, clause 1.1, clause 1.4, clauses 4.1-4.4.
For easy marking of intermediate roller
(supports) use a marking cord with marks applied on it at equal distances. The cord is pulled between the outer rollers (supports) of the straight section (span) of the route and the installation locations of the intermediate rollers (supports) are marked using the marks on the cord.