Safety is the main condition for carrying out any work on electrical wiring in the house. Therefore, it is very important to make sure that there is no voltage in the wire. One very important tool called an indicator screwdriver will help you do this. How to use it correctly?
In the house, power is supplied to the electrical wiring from a common switch
Current flows (at a voltage of 220 V) through the phase wire to the consumer, then it returns through the neutral wire to the general switch. Moreover, the neutral wire is energized only when the current-consuming device is operating. So, an indicator screwdriver helps to check whether there is voltage in the wire or not, that is, whether it is “phase” or not.
Before starting any work related to electricity, it is recommended that you become thoroughly familiar with some general rules for working with electrical wiring and learn how to identify the absence or presence of voltage in electrical wires in order to avoid dangerous situations.
Electricity
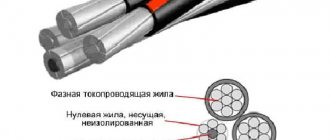
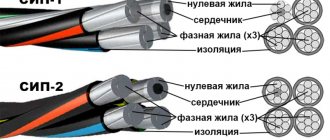
Electricity is supplied to residential buildings through two electrical wires, one of which is called phase (it is the voltage that is supplied to it), the other is zero. They are the two wires to which the plug of any household electrical appliance that consumes electricity (for example, a table lamp) is connected. To the above wires a third one is often added, called the “ground” wire.
The very first step when working with electricity is to identify which wire has a phase, that is, determining which wire is live and the other is neutral. After finding the phase wire, try not to touch it so as not to get an electric shock.
How to determine the phase
To identify a live wire, you should use the simplest tool - a phase detector. Outwardly, it resembles a screwdriver (in fact, it can serve as a screwdriver), having a rod made of insulating material and a metal tip. Commercially available phase detector screwdrivers vary in type and size. Moreover, they all function according to the same principle. When purchasing, pay attention to the quality and reliability of the product. The design of the indicator screwdriver is as follows: the rod located inside the handle is connected to a resistor, the resistance of which is quite high, and the resistor itself, on the other side, is connected to a tiny indicator light, which is connected to a metal plate installed at the end of the handle.
At the moment the tip of the indicator screwdriver touches a live, phase wire, while simultaneously pressing the finger against the metal plate, the indicator light lights up. If the light does not light up, on the contrary, it indicates that the indicator screwdriver touched the neutral wire with its tip (that is, depending on the case, any wire that is not energized). But you need to be careful: a burnt-out light bulb may show an incorrect result, deceiving you. Therefore, you should check the indicator screwdriver in advance for functionality by testing it by touching a live wire, the “phase” of which you have no doubt at all.
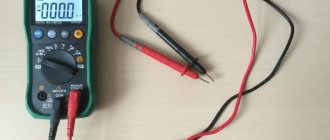
Apartment wiring - checking serviceability
Testing wires with a multimeter is provided in most devices. It is enough to switch the switch to the appropriate mode, and if current flows normally through the wire being tested, you will hear a buzzer. Of course, it is impossible to ring a long wire already laid in the wall in this way. An extension conductor is required.
Another way of dialing is to connect two conductors to each other at one (far) end, and connect to the free contacts on the near side. This way you are testing both wires in the wiring.
Attention! Before starting any work with hidden electrical wiring, read the wiring diagram. You must de-energize the cables, and without a diagram you can make a mistake and get energized.
- The most popular task is how to check a wire for a break. Occurs, as a rule, during renovations indoors. When drilling a wall or other mechanical impact, you can interrupt the wiring anywhere. To find a faulty wire, you actually need a multimeter.
- The second reason for local loss of power supply is burnout (mechanical damage) of the contact. The principle is the same: the multimeter probes are connected on one side to a working wire, and on the other side to a current-carrying path after the contact group.
You can check the integrity of the wire without a device. You will need a flashlight, or just a battery and an appropriate light bulb. Assemble a simple electrical circuit by connecting a light bulb and a battery in series. When the wires are shorted, the lamp lights up. The same principle as in a multimeter with a buzzer mode.
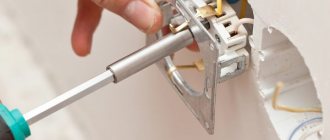
Connecting live wires at home
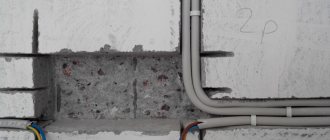
Carrying out renovation work in residential premises is not uncommon. When performing restoration or major work, it is often necessary to drill or destroy part of the wall. The tool can easily damage wiring that was previously installed, especially in cases where there is no wiring diagram.
Wiring repairs must be carried out as quickly as possible. Exposed wires can cause harm to health and even life if touched. The connection of two wires is carried out under voltage. At the same time, the installation itself is quite simple. You just need to follow the safety rules.
Any working tool that has rubber insulation is suitable for troubleshooting. To protect people, use rubber gloves. At the same time, they must be solid, without rips or holes.
To connect two live wires, you must use terminal blocks. These are special electrical installation products made of plastic. Their structure is quite simple. They have at least two holes and small clamping bolts. One end of the damaged wire must be placed in the terminal on one side. The other goes into another hole. Once placed, they are secured with clamping bolts. For reliability and additional protection, terminal blocks are sometimes rewound with electrical tape.
An alternative method is twisting. Two bare wires are connected to each other by twisting the ends. The connection point must be reliably insulated with mounting tape.
How to check the armored wire
Armored wires are checked for three types of faults, each of which can completely disrupt the sparking process:
Breakdown of high-voltage insulation
The voltage when igniting candles reaches several thousand volts. In the open air, the spark jumps at a distance of up to 3-5 mm. If the quality of the insulation is violated, spark generation is shunted by a breakdown to the engine housing, and the spark plug does not work.
Diagnosed visually with the engine running. At night, or in a closed garage with the lights turned off, the breakdown is clearly visible.
Breakage of the central conductor of the high-voltage wire
In addition to the fact that there is no voltage supplied to the spark plug, there is another danger. At the break point, a parasitic discharge can occur, heating the rubber insulation. With prolonged exposure, the rubber may catch fire.
Damage or breakage of the contact group
The signs and consequences are similar to the breakage of the central core. And increasing the resistance of the central core. The reasons are temporary wear (reduction in thickness due to corrosion), breakage of several strands of wire in the bundle. High conductor resistance does not allow the electric current to reach the required value, and the required voltage does not reach the spark plug electrodes.
How to connect wires under voltage 220
Your city is Moscow?
How to connect to live wires?
In some cases, it is impossible to avoid installing or connecting two live wires. Despite the risk to human health, the effects of electric current can be avoided. To do this, you will need to follow safety precautions and use personal protective equipment. After all, most installation work on power lines is carried out without shutting off the electricity supply.
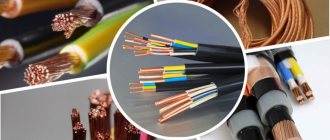
Variety of cables – large selection of tools
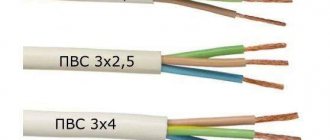
Having decided to renovate your house, you notice that the wiring is already very old, the cables get hot, and plugs or circuit breakers are constantly knocked out. After this, a decision is made - to replace all electrical wiring in the house or apartment. What tools will you need? These are household pliers, side cutters, or, as they are also called, wire cutters, tape measures and screwdrivers of various sizes. I would like to focus on what wire cutters are.
In fact, these tools can be used not only in electrical wiring, but also in other works, for example, depending on the size and shape, they can even cut through reinforcement up to 6 mm. What do regular electrician's side cutters look like? These are two parts, each of which consists of a handle and an edge sharpened inward. They are connected in the center through a special hole using a rivet made of durable material. Their purpose - again, depending on whether they are small or large - is to cut through cables or individual wires, as well as thin-section wire. For example, with a conventional tool you can work with a cross-section of about 3x1.5. A larger cable may no longer be able to be processed, or it may need to be cut in pieces. At the same time, there are also cutters that can easily cut even a thick high-voltage cable. If the action of the first type of nippers can be compared with the principle of operation of scissors, then the working part of the second is somewhat reminiscent of an excavator bucket. This tool is used near the reinforcement unit, where frames and meshes are assembled by fastening the joints with tying wire rather than welding. In this case, they are very convenient for cutting this wire into even pieces, which will be needed for tying the reinforcement.
Connecting wires in the panel
The situation of connecting two ends of live wires often arises when working in panels. If the power supply is provided from general communications, then turning off the electricity will not work. For the sake of installing a shield, no one will turn off an entire house or street.
The procedure for performing the work is simple. Initially, you should prepare a working tool:
- latex gloves;
- screwdriver with dielectric insulated handle;
- terminal block
The installation procedure is the same as described above. After completion of the work, the terminal block will have to be insulated with electrical tape.
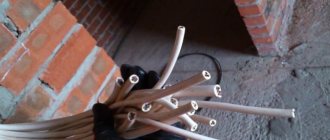
How to properly strip wires of insulation
Wire stripping requirements:
- the stripped (bare) part must be completely hidden inside the connection;
- Insulation must be removed from all sides from the surface of the core.
Mistakes made by DIYers:
- DIYers often leave exposed wires exposed. If accidentally touched, a person can short-circuit these places and receive an electric shock;
- If fragments of insulation remain on the cores, then compressing it inside may not be sufficient for reliable fastening. When there is vibration, for example, electrical wiring in a car, the connection will loosen, the wire will come out of the terminals of the device, and a short circuit to ground will occur. The vehicle may catch fire.
Cutting insulation from wires using a knife
The knife is the most common tool, so it is used most often. It is necessary to expose not only individual conductors, but also cables that contain several wires. Therefore, at the first stage, the cable is cut along its length, the wires are routed in different directions, and then the outer sheath is cut across. If necessary, this operation is repeated.
To strip a wire of insulation, you need to set the blade almost parallel to the core, and then cut off a thin layer of insulation. Subsequently, slightly turning the conductor, cut off the remaining thin layers. By turning completely 360°, complete cutting of the coating is achieved. These steps are easy to perform if you need to strip fairly thick wires.
When stripping thin wires with a knife, you only need to cut through the insulation layer.
Attention! You cannot leave a mark from the blade on the surface of the conductor, since this is where the critical zone will appear. The conductor is susceptible to breaking if bent.
After circular cutting to a shallow depth, it is easy to strip the wires of insulation; it is removed from the surface in the form of a tube.
Thick cable cores for high power supply are cleaned by cutting the plastic across and then along. Then the protective shell can be easily removed.
Removing insulation with special devices
Professionals have a fairly extensive range of auxiliary devices for removing insulation. The principle of their operation is as follows:
- A suitable stream is selected on the tool to expose the desired conductor.
- The wire is installed in this stream.
- Squeeze the handles.
- First, the wire is crimped, and then the scraper removes the insulating layer.
The entire procedure takes no more than one second of time. But such devices have a fairly high price, so they are purchased by professionals who have to perform a large amount of such work during a work shift.
For more information about insulation stripping tools (strippers), see this video:
Some home craftsmen solve the question of how to remove insulation from a wire by making a simple device on their own. To do this, use a strip of metal (preferably a piece of blade from a hacksaw). An angular slot is made on it to suit the size of the wire. The inside surface of this slot is ground to produce sharp edges.
To learn how to make a device for stripping wires, watch this video:
If it is necessary to remove the insulation from the wires, each conductor is clamped in the corner slot to the required amount, and then pulled out with force. As a result, the plastic can be easily removed from the metal.
On sale you can sometimes find special pliers that have similar slots. There are usually several of them to strip insulation from wires of different diameters. To perform the operation, the conductor is clamped in the stream, and then simply pulled in the desired direction.
There are special combs for single- and double-sided removal of insulation. They are inexpensive, take up little space, and cut off the insulation quite easily.
Some craftsmen use side cutters. They also crimp the conductor on both sides. By pulling the wire through, you can quickly remove the plastic insulation.
Attention! When using side cutters, do not squeeze the handles too hard. You can easily cut the core itself. You need to get used to the compression force.