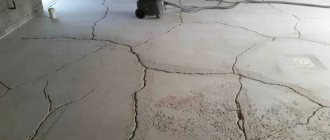
Semi-dry floor screed and its features
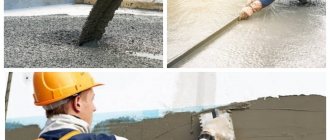
The basis of the semi-dry screed solution is a classic cement-sand mixture. To reduce the proportions of water in the mixture, when mixing the solution, a special polymer composition, fiber fiber, is added to it. Adding this composition allows you to reduce the proportion of water and make the screed semi-dry.
The solution for semi-dry screed must be mixed mechanically. Fiber fiber is added at the last stage of mixing, according to the instructions received when purchasing it.
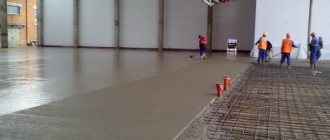
The best solution for semi-dry screed is obtained by mechanically mixing the solution in special installations. After mixing, the solution is supplied through a pipeline to the desired floor of work.
Advantages of choosing a semi-dry floor screed
Preparing a minimum thickness of a layer of semi-dry screed can significantly save space, which is especially important in rooms with low ceilings. Among the advantages, 4 critically significant ones stand out:
- Fiber fiber and standard reinforcement are used, thereby achieving a maximum margin of safety;
- high speed of strength gain;
- absence of high humidity harmful to existing repair elements;
- the cost is 2-5 times lower compared to alternative options.
There are other significant advantages, each of which often becomes decisive in the selection process. Today, this technology is the leader in terms of cost and quality ratio.
Floor construction with semi-dry screed
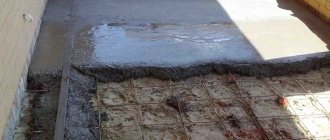
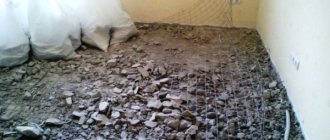
- A semi-dry screed is made on concrete bases or an earthen floor with appropriate preparation (a cushion of sand, crushed stone and a rough concrete layer).
- A layer of polyethylene or other rolled waterproofing material is laid on the rough subfloor.
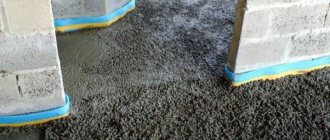
- A damper strip is laid along the perimeter of the room to the height of the screed. It separates the screed from the walls of the room and “transfers” it to the class of floating screeds.
- In apartment rooms, semi-dry screed does not require expansion joints. It is enough to make transitional seams between rooms in the doorways.
Professional installation work
Work with the foundation indoors must be trusted to trusted specialists, because this guarantees the achievement of the desired result without unnecessary investments. We guarantee our clients a range of benefits:
- Individual approach to each client;
- consulting on emerging issues;
- prompt completion of the assigned task;
- the final amount is agreed upon before the start of work, and no adjustments are made to it.
Contact our company and order a semi-dry floor screed. The minimum layer thickness is 20 mm in ideal conditions, and our specialists will select the optimal solution individually for your case. We offer favorable conditions to each customer so that cooperation brings only positive impressions.
Semi-dry screed device
- The screed solution is supplied through a pipeline to the apartment and scattered over the area of the room;
- Next, the solution is compacted (usually with feet);
- For semi-dry screed, there is no need to install profile beacons. The level of the screed is measured, and beacons of the screed itself are made according to the level;
- The compacted solution, or rather not a solution, but a mixture, begins to be leveled using the rule. As a rule, you need to apply constant pressure and, as it were, press the solution.
To level the mixture of semi-dry screeds, special tamping slats are produced and made by hand. For compacting industrial floors, there are special leveling units.
Advantages of semi-dry screed
When the mixture is free of excess moisture, it not only weighs less, but is also less labor intensive to use. During the hardening process, the solution becomes stone. In addition, it has other advantages:
- high density, which naturally increases the strength of the construction project or its structural part. Due to the fact that the solution does not have excess moisture, the evaporation process associated with the ripening of concrete is not subsequently observed. As a result, voids and cavities associated with moisture evaporation do not form inside. And, as you know, concrete is stronger the fewer voids it contains;
- due to the fact that moisture from the mixture does not evaporate, no shrinkage of the solution is observed;
- for the same reason, the time for concrete to mature is significantly reduced;
- The technological process is clean. Due to the absence of excessively wet and sticky mixture, all work is performed with “clean hands”;
- no evaporation – no excess moisture indoors. This makes it possible to perform other types of work in parallel.
The semi-dry screed is ready for the first loads within 12 hours after installation. And after just one day, builders can begin the next stage of finishing work without fear of damaging the concrete surface.
Price of semi-dry screed
Typically, the price of a semi-dry screed with material is 20 USD. per meter The maximum height is usually 16 floors. Productivity is 180-200 meters per working day.
Related Section: Floor Installation Instructions
- Instructions for installing semi-dry floor screed with fiberglass (fiber)
- Instructions for applying polymer self-leveling floor
- Instructions for laying laminate flooring
- How to prepare the base for a screed
- How to make a cement-sand screed correctly
- How to make a screed
- How to install cement-polymer floors
- Installation of electric heating on a wooden floor
- DIY bath floors
What determines the thickness of a semi-dry floor screed?
This value varies. In this case, it is worth taking into account in which room the screed is laid, what load is planned on the finished floor and what communications will take place inside the floor.
Purpose of the premises. The maximum thickness of a semi-dry floor screed directly depends on the type of room. Below are recommended values for different types of buildings:
- living space - screed thickness up to 100 mm. The load is created by furniture and a living family of several people;
- public institutions - shops, offices, cafes, car dealerships, government institutions (schools, executive committees); screed thickness up to 200 mm. The load is created by office furniture, goods for sale and the number of people passing through the premises per day;
- industrial premises - plants, factories, warehouses, hangars with heavy equipment; screed thickness up to 300 mm. The load is created by heavy equipment.
Passing communications. In residential premises, water or electric heated floors are often installed. Different sources indicate different thicknesses of the screed over the communication. For example, SNIP standards indicate thicknesses of 20 and 40 mm. Manufacturers of polymer pipelines (Oventrop and Uponor) note a figure of 45-65 mm.
From all of the above we can conclude: the minimum thickness of a semi-dry floor screed above communications is 30 mm. This is enough to hide the pipes without losing their effectiveness. For example: if you make a screed over the pipes with a thickness of 150 mm or more, the warm floor will not fulfill its function - it will only heat a thick layer of concrete, and not the room.
Pros and cons of semi-dry floor screed
In addition to the already mentioned hardening speed, semi-dry screed has the following advantages.
- The absence of excess water eliminates the formation of voids, uneven drying of different areas, and excessive surface porosity. The last advantage is especially important if a polymer or epoxy self-leveling floor is laid on the screed: low porosity allows you to reduce the consumption of these expensive materials.
- There is a lot of excess liquid in a wet screed, which not only evaporates, but also flows to the base, which can lead to leaks to the lower floors. When laying a semi-dry screed, this risk is almost eliminated.
- Rapid hardening of the solution promotes uniform distribution of loads. The coating is very durable and resistant to both mechanical and chemical influences. The surface does not generate dust and tolerates temperature changes well. Semi-dry screed has excellent thermal and sound insulation properties.
- The density of the mass allows for the simultaneous laying of two joining sections at different levels, which significantly increases productivity. For a wet screed with its fluidity, this is only possible when using formwork.
The method also has several disadvantages
- The technology requires strict restrictions on layer thickness. On the one hand, the coating should not be thinner than 4-5 cm: otherwise it will dry faster than it has time to adhere firmly and may peel off. On the other hand, due to the high density of the material, its mass is large, and a coating more than 7-8 cm thick will place an excessive load on the base.
If it is necessary to raise the floor to a height greater than 7-8 cm, a layer of light expanded clay of the required thickness can be laid under a semi-dry screed.
- If, for industrial scale work, installing a semi-dry screed turns out to be even more profitable than a wet screed, then in small rooms it will cost more. It requires special, rather rare sand, and the fibers are not cheap.
- Semi-dry screeding requires high professionalism from the performers and careful adherence to all instructions. Even minor mistakes or negligence can ruin the coating. In addition, during installation and hardening of the screed, contact with water and exposure to low temperatures must be avoided.
Disadvantages of semi-dry screed
For the sake of objectivity, when considering the positive aspects of using semi-dry screed, it is necessary to point out its disadvantages:
- high viscosity has not only positive aspects, but also negative ones. The material has poor fluidity, which does not allow the formation of clear angles at the junction with the wall or between two planes of the screed. Instead, smooth transitions are groomed;
- when arranging large areas, the labor intensity of the processes increases noticeably: it is more difficult to work with such a solution;
- It is impossible to make a screed less than 3 centimeters thick.
When working with semi-dry screed, builders go to various lengths to mitigate its shortcomings. Many, for example, add a large amount of plasticizer to reduce the number of voids in the solution. To obtain a clear line at the junctions, the solution is compacted with tampers with a rectangular base.
Requirements for the screed device
The requirements for floor screed, which are provided for in SNiP, make it possible to obtain a high-quality foundation. It is better to use these standards and requirements in the project for your apartment.
Thus, the minimum layer thickness when laying on a concrete base is 20 mm. If an additional insulating layer or soundproofing materials are laid, the thickness will be 40 mm. If a pipeline or other communications are installed in the screed, then the layer above the communications should be no less than 20 mm.
https://www.youtube.com/watch?v=ytaboutru
If compressible materials are used as heat or sound insulation, then the strength of the sand and cement fill is increased. It should be no less than 2.5 MPa. In this case, the thickness of the screed should prevent any deformation.
The minimum strength of the solution is 15 MPa, and if the decorative finishing layer is a polyurethane self-leveling floor, then the strength is made equal to 20 MPa.
To control the plane of the coating, the regulations provide for the use of a rule. If it is necessary to check the geometric characteristics of the layer, use a tool 2 m long.
We suggest you read: How to properly lay tiles on wooden floors
According to SNiP, it is allowed if the floor screed has deviations, but not more than the specified values:
- For parquet, laminate, linoleum and self-leveling floors on polymer mixtures, 2 mm by 2 m is allowed;
- For other types of coatings, up to 4 mm per 2 m is allowed.
When monitoring the surface, deviations from these standards are leveled out first, since they have a great influence on how well the finishing floor covering will be laid.
Before laying the sand-cement layer, prepare the base. There are special recommendations for this in regulatory documents.
Thus, the foundation should be planned according to the profile or marks in the design documents. If it is necessary to add soil, the layer is compacted and leveled as much as possible. A mixture of sand and gravel is often used as backfill.
If floors are laid on the ground, then work can only be done when it thaws. If the soil surface is weak enough, replacement or additional strengthening is required. It is recommended to strengthen with crushed stone with a fraction of 40-60 mm. In this case, the strength must be no less than 200 kgf/m2.
If the base is a concrete slab, then it is cleared of debris and dust. Then the surface is washed with water. If there are joints between the slabs, they are filled with cement-sand mortar. In this case, the filling depth must be no less than 50%. For these purposes, a solution of grades 150 or more is used.
The base base is processed according to all the previously described recommendations. Then it is necessary to treat the surface with primers. After the primer composition has sufficiently polymerized, a cement mortar is prepared in a ratio of 1:3, where 1 part is cement and 3 parts sand.
If sound or heat insulating materials are used, then a damper tape with a thickness of 10 to 25 mm is installed around the perimeter of the room. Also, beacon slats are installed on the floor, and then the screed is poured.
The floor will be ready no earlier than in 24 hours. You should not walk on the base with your feet. If there is a lot of time, it is better to give the screed 30 days. You can then begin sanding and applying the topcoat.
Reinforcement of semi-dry screed
To minimize the formation of cracks, fiber fiber is added to the solution. Durable and practically weightless material successfully competes with traditional reinforcing mesh. This is explained by the properties of the new material:
- fiber is easy to add to the batch . And arranging a reinforcing mesh requires a lot of effort, from delivering the material to pouring the finished structure;
- thin fibers are distributed randomly . Thanks to this, the mass receives additional reinforcement in all directions, and not just horizontally;
- fibers prevent cracks from appearing . And the mesh only keeps parts of the coating from spreading further after cracks have already appeared.
The use of reinforcing mesh is not prohibited, but, as practice shows, its effectiveness is inferior to the capabilities of fiberglass. It is important to emphasize that supporters of the traditional screed reinforcement method will have to deal with three very labor-intensive processes:
- Initially, you will need to lay 3 cm of screed according to all the rules of traditional technology for its arrangement;
- lay out the reinforcing mesh and twist the parts together;
- Fill the reinforcement with two centimeters of mortar on top and compress it all.
Composition of the mixture for semi-dry floor screed
Initially, you should perform all the necessary calculations and then purchase:
- cement grade 400;
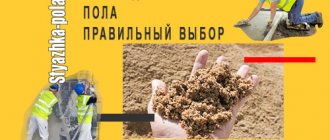
- washed sand: either river or quarry sand;
- additives and additives to improve the fluidity of the solution.
It is advisable to agree to rent a concrete mixer. Otherwise, you will have to work a lot physically.
Special attention must be paid to the requirements for the components:
- The sand fraction should be no higher than 2.5 mm. The content of clay and similar impurities in it should not exceed 3%. The presence of any inclusions of organic origin is not allowed. The natural moisture content of sand varies over a wide range of values. This must be taken into account in order to correctly determine the amount of water to prepare the solution.
- When purchasing cement, be sure to check the expiration date and integrity of the original packaging. If cement grade 400 D200 is selected for preparation, then the resulting solution will be identical in characteristics to cement grade 200. If M500 D20 was used, then the resulting mixture will correspond to the performance of M350. This solution can be used in places with difficult operating conditions.
- It is not recommended to take water from unverified sources. It may contain unacceptable amounts of impurities of biological or technological origin. Tap water meets all requirements in full.
The classic solution ratio: 3 parts sand mixed with one part cement. Water is added to the mixture in the required amount until the desired consistency is obtained. Description of the process of preparing semi-dry screed:
- A slide is made in the middle of the container for preparing the solution. 3 shovels of sand + 1 shovel of cement should be poured into this place one by one.
- The second step is mixing the bulk elements. If the mixture becomes homogeneous, it's time to add water and fiberglass.
- The consistency of the finished mixture is visually similar to clay sand, which already sticks together into a lump, but does not release moisture when pressed. In addition, the “probe” must retain its given shape.
- Since the moisture content of sand varies greatly, there are no strict guidelines for adding water. This is done “by eye” and may result in overflow. In this case, it is necessary to add dry ingredients until moisture stops oozing from the selected lump.
- To make the fiber more easily distributed throughout the solution, add it to a bucket of water. The approximate consumption is 80 g of fiber per 10 liters of liquid. The labeling of the fiber manufacturer, which in the instructions indicates the recommended doses per cubic meter of solution, will help you determine more accurately.
- If you plan to use a pneumatic machine, then it is advisable to prepare a sufficient volume of solution for the entire thickness of the layer. In the case of manual preparation of the mixture, you can lay out the screed in stages. First the bottom layer with tamping, and then the top layer with leveling and sanding the surface.
- There are experts who advise starting to work from the walls. This option is possible. But only if the whole process does not take more than an hour. If more time is needed, the initially applied solution will have time to form a crust. The result will be an unnecessary bridge for the penetration of cold or moisture.
Surface preparation
- Carefully inspect the base. It is important to identify any voids or delaminations that may exist. After this, you need to open them and fill them with cement mortar. The same should be done with cracks and other defects.
- The joints between the floor and walls must be treated with cement mortar. Even if the connections are in perfect condition.
- At the last stage of preparation, you need to get rid of grease stains, traces of paint and debris. The surface must be perfectly cleaned and degreased.