Intercom design
An intercom is a device that allows someone to enter a room, or vice versa, to deny entry, without direct contact with him. The device has gained particular popularity literally in the last decade; previously, combination locks were most often used to protect front doors.
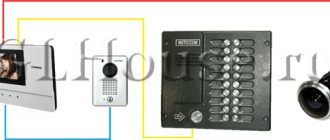
Photo - system design
An intercom in an apartment or private house consists of a handset, a calling panel, video equipment (if additional connection for monitoring a door or gate is required), a lock and a switch. Let's look at the functions of each part :
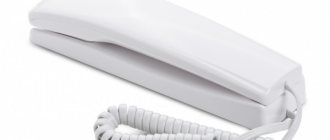
- The digital intercom handset is installed indoors so that the owner of the apartment or house can accept the call and, if necessary, open the door. As a standard, the subscriber device must be connected to the locking system;
- The calling panel is required to dial the required code. It can be of several types: with dial buttons, a special code reader from keys or cards, backlighting, or even a visual identifier. The latter is the rarest type, it is used to protect industrial or government facilities;
- A lock or intercom locking device is used to control the position of the entrance door of an apartment building or the gate of a private house. Nowadays, the most common connection is a digital intercom with an electromagnetic lock. A magnetic lock can be easily opened from the outside, but is considered more reliable than the outdated version with a metal bolt connected to an electric motor;
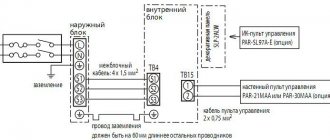
Photo - lock diagram - Using a switch module (for example, Panasonic TDA TDE or PBX), signals are transmitted from the calling panel to a specific subscriber. This practice is more common in an apartment building, since in a private building there is only one subscriber.
Photo - connecting the Commax intercom
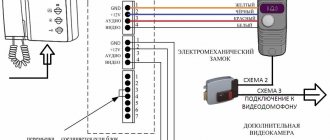
As an additional security feature, the call can also be supplemented with the ability to connect a video intercom (Kenwei KW-4HPTN, Kocom KCV-A374SD). In this case, all data is transmitted using the camera to a special TV or computer. Unlike an audio intercom, a video system is more reliable in use, because in addition to making a call, visitors are also visually monitored.
Photo - video intercom wire connection diagram
Cyfral models
The operation of changing the individual digital order of each living space is not particularly complicated. However, it cannot be accomplished by one person either - an assistant is needed. One of them remains near the entrance door to the entrance near the front panel for entering combinations. The other, meanwhile, goes to the apartment to confirm the correctness of the choice.
To begin with, you also need to activate the service mode - press the button to call subscribers and then dial the standard digital order - 1234, but for some models it is 0000. Activation of the mode will be confirmed by the inscription P— or ON on the display.
In the future, the algorithm is as follows:
- typed on keyboard 3;
- enter the subscriber number;
- the call button is pressed;
- a new secret password is dialed (4 digits);
- press the call button again;
- The door open button on the handset is pressed twice.
With the appearance of a single sound signal, you can be sure of the success of changing the combination. However, the method for entering a new password may vary depending on the specific intercom model. That is, either immediately dial 4 digits or follow the prompts displayed on the display.
Types of intercoms
There are several types of intercoms that are used to protect against uninvited guests in an apartment or private building. Their connection varies depending on the type:
- Digital (Eplutus EP-2297C, Gardi GRD, Hyundai HA-201);
- Coordinate matrix (AVC-305, Commax CDV-DPV-43 MTN, Laskomex).
Digital ones work on the following principle: when making a call, they transmit a signal over a two-wire line, in which the number of the connected apartment is recognized. In this case, so-called jumpers are used for pairing, which transmit signals through a twisted grid to a specific handset. Each tube, in turn, is equipped with microcircuits. It is very convenient that you can connect all apartments not only in the entrance to such a controller, but also on a specific floor.
The connection diagram for a coordinate matrix type is simpler and more reliable, therefore it is more popular. A switch is connected to the coordinate communication device, which switches the signal to a specific handset when calling. The connection is made using wires of tens and ones, i.e., each apartment is designated by two cables, the numbers of which are not repeated. To establish communication, the signal is sent through the DAT1 line to the switch. After this, the modulator transforms and processes the received information and connects to one specific “Unit” and one “Ten”. Afterwards, thanks to an electromagnetic relay, a connection is made to a specific apartment via a LIN telephone line.
Photo - digital model connection diagram
Most often, such a connection is parallel, which greatly facilitates independent installation. The only thing you need to remember is the polarity of the intercom calling panel, electric lock and apartment handset. If the electrical connection is made incorrectly, then the operation of not only a specific subscriber, but also the entire security system is disrupted.
Photo - intercom control unit
Rules for installing VIZIT intercoms
- How to properly install a video intercom in an apartment or private house
Types of modern intercoms and their features
An audio or video intercom is used to reliably identify visitors. The latter is often installed in private cottages and is created for additional visual control of the space in front of the front door.
- As for city apartments in multi-storey buildings, they are often equipped with an audio option, the design of which includes the following elements:
- A handset that is equipped with buttons for accepting a call and opening an entrance electromagnetic or electromechanical lock. The device is installed by a company that provides intercom installation and maintenance services. If such devices were not installed in some apartments when installing the entrance, there is the possibility of installing them yourself. You can also use the services of a specialist service company.
- A call panel equipped with a numeric dial field that allows the visitor to signal the intercom by pressing the required code, usually the apartment number. In addition, there is a reading device on the panel, with which you can use a special key to open the electromagnetic lock that blocks the entrance doors.
- Locking device with power supply. The most common type of lock today is electromagnetic. Until recently, electromechanical latches equipped with sliding mechanisms were ubiquitous. Such devices are often present in the entrances of apartment buildings even now. To operate a remotely controlled unit, you must use a DC voltage of 12 or 24 V.
- Switch. This device is designed to transmit a signal from the call panel to the subscriber handset of a specific apartment.
Depending on the type of signal processing, digital and analog intercoms are distinguished. For digital and analog models, various types of receiving devices are used. Before purchasing such a device, you should definitely find out what type is installed in the entrance.
There are two types of intercoms that can be successfully used both in a private house and in an apartment building: digital and coordinate matrix. Both types show high reliability, but their connection is somewhat different.
Digital
- The operation of this device is as follows:
- The alarm call is transmitted by a two-wire line system.
- It determines the number of the desired apartment.
- In this option, jumpers are used that transmit a signal to a specific subscriber over a twisted mesh.
The handset in each apartment has microcircuits. You can connect either the entire entrance or just one floor to such a controller.
To connect devices of this type, only a cable with two cores is used, through which an encrypted signal is transmitted. The handset installed in the apartment, the number of which was dialed on the call panel, responds to the signal.
To set the correspondence between the dialed code and the handset, special jumpers are used - jumpers - which bridge the required contacts in the answering machine. To correctly program the operation of the handset, jumpers are placed between the numbered terminals so that the sum of the numbers equals the apartment number.
The advantages of such intercoms include ease of installation and connection of new subscribers. The main disadvantage of such equipment is the influence of each tube on the operation of the entire system. When replacing a device due to its breakdown, as well as when connecting new subscribers, the correct installation of jumpers is extremely important.
If there is an error in connecting the digital handset or a short circuit in the lead wires, the system may malfunction.
Currently, to partially eliminate this drawback, floor controllers are used, which allow the fault to be localized within one level.
Another disadvantage of digital intercoms is their relative high cost, which does not allow these devices to become widespread.
Analog
A feature of these intercoms is the relative ease of installation. A commutator is connected to the coordinate communication device. It is this element that switches the call to a specific handset.
This device is connected to each apartment using two cables. Their numbers are not repeated. Communication is established by transmitting a signal to a switch. The modulator then processes the received signal and connects to the desired cable. Next, thanks to the relay, a connection with the apartment occurs.
The most commonly used connection is a parallel connection. This makes the job much easier if you decide to install the intercom yourself. The main thing is to remember the polarity of the calling panel, handsets in apartments and the electric lock.
If you make the connection incorrectly, the operation of not only a specific branch, but also the system as a whole will be disrupted.
Analog installations use a coordinate matrix connection and operate on the principle of a telephone exchange. An additional element of such a system is a switch, which processes and analyzes the signal, as well as redirecting it to a specific subscriber.
To connect the intercom handset to the switch, two buses are used. The contacts of the first of them (D0–D9) correspond to tens, and the second (E0–E9) to ones.
- Thus, to connect an intercom to an apartment whose number, for example, is 74, you need:
- connect the conductor from the positive terminal of the subscriber handset to the contact corresponding to number 7 on the tens bus;
- the conductor adjacent to the negative terminal is to the contact corresponding to number 4 on the units bus.
In the considered connection option, a device was used that was designed to serve up to 100 subscribers. There are models that can work with a large number of numbers, but their principle of operation is no different from that discussed above.
If the numbers of apartments located in the entrance do not allow connection, the installer reprograms the control panel with the numbers shifted by a certain number (for example, 84 must be subtracted from each). In this case, some difficulty arises when connecting, since without consulting the specialist who installed the intercom in the entrance, it is difficult to find out the amount of displacement.
- The sequence of actions will be as follows:
- At the first stage of work, the location of the intercom handset is selected, then it is fixed to the wall using quick installation.
- Next, the installation location of the switch is determined (for analog intercoms). On each floor they are installed in a distribution box for low-current circuits. All of them are connected in parallel, which greatly simplifies the installation process. In the general case, just one switch per entrance is sufficient, but when using such a scheme, you have to stretch wires from the apartments on the upper floors to the installation site of the device.
- After removing the protective cover of the switch, the terminals corresponding to tens and ones are determined, then the connection is made so that the sum of the numbers of these contacts shows the serial number of the apartment.
- The wires are connected to the tube. It is extremely important to observe polarity. The positive terminal is connected to the contact of the commutator corresponding to tens, the negative terminal to ones.
If the polarity is not observed when connecting the coordinate matrix system device, the operation of the devices of the entire entrance may be disrupted.
Which intercom to choose
There are many companies on the Russian market that manufacture devices for intercoms. High production technologies allow us to produce improved models every year. What kind of intercom system there will be in the house is up to the owners to decide.
When choosing an intercom, you should pay attention to the switching system. Based on this parameter, coordinate and digital intercoms are distinguished. Their difference lies in the wire through which the connection to the apartments is made.
When installing a digital intercom, one line is laid to connect the switch with all apartments. The coordinate system is designed in such a way that each apartment will have a separate wire connecting it to the switch.
Today, digital intercoms are considered more reliable in operation. But their price is three times higher than the price of coordinate ones.
Another characteristic worth paying attention to is the type of connection. There are audio and video intercoms. The difference between them is the presence of a display on which you can see who is calling. The video intercom provides high security; thanks to it, no strangers will be able to get inside the entrance. But the cost of such devices is high. Apartment owners for the most part give preference to audio intercoms.
Handset design
The residential subscriber device consists of two parts. This is a handset and panel that is usually mounted on the wall next to the front door. The handset can be installed anywhere, you just need to lay the wire around the apartment. Inside the handset there is a microphone, a speaker and a small board with discrete elements. The panel has a handset release lever, and the handset itself has a door open button.
The electronic lock button can also be located on the wall panel. In modern models, the lever is replaced by a reed switch, and there is a small magnet on the tube itself. Some models may have a handset switch. On the back of the panel there are two screws marked “+” and “–”. A two-wire line is connected to them.
The wires should be connected to the intercom handset with correct polarity, otherwise the intercom system will not be able to be used - it will not work.
- All access intercoms installed in the entrances of apartment buildings are divided into two groups:
- coordinate;
- digital.
Based on the types of intercoms, apartment handsets also have slight differences. In coordinate intercoms, a switch installed in the entrance is responsible for the apartment number, and in digital devices, a special chip, which is located on a board inside the handset.
Who pays for intercom service
From the moment of installation, the intercom acquires the status of common property and belongs to all apartment owners in the building. According to current legislation, the residents themselves pay for the maintenance and upkeep of the property. After the intercom appears at the entrance, a new receipt will appear in your mailbox.
The obligation to pay amounts for the maintenance of this device is also assigned to those owners who did not install tubes in their apartments.
Previously, people did not think that someone could enter their entrance and cause damage to the property located in it. In Soviet times, there were wooden entrance doors, and flowers in pots bloomed on the staircase landings.
Perhaps the reason for the vandalism of the entrances was the dashing 90s, when the morality of the people wanted better. That’s when they began to come up with and install various means of protection from ill-wishers. At first these were combination locks installed by housing and communal services, then they were replaced by intercoms. Let's see what else they will invent to protect common property.
Connection
Step-by-step instructions on how to independently connect the Eltis, Cyfral (Digital) video intercom with the z 5r controller:
- You can connect a key reader (touch memory) or a buzzer, a button that will be used to open an electromechanical lock, a backlight, the lock itself and a power supply to this controller;
- The buzzer and door sensor are optional parts, while the operation of the entire system depends on the door open button and power supply. If necessary, a screen can also be installed; optical control can be carried out through the monitor;
- To connect the board, a terminal block is most often used, the contacts of which will connect the necessary network wires;
- Afterwards, simply connect all the necessary wires to the apartment tube and check the correct polarity.
Domestic intercom models are also very popular, in particular the KS-2006. To connect them, schemes with two switches, one connection module, for several subscribers, etc. can be used.
What to do if the Factorial or Eltis intercom is disconnected from the power supply:
- Twisted pair wires are most often installed in the apartment panel. To find it, you need to open the panel where the Urmet, Digital, Factorial, etc. intercom cable was connected to the entrance or door lock;
Photo - marking of wires when connecting - Then determine which wires are responsible for tens and which are responsible for units. This can be done by looking at similar cables on adjacent connections;
- Be sure to pay attention to the polarity;
- When connecting a cottage intercom, it will be enough to simply connect the cables of the switch and the unlocking lock in polarity.
Prices for repairs or installation of intercom systems may vary depending on the city and the specific company. On average, the price of connecting an intercom varies between 200–500 rubles (the price is indicated only for the work, without the price list for the wires used). For example, connecting the MVK-325 UKP calling panel in Moscow and St. Petersburg will cost 500 rubles.
Content
Nowadays, almost any entrance to multi-storey buildings and office buildings is equipped with an intercom. This is done in order to prevent unauthorized entry into the territory, access to which is by definition limited. What kind of device is this, how exactly does it work?
Connecting an intercom
It doesn't matter which connection scheme you choose. The intercom installation process will have the same sequence of work. When connecting, you should follow the following sequence:
- Wire routing. This is the easiest step as you just need to connect the inside and outside of the wire using a wire. The wire must be carried out using cable channels. Its internal part can be connected both underground and by air. It is best to lay the wire underground. Typically, a stranded wire is used for connection.
- Installation of an external intercom unit. The outdoor intercom unit can be installed in any convenient place. Inserting an intercom into the gate is quite problematic. It is best to install the intercom on a pole. To protect your device, installation should be carried out in a protective block. If you plan to connect the lock opening to the intercom, then the job will become more complicated. In this case, it is necessary to lay a wire to the lock.
Read also: Russian-made manual router
- Installation of the internal intercom unit. The indoor unit is much easier to install than the outdoor unit. This unit usually resembles a video phone. Typically, the installation of this block can be done using self-tapping screws or dowels. If necessary, you can supplement your equipment with a special battery. Thanks to this, you do not need to supply power to the device. To connect it you will need a thin wire.
- Switching wires. If this is your first time connecting an intercom, then you may have a question about what to connect and where. Before you connect the intercom correctly, you definitely need to understand its wires. When connecting, try not to mix up the wires. Below we have placed a photo that shows the stage of connecting the wires. After connecting, be sure to check the functionality of your device.
As you can see, the technologies for connecting an intercom yourself are quite simple. Now we decided to give you some installation tips. In order for you to no longer have to run to the other end of the house, you need to place the device in the room in which you are most often found. If you are interested, then read about instrument transformers.
Typically this will be the kitchen or living room. If you are a lazy person, then you can install it in every room of your house. Thanks to this, you will always hear the signal. These were all the recommendations we wanted to tell you.
From year to year we regularly paid the monthly fee for the intercom, and everything was fine. But then the intercom operators suddenly decided that they were the smartest and pretended that there had been no payment for the last six months.
Residents who still had receipts ran to prove the fact of payment. But I don’t even have receipts. I paid via the Internet. Of course, I tried to print something out there and show it to someone, but... they either don’t hear or don’t want to hear. In the end, I got tired of everything, and I decided not to pay until they sorted it out themselves.
And then one day a friend calls me and tells me that my intercom doesn’t work (it just doesn’t ring into the apartment). When you try to dial a number, everything is reset, an error signal sounds and “Err” appears on the indicator.
I came to the conclusion that there can only be one reason for this - the intercom operators turn off the intercom in such an original way for non-payment (they can do this for one apartment).
In general, of course, there may be other reasons, but I know exactly why my intercom doesn’t work. Apparently they think I have to pay for the same service twice.
Interestingly, I was still able to enter the entrance using my set of keys. You can't just open the door by pressing a button on the handset. If guests come, you have to go downstairs and open it manually.
It is clear that in this situation it makes no sense to contact a company that services the intercom. I had to figure out for myself how it turns on.
Let's first determine why the intercom may not work:
- The call to your apartment has been disconnected (an error sounds when dialing the apartment number). You cannot call from the street and you, accordingly, cannot open the front door by pressing a button in your apartment. The most common option.
- We have deleted your keys from the intercom memory. In this case, you cannot get into the entrance using your tablet keys. The other residents' keys work as always. This is not usually done, but there have been cases.
- Any technical malfunctions of the units, wire breaks (intentional or not), acts of vandalism, etc. These cases are always very individual and will not be discussed in this article.
Let's see what can be done using the Visit intercom as an example.
Design and principle of operation
An intercom is an electromagnetic locking device with the ability to remotely control the opening and closing process from remote controls (handsets) located in apartments or offices. The system is installed on the entrance door and protects the building from unwanted entry.
Depending on the system for connecting apartments to the intercom device, a distinction is made between digital and coordinate devices.
With a coordinate switching system, a separate cable goes from the intercom to each apartment, but with a digital system, there is only one connecting cable. It would seem that digital intercom devices should be cheaper, however, in fact, everything is exactly the opposite - their cost is almost 3 times higher than that of coordinate ones. But it is believed that this pays off with the higher reliability and security of such a communication system.
- How the intercom key works - the principle of operation of the intercom key
Based on the type of communication, intercoms are divided into audio and video devices. From the name it is clear that video intercoms have a screen that displays the identity of the calling visitor, while audio devices provide only voice communication. Naturally, devices that transmit video images provide a higher level of protection, but do not forget about the price aspect - they are much more expensive than voice intercoms and, as a result, much less common. Typically, video devices are installed on the gates of large private properties.
Connecting to digital intercoms
How to properly connect a digital intercom handset in an apartment? This is not at all difficult, provided you follow a few rules. The subscriber node of the intercom system consists of a panel and a handset. The panel is usually installed on the side of the front door; the installation location of the tube can be anywhere, if desired, the only thing is that you will need to run the cable from the panel there. The internal structure of an intercom handset is almost no different from a telephone handset - it also has a microphone with a speaker and a microcircuit. The access door unlock button can be located either on the handset or on the wall panel.
On the rear side of the panel part of the device there are two terminals with polarity symbols (“+” and “-”). You need to connect a two-wire line to them. It is important not to reverse the polarity of the wires during installation - otherwise the system will not function.
To facilitate this process, wires of the same polarity are usually the same color.
The initial installation of an intercom system is always carried out by professionals; independent replacement comes down to purchasing a new intercom, actually replacing and connecting the wires. Before purchasing a handset, check the type of intercom you have. There are different models for digital and coordinate systems. The connection diagram of the handset to a digital intercom has its own characteristics. During the installation process, you must dial the apartment number. It's done like this.
- Carefully open the intercom housing. You will see that there are paired pins on the chip with numbers 1-2-4-8
- Using special jumpers, connect the pairs in parallel so that the sum of their numbers equals the number of your apartment. For apartment No. 15, for example, you need to short-circuit the first four pairs.
Please note that problems with one apartment intercom can affect the functioning of the entire system; this is the main disadvantage of such systems. To localize a fault within one floor, floor controllers can be additionally integrated into the system.
What breaks most often in the intercom handset?
No one is immune from breakdowns during daily use of the intercom system. Most of them can be eliminated with your own hands. The list of the most common breakdowns includes the following:
- The button responsible for opening the lock has stopped working;
- The guest or owner of the apartment cannot be heard or is heard poorly;
- The tongue of the tube sinks;
- The cable that connects the intercom handset to the electronic unit located inside the holder has become bent and broken.
Thus, if the intercom is used daily, its handset may break. These breakdowns are of a different nature, but restoring the connection of the intercom handset does not seem to be something supernatural.
If the front door on which the intercom is installed no longer opens using the handset from the house, it is worth assuming that the button for opening the door to the entrance has died. This could happen due to a breakdown of the microelectronic switch located on the board inside the tube. There are two options for solving this problem: either find a replacement switch, or buy and connect a new handset.
When the connection fails - you can hardly hear the interlocutor or not at all - these are symptoms of a broken speaker or microphone of the handset. Select suitable new replacements for broken parts. If you are not good at this, buy it and go immediately for a new tube.
When the tongue of the tube sinks, you need to bend the button holder. It is made of plastic and for this you first need to warm it up with a heating device that you have at hand. A soldering iron works well. The main thing is that it does not damage the intercom elements.
If a break is detected in the patch cable, you must purchase a new one, the connectors of which will be similar. Experts remind you that for the intercom to work correctly, it is important to observe the polarity when connecting. If this is not done, failures in the operation of the intercom system are unlikely to be avoided. This and other information you are interested in can be found in the intercom instructions.
Installation on a coordinate matrix type device
Connecting a handset to an analog (coordinate matrix) device differs from the same operation with a digital device. An analog intercom system operates on the principle of a telephone exchange - reception, analysis and connection with the desired subscriber is carried out by a switch. Subscribers are most often connected to the system in parallel.
There are 2 special buses for connecting the intercom with the switch. On the first bus, the contacts (D0-D9) are responsible for tens in apartment numbers, on the second (E0-E9) - for units. Connect the wire from the terminal with a plus sign to the contact responsible for the ten in your room (for apartment No. 87 - 8), the wire from the negative terminal is connected to a single contact (7 in our example).
If there are more than 100 apartments in your entrance, the intercom model must correspond to this number (there must also be a third bus, responsible for hundreds in apartment numbers). The principle is the same.
In some cases, when installing an intercom system, installers reprogram the panel, shifting the numbers by a certain amount. This action is performed, for example, if it is impossible to connect hundredth numbers. In such a situation, you will not be able to connect the handset yourself; you will have to call the specialist who set up your system. Switches are usually installed on each floor in distribution panels and connected to each other in a parallel circuit.
- A guide for those who have poor memory: how to open an intercom without a key
It is also possible to install one switching device for the entire entrance, but in such a situation additional tens of meters of cable will be required in order to sequentially connect the apartments on the upper floors. If, when connecting at least one subscriber intercom to the entrance analogue system, the polarity of the wire connection is violated, this may affect the functioning of all system devices, as is the case with digital intercom communication.
Possible faults
During operation of the intercom system, various malfunctions :
- mechanical damage to the tube;
- When you pick up the handset, the signal continues to sound;
- failure of the lock release button;
- the voice of the caller is hard to hear;
- if you press the door open button, the call is dropped.
In the first case, it is easier to replace the damaged part (pipe), because they are not so expensive. The main thing is to choose the right intercom for your intercom system model. In situations where the call signal does not turn off when the handset is picked up, there is no connection with the calling visitor and there is no reaction to pressing the lock control button - look for a breakdown in the handset switch. You can repair or replace it yourself, however, it is still recommended to entrust this to professionals, especially if you have never done anything like this before. This procedure requires some experience and appropriate tools.
If you have to press the electric button several times to open the lock, the microswitch is to blame. It is not difficult to change this part yourself, even if it is located on the intercom handset. It is enough to carefully unsolder the contacts of the faulty part, remove it and solder a new one. If the visitor is hard to hear, the problem is in the speaker or microphone. In some models, such a malfunction may be caused by a clogged “Balance” resistor installed on the intercom handset board .
In the latter case, you can try to twist the resistor lever yourself; in most cases, audibility is restored.
Unauthorized disconnection of a call when the lock is unlocked may be caused by an interruption in the electrical circuit coming from the speaker. In this case, carefully inspect all cable connections - both on the panel and on the intercom. Of course, turn off the device first. If there is a break somewhere, you need to replace the wire or solder the contacts of the wire and terminals. To summarize, we can say the following: in many cases, you can replace a damaged tube of both a digital and a coordinate matrix intercom yourself; this is a fairly simple action. Only in some cases is it worth calling the adjusters of your intercom system.
To learn how to connect different intercom handsets, see the following video.
An intercom is already a necessary device for a homeowner in an apartment building. It minimizes the access of strangers to the entrance: tubes equipped with audio and, in many houses, video communications allow you to quickly identify the person on the other side of the door. Many people are interested in whether it is possible to connect an intercom in an apartment on their own. Of course, if you understand at least the basics of electrical engineering. And we, in turn, will provide you with detailed instructions that will help you easily cope with this matter.
If the call to your apartment does not go through
Most likely, the so-called “intercom mafia” did this to force you to pay for a previously imposed service. They do this without entering the entrance, changing the intercom settings using the master key.
But, fortunately, this is easily fixable.
So, to connect a disconnected Vizit intercom, proceed as follows.
- We are looking for the intercom control unit in the entrance. Usually, this is some kind of gray metal box with a lock, like in store lockers or like some mailboxes. These locks open surprisingly easily; all you need to do is poke around inside with something suitable for a few seconds. In my case, the box was not locked at all. Inside the box you should see a BUD-301 (or BUD-302) block. It looks something like this:
- We unscrew the screws holding the cover and move the jumper inside the board from the “WORK” position to the “PRG” position. DO NOT turn off the power to the intercom!
- Now we go down to the front door and type on the keyboard:
Read also: Cold sheet stamping method
#999 (the intercom will beep twice and “1–2” will light up on the screen) 1 (we have entered the service settings mode, there will be one beep and the indication “P_SE”) 8 (we have entered the mode of turning on/off a call to the apartment, the inscription “ will appear SE_8", a single signal will sound and “A_” will immediately be displayed) APARTMENT NUMBER (from one to three digits) # (we skip the hash if a three-digit apartment number was entered) 1 (a call to the apartment was turned on, and “On” will light up on the indicator and the intercom beeps twice) * (asterisk to save all settings)
We make sure that the intercom was able to be unlocked (calling to the apartment works), and return the jumper on the ECU board to its place. Otherwise, the intercom operators will ignore your manipulations and come up with some other trick.
Once again, without further comment. To turn on the call, dial:
#999 1 8 00# 1 *
Instead of 00 you need to substitute your apartment number. Then return the jumper to the “WORK” mode, close the lid and quietly leave.
What to do if the key does not work
These are again the tricks of the “intercom mafia.” They simply erase information about your keys from the intercom and that’s it.
The problem can be solved in two ways:
- ask your neighbors for one of the keys and go make a couple of copies for yourself and your family members. The city is full of craftsmen providing this service. The advantage of this method is that you will never be disconnected again;
- record all your keys into the intercom memory again. To do this, you will again need access to the control unit (ECU) in order to switch it to programming mode (read how this is done a little higher).
Regardless of which method you choose, we proceed as follows.
We open the ECU, put the jumper in the PRG position, go down and switch the intercom to the service settings mode:
#999 (the signal will sound twice) 1 (single beep) 3 (beep again) APARTMENT NUMBER#
After the apartment number and hash have been entered (if the number is 3-digit, then you do not need to press the hash), a single signal should sound. This means that everything is OK, the memory is free and ready to write the key. If you hear four beeps in a row and the word “FULL” , it means that you won’t be able to record the keys; you will have to clear the memory first.
After a single beep, place your key on the reader. You should hear a double squeak and see “YES” . This means your key has been successfully written into memory. We apply the next key, then the next one, etc. When you run out of keys, be sure to press the asterisk * (this is so that all settings are saved). And also be sure to return the jumper back to hide traces of tampering.
You can add another key in the same way. Let's say you want your friend to be able to freely enter the entrance using the key to his Visit intercom. In this case, you can simply enter the key recording mode as described above and add its key. All previously recorded keys will be saved (i.e., you do not need to record all the keys from the very beginning each time).
As you can see, there is nothing easier than connecting an intercom yourself that was disconnected for non-payment. Just download the instructions (this one) and carefully read what is written there. For example, you can set your own individual code that will open the intercom without a key. Or you can write down your own master key so that you don’t have to go into the box and rearrange jumpers on the board every time