How can you test a multimeter?
A multimeter can have a very diverse functionality, represented by the definition:
- indicators of voltage and resistance, “continuity”;
- capacitive parameters of the capacitor;
- indicators such as light and noise;
- frequency level;
- temperature indicators;
- integrity and polarity of elements such as transistors and semiconductor diodes;
- the presence or absence of defects in the connections.
When choosing an electrical measuring instrument, immediately before purchasing, it is very important to pay special attention to the following indicators of the tester:
- the presence of a logo printed on the body, indicating the certification of the device according to the results of state testing;
- quality characteristics of the switching device, since long-term operation is most often inherent in devices produced by well-known and well-established manufacturers;
- display bit depth indicators for digital devices. Multimeters with a 3.5 digit display values in the range of 0.001, and with a 2.5 digit - in the range of 0.01;
- indicators of permissible errors, which can fluctuate significantly, but should not exceed 10%.
Multimeter serviceability
No less important criteria when choosing are the limits allowed by the device’s measurements and operating range. The sound probe should operate almost instantly when the probes are shorted.
Checking the functionality of the purchased electrical measuring instrument is a prerequisite for trouble-free operation, and is most often carried out by connecting a voltmeter in parallel to an electrical outlet, followed by checking the readings on the instruments or using a battery.
How to calibrate a multimeter
Calibration is a very important process in setting up an instrument. After several years of use, or even immediately after purchase, a multimeter needs calibration. Therefore, it is important to be able to do it yourself at home. To calibrate the device, you need to do the following:
- First you need to adjust the divider, this will require the use of a potentiometer;
- switch the multimeter to the 200 mV column to measure direct current;
- using a voltmeter, apply the required voltage to the input, which will be as close as possible to this figure (the main thing is that the voltmeter is accurate and in good working order).
This is how the device is configured. The main thing is to do it consistently and in strict accordance with the instructions. Then the device will last a long time and will not cause trouble during operation.
A multimeter is used to check the health of devices and monitor their voltage. But this equipment often needs testing itself. That is why it is important to be able to find problems in the operation of a multimeter, as well as to correctly configure this device yourself and at home using a working voltmeter. We must not forget about checking before purchasing - it will not allow you to buy a damaged multimeter.
Using the battery
Testing the device with a battery is convenient and consists in the fact that the result of changing the polarity of the probes is that the multimeter produces absolutely identical voltage measurements.
When using a battery, the test mechanism is very simple and consists of several simple steps:
- selecting the operating mode of the electrical measuring device, which corresponds to measurements of the DC voltage level;
- setting measuring limits equal to 20 V.
After instrument probes are applied to the battery contacts, voltage readings are measured and data is taken.
A working battery shows a voltage of 1.35 V. However, low-demand devices may well use cells with a charge level of at least 1.2 V. Batteries with a minimum charge are subject to mandatory recycling.
Repeated testing allows you to check the capacitance indicators of the element under load conditions:
- connecting the multimeter probe to the contacts of the power element;
- parallel connection of the load element;
- maintaining a pause within 30-40 seconds;
- recording the obtained results.
Batteries with residual values of 1.1 V can be used exclusively in household appliances characterized by low energy consumption, but at the same time, the quality parameters of the equipment’s operation are significantly reduced.
It should be noted that ensuring maximum accuracy of the measurements obtained requires pre-setting the minimum limit of the measured voltage on the device, due to which the measurement error is easily determined.
It is important to remember that a voltage indication of 1.6 V when using standard “AA” batteries, as a rule, does not indicate a low level of accuracy of the electrical measuring device. Many manufacturers of new power supplies slightly increase the voltage level, which allows the battery to have the longest possible service life.
The most accurate data can be obtained by measuring with a load, and a traditional light bulb intended for installation in a flashlight is most often used as the main load element.
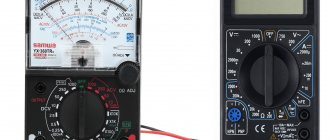
Types of Multimeters
There are currently two main types of this device on the market. This is an analog multimeter and a digital one.
Initially there were only pointer models
Analog
Analog testers appeared on the market earlier.
When using an analog multimeter, the measurement result is read from the arrow. She moves along the scale. It contains the following indicators:
- current;
- voltage;
- resistance.
Their design contains elements whose work is based on magnetism.
The accuracy of these devices is influenced by factors such as:
- magnetic fields (are there any in the measurement area);
- air humidity;
- temperature.
For your information . The main disadvantage of an analog multimeter is associated with the scale. If it is not depicted well, it may be difficult to read the device's readings. Then there will be a measurement error.
The advantages are their availability and simplicity. In addition, analog multimeters are inexpensive.
The highest accuracy of measurements with an analog multimeter is achieved using a special construction resistor. It is built into the device.
In most countries, the production of multimeters of this type has been discontinued.
Non-analog models are most common
Digital
The main difference between a digital multimeter and an analog one is the format for displaying the result. Indicators are reflected in numbers. They are displayed on the screen. It can be either LCD or LED. A digital multimeter is distinguished by significantly greater measurement accuracy. They are easy to use. When using an analog multimeter, you do not need to learn to read the scale. Often digital multimeters also have a built-in signal.
Additional Information! Particularly advanced models “can” work from a computer. They collect the results of their measurements and then transmit them to the machine, which in turn processes the received data.
Performance is important
A multimeter is a very useful device at both the domestic and professional level. It measures basic electricity indicators. Thus, even the basic model can replace three separate tools. In addition, modern digital multimeters are characterized by ease of use. They also have a fairly high measurement accuracy. However, it is extremely important that they work correctly. The slightest malfunction in the device can lead to unrealistic measurements. You need to know not only how to use the device, but also how to check the tester for functionality.
Closing contacts in resistance measurement mode
In the absence of special equipment used to calibrate the measuring device, checking the accuracy of the readings obtained is determined not only with the help of a conventional battery, but also by closing the contacts in the resistance measurement mode.
It is necessary to pay attention to the fact that these works can be carried out exclusively in the resistance level measurement mode, since some models designed to measure other parameters often fail as a result of contact closure.
Resistance/continuity/diode test mode
After the probes are connected to the appropriate connectors and a contact closure occurs, the indicator of the measuring device should show a resistance of “O”. The presence of any other readings indicates a malfunction of the tester.
If necessary, resistor resistance is measured with known values. However, even serviceable multimeters, as a result of improper operation, can distort the data obtained. The standard connection rule is used, in which the red probe is connected to the positive pole, and the black wire to the negative.
The contact part on the probes must be kept clean, since the presence of solder or rust increases the resistance and distorts the measurement results.
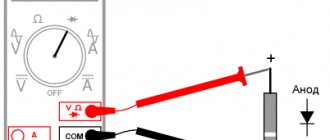
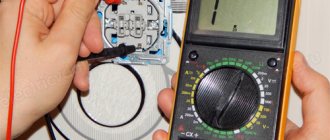
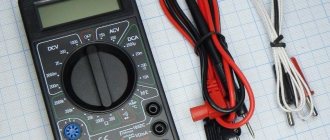
How to connect multimeter wires
Many beginners, after purchasing, often have a question: where to insert the wires (to be precise, they are called probes ) of the multimeter and how to do it correctly.
Most multimeters have three wire connectors and two wires - black and red. The black is inserted into the socket labeled COM , the red wire into the socket where the symbols include the designation V.
The third socket is used to measure high currents and we don’t need it to measure voltage; in general, if necessary, the red wire is plugged into it, and the black one always remains in one socket.
Instrument readings
Multimeters are represented by analog models and digital devices. All testers differ in functionality, as well as in the accuracy of the readings obtained. Popular analog multimeters show all data on the measurements performed with an arrow and a scale. Working with this type of device is not always convenient and requires some skill, and among other things, the pointer tester must be kept in a stably fixed position, which will not allow the pointer to “jump”.
Multimeter Aneng AN8001
In digital multimeters, measurement results, or rather readings, are displayed on a convenient LCD screen and have the form of intuitive digital values, which eliminates errors that inexperienced technicians make when taking data.
Such testing devices are very easy to use, so they are widely used. The cost of any measuring device varies depending on the quality characteristics, functionality and accuracy of the readings obtained. A standard tester allows you to measure current, voltage and resistance.
In order to correctly read the digital data of the measurement results, you need to remember that with a measurement range of 200mV, the indicators on the screen are “1”, with 2.0V - “1.607”, values of 20V correspond to the level of “1.60”, and 200V - “1.6” "
Big and small tester
The absence of correct readings on the device may indicate the use of discharged batteries, lack of user activity and switching the tester to the “economy” mode, incorrect connection of the probes, failure of the fuse, as well as setting the switch to the wrong mode. If necessary, adjust the range selection manually.
How to measure the voltage in an outlet
One of the most common tasks is measuring the voltage in an outlet or in apartment wiring. This is very easy to do with a multimeter. As we wrote above, alternating current flows in sockets, so to measure it you need to set the switch on the multimeter to the ACV .
We know that the voltage should be approximately 220 volts, so if you have a multimeter like the example in the photo above, set the switch to a mark higher than the expected value , in this case 750 in the ACV range.
Having set up the device, it’s time to put your probe fingers into the socket. It makes no difference which wire is inserted into which hole in the socket. In general, there is nothing to be afraid of here, the main thing is to hold on to the insulated part of the probes and not touch their metal part (although this is quite difficult to do even with a strong desire), and also not to allow them to touch each other while they are inserted into the socket, otherwise you can cause a short circuit .
If you did everything correctly, the screen of your multimeter will show the current voltage in the outlet and your indoor wiring.
In our case, this is 235.8 volts - within normal limits. You will never see exactly 220V on the screen, so an error of +-20 is normal.
What is important to know about the tester device
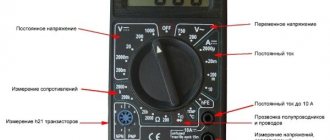
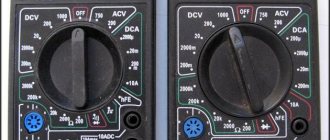
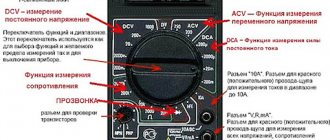
Before you start making any electrical measurements, it is worth understanding what the device itself is and what its functions are. All information is printed on the front panel. You can learn how to use a multimeter of the selected model based on the following generally accepted notations:
- ON/OFF – button to turn the device on/off (on some testers it may not be present; in this case, the device will be turned on by turning the range switch);
- DCA (or A—) – direct current;
- ADCA – alternating current;
- ACV (V~)/DCV (V—) – alternating/direct voltage;
- Ω – resistance.
To take readings, you need to use a rotary switch, which allows you to set different operating modes of the multimeter and select the measurement range.
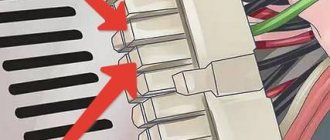
One of the important points in mastering the question of how to use a digital multimeter is the correct connection of the test leads to the appropriate connectors. The correctness of the measurements taken will depend on this. In order not to make mistakes, there are simple rules:
COM - black size on the left, universal connector in the center, connector for measuring high currents - on the right
- COM connector is common, it is used to connect the negative black measuring wire;
- to connect the red positive probe, one of the sockets for measuring voltage (V), resistance (Ω), current (mA, A) can be used, while it should be taken into account that, as a rule, there are two current sockets (for working with low-current circuits and with current up to 10/20 A depending on the tester model).
But it is also necessary to take into account that when measuring voltage or current, measuring probes installed in reverse will lead to a change in the polarity of the received data, which will be reflected on the display by the appearance of the “-” sign. The digital values will be correct. This is how digital devices differ from analog ones. In the latter, the arrow most often goes beyond the scale, and in some cases such work can lead to damage to the device.