Fastening floor beams to the mauerlat: technology for performing the work
Many homeowners strive to build their country houses themselves. There comes a time when they are faced with the question of whether it is possible to build a roof with their own hands and how to do it. In any case, it is important to remember that this work is quite labor-intensive and requires a competent approach and strict adherence to a certain sequence.
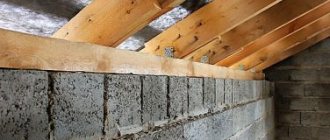
One of the important stages of roof construction is the correct installation and fastening of the murlat. This is a specific support that absorbs part of the force created by the roof structure.
Installation ↑
To construct the murlat, wooden beams are used, which are laid in a plane parallel to the future ridge. They begin to install it during the construction of walls. For example, in the case of brickwork, you can do the following:
- closer to the top, approximately 4–6 rows below the edge, lay a thick wire at intervals of 1 m; the wire is firmly fixed inside the masonry in the center; the length of the free ends should be sufficient to subsequently wrap around and tie around the support beam without any problems; after construction is completed, visible parts of the fasteners are hidden, for example, by applying a layer of plaster.
To prevent rotting of the murlat beams, they are waterproofed by laying rolled material such as roofing felt.
When arranging the Mauerlat along the perimeter of the walls, it is necessary to check not only the reliability of the fixation, but also the horizontalness of the support beam.
Is a Mauerlat needed if there are beams ↑
When hanging rafters rest on floor beams that are laid directly on the wall, then with this arrangement serious point forces arise that affect the building structures. As a rule, a similar approach is practiced when constructing a wooden house. In this case, this is justified, since due to the horizontal arrangement of the logs and beams used in the construction of the walls, the loads they experience are evenly distributed.
For brickwork or when using cellular blocks, undistributed pressure can be disastrous - in places where the floor beams are located, the walls begin to crumble at the edges. It is for this reason that the pressure should be dispersed. To do this, it is recommended to lay murlat on its ridge, which is made from thick wooden beams. Thus, the positive answer to the question of whether a Mauerlat is needed for floor beams in such structures is beyond doubt.
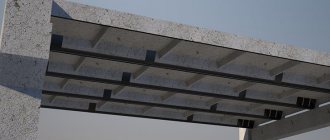
If the roof structure involves the connection of rafters and floors, then it is first necessary to ensure reliable fastening of the floor beams to the mauerlat. The latter will actually be assigned the unloading function.
"Pie" overlap
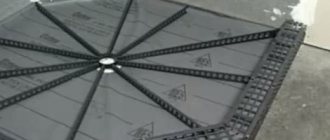
The design of the beam floor varies. Most often, the space between the beams is filled with insulation in the form of basalt fiber slabs, which perform heat and sound insulation functions. The thickness of the insulation layer is calculated based on the tasks assigned to it. So, for interfloor ceilings, where only noise protection is important, the insulation layer is from 50 to 150 mm.
We suggest you familiarize yourself with Laying plastic panels on the wall
Insulation of floors using wooden beams
Typically, heat and sound insulation material is placed in the gap between the beams, protecting it from moisture from below with a vapor barrier film, and from above with a waterproofing film.
To ensure the durability of the insulation, it must be protected from moisture. To do this, it is covered from below with a vapor barrier (usually a film type), cutting it off from water vapor rushing upward from the lower rooms of the building. In addition, vapor barrier prevents foreign odors from entering the room. The vapor barrier is laid either along the bottom surface of the beams or so that it goes around the beams.
On top of the insulation, as a rule, is covered with a waterproofing film to protect it from moisture, which can enter it through the floor of the upper room, observing the same rules during installation as when installing a vapor barrier. Either the ceiling lining of the lower floor (for example, lining) or one or another structure for the ceiling covering is attached to the lower surface of the beams.
Mounting sequence ↑
After arranging the murlat, they proceed to laying and fastening the ceiling beams to the Mauerlat.
- Parameters such as the cross-section of the structural beams and the installation pitch are calculated when designing a house based on the optimal cross-section and pitch of the rafters. For example, if the rafters are supposed to be made from boards 5 by 15 cm, then the distance between these elements is chosen to be 0.6 m. This is the best option, especially since the width of the heat-insulating material is also 0.6 m.
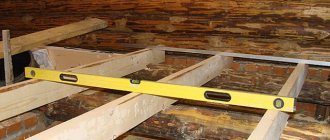
- Most often, they have a cross-section of 200 by 100 or 150 by 100. The final length is selected taking into account the width of the future cornice. The offset is about 0.4–0.5 m. As a rule, they are installed in one direction - mainly across the room. On the fixed Mauerlat, small grooves are made (a sufficient depth of 20–300 mm) for the ceiling elements. First, the outermost ones are installed, located at opposite walls, retreating from their inner edge by 0.5–0.6 m. Next, a rope is pulled between them and the remaining beams are laid out at the calculated distance from each other according to the obtained level. By following this rule, you can ensure an even horizontal plane of the ceiling. It is imperative to check the places where the beams are attached to the Mauerlat. If necessary, they can be slightly cleaned, trimmed with murlat, or, conversely, small dies made from pieces of plywood can be placed. Then the cross beams are installed in 1 m increments.
How to attach rafters to floor beams
During the construction of a roof, like any other structure of a house, you need to pay attention to all the little things. The strength and durability of the entire structure will depend on this, as well as on the quality of the materials used. For example, fastening rafters to floor beams, how is such work carried out? This kind of roof construction, where such a connection is used, is not so common. But if you have to perform this operation, then you must know all its nuances. This is exactly what the article will discuss.
Mounting options for small roofs
It is generally accepted that if the house has a small area, then the rafters can be mounted directly to the floor beams, without first attaching the Mauerlat. It is important to take into account the fact that a lot of tension is generated at the support points. Mauerlat allows this tension to be distributed as evenly as possible over the surface.
Sometimes in such situations, rafters are used that are connected to reinforcement driven into the masonry by twisting wire. Thanks to them, the Mauerlat is directly pressed against the wall. But such a solution is recommended to be used only in situations where it is impossible to apply any of the other existing methods.
We suggest you familiarize yourself with How to fix floor beams to a wall
Traditional fastening using wire works like this. First, you need to place the middle of the pieces of wire in the masonry 4 or 5 rows before its completion at a distance of 60-65 cm. Lift up the ends of the wire 25-30 cm long. If the external plaster of the house is not intended, hide the outer part of the wire in the solution. Wait until the mortar is strong enough and twist the ends of the wire over the wooden beam, pulling it tightly to the wall.
In various small buildings it is convenient to install a system with wooden plugs. It is best to use a brick-sized cork. The material is pre-treated with an antiseptic and wrapped in roofing felt. The plugs are laid at a distance of 50-70 cm from each other directly under the Mauerlat or slightly lower. The elements are connected using metal brackets.
When they do this
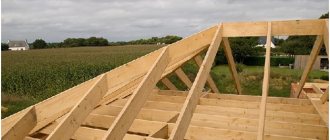
Before considering how the rafters are connected to the beams, you should consider when this method of fastening may be needed. When erecting a roof, you need to pay close attention to all its elements. But the most important question is rightfully considered to be the reliability of the rafter system. It is this component that will bear all the main loads.
Fastening the rafters to the floor beams can be done both when the house is wooden and when the walls are made of bricks or blocks (foam blocks or the like). But in each case, such a connection has its own characteristics, namely:
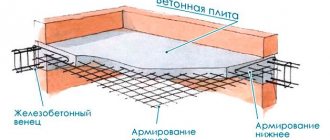
Many experts advise using additional protection if the house is made of bricks or blocks. If you decide to install roof rafters on floor beams, then the top row of walls is reinforced with a reinforced belt. To do this, formwork is first made. After this, the reinforcement is laid, and everything is filled with concrete mortar. In this case, the point where the rafters rest on the floor beams will not destroy the walls.
Sliding type mount
The movable joint is used for houses made of timber, logs and other materials that shrink. If in such a house you make a rigid joint between the rafter legs and the mauerlat, over time the entire structure may collapse. When there are errors in construction, deformation begins from the walls of houses and is transmitted further.
We suggest that you familiarize yourself with the Standards for distances between buildings on the site
For a sliding connection, it is a good idea to purchase a special fastener called a “sled” from any hardware store. You can also purchase corners with unusual holes for connection (oblong shape). The rafters are attached to all roof elements using clamps and brackets.
The hard way
Attaching rafters to beams can be done using several methods. One of these fastening methods is called rigid. This fastening of the rafters to the beam is carried out in the following sequence:
- First, prepare the beam. You need to cut a notch in it. It must be done in such a way that the depth is no more than a third of the thickness of the floor beam. Also, the place where the rafters are attached should be no closer than twenty centimeters from the edge. In this case, you can avoid chipping the beam.
- The notch is made depending on the method of fastening the rafters used. Most often, two methods of rigid fastening are used - with one or two spikes. If the roof of the house has steep slopes, then it will experience less snow load. In this case, the method of fastening rafters with one tenon is used. At a smaller angle of inclination, it is better to use fasteners with two spikes. In this case, the rafters will be more securely coupled to the beams and will be able to withstand heavy loads.
- The next step is preparing the rafter legs. In their lower part, you need to cut out protrusions that will exactly repeat the recesses in the floor beams.
- In both cases, both with the beam and with the rafters, all work must be carried out carefully. It is necessary that the protrusion coincides with the recess. To make this task easier, it is advisable to make a template in advance.
- Next, we fasten the rafters into place. They are installed in recesses. But such fastening of the rafters will still not be able to withstand the load. Therefore, it is reinforced with nails driven in at an angle. In addition, it is better to use additional metal strips and corners.
Installation of rafters on the ceiling
Rafter mounting options
Below I will tell you in more detail about all the installation methods, and you can choose the option that suits you.
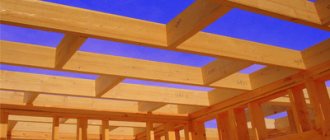
Rafter beams allow you to span large buildings that do not have internal walls
This method of fastening is the simplest and fastest. Its principle is based on the fact that the leg is cut from the end at an angle equal to the angle of inclination of the slope, which makes it possible to maximize the support area of the rafter leg.
In this case, special fastening elements are used to fix the leg, such as:
- Toothed plates that are clogged at the junction of parts. The plates are laid on both sides of the joint. It must be said that they can be used to connect any parts of the rafter system;
You can ensure a reliable fastening point using serrated plates
- Perforated plates. They are placed at the junction of the parts and tightened with screws or fixed with nails.
The use of fasteners can significantly simplify and speed up the process of constructing a rafter system. However, fasteners do not tolerate thrust loads well.
Therefore, the legs must be tightened with crossbars. In addition, it is additionally advisable to use racks, as in the photo below.
The fastening unit using toothed plates must be reinforced with racks
Inset
The insert allows for rigid fastening of the leg to the base. Moreover, this method can be used to install rafters both on the floors and on the mauerlat.
The notch provides rigid fastening of the legs to the base
The principle of cutting is based on making grooves at the base into which the legs rest. In this case, the ends of the legs themselves are cut at a sharper angle than the angle of inclination of the slope, which ensures even more reliable fixation of the parts.
Double double tooth mortise is more reliable
This connection method has one drawback - the complexity of its implementation. But the fastening unit is capable of withstanding large thrust loads. Therefore, it is excellent for hanging rafters.
When using a mortise, additional fixation is carried out using the fasteners that I described above, or with a pin, as in the diagram above.
The tooth-and-tenon type insertion method is the most complex
Tooth and thorn
The method of installing rafters with a tooth and a tenon is practically no different from a conventional mortise. The only thing is that there is an additional spike in the leg, which provides additional fixation.
The spike not only increases the load-bearing capacity of the attachment bridle, but also prevents lateral displacement of the leg. This installation method does not require the use of additional pads. Fixation can be done with nails or screws.
Since this installation method is the most complex, it has recently been rarely used.
The bar overlay can be applied in two ways
Overlay
The use of an overlay is, in fact, also one of the variations of the insert. Installing the pad allows you not to cut the leg at an acute angle, but to join it in the same way as when using fasteners. Instead, a block is cut, the end of which is located below the leg.
In this case, the pad itself is attached to the leg using studs, bolts or clamps. Sometimes a flashing is used to strengthen a mortise joint. This increases the resistance of the unit to thrust loads.
If the roof is small, connections can be made with bolts
Here, in fact, are all the most common methods of attaching rafter legs.
We use bolts
The methods of attaching rafters to beams are quite varied. One of these involves the use of a bolted connection. In this case, work on fastening the rafters is carried out in the following sequence:
- First of all, a triangular cut is made on the edge of the beam protruding beyond the wall. In this case, its hypotenuse should be located at the same angle as the notch on the bottom of the rafters;
- Next, the connection is assembled. To do this, install the rafters on the floor beam in the previously made cut. The attachment point is reinforced with nails driven in at an angle; at least three of them must be used;
- For the next step you will need a drill and a thick wood bit. Its cross-section should be slightly larger (a few millimeters) than the cross-section of the bolt used. Using a drill, a through hole is made. It is placed at an angle of ninety degrees relative to the plane of the rafters;
- After this, a bolt is inserted into the hole. In this case, it must pass from bottom to top. You need to put a washer on it. After this, the bolt is secured with a nut.
Some experts consider this type of fastening of rafters to the beam more reliable. Moreover, this method is easier. In this type of fastening there is no need to cut complex recesses and protrusions in the beams and rafters.
But there is one nuance here too. In order for the fastening to be reliable and durable, it is necessary to choose a bolt, washer and nut made of good steel that can resist corrosion. Also, before fastening, it is advisable to treat all metal elements with a special coating. You can do it even simpler. The mounting area is painted.
Fixing the Mauerlat using wire
Before attaching the Mauerlat to aerated concrete using steel wire, it must first be fixed in the thickness of the wall. This should be done while laying the last rows of gas blocks - the wire is placed under them.
The installation technique in this way looks like this:
- A couple of rows before the end of the masonry, a twisted wire of several thinner wires with a cross-section of 6 mm is placed between the blocks.
- In this case, the central piece of wire will be placed in the thickness of the masonry, and the ends will hang down on both sides of the masonry. The length of the ends is made such that they are enough to wrap freely around the beam.
- There should be so many pieces of wire that it is enough to tie all the rafter legs.
By chemical anchor we mean a liquid injection mass made on the basis of a polymer resin, which quickly hardens and firmly fixes the metal rods in the thickness of the Mauerlat.
The advantage of this material is the absence of bursting stress, so fragile aerated concrete does not collapse. If mechanical anchors fix parts by expanding the dowel, then the adhesive composition of a chemical anchor fills the pores of aerated concrete and holds the rod motionless.
The process of attaching liquid dowels looks like this:
- A recess for the anchor is drilled in the gas block. The size of the recess should be larger than for a regular anchor bolt.
- Remove dust and debris from the hole, for example, with a vacuum cleaner.
- The adhesive composition is poured into the hole.
- Next, a threaded metal rod is inserted into the glue - an M 12-14 pin or a piece of reinforcement.
- Complete crystallization of the polymer composition occurs in 1/3 hour if the ambient temperature is above 20 ℃.
- Once the glue hardens, the pin will be securely fixed. It is noteworthy that such fasteners are stronger than mechanical ones.
We suggest you familiarize yourself with How to choose foil insulation for a bath
Installing a roof plate on a wall made of aerated concrete using liquid dowels has a number of undoubted advantages:
- The fastening does not lose strength for more than 50 years.
- Due to the polymer structure of the glue, this method of fixation is widely used at the edges of walls, where there is a risk of the gas block splitting.
- The chemical anchor has good chemical resistance.
- Even damp weather and wet surfaces of the joining elements do not prevent the installation of these fasteners.
- The installation of the roof mauerlat on aerated concrete blocks can be carried out without pouring an armored belt, since the reliability of fastening a chemical anchor is much higher than that of a mechanical one.
- The chemical composition of the anchor is ideally combined with the porous structure of aerated blocks.
- To install liquid dowels, holes of a shallower depth are required than in the case of mechanical anchors - there the depth is 2-3 rows.
However, welding work cannot be carried out on anchors installed by this method - overheating of the metal rod will lead to disruptions in the polymer structure of the material, causing it to lose strength.
Before attaching the Mauerlat to aerated concrete using steel wire, it must first be fixed in the thickness of the wall. This should be done while laying the last rows of gas blocks - the wire is placed under them.
By chemical anchor we mean a liquid injection mass made on the basis of a polymer resin, which quickly hardens and firmly fixes the metal rods in the thickness of the Mauerlat.
The advantage of this material is the absence of bursting stress, so fragile aerated concrete does not collapse. If mechanical anchors fix parts by expanding the dowel, then the adhesive composition of a chemical anchor fills the pores of aerated concrete and holds the rod motionless.
However, welding work cannot be carried out on anchors installed by this method - overheating of the metal rod will lead to disruptions in the polymer structure of the material, causing it to lose strength.
Some recommendations
Whatever method you use, there are some rules to keep in mind. The rafters will be securely fastened if:
- High-quality materials were used during installation. Moreover, this applies not only to the rafters and beams themselves. The materials you use for fastening (bolts, staples, clamps, screws, etc.) must also be of high quality.
- There is no need to rush. The installation of rafters and their fastening must be carried out strictly in compliance with technology.
- All cuts used must be done carefully and this must be done so that the protrusions on the rafters strictly coincide with the recesses on the floor beams.
To make the work easier, it is better to make a template. It is performed when attaching the first joint of the rafters. Further, according to this template, all the recesses and protrusions will be identical. As a result, it will be easier to fasten and the work will go faster.
It is worth remembering that building a roof is a difficult job. Experience is important here. If you are doing this for the first time, it is better to consult a specialist in advance. And if you have no experience at all in working with wood, then it is better to entrust the fastening of the rafters to the floor beams to a professional. In this case, the roof of the house will be reliable and durable and will not cause you any trouble during operation.
Video on the topic:
Several basic rules for attaching rafters to the Mauerlat
- It is necessary to ensure a reliable, durable and high-quality connection of the fastened parts.
- In the places where the rafters adjoin the mauerlat, it is necessary to ensure high accuracy of cuts.
- Fastening work should be carried out using metal angles, plates, brackets, threaded rods or bolts with nuts.
- Use bolts and nuts only with metal plates or washers.
- Nails and screws are used as a temporary fastening option. Later they are replaced with angles, plates or bolts.
Fastening the rafters has always been an important point when constructing a roof. The reliability of such a structure is guaranteed not only by the correct calculation and choice of material, but also by the correct installation of the rafters to the mauerlat, as well as to the floor beams.
When constructing roofs, two types of rafter structures are used - hanging and inclined rafters. Let's try to briefly consider both types of such structures and their attachment to the Mauerlat.
To evenly distribute the loads of an inclined roof structure, spacer and non-spacer methods are chosen for attaching the rafters to the Mauerlat. When a non-thrust design of rafter legs is used, then there is no thrust pressure between the walls and supports of the building.
To arrange a spacer structure, only rigid fastening of the rafters along the gable is used without the use of sliders. The force from the roof through the rafter legs is absorbed by load-bearing walls and supports. Attaching the rafters to the Mauerlat is done in this way:
- The support for the rafter leg is the mauerlat. The rafters are fastened using the sliding leg principle, and the upper part is fixed to the ridge run.
- The lower part of the rafter leg is secured to the Mauerlat using a slider. At the top, the rafters are connected by bolted joints or other means.
- The rafter structures and ridge purlins are connected into a durable structure, also called a ridge assembly, using a wooden block. They are fastened with nails, which must be driven in on both sides parallel to the ridge.
Fastening rafter structures to the Mauerlat using a non-thrust method is somewhat different from what was described earlier:
- It would be the right decision to make fastenings using sliders. In this case, there will be no auxiliary support at the bottom of the rafter leg. In the upper part, the structural elements rest against one another and they are connected to each other by various overlays.
- Fastening is carried out by rigidly pinching the lower ends of the rafters with the Mauerlat. To do this, use the lower support bar or gash, and the upper end rests on the ridge run into the horizontal notch. You can use a fastening with a slider, then there will be a slight possibility for vertical rotations at the joints.
In cases where the roof structure provides for the installation of hanging rafters, and this happens if there are no internal supports in the building or pillars, the lower end of the rafter leg has an overhang and extends beyond the supporting wall. The entire load coming from the roof is distributed over the external walls.
The system has the form of a symmetrical triangle, the side of which can have a length from 7 to 12 meters. Its design includes horizontal braces made of timber, as well as rafter legs, which are installed at an angle with a certain angle. The upper ends of the rafters on the ridge are installed in the completed cut. The structure is strengthened using a crossbar.
The places where the rafters are fastened are called the support node. There are several types:
- The unit is hinged and has one degree of freedom. With this connection, it is possible to rotate the beam in a circular manner.
- The unit is hinged and has two degrees of freedom. This connection allows the beam, in addition to circular rotation, also the possibility of horizontal displacement. Fastening is done using slides or sliders.
- The hinge joint, which has three degrees of freedom, gives the beam the ability to move horizontally and vertically. There is the possibility of circular rotation, but for this it is necessary to make a special hinge. It is installed on the Mauerlat.
- The most common are nodes with zero degrees of freedom. With this method of fastening for rafters, both ends are rigidly fastened with rafter corners on both sides. This method eliminates the possibility of the beam moving.
It is considered optimal to mount this material flush with the inner surface of the walls of the house. It is strictly not recommended to lay the Mauerlat on the house closer than 5-6 cm from the outer plane of the walls.
- The Mauerlat must be attached to the wall of the building. In this case, it is recommended to make a protective fence for the Mauerlat outside, preferably from brickwork. We should not forget about waterproofing, it is necessary to protect the wood. You shouldn’t overdo it, two layers of roofing material will be enough.
- There are several ways to directly attach a structure such as a Mauerlat to a house. If the walls are brick, wooden blocks are built into the masonry several (2-3) rows below the top row of the wall.
- It is to these bars that the Mauerlat will subsequently be fastened using staples. When constructing roofs for houses built from expanded clay concrete or foam concrete or gas silicate blocks, a reinforced concrete belt should be made under the roof.
- When pouring this belt, it is necessary to insert threaded rods into it. After this, holes are drilled in the Mauerlat beams for these studs and beams are installed directly on them, which are pulled to the walls of the house with nuts and washers.
We suggest you familiarize yourself with Old wooden windows in the house: should they be replaced or can they be repaired?
The most common are studs with a diameter of 1 2 - 1 6 mm. They must be installed at least every 1.6-2 m.
There is also fastening of the Mauerlat to the house using studs, intended for brick walls. So, during the construction of walls, studs are embedded in the brickwork so that the depth is at least 3 rows of bricks.
To save money, instead of studs, it is recommended to embed simple reinforcement, welding nuts to it by welding. In the same row of brickwork where the studs (reinforcement) are embedded into the house, it is necessary to insert thick (3-6 mm) steel wire, the ends of which must be of sufficient length to tie the Mauerlat.
Note that often during the installation of a structure such as a Mauerlat, it becomes necessary to splice the beams together. This is done by cutting the beams into half a tree, and then fastening them with bolts or nails.
- One of the most popular recently is the fastening of the Mauerlat, which uses exclusively edged boards measuring 50x150 mm (usually up to 60 x 160 mm).
- Initially, you need to lay out one row of boards on the walls, and then secure them to the house using anchor screws (not bolts, since their heads will protrude). The length of the anchors must be at least 20 cm.
- Holes in a reinforced concrete belt or brickwork are made using a hammer drill, having first drilled the board with a regular drill. Then you need to lay out the next row of boards on the house, nailing them to the first row using simple 100 mm nails.
- The joints of the boards should be made in other places, thus performing the dressing. In the corners, the boards also need to be laid with a bandage. The result will be a Mauerlat with a thickness of 100 mm, which is quite enough.
This method of attaching a mauerlat to a house, especially to expanded clay concrete blocks, is popular for several reasons. First of all, it is much easier to lift boards to a height than bars. The next reason is that there is no need to cut half a tree.