Determining the type of foundation
Based on the composition of the soil and its resistance to loads, the general recommendations look like this.
- On fluid and fluid-plastic soils (sandy loams, loams, clays flow down an inclined surface, do not roll out into a rope, stick) with a plasticity index JL from 0.75 to 1.0 or more: slab base.
- Tightly plastic and hard soils (sandy loams, loams, clays crumble upon impact or are difficult to knead). JL 0 - 0.5: strip, columnar foundation;
- On sandy soils - screw piles.
- On peat soil more than 3 m thick - driven or screw piles.
Where there is no soil and rocky, coarse rocks come to the surface, they themselves can serve as a foundation.
Engineering-geological surveys require financial costs; they are carried out infrequently for bathhouses specifically. They use the results of studies of their own and neighboring areas. If there is a gas pipeline, the operators have a survey report.
Before choosing, a preliminary calculation is carried out. The main quantities that are used are: the depth of the foundation for the bathhouse and the load.
Laying depth
Seasonal soil freezing is the main indicator that must be taken into account. Its dependence on the groundwater level and snow cover is standardized by SNIP 23-01-99 (Building climatology). Then the load, the depth of the foundation of the adjacent structure, and the location of utilities are considered.
| Depth of seasonal soil freezing, cm | |
| Omsk, Novosibirsk | 220 |
| Tobolsk, Petropavlovsk | 210 |
| Kurgan, Kusentai | 200 |
| Sverdlovsk, Chelyabinsk, Perm | 190 |
| Syktyvkar, Ufa, Aktyubinsk, Orenburg | 180 |
| Kirov, Izhevsk, Kazan, Ulyanovsk | 170 |
| Samara, Uralsk | 160 |
| Vologda, Kostroma, Penza, Saratov | 150 |
| Tver, Moscow | 140 |
| St. Petersburg, Voronezh, Volgograd, Guryev | 120 |
| Pskov, Smolensk, Kursk | 110 |
| Tallinn, Kharkov, Astrakhan | 100 |
| Minsk, Kyiv, Rostov on Don | 90 |
| Frunza, Almaty | 80 |
| Kaliningrad, Simferopol, Sevastopol | 70 |
A map and freezing tables for Russian cities will also help determine the required indicator, depending on the type of soil. Where frost heaving of the soil and its settlement during thawing is possible, to design the foundation one must be guided by Chapter 14 of SNIP 2.02.01-83. A bathhouse is a building with irregular heating. This must also be taken into account when making calculations: a shallow type with an insulated base and blind area will not help with heaving.
Loads
The prefabricated load consists of the weight of the base, the structure and its contents.
- The weight of a monolithic strip foundation is equal to the volume of reinforced concrete multiplied by its density: 2500 kg/m3.
- Weight of walls, partitions, plinth, stove, ceiling, roof, gables. Defined similarly.
- Temporary loads: people, water, snow on the roof. In areas with strong winds, this indicator should be added.
The resulting value is divided by the area of the foundation. This is R - the calculated resistance is 1.55 (conditionally) kgf/cm2, 15.5 tf/m2, 155 kN/m2, 155 kPa. It is multiplied by the reliability coefficient - 1.3.
The design resistance of a specific soil is determined using the tables in SP 22.13330.2011. So, for loam it is 1.8 - 2.8 kgf/cm2. Mixed sand – 3 – 5 kgf/cm2. If the calculated indicator is lower than the calculated normative one, the decision is correct. Above that, subsidence of the foundation, and with it the structure, is inevitable.
Requirements for a bathhouse foundation: choosing the optimal design option
Requirements for a bath foundation
There are 2 key requirements for the foundation of any building. Firstly, the supporting structure must be as reliable and durable as possible. Secondly, the foundation design must be such that seasonal soil movements do not have a significant impact on it.
When choosing a foundation design and its overall dimensions, in addition to all other factors, you need to take into account the type of soil at the construction site and the depth of soil freezing, according to which such a significant indicator as the depth of the supporting structure is determined. While studying third-party manuals, you probably came across recommendations from not entirely competent authors to lay the foundation to a depth of 60-80 cm, etc. In some cases, of course, such advice is relevant, but not always. The bottom line is that in different regions of the country the soil freezes to different depths and this must be taken into account. Information regarding these points is given in the following table.
Soil freezing depth by region
Soil freezing depth
In addition to the depth of soil freezing, it is necessary to take into account its type. The images show what types of soils there are and what they look like.
Soil types
Properties, composition and types of soils
Classification of soil varieties
The dependence of the laying depth on the level of groundwater passage and soil freezing is reflected in the following table.
Table. Relationship between foundation depth and soil characteristics
Based on all of the above, we can provide a table with recommendations for choosing the type of foundation for a 3x4 m bathhouse in accordance with the properties of the soil at the construction site.
| Foundation | Illustration | Priming |
| Belt (prefabricated, monolithic, prefabricated-monolithic) | Non-heaving, dry, sandy | |
| Belt rubble concrete | Non-subsidence clayey | |
| Slab solid | Slab foundation | Mobile, heaving, subsiding |
| Pile | Pile foundation | Almost all types of soil |
Band support structures are the most common.
Band support structures
Deep strip foundations are made in monolithic, prefabricated and combined versions along the perimeter of the building and under load-bearing walls
Slabs are somewhat less common, because cannot be used in combination with all types of soil - too mobile soil will simply destroy the slab.
Slab foundation is the most durable type of foundation, which is widely used in private construction
Pile foundations are the most versatile, however, the purchase and installation of screw piles directly leads to an increase in the final cost of the work performed, which is not acceptable for every developer.
Foundation on screw piles
A more budget-friendly option for a supporting structure, much like a pile foundation, is a columnar foundation.
Columnar foundations
In view of the above, we suggest that you familiarize yourself with the instructions for the calculation and construction of the most commonly used types of support foundations: strip foundations and columnar structures.
Foundation for a bathhouse: which one is better?
The answer is obvious. One that suits the soil, climatic conditions and is not burdensome in terms of finances and labor costs. The availability of materials and construction equipment for these works is also important. Main types.
- Tape.
- Slab.
- Columnar.
- Pile.
Each has advantages and disadvantages. Let's look at each of them in detail. General site preparation is set out in SP 31-105-2002.
Strip foundation for a bath
A simple, traditional and cost-effective type - tape, in various options.
- Monolithic ribbon belt. Reinforced concrete.
- Prefabricated tape. Material – FBS foundation blocks, building concrete.
- Rubble concrete. Rubble stone, concrete.
- Brick. Only baked clay bricks.
- Cellular concrete. Foam blocks of a grade of at least D 1000.
- Pile-tape. Recessed concrete grillage on piles.
The choice is made based on the availability of materials, the costs of their acquisition and delivery.
Monolithic
A concrete reinforced strip foundation for a bathhouse is the most common option. Available everywhere, forgives minor errors in design. Requires quite a lot of materials.
- Sand for pillows, filling sinuses.
- Crushed stone.
- The boards are edged on the inside.
- Bars for posts, struts.
- Reinforcement or mesh.
- Polyethylene film.
- Nails, screws.
- Knitting wire.
Tools used when laying the foundation: 1 - trowel; 2 and 3 - jointing; 4 - shovel; 5 - rammer; 6 — hammer-pick; 7 - plumb line; 8 — roulette; 9 - meter; 10 - square; 11 — level.
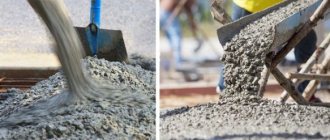
Concrete for the foundation of a bathhouse is preferable to factory-made: it is never of poor quality. In its absence, you will have to set up a small concrete-mortar unit. Concrete mixer, warehouse for cement, inert materials, containers for water and concrete.
Do-it-yourself strip foundation for a bathhouse: step-by-step instructions include many rather labor-intensive steps, so if possible, you should use ready-made concrete.
Choice of depth and width, pillow
Determined from tables, depends on climatic conditions, soil, load.
Further technology depends on the depth. Depending on it, the foundations are fine-medium and deeply buried. The latter option is used in the construction of large bath complexes.
When choosing between a shallow or medium-depth foundation, it should be taken into account that the middle foundation does not need to be reinforced, but a shallow foundation is always reinforced.
The width of the bath tape is also selected depending on the thickness of the walls. Already at this stage it is necessary to clearly understand not only the material of the walls, but also its physical dimensions. For timber they are standard: the width of the foundation under it can be equal to the width of the timber. Floor joists are on hanging brackets fixed to the first crown with mandatory waterproofing.
The log can have a diameter from 24 to 36 cm (it will look very aesthetically pleasing). But every centimeter of width is at least a hundred kilograms of concrete. On average, the width of the foundation is taken to be 150 - 200 mm larger than the width of the walls.
| Foundation material | Recommended width of strip foundation | |
| Wall length up to 3 m | Wall length more than 3 m | |
| Clay brick | 600 | 700 |
| Monolithic concrete | 400 | 450 |
| Reinforced concrete blocks | 400 | 450 |
| Rubble concrete | 500 | 600 |
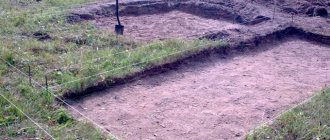
At this stage, the site is cleared and leveled. Marking is done using a cord, pieces of reinforcement or stakes, and a water level. After this, a trench is opened. The fertile layer is stored separately.
A sand cushion is laid at the bottom of the trench over geotextile (prevents sand from mixing with the soil), with obligatory hardening by pouring water and subsequent compaction. Crushed stone or gravel is laid and compacted on top of the sand. Particular attention is paid to the uniform thickness of the pillow. It is defined as three widths of the foundation, but in practice it is within 20-30 cm. Waterproofing is laid on the cushion.
Formwork installation
The most critical stage: its strength ensures the success of the entire process. Saving materials at this stage is unacceptable. A budget option is an edged board 2.5 - 4 mm, 10 - 15 cm wide. It should be protected from contamination with plastic film (it will also prevent leaks of cement laitance). After dismantling the formwork, the boards are used for their intended purpose. Plywood or OSB with a thickness of 1 - 2 mm is also suitable.
It is also not forbidden to use permanent formwork or ready-made metal panels. It all depends on the financial capabilities of the developer. It is necessary to arrange ventilation, provide a place for supplying electrical cables, water, and exit to the sewer.
The formwork is plumb, checking the diagonals is mandatory.
The most common mistakes: a large distance between the vertical columns, weak fastening of the struts, the height of the formwork is located at the height of concrete pouring.
Read a detailed article about constructing formwork with your own hands
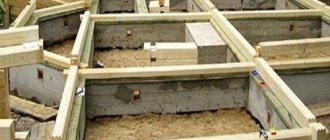
Installation of fittings
The small size of the bath allows you to knit the reinforcement frame on a convenient platform, then lower it into the trench.
For the horizontal part of the frame, periodic reinforcement d12 -16 mm is used. For vertical rods, wire rod 6-8 mm. There are 2 horizontal rods in the upper and lower chords. Vertical and transverse rods are located in increments of 50 cm.
At corners and junctions, the reinforcement is connected with knitting wire with an overlap of up to 70 cm. It is not recommended to weld the belt elements. The reinforcement is positioned and secured to the clamps so that all of it is inside the concrete strip, at a distance of 5–7 cm from any of its edges.
Pouring concrete
If possible, order a mixer and pick it up directly at the work site, this must be done. Continuous pouring ensures maximum strength, while pouring the foundation for a bathhouse with your own concrete in one day (the rules require this) can be difficult. Layers of 20–30 cm each must be bayoneted or passed through with a vibrator.
The most common brand of concrete for bathhouse foundations is M200, M400. At the construction site it is prepared from 1 part M400 cement, 3 parts sand, 4 parts crushed stone.
To avoid cracking of the surface from rapid loss of moisture, the tape is covered with film and watered for 3-4 days. The foundation will gain full strength after 28 days, after 14 days - 90%. At this time, you can begin to build walls.
The finished tape cannot be left uncovered for the winter: frost and uneven thawing can break it.
After removing the formwork, the spaces between the foundation and the tape must be filled with sand. This will reduce the tangential heaving forces. It’s also a good idea to add thermal insulation along the outer perimeter of the tape: in winter, the bathhouse will be noticeably warmer.
The advantages of such a foundation: simple technology, reliability, durability. Disadvantages: high labor intensity.
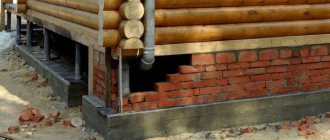
Prefabricated belt made from small-sized FBS, concrete and expanded clay concrete blocks
Quite a common type. It is not as labor-intensive as cast-in-place, but installation of FBS requires heavy construction equipment.
FBS blocks
It is rational to use when the project provides for a basement or semi-basement under the bathhouse. In this case, the blocks serve as the foundation and basement walls.
Thus, FBS 24-3-6 with a length of 2380, width of 300 (ideal for a bathhouse) and a standard height of 500 mm is able to withstand any load. This is steamed and factory-vibrated reinforced concrete. In combination with an additional block (grade 8.9) it will provide any foundation configuration.
Installed on a sand bed. Such a foundation does not require formwork. The joints between the blocks are filled with sand concrete. The outer side must be waterproofed and insulated with extruded polystyrene (penoplex) 50 mm thick.
The blocks are installed with dressing. If the foundation is left for the winter, a reinforced belt should be installed under the blocks to avoid shrinkage.
Foundation made of solid concrete, expanded clay concrete building blocks
Size: 39x19x18.8 cm. Also placed on a sand bed through waterproofing. No cross ligation. Instead, a reinforcing mesh is laid on the first row. Three to four rows are enough for a block foundation to support a small building well.
This option is suitable for hard soils.
Rubble concrete foundation
A tape made of rubble concrete allows you to do without reinforcement: the stone plays its role. Used where bottle is available. Preparation of the trench and formwork is similar to the concrete strip. The first layer on the cushion is concrete.
Washed wet stones without internal cracks are placed in it (checked by hitting a hammer). The optimal diameter is one third of the width of the tape.
Next, the next layer is poured and the stones are laid again. The basic rule: there should be a 5-centimeter distance between them, filled with concrete. The solution is prepared from 3 parts sand and 1 part cement M400 or 500.
Upon reaching the design height, the top layer of concrete is leveled according to the marks.
Brick
Only solid baked clay bricks are used. This is a durable material, but perfectly absorbs moisture. Therefore, isolation from it is mandatory. It is mainly used where there is a lot of old brick, which can be cleaned of adhering mortar. It is irrational to use new brick for such purposes.
Formwork is installed at the bottom of the prepared trench. Concrete is poured into it for waterproofing to a height of 10 cm and a width 12 cm greater than the width of the brick foundation. After a week, they begin laying according to any pattern.
Between the first and second, penultimate and last rows of bricks, reinforcing mesh or reinforcing bars are laid. This will give additional rigidity. After the brickwork has gained strength, it is waterproofed in places of contact with the ground.
Cellular concrete
A strong foundation for a bathhouse made of foam blocks can only be built from blocks of grade D 1000 with a strength of 50 kg/cm2. The large size 600x300x300 and relatively light weight - 39.6 kg - allow you to quickly complete the laying without the use of machinery.
The laying technology is similar to brick - with pouring a concrete belt along the concrete base. Each row and corners are reinforced. Waterproofing should be given the most serious attention. High moisture permeability is the main disadvantage of foam blocks.
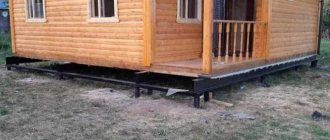
Pile-tape
Shallow view. It is used on slopes and soils with weak heaving. It is a concrete strip reinforced at the corners and junctions with cast-in reinforced piles. Their depth is 0.5 m below the soil freezing level.
The construction of such a foundation.
1. Poured pile. 2. Foundation tape. 3. Sand and gravel cushion. 4. Frame made of reinforcement. 5. Formwork for the pile.
The reinforcement frames of the tape and the piles are interconnected: this is a prerequisite for the normal operation of the entire foundation.
Work order
In the trench prepared for the tape, places for piles are marked. The soil is selected with a garden drill and covered with sand to a depth of 20 cm, followed by compaction. The formwork of the resulting cylinder is made with any flexible material, most often roofing felt.
The round reinforcement frame is knitted from 10 or 12 reinforcement and 6 mm rolled wire. Frame height: up to the top of the reinforcing frame of the tape. The well is being filled and bayoneting is required. All other work is similar to pouring a strip foundation.
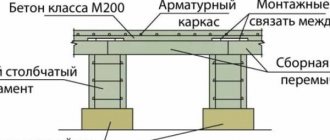
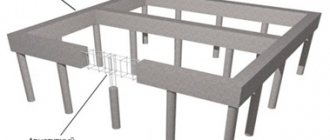
Columnar foundation with grillage
When constructing a heavier bathhouse building (for example, made of brick) or if you want to equip a basement, you can mount a columnar foundation with a grillage. This is a monolithic reinforced concrete strip structure that connects the top points of all foundation elements buried in the ground.
To fill the grillage, you will need formwork material: edged board with a thickness of 20 to 40 millimeters, plywood, OSB or other similar building material. As well as reinforcement with a cross-section of 10-12 millimeters and concrete of at least grade 150. Most often, grade 200 concrete is used to fill the grillage, and if you make it yourself, you need to mix M400 cement, coarse sand and medium or fine crushed stone in a ratio of 1:2, 5:4,5.
Let's calculate the amount of lumber for formwork. It must be taken into account that the height of the grillage should be at least 0.3 meters, and its width should be 10 centimeters greater than the width of the manufactured columnar supports.
- We determine the immediate height of the grillage and add another 0.2 meters to it since the height of the formwork must be greater than the level of concrete poured into it.
- We fix the thickness of the formwork material in meters.
- We measure the total length of the future grillage.
- We multiply all the obtained parameters together and get the required amount of material for formwork in cubic meters.
From the prepared lumber we knock down the formwork box. In its lower part, holes should be cut for the previously made pillars, which should rise slightly above the lower part of the formwork.
Formwork assembly
Video - Installation of formwork
From reinforcement rods it is necessary to make frames with transverse square clamps, which can be bent from thinner smooth reinforcement or from wire Ø6-8 mm. They will give the necessary strength and reliability to the structure. Every 30-35 centimeters we connect clamps and reinforcement rods with knitting wire in an amount equal to the entire perimeter of the grillage. We calculate the size of the frame in such a way that there is 5-7 centimeters from it to the walls of the formwork.
If the finished foundation pillars are located at a considerable distance from each other, then for reliability you can strengthen the formwork with wooden supports, which must be installed strictly horizontally.
Before pouring concrete into the formwork box, we will install a reinforcing frame, fixing its lower part to the reinforcement protruding from the columns.
Slab foundation for a bathhouse
It is used on any soil, including quicksand and peat bogs, with high groundwater levels. Does not shrink and is resistant to frost heaving. But it makes no sense to use this type on strong, stable soils.
It is a reinforced concrete slab on an artificially created foundation. This is a “floating” structure: soil movements during freezing and thawing occur together with the slab.
Pouring the foundation for a bathhouse in the form of a slab allows you to position it above the ground surface, while the slab itself will play the role of a plinth. If you place it below the freezing point, it will be a basement floor; if you sink it into the ground, it will be a semi-basement.
On soft soils, a sand and gravel cushion is required. If groundwater is close to the surface, crushed stone is first poured, then sand in a 10 cm layer. They are compacted and separated - to avoid mixing - with geotextiles.
On large foundations, a 10-centimeter layer of lean concrete is recommended for greater rigidity. The pillow is covered with waterproofing materials in at least 2 layers.
The slab has a thickness of up to 25 cm. Depending on this, a reinforcement frame (d 10-16 mm) is formed so that it is completely hidden in the concrete. The rods are knitted or welded.
After this, the formwork is assembled and poured with M300 concrete with a water permeability of at least W8 and frost resistance F200. The concrete is leveled according to pre-installed beacons: horizontality can only be ensured this way.
The concrete is kept under the film for at least 2 weeks with spillage during the first week.
Recently, in cottage construction, a type such as an insulated Swedish stove has become widespread. Rigid insulation up to 200 mm thick is laid over the sand and gravel base. In places where walls and partitions support, its thickness is up to 100 mm. If you plan to have a heated floor in the bathhouse, then this design will justify itself.
Disadvantages: high cost and labor intensive. Impossibility of pouring on slopes: the slab can slide down along with the bathhouse.
How to make a columnar foundation
For small and medium-sized bathhouses, the most common type of foundation supports are concrete pillars, which are necessarily formed at the corners of the building, and, if necessary, under load-bearing walls in increments of 2.2-3 m.
Construction includes the following stages:
- digging rectangular holes about 2 m deep;
- production of cushions and waterproofing by analogy with the tape type;
- installation of wooden formwork;
- installation of reinforcing rods (the main reinforcement is mounted vertically and tied with jumpers);
- pouring concrete in layers with vibration compaction, while reinforcing pins 10-13 cm long are removed from the upper plane;
- dismantling of formwork;
- providing side and top waterproofing.
A grillage is installed on top of the pillars in the form of a wooden beam measuring at least 15x15 cm or a metal element that connects the supports to each other.
Columnar foundation for a bathhouse
To the question of how to make the foundation for a bathhouse as budget-friendly as possible, there is a simple answer: put it on posts.
You can make a column from a variety of available materials.
- Wooden log or timber.
- Reinforced concrete pile, fence post, stepson for overhead line posts.
- Granite stones.
- Iron ore brick.
- Building blocks.
Bored columns are installed by drilling a hole of the estimated diameter, reinforcing it and filling it with concrete. You can form a well with a pipe, a sheet, or a barrel. Sand is used for backfilling.
It is advisable to use a TISE hand drill. Its peculiarity is that it allows you to make a widening - the sole - at the bottom of the well. This significantly increases the bearing capacity of the foundation.
The depth of the columns is below the freezing point plus 50 cm. The layer of sand and crushed stone for heaving soils is at least 15 cm.
Shallow columnar foundations are made from reinforced concrete rings KS 7.9, with a diameter of 70 or 90 cm. They are dug to a depth of 1 m and filled with sand compacted layer by layer. A reinforced concrete slab of 100 - 120 mm is laid on top. A grillage is arranged along it.
The reliable columnar foundation for the bathhouse is ready.
Read detailed material about constructing a columnar foundation with your own hands
Foundation for a bathhouse: its meaning
Laying the foundation is the beginning of any new building, not just a 3 x 4 bathhouse. But this business also has its secrets. You can make two types of foundation with your own hands (depending on the soil on your site):
- Columnar - on fine gravel, coarse sand, loam or clay (pillars made of brick, stone, concrete are located in the corners, at the intersection of walls and under frame posts).
- Belt - on liquefied (swamp) soil, forest or garden soil (trenches are dug around the perimeter of the building and filled with concrete).
Screw piles are a type of columnar foundation. It is this type of pile-screw foundation for a 3 x 4 bathhouse that you can install with your own hands on swampy or waterlogged soil with non-uniform heights. To install the piles, you don’t need any special tools; you just need to call one of your stronger friends for help.
The strip foundation type includes a monolithic base, which is made of concrete poured into a previously prepared pit measuring 3 x 4.
Pile-screw foundation
Screw piles began to be used in low-rise construction relatively recently. Their advantages suggest that within 5–10 years they will completely replace traditional tape.
- Suitable for any soil.
- Installation time: 1 work shift for a team of 3-5 people.
- Reduced estimated cost.
- Reusable.
Such a foundation for a bathhouse successfully resists seasonal ground movements. It does not respond to flooding and has no alternative on slopes, which fully satisfies the natural desire to place a bathhouse closer to the water. The only disadvantages are the difficulty of diving into coarse soils, rock, and the impossibility of constructing a basement.
Device
Structurally, the pile is a pipe with blades at the bottom. The screw tip can be welded (SVS), cast (SVL), narrow-bladed (SVLSH, SVSM), wide-bladed (VSL, SVL, VSG). Cast tips are used when installing power transmission line supports and other critical structures in rocky areas.
Inexpensive SHS piles are recommended for bathhouses. The pipe wall is at least 3.5 mm, diameter is from 40 to 140 mm. There is a through hole in the upper part for screwing into the ground. The set includes a head that serves as a support for the grillage.
Calculation
Produced according to SNiP 2.02.03-85, pile foundations. Calculation logic: the area of the blade is determined (for a pile d 108 with a blade of 300 mm - 706 cm2). The tables determine the bearing capacity of the soil. For loam it is 6 kg/cm2. The result of multiplying these values gives the result: 1 pile can withstand 4.235 tons.
The number and diameter of piles are determined based on the prefabricated load. The following data serves as a guide.
- D 57 mm – construction of fences in increments of 0.5 - 2 m.
- D 76 mm – for outbuildings, small baths; step 1 - 3 m.
- D 89 mm – bathhouse, light frame house; step 2 - 4 m.
- D 108 mm – houses made of timber, stone, one- and multi-story; step 2 - 5 m.
Larger ones are for industrial construction. The distance between elements for baths is taken from 2 to 3 m.
The length of the pile is selected so that its blades go deeper into solid soil by at least 0.5 m. It is also important that the upper boundary of the blade passes the mark of the standard freezing depth. It should also be taken into account that the upper part of the pipe with the mounting hole is cut off before installing the head.
The height of the pile from the surface is 0.5 m or more. This reduces the degree of wetting of the walls from rain and snow, and a log house on a high base looks more aesthetically pleasing. The thickness of the pile wall is correlated with its length and is calculated at the manufacturer.
The quantity is determined by the number of corners and partitions. If the sauna stove weighs less than 300 kg, an additional pile is installed under its center. If more than 300, piles are installed at its corners. Naturally, the total load on the piles should not exceed the calculated one.
Installation
It can be done at any time of the year and does not require excavation work. Correctly marking the area and checking the diagonals is an important procedure, since a deviation of even a millimeter will create problems when building walls. A common method: the first pile is installed, then the entire field is marked.
The main task when screwing in is vertical orientation. To do this, one worker constantly monitors the position of the pipe by level. If necessary, adjust it manually.
Corner piles must be strictly vertical. If the intermediate ones have moved a little to the side, they can be used. Therefore, during non-professional installation, it is advisable to start with those that are between the corner ones.
Methods for installing piles.
Manually
Tools: crowbar, 2 pieces of pipe 2.5 -3 m, tape measure, special double-sided level or two regular ones.
To facilitate installation, it is recommended to use a garden drill of a smaller diameter to select a guide hole with a depth of 20-30 (depending on the depth of the pipe). It is strictly forbidden to remove soil to great depths: this reduces the load-bearing capacity of the pile. To make it easier to enter the hole, water is poured into the hole.
The crowbar is inserted into the mounting hole, and two or four people screw in the pile using extended levers.
Manual mechanized
An electric motor with a power of at least 2 kW is connected to a step-up gearbox and a piece of pipe larger than the diameter of the pile. Such a mechanism is kept from turning by a long lever: the same crowbar with a pipe.
This method is most suitable where, due to the short distance of the pile field from buildings and fences, manual twisting is impossible.
Special mechanism
Type GZU "Hercules" or a device mounted on self-propelled vehicles. The advantage of this method: quick installation of piles. The downside is that it is not always possible to drive up to the installation site; in the summer, self-propelled equipment with frequent travel will significantly damage the soil.
Grillage arrangement
After installation and trimming, the piles are filled with concrete or sand-cement mixture. The goal is to protect the internal cavity from moisture. Filling does not increase the strength of the pile field, so you can do without it.
A head with a platform is installed on the prepared pile, a grillage is installed - an element that receives and evenly distributes the load along the perimeter of the building.
These are the most common types.
- Log or lumber.
- From shaped steel: channel or I-beam.
- Reinforced concrete (monolithic or prefabricated).
For a bathhouse, the first two options are preferable. The metal one is connected to the head by welding, the wooden one is connected with bolts or brackets through waterproofing. The above-ground parts of the piles and grillage are painted and treated with antiseptics.
The distance between the grillage and the ground - the backfill - is laid with piece material or a pile is arranged.
The foundation is ready for the construction of walls.