With the advent of LED technology, lighting systems have reached a whole new level. Economical, environmentally and electrically safe devices are used everywhere today - they have replaced the standard “Ilyich lamps” and the “housekeepers” that have gained popularity. The former have long been outdated from a moral point of view, the latter are extremely dangerous to health due to the mercury vapor contained inside.
Despite their long service life, even such devices fail over time. In some situations, expensive repairs of LED lamps can be done independently, at home, which we will consider further.
Elements of LED light sources
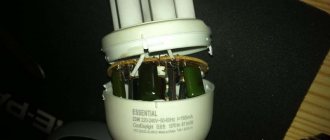
Before disassembling a failed LED lamp into its component parts, be sure to study its structure and operating principle. Standard equipment of this type consists of an electronic power board, a light filter and a housing with a base. Cheaper models use conventional capacitors instead of current and voltage limiters.
One lamp can contain several dozen LEDs, which are connected in series or in parallel. In the second case, the design turns out to be expensive (a separate resistor is connected to each LED diode or group), so not everyone can afford it.
The operating principle of an LED is almost identical to a semiconductor element. The current between the anode and cathode moves in a straight line, which leads to the formation of a glow. Each LED individually is characterized by a minimum power, which is why several are used at once. To create the required luminous flux, a phosphor coating is used, which transforms the light into a spectrum visible to the human eye.
High-quality models contain a high-tech driver that performs the function of a converter along with a diode group. The primary voltage goes to a transformer, which reduces the current characteristics. At the output of the element we obtain the direct current necessary to power the LED diodes. In order to reduce ripple in the circuit, an auxiliary capacitor is used.
Despite the numerous varieties, differences in devices, and the number of LEDs used, all lighting devices of this type are characterized by the same design, which simplifies their maintenance.
Types of breakdowns and their causes
There are several possible malfunctions of LED devices, which is due to their similar, but rather complex design. The most common breakdowns among others are accompanied by the following points:
- complete absence of glow;
- periodic lack of lighting;
- short-term flickering;
- turning off the lights at random times;
- damage to the light bulb or LED.
There are even more reasons for breakdowns. The most common of them are the following:
- Violation of the rules and recommendations for the operation of LED devices. When buying a new lamp, be sure to study the operating conditions specified in the technical manual. If you ignore any rule, the likelihood of breakdowns increases several times.
- Equipment overheating. The LEDs themselves practically do not heat up during operation, but if the temperature exceeds the stated 50–60 degrees, then the filament, holder, or detachment of contacts on the electronic board may occur. Overheating sometimes occurs due to the fact that a lamp not intended for this purpose is installed inside the stretch ceiling. This prevents its natural cooling.
- LED diode burnout - complete or partial. This can be caused by high mains voltage surges or capacitor burnout.
Important! The last failure is relevant for cheap devices that use low-quality boards.
If you go deeper, you can identify several other, rarer, but no less interesting reasons why an LED lamp may not work:
- technical violations when connecting to the power supply;
- short circuit;
- incorrect installation of equipment;
- errors when constructing elements in the connection diagram;
- low quality product - when trying to save money, do not forget that you are buying a “pig in a poke.”
In such devices, the contacts may initially be poorly soldered, or a cheap capacitor may be used instead of a driver. This is a so-called manufacturing defect.
LED ceiling lights with a remote control often fail precisely because of manufacturing defects. Thus, to carry out repairs, it is important to correctly determine not only the breakdown, but also the cause of its occurrence.
Troubleshooting remote-controlled lamps
This type of chandelier is much more complex than conventional models, so it needs to be repaired differently. If the equipment does not turn on, the first thing to do is replace the batteries in the remote control; this is often the problem. If replacing the batteries does not produce results, then carry out repairs as follows:
- Carefully remove the chandelier from the ceiling and prepare it for inspection. First, select a power supply with a suitable voltage and connect it to the contacts, then turn on the equipment using the remote control. If it works, then you should look for a problem in the wiring. When the chandelier did not turn on, but a soft click was heard, the controller is most likely working.
- It is easy to check the driver; to do this, you need to disconnect it from the controller and apply voltage directly. If the lamp works, then the problem is in the controller. When the light does not appear, you need to buy a driver. They have approximately the same characteristics, the main thing is to take into account the number of control channels.
- When there is no driver, but you need to use the chandelier, you can disconnect the wires of the lamps and drivers and directly connect them to the terminal block. Then you will use the equipment from a standard switch on the wall.
- Searching for other faults should be carried out in the same way as described above; there is no difference in replacing the LEDs.
Mark of overheating on the driver housing.
If the remote control does not work, only replacing it will help.
Repairing LED lamps with your own hands is possible for anyone who understands the simplest circuits and knows how to use a soldering iron. The main thing is to be careful and not use parts that do not match the characteristics of those that have failed.
Preparation for repair of LED devices
To perform high-quality repairs that guarantee the serviceability of the product and its long-term operation in the future, painstaking preparation is necessary. First, dismantle the chandelier or wall lamp. For table lamps, simply unplug them. In the future, some tools and materials will be useful, including a screwdriver, pliers, electrical tape, and a knife. Pliers or pliers are useful if the device body is connected using special twists. Use a multimeter to check the contacts.
Since LEDs are small in size, tweezers are useful for manipulating them. Subsequently, if a break in the circuit is detected or the need to replace any element, a soldering iron may be required. To replace LED diodes, use a drill with a variety of drill bits.
Do not forget that each tool must have electrical insulation - it is prohibited to perform work with pliers or pliers with bare metal handles.
Repair
As already mentioned, modern LED chandeliers are distinguished by their original design. Despite this, almost all devices have a modular design. That is, regardless of the collection and design, chandeliers are assembled from the same type of electronic components. You can adjust the brightness and contrast of lighting in the room, turn on/off one or more groups of lamps using the control panel. The device is very convenient to use. In its design and construction it resembles a regular TV remote control (for an expensive model chandelier).
Typically, LEDs used for chandeliers are connected in series. There can be 10, 20, 50 or more of them in one device. Chandeliers burn from a 220 V network. To reduce the voltage in devices, most often, a quenching capacitor is installed. The scheme has a drawback - a short service life. After a short amount of time, the LEDs go out of tune. Moreover, almost everything. Repairing lighting fixtures involves replacing all lamps. The best LEDs for this are those with a wide lighting angle. They are easy to replace, so repairs will not take much time. Then you need to check whether the chain is connected correctly (the main thing is not to confuse the polarity).
It happens that the main lighting in a chandelier works at a high level, but the LED night lighting does not light up at all. If the modes in the device switch, then the problem is in the power supply. Its repair consists of the following - renewing the connections of the conductors between the LEDs. At the same time, do not forget about safety precautions. Chandelier repairs are best left to professionals. Since devices with a control panel are not very cheap, you need to reduce the risks to a minimum. Specialists will quickly identify the problem why the backlight is not working and carry out high-quality repairs.
Chandeliers with remote control often go out of tune if they are made of poor material. Therefore, when purchasing a lighting device, you should pay attention to the brand and country of manufacture. LEDs used for a chandelier, like other lighting equipment, must have a quality certificate and are officially approved for sale. To avoid making expensive repairs in the future, it is better to immediately request documents for the goods. Chandeliers with a remote control must also have a warranty period (quite long).
Modern lighting fixtures with remote control, which stand out on the construction market with their attractive design and original design - chandeliers with LEDs. They are chosen for residential premises.
Design of LED chandeliers and visual inspection
LED pendant lights operating from a remote control have appeared relatively recently. Not everyone is familiar with their design, so let’s briefly consider the design of the devices.
In the simplest configuration, an LED chandelier consists of a housing (metal, plastic, glass), a block with a controller (driver). The last element is used as a voltage rectifier; terminals and clamps are placed on it, to which power is supplied from an industrial network. The power supply is connected to the lamps by wires.
Complex chandeliers use an antenna, a control unit, and a regulator (several units) necessary for automatic adjustment. Raster lighting devices contain several drivers and LED lamps of various types. The repair sequence directly depends on the specific type of lamp.
Study the design of the device using the instructions supplied with it to understand where the control units are located. They can be installed both inside and outside the product.
Repairing a chandelier without a remote control is much easier. This device contains a diode or diode bridge with electrolytes and resistors. There is also a coil with winding to reduce ripple.
To properly repair an outdoor or indoor lamp, follow the step-by-step instructions:
- Remove the device from the ceiling or wall and remove the housing cover.
- Examine the electronic circuit to see visible defects (or confirm their absence). These include wire breaks.
- Remove the lampshade and other decorative decorations from the equipment, and unscrew the LED bulbs, if used.
- Examine the base for burnt areas. You can use a regular knife for cleaning.
- Re-twist, tighten all the screws on the elements attached to the board. If there are no visible defects, examine the lamp directly.
Repair
As already mentioned, modern LED chandeliers are distinguished by their original design. Despite this, almost all devices have a modular design. That is, regardless of the collection and design, chandeliers are assembled from the same type of electronic components. You can adjust the brightness and contrast of lighting in the room, turn on/off one or more groups of lamps using the control panel. The device is very convenient to use. In its design and construction it resembles a regular TV remote control (for an expensive model chandelier).
Typically, LEDs used for chandeliers are connected in series. There can be 10, 20, 50 or more of them in one device. Chandeliers burn from a 220 V network. To reduce the voltage in devices, most often, a quenching capacitor is installed. The scheme has a drawback - a short service life. After a short amount of time, the LEDs go out of tune. Moreover, almost everything. Repairing lighting fixtures involves replacing all lamps. The best LEDs for this are those with a wide lighting angle. They are easy to replace, so repairs will not take much time. Then you need to check whether the chain is connected correctly (the main thing is not to confuse the polarity).
It happens that the main lighting in a chandelier works at a high level, but the LED night lighting does not light up at all. If the modes in the device switch, then the problem is in the power supply. Its repair consists of the following - renewing the connections of the conductors between the LEDs. At the same time, do not forget about safety precautions. Chandelier repairs are best left to professionals. Since devices with a control panel are not very cheap, you need to reduce the risks to a minimum. Specialists will quickly identify the problem why the backlight is not working and carry out high-quality repairs.
Chandeliers with remote control often go out of tune if they are made of poor material. Therefore, when purchasing a lighting device, you should pay attention to the brand and country of manufacture. LEDs used for a chandelier, like other lighting equipment, must have a quality certificate and are officially approved for sale. To avoid making expensive repairs in the future, it is better to immediately request documents for the goods. Chandeliers with a remote control must also have a warranty period (quite long).
Testing the driver and series-connected chandelier LEDs
Hi all! Today’s article will talk about LED radio-controlled chandeliers, or more precisely, about such a part of it as LEDs. A common malfunction of the chandelier when the LEDs stop lighting will be considered. There will be a theory, a diagram, a photo, and a real repair.
The topic of installation and repair of LED chandeliers with a remote control on the Internet (and on my blog) is covered quite widely, but there is practically no information on LEDs and their connection in a chandelier. Now it will definitely be)
I have several articles on chandeliers with a remote control; I will provide links along the way. On the topic of LEDs, I’ll give you a link right away.
Recently I had to repair such a chandelier; the LEDs in it stopped lighting. Based on fresh memory, I will comprehensively consider this issue and share my experience.
The easiest way to check a lamp's LED circuit
Let's look at the easiest method for checking an LED circuit. First, fix the lamp using a cut plastic bottle with a smaller diameter. The lamp is inserted into it. To supply power, use an auxiliary power supply (if we are talking about a 12 or 24 V device).
Instead of ringing every LED in the circuit, you can resort to a simpler method. In turn, install a jumper between the contacts of each diode using tweezers. If there is no jumper, then take any wire, first stripping both ends and tinning the contacts.
It is important that the lamp is connected to the network at this moment. As soon as you close the contacts on the burnt out LED, the device will light up. If this does not happen, then more than one diode may have burned out.
Continue visual inspection of the circuit and look for burnouts, swollen capacitors, and examine each trace on the board. If broken contacts are found, perform soldering. If the circuit consists of 10 or fewer elements, then under no circumstances replace a burnt-out LED with a wire or jumper. This can overload the coils and burn out the diodes.
Troubleshooting a remote controlled chandelier
Most often, the reason for the breakdown of a chandelier with a remote control is overheating of the matrix. In such a situation, repairs are performed as follows:
- Remove and disassemble the chandelier.
- Find out the cause of the breakdown - look for burnt out elements.
- If you need to replace components and perform soldering, be sure to study the device diagram attached to the warranty card.
The controller, antenna or control unit may burn out. In this case, a banal replacement of the failed product is required.
Malfunctions of chandeliers with PU and their elimination
So, most often the LED chandelier with a remote control simply does not turn on. What could be the reasons?
- The remote control itself does not work. You need to check the batteries, they may simply be dead. Replacing them with new ones can immediately solve this problem.
- If the first reason is excluded, and the chandelier still does not light, then you need to deal with the controller. This is the name of the receiver that receives signals from the control panel.
- Since our chandelier is an LED lamp, the light sources themselves cannot operate directly from a 220-volt network. An additional power supply must be installed in the chandelier design. This is a step-down transformer. Repairing such a malfunction consists of replacing the faulty device with a new one.
It should be noted that combined type chandeliers are halogens as the main type of lighting and LEDs used as backlight. So, you always need to pay attention to which halogen lamps should be installed in the lighting device. This refers to their power. If lamps of higher power were installed by mistake, then either the step-down transformer or the lamp sockets will definitely burn out. By the way, repairing cartridges in such chandeliers is the most difficult.
Cooling radiators
Most LED lighting fixtures come with cooling radiators. The presence of this element is a sign of the high quality of the device. In these products, a special seat is allocated, and a radiator is used to remove heat. The thermal paste needs to be replaced periodically. If this is not done, then over time the radiator will lose its efficiency and the board or unit will burn out. Disassemble the device and make sure that thermal paste is applied to both surfaces of the seat.
If necessary, apply a thin layer of special lubricant yourself to the entire surface of the seat. Too much thermal paste affects heat transfer just as negatively as its absence. To increase thermal output, you can screw an additional aluminum plate to the radiator, but make sure that it does not block the main air flow.
High-quality repair of LED light sources with your own hands is possible provided that safety rules are followed and the design diagram of the electrical device is available. The article described in detail the main causes and types of malfunctions, and provided recommendations for finding and eliminating them.