The counters of markets and hardware stores fascinate with the shine of new heated towel rails. Any house owner cannot resist the opportunity to make functional and aesthetic changes to his home. After purchasing the selected device, you should find out how to install and connect it.
You will learn everything about how to replace a heated towel rail in a bathroom in accordance with regulatory requirements by reading the article we presented. We have described the technological steps in detail and listed the subtleties of the process. To help independent craftsmen, connection diagrams for heated towel rails are attached.
Choosing a new heated towel rail
How to change a heated towel rail in the bathroom with your own hands in the fastest and easiest way? The replacement process will cause the least amount of complications if the new model is not very different from the old one. What should you pay attention to here?
The most important parameter can be considered the distance between the eyeliners. If it matches, then there is no need to modify the water supply system to the device, and this is the most difficult and costly part of the work when replacing a heated towel rail. All manufactured varieties fit into a standard range of sizes between supply pipes: 400, 500, 600, 700 and 800 mm. Having carefully measured the distance between the connections of the old heated towel rail, you can go to the store to buy a new one.
Another important point. There are two types of heated towel rails: the heating element can be in the form of a ladder or a coil. Changing one type to another is problematic: hot water is supplied to the coil from the side, and in the ladder model - from above or below.
The dimensions of the heated towel rail and the mounting location are not decisive. Even a mismatch in the diameter of the supply pipes is easily eliminated with the help of adapters.
USEFUL INFORMATION: How to install a bathtub under tiles
Connection Quality Test
It is necessary to check the quality of the connection. There should be no leakage at the connections. Connecting a heated towel rail to the general system is carried out in several ways. The most effective is the side or diagonal option. The system works ideally with different directions of flow in the riser and does not depend on the speed of water flow.
With a lower connection, the riser outlet is made below the point of connection to the dryer; with the upper version, the riser outlet should be above the connection point with the heated towel rail. Also, for normal water circulation in the pipes, the slope of the supply system must be observed. The level of difference ranges from 3 to 30 mm. The bottom connection eliminates any narrowing.
If problems are noticed when testing the connection quality, you need to check for the following defects:
- the dryer is located below the lower outlet, the water cools and stagnates in the lower part of the structure, it does not flow into the common riser due to the pressure of hot water, the natural process of water movement is disrupted;
- the upper pipe is bent in a loop, air collects in it, which disrupts circulation; to avoid this, you need to install a Mayevsky air release device;
- Air accumulates in the loop of the upper pipe, water collects in the sump due to the loop in the lower pipe.
With a diagonal connection, more problems may arise. In the process of work, it is necessary to more carefully think through and work out the existing design.
In order for water to circulate well, the following design features should be adopted:
- the lower insertion point is located below the pipe;
- the structure should not have unnecessary bends so that water does not accumulate;
- the diameter of the liner must exceed 25;
- the permissible range of distance from the riser is no more than 4.5 meters;
- with a lower connection, a narrowed bypass is required;
- When connecting hidden, thermal insulation is required.
All pipelines must be located below the tapping point. If the recommendations are followed, water will circulate through the pipes efficiently, without stagnation.
Removing the old heated towel rail
The heated towel rail can be connected to heating or hot water pipes. The second option is preferable - then the bathroom will be warm and dry all year round.
In any case, you will have to contact the housing office or a local service company. Only their plumber can turn off the hot water in the riser. Of course, no one will allow you to turn off the heating in winter. In this case, replacing the heated towel rail in the bathroom is carried out in the summer. But you still need to check whether the water has been drained from the heating system. We open the tap on any radiator, placing a convenient container under it. After checking, you can begin dismantling.
It would be good if the old structure was attached to the pipes using threaded connections. Then you can simply unscrew them after draining the water from the system. But what to do if it is no longer possible to unscrew the thread or the old heated towel rail was simply welded? You will have to cut the pipes with a grinder. It is important not to forget that these pipes will then have to be threaded. To do this, leave a piece of sufficient length.
It is better if the cuts on both pipes of the heated towel rail line are positioned strictly vertically. To do this, first mark the cutting line using a level. The cut itself should be perpendicular to the pipe. Having cut it off, we make small chamfers at the ends at an angle of 45˚, they will be needed for the free entry of the tool when cutting threads.
At least two people need to dismantle it: one works with an angle grinder, and the other supports the heated towel rail. Otherwise, it may fall or jam the disc in the grinder, which can lead to very sad consequences.
After disconnecting from the pipes, dismantle the fastenings and remove the old heated towel rail.
Preparation
Procedural part
Replacing a heated towel rail is an ordinary task. Complications arise when the connection diagram and/or location is changed. In addition to technical ones, they solve organizational and legal issues. The system option determines the capabilities of residents:
- Individual autonomous heating allows work to be carried out without approval, at a time convenient for the owner.
- Connection to the heating supply (HS) of an apartment building limits replacement in the cold season without good reason: emergency leaks, lack of circulation.
- Connecting an apartment to the hot water supply (DHW) line allows for a temporary stop in water supply, but also requires contacting the management company.
It is impossible to independently turn off the vehicle, hot water supply, or drain the water in the second and third cases. Unauthorized actions can lead to air congestion, imbalance, and defrosting of the system. Flooding of the neighbors is possible; if the riser valve does not hold, you will have to shut off the supply to the entire house, which is dangerous in winter. You are responsible for the consequences.
The above is typical for Soviet standard panel series, where taps that cut off the dryer from the common branch were not installed. For example, the Khrushchev bathroom was equipped with a simple bent model, embedded directly into the heating pipe without a jumper.
New buildings usually have a bypass and taps in front of the towel, so you can repair or replace them without regard to your neighbors. In the absence of fittings, interaction with the management company will help to avoid problems:
- It is necessary to submit an application to the office of the Criminal Code with a request for permission to replace the heated towel rail in the bathroom. The document must be registered.
- Having received a positive response, contact the housing manager and agree on a time for the work.
- After the replacement is completed, a representative of the management company is invited to monitor compliance of the repair with the permit.
The algorithm involves the services of a third-party company. The service company can do it on its own, then the application asks to replace the water heated towel rail with a purchased new one, indicating the reason: the device is leaking and does not heat. It is easier to change the dryer in the summer during a major overhaul of the in-house networks; the cost of dismantling and installation is included in the mandatory payments for the overhaul.
The hired contractor must provide an extract from the Unified Register of SROs certifying the right to carry out the work. Those wishing to independently replace a leaky coil with a stainless steel sample or an ergonomic ladder will still have to negotiate with the housing department about shutting off the riser.
Note! In an apartment building, installing a jumper and shut-off valves, moving a device, changing a model, changing the connection method and diameters of the connections is not a reconstruction, since it does not require changes to the technical passport.
However, the listed actions change the design scheme of heat supply or hot water supply and affect network parameters, so approval of the engineering service of the management organization is necessary.
Often, the housing office offers to negotiate with the plumber privately, placing subsequent responsibility on the resident. You have the right to demand an official justified refusal with references to the standards.
To avoid discrepancies in the interpretation of articles of the housing code, study regional documents on the procedure for reconstruction. A few examples showing the interpretation of the term “reorganization”:
Remember! You cannot change it without permission. It is fraught with instructions to bring the diagram to its original form.
It is recommended to notify residents of the planned outage.
Technical events
Find out in advance from the senior building who holds the keys to the basement or attic to ensure access for repairmen. The linear fittings are closed by the personnel of the medical department or a specialized company.
If there is a dead-end DHW distribution, it is enough to turn off the apartment line. Circulation circuits require shutting off all risers included in the group.
A malfunction of the valves forces the building to be shut down; with an open heat supply circuit (hot water intake from the heating main), the valves are located in the elevator unit.
Connecting to a vehicle with bottom wiring requires shutting off the return and supply in the basement. The upper wiring allows you to cut off the branch by closing the taps on the roof and below.
Fitters empty the pipeline through drain fittings or plugs, usually into the sewer. The vehicle riser is drained at the top supply by opening the air vent on the roof; discharge at the bottom supply is accompanied by “hanging” water and the formation of air pockets.
The required volume of discharge depends on the type of wiring, floor, and is determined by plumbers. With a dead-end single-pipe distribution with a circulation riser, the descent can be done through the bathroom faucet.
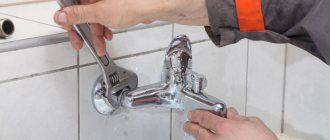
Threading and pipe fastening
To connect to the riser, the remaining parts of the pipe must be threaded. It is most convenient to use a lever mounted on a ratchet with a long handle. You must first apply any lubricant to the pipe. It is important to ensure that the leech goes in smoothly.
The thread is cut as follows: half a turn forward – a quarter turn back. There is no need to rush during this operation.
Which pipes are best to use?
- To supply water to the heated towel rail, it is more convenient to use reinforced plastic pipes. It is not necessary to buy a soldering iron for welding; you can borrow it from friends or rent it
- You can use steel pipes, but connecting them will require quite complex welding work. They weigh a lot and are susceptible to corrosion.
- Copper pipes do not rust, but they will have to be connected by soldering, and they cost a lot.
USEFUL INFORMATION: Installing a washing machine under the sink
Fittings are screwed onto the resulting threads on the pipes. For compaction, use flax tow and Unipak paste. There are recommendations to use waterproof sealants, but then the connection will be permanent.
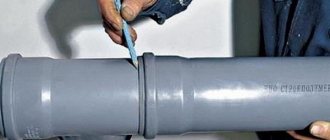
Installation of polypropylene pipes is simple. To connect them, various fittings, angles and couplings are used. The welding soldering iron comes with instructions that describe in detail the entire process of pipe soldering. There are several important points:
- When soldering plastic pipes, it is strictly forbidden to rotate them.
- It is not recommended to use tow to seal polypropylene pipes.
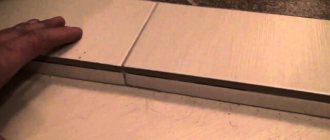
- The supply line must be installed in such a way as to provide the heated towel rail with a distance of at least 35 mm from the wall. With a coil diameter exceeding 23 mm, the offset increases to 50 mm.
- Tightening plastic fittings should be done with special strap wrenches; using gas ones can lead to damage to the connecting element.
- It is imperative to install a Mayevsky valve into the system to bleed air.
- Shut-off valves on pipes must be reliable.
- During installation, it is better to use “American fittings” (fittings that allow you to connect system elements by tightening a union nut), so that later you can easily disassemble the entire system if necessary.
Recommendations for replacement
First of all, you should check the equipment of the new heated towel rail and study the instructions. Although most devices have a similar structure, the manufacturer can regulate the installation features of their product.
Dismantling the old device
The heated towel rail can be connected to hot water pipes or heating. The first option is the best, as it allows you to maintain a favorable microclimate in the bathroom throughout the year. Since only a housing department plumber has the right to shut off the liquid in the riser, you will have to contact this organization.
When installing pipes, do not forget to check them for the presence of water.
If the device will be connected to the heating system, then replacing the heated towel rail in the bathroom should be carried out in the summer. However, you first need to check the presence of water in the system. To do this, open the valve on any of the radiators, placing a container under it to collect liquid in advance.
After this, you can begin to dismantle the old device. If threaded connections were used to attach it to the pipes, then after removing water from the system, you can simply unscrew them. However, in some situations this cannot be done, for example, when the heated towel rail to be dismantled was welded. In such a situation, it must be cut out using a grinder, and then threads must be cut on the pipes.
To simplify the task, the cuts on the supply pipes should be in a vertical plane. To do this, you must first mark the location of the cut using a building level. At the ends of the cut pipes, it is necessary to make small chamfers at an angle of 45° to ensure free movement of the die. It should be remembered that dismantling must be carried out by two people - one works with the angle grinder, and the second supports the old device.
Installation of a heated towel rail:
Threading
To ensure a reliable connection, threads must be cut on the remaining parts of the pipes. The easiest way to perform this operation is with a die attached to a ratchet with a long handle. The pipe must first be coated with lubricant. When cutting threads, the tool is turned forward a half turn and then a quarter turn in the opposite direction. This is a responsible operation and there is no need to rush here. When installing a new device, the following types of pipes can be used:
- Plastic ones are the best option, as they are reliable in use. To weld them, you will need a soldering iron, which can be easily rented.
- Metal ones are a less preferable choice due to their heavy weight and susceptibility to corrosion. In addition, when working with steel pipes, a lot of welding may be required.
- Copper ones are expensive and require soldering to connect them.
Once the thread is cut, the fittings are put on it. These structural elements can be sealed using plumbing flax. If you use waterproof sealants, the connection will be permanent.
Connecting a water heated towel rail:
Working with polypropylene pipes is quite easy. When installing them, various fittings, couplings and angles are used. The welding soldering iron comes with instructions that describe the soldering process in detail. However, there are some points worth paying special attention to:
- It is strictly forbidden to rotate polypropylene pipes during soldering.
- Plumbing linen is not recommended for use as a sealant for this type of pipe.
- The supply must be made so that the distance between the coil and the wall is at least 35 mm. If the diameter of the device exceeds 23 mm, then the indentation should be increased to 50 mm.
- Plastic fittings are tightened using special strap wrenches.
- A Mayevsky valve will have to be installed in the system to bleed air if necessary.
- During installation, it is worth using “American” fittings that connect structural elements using a union nut.
Moving a heated towel rail to another wall:
Bypass installation
Bypass is a jumper , thanks to which if a leak occurs in the heated towel rail, there is no need to shut off the water in the riser. If you do not install it, the process of stopping the water supply to the device will take a long time. In addition, do not forget about the consequences of possible flooding of the apartment. Thanks to the bypass, the water supply to the heated towel rail can be quickly shut off without disrupting the circulation of liquid throughout the house.
This device is a bypass pipe installed at the point where the coil is attached to the riser. However, the bypass must be installed before the taps that regulate the flow of liquid into the heated towel rail. You should also remember that you should not install a tap on the bypass. Otherwise, the circulation of liquid in the riser may deteriorate.
Installing a heated towel rail on ready-made communications:
Attaching a new heated towel rail
First, you should screw the “American” response elements into the purchased device. It is extremely important to reliably seal all joints. Then the coil should be attached to the wall and the attachment points should be marked. At the next stage, holes are drilled for installing brackets, which are most often mounted on dowels.
Then the heated towel rail can be connected to the riser and fixed to the wall, leveling it. Fasteners should be tightened carefully so as not to damage the threads. If they are not sealed enough, then a leak will appear after water is supplied. When all work on installing the device is completed, you can check its functionality. The fluid supply taps should be opened slowly to avoid water hammer.
Installing a bypass on a heated towel rail
This is a kind of jumper that will allow you not to shut off the water in the entire riser if, for example, you notice that the heated towel rail is leaking. Stopping the flow of water to the coil without a bypass can take quite a long time. There is no need to specify at whose expense in this case the flooded apartments will be repaired.
Installing a bypass allows you to quickly shut off the water supply to a damaged heated towel rail without disrupting its general circulation in the house. It is a bypass pipe that is installed at the junction of the coil and the riser, but before the ball valves that regulate the water supply.
It is not recommended to install a faucet on this pipe. It can impair the circulation of water throughout the riser, so a housing office representative may require its removal.
USEFUL INFORMATION: Expert advice: how to choose the best acrylic bathtub?
Using a bypass in a connection diagram
The bypass will greatly facilitate the process of repairing the heated towel rail; if it is present, the riser will not need to be disconnected. This part is placed in front of the entrance and exit of the structure and promotes the movement of water in any conditions. The device is a pipe through which water circulates. The bypass device is fixed in place of the coil using two tees; a pipe with a discharge will also be required.
Three valves are fixed on the bypass: 2 – for connecting to the dryer, 1 – to stop the flow of water.
There is no need to install a bypass and taps, but this system will greatly facilitate and secure the dryer repair process. It is prohibited to install taps on the bypass; this will lead to a decrease in pressure and the water from the tap will not flow hot enough.
Attaching a new heated towel rail
Installation of the heated towel rail is carried out as follows:
- The American counterparts are screwed into the purchased heated towel rail. All joints are sealed.
- The coil is applied to the wall, and attachment points are marked.
- Holes are drilled in the wall for attaching brackets, which are usually mounted on dowels.
- The heated towel rail is connected to the riser, after which the fastenings are fixed to the wall. It is recommended to first level the coil. Connections must be tightened carefully so as not to damage the threads. But their insufficient compaction can lead to the system leaking.
- To check the tightness, we fill the coil with water. The taps must be opened smoothly to avoid water hammer.
- If leaks are detected in the pipes, we turn off the shut-off valves and eliminate any deficiencies.
Thus, knowing how to replace a heated towel rail, you can do the work yourself or supervise the work of professionals.
Cost of replacing a heated towel rail
Replacing the coil yourself will cost much less. You only need to pay for materials and equipment. Heated towel rails have different prices, which depend on their type and complexity of design.
Installation work on installing a structure for drying towels can be ordered from a special organization or contacted by private craftsmen. In this case, you will need to pay for the work. The cost of services ranges from 1,500 rubles to 4,000 and more if the project has a complex structure. If you can save on work, it is better to carry out the installation yourself.
Where to go to replace the structure
Diagram of the heated towel rail
If you don’t want to deal with replacing the heated towel rail yourself, then you have several options for further action. The easiest way is to contact the housing office and order installation of the device there. However, not everyone is ready to entrust their home to employees of a management company.
The second option is to order installation in the same place where you will buy the heated towel rail. Large companies also provide such services. Moreover, wanting to attract customers, they often offer favorable conditions for their clients.
If you turn to the housing office for help, you will have to pay from 1.5 to 2 thousand rubles for the work. But this is only if alteration of the hot water supply riser is not required. Otherwise, the price for the work will increase many times and range from 5 to 15 thousand rubles. Bypass installation is calculated separately: from 4 to 8 thousand rubles.
Don't chase too low a price. As a rule, those who underestimate the price are those who do not hope to attract clients with quality, experience and recommendations. But an inflated price does not guarantee high quality.
Why are heated towel rails replaced?
Any renovation work in the bathroom is an update. Updating old finishes, replacing tiles, changing plumbing fixtures. The plumbing fixture called a heated towel rail is no exception.
Essentially, a heated towel rail is a heating radiator made from plumbing water pipes, welded or simply bent in various designs. For connection, the device is equipped with union nuts with a diameter of ¾ inches (G 3/4″).
When choosing and purchasing a multi-pipe heated towel rail, it is important to pay attention to the location of the connection nuts. If the nuts are located at the bottom, such a device is considered a bottom connection device, if on the side, it is a side connection device. The location of the connection nuts determines the choice of connection diagram, pipe connections to the heated towel rail and, as a result, its normal operation.
Features of electric heated towel rails and their installation
There are 2 ways to connect electric dryers to the network: through an outlet or directly to a junction box. The latter is safer for the bathroom. But the master will have to trench the walls to make the correct wiring.
An acceptable alternative is to make a moisture-proof outlet, placing it at a distance from water.
To install the device you will need:
- tile drills;
- roulette;
- building level;
- marker.
Stages of work:
- You need to mark the attachment points of the device on the wall, check them with a level, make holes and insert dowel nails into them.
- According to the diagram in the instructions, you need to assemble a heated towel rail.
- If installation is carried out directly to the electrical wiring, you need to connect the wires. The joints are protected with shrink film.
- Finally, you need to hang the heated towel rail on the mountings and tighten the screws.
Do not hang the device upside down; its performance will be impaired. After installation, you need to turn on the electricity and check whether heating has started.
Basic list of materials for replacement and stages of work
In order to replace a heated towel rail in the bathroom, you will need:
- the product itself;
- brackets;
- PVC pipes;
- machine for welding and soldering PVC pipes;
- hammer drill, wrenches, building level, tape measure and marker;
- scissors for cutting PVC pipes;
- connecting PVC – fittings and couplings;
- ball valves (2-3 pieces), including the Mayevsky valve.
Heated towel rail
Replacing a heated towel rail with your own hands involves completing the following work plan:
- Purchase of the structure itself and all necessary materials.
- Carrying out preparatory work.
- Dismantling a used heated towel rail.
- Installation of bypass jumper and ball valves, as well as welding of PVC pipes.
- Installing a heated towel rail in the bathroom and connecting the structure to the system.