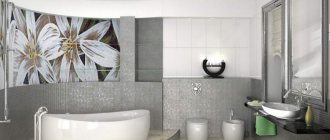
The bathroom is the most demanding room when it comes to the choice of finishing materials. Choosing flooring for the bathroom , take into account its features - high humidity, temperature changes, safety requirements, comfort and aesthetic appearance of the material. About what types of coatings are most often used in bathrooms, what are their features, pros and cons - today's material.
Bathroom flooring
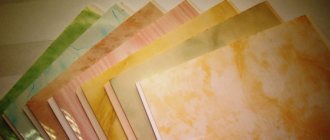
Ceramic tile
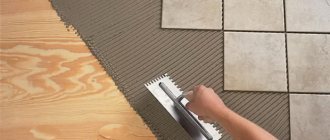
The most common bathroom flooring material is porcelain stoneware. A distinctive feature of ceramic tiles is the minimum level of moisture absorption. If any dirt appears on the ceramic tiles, it can be easily removed.
However, ceramic tiles are not very suitable for flooring in a wooden house. Why? Because the base in such a room is very mobile. Ceramic tiles must be installed on a fixed base. To lay ceramic tiles, a cement-sand screed is required. Cement-sand screed will increase the pressure on the beams.
Filling the screed
The quality of laying the flooring depends on how smooth the base is. It is important to carry out filling work without deviating from the technology, since any violation may appear later during operation. The simplest leveling method is to pour a cement-sand screed. An alternative option is a self-leveling mixture, but it is not suitable for floors with large uneven surfaces. It is best used as a finishing coat.
Concrete screed is carried out as follows:
- Along the perimeter of the room on the walls it is necessary to mark the horizon line at the level of which the screed will be poured. You can use a laser or liquid construction level for marking;
- For high-quality leveling deep into the room, it is worth installing beacon marks, securing them to small slides of the same solution that will be used for the screed, but with the addition of alabaster. The upper part of the lighthouse should correspond in level to the horizon line;
- the solution is mixed using a drill with a special attachment;
- The solution is poured clearly along the horizon line and the level of the beacons. To avoid difficulties, it is best to install beacons with an interval of 1 meter;
- It is necessary to level the flooded areas using the rule - slats 20-30 centimeters larger than the distance between adjacent beacons. By stretching a perfectly flat strip over the surface, you can evenly distribute the mixture over all cracks and dents;
- the screed must be completely dry. To do this, it is necessary to maintain the temperature regime in the room and avoid drafts for a certain time. In the case of a cement coating, you will have to wait about a month.
If a heated floor is being installed, the screed is poured in two layers. After pouring the first layer, you should wait until it dries. Then you need to lay the thermal insulation layer and heating elements of the system. A second layer of mortar must be poured on top of the laid structure.
Wood
The best option is to choose a wooden floor. But this option is rare. Because there is a fear that this material will begin to deteriorate under the influence of water. But it is not so. If high-quality material is selected and competent waterproofing work is carried out, the service life of the structure will increase.
An excellent material is larch, as it has a high level of resistance to moisture. Balsa wood is also a good material. In addition to the high level of moisture resistance of these wooden materials, they have excellent strength and also have a beautiful appearance.
Also one of the best wooden materials is teak wood. Teak is commonly used in the construction of ships. The composition contains oils, thanks to which teak wood is not afraid of moisture.
If teak wood was chosen for use, then it is necessary to seal the seams with sealant. Your shower will feel like the deck on a ship.
A significant disadvantage of wooden material is its high cost in the construction market.
Where to start repair work ↑
First of all, you need to outline an action plan, and for this, assess the scale of the upcoming work. Most often, floor repairs are carried out in conjunction with general repairs of the room and, accordingly, replacement of plumbing. If this is the case, then it is better to inspect the foundation after dismantling the old equipment. We carefully inspect the old floor covering or screed, tapping all suspicious places. It is worth noting that, most likely, her condition will not be the best. We'll have to dismantle it.
Old tiles and screed will have to be removed using a hammer drill
Selecting material for flooring
When the house has not yet been built and is under construction, it is better to use metal I-beams instead of wooden beams for the floor. After this, concrete is poured. If the wooden floor in the bathroom has this design, then any material can be laid on it as a floor covering. This design is only suitable for a bathroom, which will be located on the first floor.
If a bathroom in a wooden house is planned to be located on the second floor of a wooden house, then the creation of such a structure is prohibited. In this situation, the base must be level and strong. The screed should occupy the entire room. It is necessary to make a correct calculation of the load on the beams, since the screed has a huge mass. Due to improper distribution, the floor may collapse.
But still, if you decide to use ceramic tiles as flooring in the bathroom on the second floor, then to do this you need to make the distance between the beams small and also increase their cross-section. The ceiling level must be lowered by ten centimeters.
This procedure is planned to be carried out if the house is at the design stage. But, if the house is built, then these changes must be made. However, in this case it is best to stick with wood. Wood looks aesthetically pleasing and is an environmentally friendly material. You can use linoleum and laminate, since these materials do not have a high cost. You just need to carry out high-quality waterproofing.
What modern materials can be placed on wood in the bathroom?
There are not many options for flooring that can be used in the humid atmosphere of a bathroom, since material manufacturers focus primarily on concrete bases, which are the most common in modern house construction.
If you exclude the most extreme method of dismantling the wooden floor, boards and joists, you can put a covering on the floor in three basic versions:
- Screed the wooden bathroom floors and lay tiles;
- Lay waterproof laminate or linoleum;
- Leave the old plank version as the subfloor of the bathroom, on top of which lay a wooden panel made of moisture-resistant wood.
For your information! A wooden floor, made using modern tracing paper from traditional and new materials, has stunning beauty, while in terms of durability and consumer qualities it is not inferior to ceramics and plastic.
Waterproofing concrete floor
Might be interesting
Thermal insulation
Penoizol: self-production
Thermal insulation
Distinctive features and variety of ceiling tiles…
Thermal insulation
How to insulate the ceiling in a wooden house?
Thermal insulation
What is a heating cable?
Waterproofing a concrete floor is a simple process. First, you need to create a pillow consisting of different materials that have different densities. Next, the crushed stone is laid. The crushed stone layer is ten centimeters. Next, sand is added to the crushed stone. The prepared pillow will serve as an obstacle to the penetration of moisture into the screed.
If the main problem is a high level of groundwater, then you can protect it at this point with the help of plastic film. Instead of polyethylene film, other specially designed materials for waterproofing can be used. Then a polyethylene waterproofing membrane is laid on the prepared cushion. The screed itself is poured from the top.
From the top of the screed, layers of waterproofing, thermal insulation, and sound insulation (optional) are laid.
Waterproofing a wooden floor
Before starting waterproofing work, the surface must be thoroughly prepared. Moisture insulation will be useless because construction debris can destroy it. The room must be completely cleaned. All noticed defects, namely cracks and crevices, should be repaired using wood mastic. Then the wood is impregnated using antiseptics.
The next stage is priming the floor. The primer is carried out in order to ensure excellent adhesion of waterproofing materials to the surface.
The proportion of the primer solution with water is one to one. After the primer has been applied, the surface is dried. Joints and corners must be taped using waterproofing tape. The advantage of such insulating tape is that vulnerable areas will be completely protected.
Next you need to choose the type of waterproofing:
- Coating waterproofing. Bitumen or a specially designed solution is applied using an ordinary roller. This is the fastest way to carry out waterproofing work. Apply two layers. After the first coat has been applied, it is necessary to take a break, which will last approximately seven hours.
- Painting waterproofing. Mastic, which consists of bitumen and polymers, is applied to the surface. There is a significant drawback - a short operational life, which lasts a maximum of four years. Usually three years.
- Pasted waterproofing. The floor is pasted using materials that also consist of bitumen and polymers. Pasting is carried out at high temperatures. This procedure requires specially designed tools. The person must have the required experience.
Everyone chooses the type of waterproofing available to them. Also, the choice of waterproofing material depends on the floor covering that will be applied to the floor in the future. You can do all the installation work yourself. But it is better to entrust the work to real professionals.
A natural stone
Like finishing with exotic wood, flooring made of marble, travertine, granite or other rocks is a solution from the premium segment. For natural stone, all the disadvantages of porcelain stoneware are true. Also added to the disadvantages is the need to regularly treat the stone floor to preserve its original texture. All difficulties are more than compensated by the chic appearance of the bathroom floor made of natural stone.
We invite you to the Polov salons in Moscow and Odintsovo: see samples of bathroom flooring, ask related questions to the managers, order accurate delivery!
Creating a warm floor
It is quite possible to make a warm floor in a wooden house. First, the screed is poured using bitumen. The most budget option is a water heated floor. The screed is filled:
- Thermal insulation material is laid from the bottom;
- A frame is installed from the top, which is made of reinforcement.
Next, the water pipes are secured to the frame. At the end, the entire structure is filled with cement-sand mortar.
For a concrete base, a penetrating waterproofing layer is suitable.
Preparatory work
When laying the floor after dismantling the old covering, you must take care to clean the base. Old tiles and adhesive residues must be removed. In this case, you can use a concrete screed or wooden logs as a base.
It is recommended to use the first option, because... the design will be more reliable. It is important to comply with the following requirements:
- no cracks or deformations in the corners;
- it is necessary to ensure the evenness of the subfloor, eliminate large differences - they should not be more than 2 mm per 2 m of area;
- the density of the screed should be the same throughout the entire area;
- To guarantee resistance to loads, it is advisable to make the screed as strong as possible.
Sometimes it becomes advisable to carry out preliminary insulation. This is true for the first floors. In this case, you can lay thermal insulation materials such as polyethylene foam, expanded polystyrene or expanded clay.
Warm floor in the bathroom - installation technology and do-it-yourself coating installation (120 photos)
Bathroom floor tiles - step-by-step instructions for installing the optimal floor covering (120 photos)
- Bathroom floor: rules and design features of modern floor coverings (140 photo ideas)
Carrying out primary waterproofing
How to make a bathroom in a wooden house? What will a DIY bathroom in a wooden house look like? The work of carrying out waterproofing work is complex. The ceiling and walls are being waterproofed. The bathroom becomes a completely vapor-tight room. Algorithm of actions:
- The best option is if the bars intended for laying floorboards on them are impregnated with a special material, namely with the help of oil processing.
- Expanded clay must be poured between the bars. This is necessary in order to cut off the rise in humidity from the surface of the earth and preserve the heat insulator from getting wet. Foam plastic is best suited for this procedure, because this material has a low cost. Mineral wool may also work.
- On the flooring along the floor beams, on which the insulation (subfloor) is laid, it is necessary to lay a roll for waterproofing. A thick polyethylene membrane can be used as a rolled waterproofing material. The polyethylene membrane is laid in a continuous layer with an overlap of ten centimeters. Next is sizing with tape, which is adhesive. Then an overlap is made - fifteen centimeters. The material is secured using a special construction stapler in a block. The purpose of these waterproofing layers is to protect the insulation from getting wet from two parts (top and bottom). This is how a bathroom in a wooden house is finished.
How to make a bathroom floor with your own hands: photos of the main stages of work
If you decide to do everything on your own, be prepared for the fact that you will have to “tinker” with this room. Arrangement of the floor involves the expenditure of considerable effort, care and patience. Each of the stages can take a long time. In order for the floor structure to be durable, the materials must gain high strength and dry. Therefore, there is no need to rush - you don’t need a low-quality floor.
The arrangement of the floor in the bathroom is unified and occurs in several main stages, which you will learn about below.
- Preparatory work.
The preparatory work is carried out in two scenarios and is explained by the current state of the bathroom: residential or “after the builders”.
Bathroom renovations involve removing the leveling screed and floor covering. In most cases, ceramic tiles were laid in the bathrooms, which had to be removed using a hammer drill and the remains removed. During dismantling, the leveling screed will be broken. Cracks, holes and splits will remain after the hammer drill. For this reason, the screed also needs to be removed. Moreover, if your apartment is old, it is unlikely that it was made with high quality during the Soviet Union, which means it needs to be rented. If the floor was previously wooden, you need to saw down some of the boards and then begin dismantling the rest. Also, removal of the screed will be required in order to perform high-quality waterproofing of the floor. After the preparatory work, all that remains is to sweep out the garbage, if, of course, there is any.
After this, the concrete base of the floor must be vacuumed and visible cracks must be sealed. Moreover, this applies to both new buildings and residential apartments. To prevent cracks and holes from getting larger over time, seal them with tile adhesive. After it dries, you need to proceed to the next stage.
- Waterproofing the bathroom floor.
For better adhesion of the waterproofing material to the floor surface, it must be primed. Therefore, we first treat the floor with a primer and only then proceed to waterproofing.
There are several options for waterproofing the bathroom floor: roll, guided, painting and coating. Each of them has its own advantages.
Guided waterproofing is used to treat floor slabs; it is produced with an overlap of at least 25 cm on the walls. Then a concrete floor is poured onto it, on which, in turn, it is necessary to apply guided insulation or use more modern materials.
The painting method is suitable for waterproofing a concrete floor (although keep in mind that it is short-lived). The average service life of such waterproofing is three to five years. But painting waterproofing is the easiest and simplest method: with a roller or brush you need to apply the solution to the floor surface by 10 cm, overlapping the walls.
Rolled waterproofing is useful for applying to walls at the junction of a bathtub or shower.
Coating waterproofing is the most durable and optimal in this case.
To perform such waterproofing you will need:
- Make the mixture by pouring the dry ingredient into water and stirring well. Moreover, it is important to adhere to the ratio of components 1 to 1. You need to knead thoroughly, resulting in a homogeneous mass.
- Apply the mixture to the entire floor surface using a brush or roller. For hard-to-reach places it is better to use a spatula. Material consumption per 1 m2 is always indicated on the packaging, so take it into account.
- Apply special waterproofing tape to the joints between the floor and walls and other structures.
- Be sure to coat the walls and tape with the mixture 10-15 cm upward, thus making a “trough”. In the event of a flood in the bathroom, the “trough” can hold back some of the water so that it does not flow into adjacent rooms or neighbors.
- The waterproofing mixture is applied in two layers. Moreover, after applying the first layer, wait until it dries - 4-6 hours. Then apply a second layer.
- Wait until the waterproofing is completely dry. You can begin further work only in a day.
At the current stage, you need to stop and think: is it worth making any serious changes in the bathroom. And below you will find out what these changes are and how they affect the subsequent stages of DIY bathroom renovation work, and you will also see a photo.
- Design changes
If you have already started renovations and are changing the floor in the bathroom, it is possible that you will want to make structural changes to the room's devices. To increase comfort and improve the bathroom, you can resort to installing a “warm floor” system, moving the toilet to another place, or installing a water drain. It is imperative to make a decision at this stage, before you have poured the concrete screed.
The “warm floor” system will significantly increase the convenience and comfort of staying in the bathroom barefoot. Indeed, in most cases, tiles are laid on the floor, which are quite cold to the touch. It is especially inconvenient to step onto the tiles in the morning, when you have just gotten out of a warm bed. An excellent solution would be to install electric heated and water floors. Contrary to popular doubts, the “warm floor” system in the form of an electric heating cable can be easily installed in the bathroom. It is easy to install and eliminates combing. However, there is one noticeable drawback - you will increase your energy costs. A “water heated floor” consisting of hot water pipes is connected to heating pipes or heated towel rails.
By installing a water drain, you can protect your neighbors and apartment from accidental flooding. In addition, water flying onto the floor will immediately go into the sewer. To perform drainage, the floor surface is made with a slight slope towards it. Moreover, the overall floor level in this case will rise by 10 cm. It is necessary to install a drain and a discharge pipe, and during subsequent work, the neck of the drain must protrude above the level of the screed. It is important to carefully monitor this, and during the repair process, cover it with a rag so that the pipe does not clog.
If you need to move the toilet, you will have to resort to a set of design changes. The toilet needs to be connected by a pipe to the sewer, making it at an angle for good water flow. In order to hide the pipe, you will have to either install a separate pedestal for the toilet, or raise the overall floor level by 15 cm. At this stage, you need to dismantle the old toilet and lay a pipe to the new location. To keep the toilet out of the way, do not put it in place yet.
Advice! A low floor level in the bathroom relative to the general floor level in other rooms helps to avoid flooding of the entire house or apartment, including neighbors. If it is not possible to make such a floor, it makes sense to equip a high threshold (up to a certain point it will hold back the flow of water).
Before you start pouring the floor in the bathroom, you need to install all communications and know at what level the floor will be located. When everything is ready, proceed to the actual screed.
- Screed
The quality of laying the floor covering and the durability of the entire floor depend on how level the base of the floor is. For this reason, you need to approach the floor screed in the bathroom with the utmost care.
The most common material for leveling screed is a cement-sand mixture. An alternative would be a self-leveling mixture, but it will not be suitable if the floor has significant imperfections or is uneven. As a last resort, you can use it for the second leveling layer.
How to make a concrete screed? Main stages:
- On the walls of the bathroom you need to mark the level to which the floor will be poured.
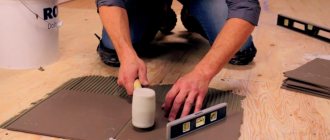
- Beacons must be installed at intervals of one meter. To secure them, tubercles of cement-sand mortar are laid out on the floor, to which alabaster is added. Then the beacons are placed on them and, guided by the marks, they are leveled. At the same time, they are slightly pressed into the solution.
- Next you need to prepare a solution for the screed by mixing it with a drill.
- Then it is filled with mortar along the edges of the beacons.
- For leveling, you can use a rule 20-30 cm longer than the distance between the beacons. It is applied to the beacons, after which it is pulled towards itself, thereby removing excess solution and distributing the solution over the voids.
- It is important to wait until the screed is completely dry. Maintain the microclimate indicated on the package with the mixture, avoiding drafts.
To install an electrical “warm floor” system, the screed must be poured in two stages. As soon as you pour the first layer, you need to wait until it dries completely. Next, lay out the thermal insulation and lay out the “warm floor” system. Then fill the system with a second layer of solution.
- Flooring installation
The final stage of do-it-yourself bathroom floor renovation is laying the floor covering. You have a ton of options here. And as an example, we recommend that you familiarize yourself with the technology for making self-leveling floors:
- Make the mixture by pouring the dry ingredient into water and mixing with a drill and mixing attachment. In this case, you should follow the proportions indicated on the packaging.
Advice! When pouring the self-leveling floor, the temperature in the room should be +15..+25 degrees, humidity no more than 80%.
- Starting from the corner opposite the doorway, you need to fill in the first strip.
- Level with a spatula or squeegee, adjusting the layer thickness.
- After pumping with a needle roller, remove air bubbles.
- The remaining stripes are filled in using the same algorithm.
The floor can be used after 6-12 hours, but before that it must gain strength. However, the floor dries completely after at least three days.
Advice! If a “warm floor” system was installed in the bathroom, turn it on no earlier than 7 days after it was poured.
- Choosing bathroom flooring
Nowadays, there are many flooring options available. When choosing, you need to take into account your budget, personal preferences and, of course, performance characteristics.
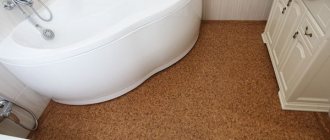
- Cork floor
Recently, many owners are choosing cork flooring for their bathroom. This material has a huge number of advantages: the surface is pleasant to the touch and warm, does not spring, does not rot, fungi do not multiply, and does not absorb water. Compared to tiles, cork flooring is completely non-slip. The cork springs pleasantly under your feet, quickly returning to its original position. Moreover, it is completely natural and hypoallergenic. However, keep in mind that only solid cork does not absorb moisture. Floors based on HDF do not have this feature. For this reason, give preference to an array of cork with a thickness of four to six millimeters, glued to the base.
- Self-leveling floor
One of the simplest is self-leveling flooring. It gained recognition and high popularity relatively recently. Another significant advantage is the waterproofing properties, ease of installation, variety of shades and patterns. In addition, you can install a “warm floor” system underneath it. But at the same time, self-leveling flooring has obvious disadvantages: it ignites easily, the freshly prepared mixture has a toxic composition, requires a flat base, is unnatural, and feels great to the touch.
Self-leveling floors are durable, hygienic, moisture resistant and look very impressive. If necessary, you can look at photographs of different options for this floor with a 3D effect. This coating allows for an almost unlimited amount of design, for example, under the transparent polymer you can place whatever you want - photographs of nature, pebbles, sand and other natural materials. These floors fit perfectly into any interior.
- Floor tiles
As before, tiles are the most popular and common material for bathroom floors. And despite the fragility of tiles and complex laying technology, the variety of colors and shapes and the naturalness of the material, many people prefer this particular material. You should not be stopped by the fact that if the tiles are damaged during operation, you will have to replace the entire section. All for the reason that during dismantling of the split tile, its connection will be damaged. But be that as it may, some tradition and aesthetics are more important.
Advice! It is advisable to buy tiles with a corrugated structure, because this way you will not slip even on a wet floor.
- Wooden floor
Today, such flooring is extremely rare in bathrooms, since not every wood can withstand regularly high levels of humidity. Larch and teak are used for wooden floors and provide additional waterproofing. This floor is beautiful, warm and healthy. Still, experts recommend replacing the wood with a moisture-resistant laminate, which will be more suitable for the bathtub.
- Linoleum for flooring
As a finishing coating in the bathroom, you can use linoleum flooring. It will provide additional waterproofing and is easy to install and maintain. However, it has one significant drawback - it can quickly dry out and lose its visual appeal. This is actually why linoleum is used as an economical option or temporary covering.
Attention! Natural linoleum is an expensive and high-quality material, but it is absolutely not suitable for the bathroom. Material based on waterproof PVC is suitable here. To eliminate the possibility of injury on a wet floor, you should choose textured coatings.
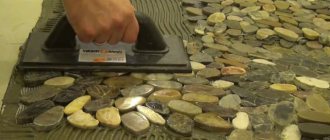
- Other bathroom flooring
In addition to all the options listed above, natural stone, bamboo, slate, and mosaic are used for floor finishing. All of these, of course, are beautiful types of coatings that belong to the elite category, but their cost is correspondingly quite high.
Wood floor treatment
Wooden floors can be treated with several types of coatings. Floor in a bathroom in a wooden house, its treatment:
- Processing using impregnation. This type improves the permeability of wood, and also increases strength and resistance to external factors.
- Using stains. This type of treatment can change the color of the wooden material. Thanks to this type, the structure becomes bright.
- Application of yacht varnish. This type of processing is the best. The Tikkurila concern has the best yacht varnish.