Regulated standards
When choosing the location of sockets, you need to take into account the standards of PUE, GOST, as well as the layout
The level of location of power points is specified in the instructions of PUE, GOST, SP. When performing work, you should be guided by the given standards.
PUE recommendations
The regulations look like this:
- Power points are removed from the gas pipeline and heating radiators by at least 40 cm;
- switch height from the floor - 1 m;
- in the bathroom, plug sockets are moved 60 cm away from the shower stall, sink, bidet or bathtub;
- The power points are moved 10-15 cm away from the door jamb.
When installing power points in the bathroom, it is imperative to connect them through an RCD.
GOST and SP requirements
Requirements for installing sockets and switches according to state standards:
- the location of sockets and switches is determined by the home owner/customer himself;
- There should be one power point per 4 m2 of living space;
- in the corridor - one for every 10 m2.
The joint venture also prescribes certain standards for performing electrical installation work:
- It is recommended to raise switches in rooms from the floor at a level of 1-1.5 m;
- if the question is about child care facilities, the distance is increased to 1.8 m;
- power sockets at public catering points and food production are mounted from the floor at a height of 1-1.3 m.
If desired, the technician can familiarize himself with the regulatory documents in detail and select the optimal level of location of sockets/switches for a specific facility.
Eurostandard for modern kitchen
Every modern kitchen is literally filled with various household appliances and equipment. Therefore, installing sockets and switches according to European standards in this room is of great importance. The height and location of electrical installation products are not limited by anything, except for the basic requirements of the PUE. In all other matters, you should be guided by the ease of connection and further operation of the installed equipment.
The installation height is significantly influenced by the size and configuration of the kitchen furniture. In this regard, based on practical experience, several levels were formed to determine the installation height of sockets and switches in kitchens:
- At the first level (10-15 cm), sockets are installed for basic equipment - an electric stove, refrigerator, dishwasher and other powerful units. This height provides free access to sockets, and after installing the furniture, this can only be done from below.
- The second level (110-130 cm) is intended for installing sockets that will plug in electrical appliances most often used in the kitchen - blenders, kettles, multicookers, etc. For them, this is the most acceptable and standard placement. The main place for their use is the working surface of kitchen furniture.
- The third level is the highest (2-2.5 m). This is where lighting and exhaust ventilation are installed and connected. In this case, the possibility of free access to sockets is also taken into account. It is quite possible to get them from an ordinary chair, and from the floor they become invisible, thanks to wall cabinets.
This technique ensures the most rational distribution of all connection points along the kitchen walls. At the same time, the laying of cables is marked in accordance with the power of a particular equipment. In such cases, it is important not only the installation height of sockets and switches, but also the possibility of creating a certain power reserve in case of installing additional or more powerful equipment.
What is proper electrics?
Technical issues and safety issues of the electrical system in a house or electricians in an apartment are usually considered by professional electricians to be the most important criterion for evaluating this system. This is of course true, but comfort, practicality and versatility of the electrical system are also very important.
To satisfy both the requirements of functionality and safety, the designer must carefully design the entire system, based on the requirements of standards and regulations, while at the same time taking into account the wishes of the customer. This is a very important step in the planning mechanisms for major repairs or construction of an apartment or house. Before designing, you must initially know how this or that space in your home will be arranged (rooms, bathroom, kitchen, and so on).
All issues regarding the location of all electrical points, including lighting, must be resolved long before the start of major repairs or construction.
Height of the switch from the floor. Standard values or customized
In older houses, sockets and electrical switches were installed with standard clearances from the floor. Even now, in many apartments they are still located at a height of 1.5-1.6 m. Many people, especially those of a decent age, are so accustomed to this arrangement of switches that they are unlikely to change their height even in a new apartment.
The desire to make their home comfortable pushes people to experiment. Not so long ago, during renovations, light controllers began to be lowered much lower than one and a half meters. Most people find it convenient to turn the light on and off at a height of 80-90 cm from the floor. These dimensions are considered closer to European standards.
The height of the switch in the house is an individual decision of the owners. There are no clear rules, norms or restrictions. You can stay with standard values or plan the location to suit your individual needs.
It is important to take into account family characteristics. For example, if you have small children, you should not mount switches too high. Surely, parents will very soon get tired of their children’s constant requests to turn on/off the lights. It is very convenient when children can cope with this task on their own, but in this situation it is worth paying special attention to the choice of model and design, their safety of operation. Some parents, on the contrary, feel calmer when everything related to electricity is out of children’s reach, including outlets.
How important is it
Placing electrical wiring is one of the most critical tasks when renovating a home. At the beginning of the process, it is recommended to decide where the equipment, computer desk, and TV will be located. This is the only way to install sockets at a convenient distance. When drawing up a source equipment diagram, it is also important to take into account the size of the room, the total number of sockets and switches.
Not only the ease of use, but also the appearance of the apartment depends on the location of the connectors. Incorrectly positioned devices can spoil the impression of a repair. A connector installed in the middle of the room will look awkward and will be inconvenient to use.
In other rooms
Here everything depends on the owner’s imagination. The number of sockets is calculated so that it is enough for all the equipment that will be in a given room. But it is better to use several levels: first and second, in order to ensure convenient use of all electrical appliances.
Electrical sockets are installed at a height of 0.15-0.2 m above the table surface and 0.3 m above the floor. Other accommodation options depend on your convenience.
Rules for placing electrical wiring
There are no strict restrictions. However, there are some requirements for installing sockets, for example, in the bathroom or in industrial premises. There are also recommendations for installing switches and sockets in an apartment, but whether to adhere to them or not is purely a matter of your needs and tastes.
In the Soviet Union (during the time of old traditions), it was believed that the socket should be at a distance of 90 cm from the floor, and the switch should be at a distance of 160 cm (1.6 m).
Such standards created ease of use, since in order to reach the level of the switch, there was no need to bend down or sit down. Thanks to this, even now many people adhere to just such rules.
Rules and standards
According to the Euro standard, sockets should be installed at a distance of 30 cm from the floor. But this is not always convenient. For example, in the bedroom, if you want to charge your phone or connect your laptop, it will not be very convenient to perform this procedure while lying on the bed. It is better to place sockets in the bedroom just above the bedside table.
This rule also applies to the kitchen. The connectors should be installed above the working surface of the table. This will make it more convenient to include small household appliances in them. There are designs built into furniture.
Note. It is better to place sockets for the refrigerator and kitchen stove at the bottom so that unnecessary wires are not visible. For exhaust hood, the connector must be located under the ceiling.
The bathroom is a high-risk facility, so the sockets in it must be special. Protection class is not lower than IP 44. They should be located at a distance of at least sixty centimeters from the bathtub, shower stall and washbasin. Of course, in a city apartment it will be very difficult to comply with this rule.
But in the living room and hallway you can safely adhere to the Euro standard and install connectors at a distance of 30 cm from the floor. In the nursery, sockets with protective curtains should be installed. Because children, due to their curiosity, love to poke various objects into holes. It is better to warn them in advance against unnecessary actions.
At what distance are they installed in the room?
Let's look at European and Soviet options for mounting connectors and find out the height from the floor.
European installation standard
This term became popular after the introduction of the definition of “European-quality renovation”. Some users find the following arrangement of sockets and switches convenient:
- switches at a distance of 90 cm from the floor surface (by passing by and without raising a hand, a person fixes the lighting in the room);
- mounting electrical sources at a height of 3 cm from the floor (at this distance you can hide the wires and conveniently use household appliances).
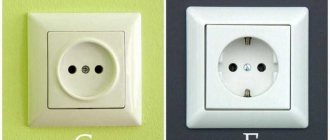
When choosing European sockets, you need to know that the diameter of the pins and the length between them are greater than those of Russian models. The current strength of imported devices is 10-16 amperes, Russian - no more than 10. Therefore, more powerful devices can be inserted into such connectors.
Soviet standards
Previously, sockets were fixed at a height of 90 cm from the floor, switches - at a distance of 160 cm. These indicators are no worse than the European standard and have a number of advantages:
- the plug can be inserted into the electrical socket without bending over;
- small children cannot reach the connector because it is installed at a height;
- This location is convenient for equipment that does not need to be constantly connected to the network (air conditioners).
Minimum height from floor
The rules for the installation of electrical installations and the design of residential buildings do not contain clear requirements for the location of sockets and switches with regard to floor coverings, walls and other elements.
The Electrical Installation Rules state that the distance from devices and gas pipelines must be higher than 50 cm. In the bathroom it can be placed at a distance of 60 cm from the sink.
At what height are plug sockets installed?
The joint venture states that electrical installations must be installed anywhere at a height of up to 1 meter.
The distance from sockets for connecting electric stoves and air conditioners is not indicated. In schools, kindergartens are placed at a height of 180 cm from the floor. The recommended length from the floor covering is 1 meter.
The height and distance are determined by the owner of the premises. In some cases the following rules apply:
- sockets are placed no closer than half a meter to the gas pipeline;
- in the kitchen and bathroom, electrical installations are placed at a distance above 60 cm from the floor surface and water supply.
Plug connectors in homes must be protected with a special device that will prevent access to them when the plugs are pulled out.
Proper placement of switches involves installation on the wall at a distance of up to one meter from the side where the door handle is located or under the ceiling area with the cord.
After completing the installation of connectors for electrical devices and switches, the PUE indicates the need to carry out work regarding electrical measurements. They will allow you to identify violations, possible problems and completely secure the process of use in everyday life.
For proper and convenient placement of connectors and switches, it is first recommended to determine which way the door opens. Then the switches are placed on the side of the handles on the door leaves. This is done at a distance of 80 cm to 1 meter, depending on the height of the residents.
The placement of electrical installations depends on the type of room:
- in a long corridor, on the staircase, sources are installed at the beginning and end of the path;
- in the living room and bedroom it is comfortable when the switches are located at the entrance to the room and next to the sofa and bed to simplify the process of using lighting.
The length of electrical installations from the floor must be selected taking into account the location from which they will be accessible. For example, when entering a room, choose a height of 90 cm, next to an armchair or bed - 60 cm, so that it is convenient to reach with your hand.
At what height to install sockets: recommended parameters
Both the construction of new housing and major repairs in a house or apartment involve a considerable amount of electrical work. This includes organizing the introduction of a common power supply line, creating a grounding loop and potential equalization, installing a distribution board with an energy meter, laying in-house electrical networks and distribution boxes, and, finally, installing lighting devices and custom electrical fittings - switches and sockets.
At what height should sockets be installed?
By and large, this, of course, is a task for electrical specialists. However, many works can be carried out independently, provided that the home craftsman has basic concepts in the field of physics, electrical engineering, organization of internal electrical networks and skills in general construction and electrical work. But it is also very important to know where exactly to place and at what height to install sockets and switches. There is a lot of debate on this issue, but there are still certain official rules and unofficial recommendations that need to be understood in more detail.
Basic parameters for the correct installation of sockets and switches
It should be noted right away that finding exact uniform standards for the height of installation of switches and sockets is quite difficult, for the simple reason that they do not exist. Some references to existing “European standards” are just a desire to copy the established fashionable trend of “European renovation”, the established tradition of installing electrical appliances in Western Europe.
By the way, installation standards existed for some time - it was they that guided builders when constructing residential buildings of mass multi-story buildings. Then all sockets were placed at a height of 900 ÷ 1000 mm from the floor surface (at the level of the lowered hand), and switches - 1600 ÷ 1700 mm (at eye level). In most apartments of old construction, such wiring can still be seen. Many homeowners are accustomed to it, consider it convenient and have no intention of changing it.
What explains these parameters is difficult to say now. Perhaps this was caused by safety reasons - all sockets with wires coming from them are always in the field of view of residents, and children cannot reach the switches. On the other hand, the most dangerous points - sockets - remain accessible to children, and there are no special safety considerations in this, but a child under 8 ÷ 10 years old cannot put out the light on his own. Another probable reason for such an installation is that electrical wiring was always carried out in rooms on top of the walls, and such placement of switches and sockets made it possible to significantly save on cables (on the scale of mass construction carried out in those years, the savings were serious).
However, today the accepted European standards are more in use, rather than the traditions of installing these elements of electrical fittings. What are they?
Recommended, but not at all mandatory, parameters for the height of sockets and switches above floor level
Some construction guides give the following recommendations (taking into account planning during the construction phase of the house):
- Sockets – 400 ÷ 450 mm from the level of the subfloor (interfloor slab). Thus, after pouring the screed and installing the finishing floor covering, the height will be about 300 mm.
- Switches - 1000 ÷ 1050 mm from the rough surface, respectively, about 900 mm upon completion of finishing work.
How is this convenient? Sockets and included power cables are not noticeable and do not spoil the appearance of the room, and you can turn the light on or off with your hand down. It is possible to teach children to be independent (with adult supervision, of course) - the switch is within their reach.
It is worth mentioning right away that such “standards” exist only for ordinary living rooms. In other places, for example, in kitchens, the rules will be completely different - this will be discussed below.
There are special requirements for installing sockets and switches in institutions associated with children - in schools, kindergartens, etc. There, in order to avoid uncontrolled actions of children with electricity by teachers or educators, these fittings are installed equally high - at a height of no lower than 1800 mm.
So, if we talk only about the installation height of sockets and switches in residential premises, then any owner of an apartment or house has three options:
1 — When making repairs, do not change the location of sockets or switches, or carry out the initial installation according to the usual “Soviet standards” if this seems more convenient and safer.
2 — Redesign the arrangement of the fittings elements according to the European traditions, which were mentioned above.
3 — Provide your own location based on personal preferences and convenience - this in no way contradicts the existing rules.
There are significantly more restrictions and recommendations for other installation parameters - they are set out in the current operating rules for electrical installations (PUE), and they must be taken into account:
- The minimum installation height of sockets in residential premises is not regulated, the maximum is not higher than 1000 mm. Even their location at floor level is allowed - provided that special skirting boards with cable ducts made of fireproof materials and special types of sockets are used.
Special socket placed on the baseboard - right at floor level
- In industrial premises, however, it is recommended to install sockets at a height of 800 to 1000 mm, and with overhead network wiring, they can be raised to 1500 mm. We have already mentioned about children's and school institutions - at least 1800 mm from the floor level.
- In apartment conditions, especially when children live in it, it is strongly recommended (although not a mandatory rule) to use sockets with protective rods that automatically close the holes when the plug is pulled out.
The optimal solution for apartments where young children live - sockets with protective curtains
- Electrical wiring and electrical appliances should not be placed closer than 500 mm from gas supply risers, closer than 100 mm from window or door openings, or less than 150 mm from the level of the main ceiling. If you plan to install a false ceiling (suspended or suspended), then both the wiring and the distribution box must be below its level.
- It is not recommended to install sockets in bathrooms. If you still can’t do without it, then it should be mounted at least 600 mm from the door of the shower stall or bathtub. In this case, a prerequisite is the use of special sockets for wet rooms (with increased tightness of the housing and with spring-loaded protective covers), and with the obligatory power supply through an RCD with a leakage current (differential current) of no more than 30 mA.
Sockets for rooms with high humidity are equipped with protective closing covers.
To finish the issue with the bathroom, we can add that sockets should not be installed close to the floor surface. “Design” does not play a special role in such conditions, and it will be more convenient to use a hairdryer, curling iron or electric razor from an outlet located at a height of one or even one and a half meters. In this case, placing an outlet above the washbasin is absolutely excluded.
- Switches are usually mounted on the wall at the entrance, on the side of the door handles. Installation height – from 800 to 1700 mm. If necessary, you can install them higher, providing, for example, the ability to turn on using a cord. Very often in small rooms (in hallways, kitchens, in rooms with a small area) it is necessary to combine sockets and switches in blocks - then the optimal height for such a block is considered to be about 900 mm from the floor - the “golden mean”.
In any case, no matter how the electrical fittings are located, it will be necessary to replace the old sockets with new ones of the so-called “European format”. Their hole diameter is 0.8 mm wider than the old domestic ones, and the distance between the contact pins of the corresponding plug is also slightly wider. Such sockets can withstand much larger loads - they are usually designed for currents of 10 or 16 A, respectively, for a load of 2.2 kW or 3.5 kW, respectively. (For comparison, the old sockets could withstand 6 A, that is, only 1.3 kW, which, given the modern saturation of human life with electrical appliances, is clearly not enough).
In addition, if there is no grounding loop connected to the old location of the sockets, you will have to deal with this closely - most modern electrical appliances have three-pin grounded plugs to ensure the safety of users (for some powerful household appliances, connection to the grounding loop is simply a prerequisite). More details about the grounding system can be found in a special publication on our portal.
Video: where to place sockets and switches on the wall
Prices for sockets, switches and frames
Sockets, switches and frames
Some nuances of installing the cable part
Once general repairs are being made, it is worthwhile to inspect the cable part - if the wiring is aluminum, it is recommended to replace it with copper, with a cross-sectional area of at least 1.5 mm². This cross section should be sufficient for fairly high currents. True, if you plan to install high-power household appliances, it will be necessary to lay more powerful lines.
| Cross section of copper wire, mm² | maximum current at continuous load, A | maximum load power, kW | rated current of the circuit breaker, A | maximum operating current of the circuit breaker, A | scope of application in home (apartment) conditions |
| 1.5 | 19 | 4.1 | 10 | 16 | lighting, alarm devices |
| 2.7 | 27 | 5.9 | 16 | 25 | socket blocks, floor heating systems |
| 4 | 38 | 8.3 | 25 | 32 | HVAC equipment, water heaters, washing machines and dishwashers |
| 6 | 46 | 10.1 | 32 | 40 | electric stoves and electric ovens |
| 10 | 70 | 15.4 | 50 | 63 | power input lines |
It probably makes sense to dwell a little on the correct placement of electrical wiring.
Each outlet (or outlet block) must be powered from its own junction box
- Each socket (group of sockets) or switch must have a supply from an individual mounting box. Making long hidden parallel connections from one outlet to another is unwise, and in some cases can even be dangerous - this can easily lead to an overload of this line with all the ensuing consequences.
From wiring boxes to switches and sockets, the wiring must go down (or up) strictly vertically
- Strictly vertical wiring must run from mounting boxes with sockets or switches. This is explained simply - you can always visually determine the location of the power cables in the thickness of the wall. If the line is laid in any order - at an angle (as in figure No. 3) or even vertically, but with an offset (Pos. No. 2) from the location of the socket (switch), then it can become an object of hidden danger.
Typical mistakes when laying wiring to sockets and switches
After some time, and this happens quite quickly, the location of such non-standard wiring is forgotten even by its craftsmen. Moreover, this will be a “surprise” for the new owners of the apartment. When trying, for example, to harmlessly hang a mirror or shelf, there is a high probability that the drill will hit a live power line with all the sad consequences - a short circuit and the need for large-scale wiring repairs.
Wires can be placed arbitrarily on the ceiling
- But on the ceiling surface of the floor slab, if a suspended or suspended ceiling is to be installed, the wiring can be placed arbitrarily, usually at the shortest distance. If a NYM type cable is used, it will not even require additional protective insulation - it can be attached directly to plastic dowel clamps. Cables of another type (VVGng or VVG) are placed in a corrugated plastic pipe of the required diameter.
If the floor is wooden, then the wires are contained only in metal pipes
- On the floor, under its decorative covering, power cables can also be located arbitrarily, at the shortest distance. However, there are special caveats here. So, if the floor is laid on wooden logs, then wiring, regardless of the type of cable, is allowed exclusively in metal pipes, regular or corrugated.
If a screed is planned, then corrugated plastic pipes are sufficient.
If the wiring will be filled with a concrete screed, then it is usually placed in a corrugated plastic pipe.
- The next question is how often should sockets be installed, are there any standards in this regard?
There is no specific answer. You can find recommendations - install them 1 piece per 6 ÷ 10 square meters of area. However, apparently, these “standards” are somewhat outdated, since the equipment of housing with electrical appliances is constantly growing. Therefore, it is probably advisable to think in advance about the placement of the main instruments and devices, to set a certain reserve in order to exclude in the future the use of all kinds of tees or extension cords. It is best if a plan is drawn up in advance with a fully thought-out arrangement of household items and the location of power points.
A well-designed diagram will be of great help in carrying out electrical installation work.
- And one more very important note, or rather, good advice. When carrying out repair and electrical installation work, you must take the time to photograph all the cable laying lines, the placement of distribution boxes and other elements of the home electrical network, until they are hidden by plaster or finishing materials. It is advisable to take photographs in such a way that it is possible to link hidden objects to stationary elements. For example, with putting down dimensions from a window or doorway, corner of a room, heating riser, etc. - so that you can quickly and accurately find the required unit if any emergency, repair or maintenance work is required.
If you plan to install electrical wiring in a wooden house , then it is better to refer to a special publication on our portal, in which this issue is outlined in more detail.
Prices for cables and wires for construction and repair
Cables and wires for construction and repair
Features of installing sockets and switches in the kitchen
The kitchen is a special room for many reasons. Firstly, in terms of the degree of humidity and saturation with evaporation, it differs significantly from all other rooms. And secondly, a modern kitchen is the center of the maximum concentration of all kinds of household appliances. Many electrical appliances are used simultaneously during cooking or other household operations, so the level of total load is usually the highest here.
The table below shows the characteristics of the main kitchen electrical appliances - you can estimate the level of energy consumption when performing certain household tasks. If you consider that many of them require separate power lines, you can imagine how many connection points need to be equipped in the kitchen (it is clear that tees in such conditions are absolutely unacceptable and pose a serious fire hazard):
| Type of household electrical appliance | Average power consumption | Features of connecting to power supply |
| Electric stove or hob | from 3500 to 12000 W | Individually routed power line |
| Electric oven | from 2500 to 10000 W | similarly |
| Washing machine | from 1500 to 3000 W | similarly |
| Water heater | from 2500 to 7000 W | similarly |
| Dishwasher | from 1500 to 3500 W | similarly |
| Microwave | from 700 to 2500 W | Can be connected to a regular 16 A outlet |
| Refrigerator (peak value - only at start-up) | from 500 to 2000 W | similarly |
| Electric kettle | from 700 to 1500 W | similarly |
| Kitchen processor | from 500 to 1500 W | similarly |
| Bread maker, steamer, etc. | from 700 to 2000 W | similarly |
| Toaster | up to 1000 W | similarly |
| Kitchen hood | from 500 to 1500 W | similarly |
| Waste shredder | from 400 to 1000 W | similarly |
Obviously, a lot of sockets are needed. In addition, it makes sense to think about installing several additional switches - for example, for a waste shredder installed in the kitchen sink and for additional lighting of the workspace in the area of the cutting table, stove, and sink.
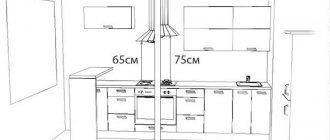
Here there can be no talk about any standards for the height of installation of sockets - their location should, first of all, ensure convenience, the possibility of access when such a need arises, safety of use, maximum protection from moisture, for stationary equipment - concealed placement of wiring . There can be many options here - one of them is shown in the figure:
One of the options for placing sockets and switches in the kitchen
It is clear that there are many options for placing built-in appliances, and if we add to this the variety of desktop electrical appliances and the features of their use (for example, there are housewives whose favorite kitchen accessories are constantly “registered” on the desktop), then, most likely, the spirit There are no absolutely identical schemes. Therefore, there can be no copying here - the plan for placing the equipment and laying out the wiring to it is drawn up by each owner individually, but taking into account general principles.
- The power of the supplied power lines (cross-section of copper wires) has already been discussed - just compare the data from the first and second tables above. However, there is another figure by which you can decide on this issue.
Possible option for laying power lines for the kitchen
An important condition is that the total power of all lines supplied to the kitchen should, with a large margin, ensure the possibility of simultaneous inclusion of all points of consumption. In practice, of course, this should not be allowed under any circumstances, but insurance is still necessary.
- For the hob (electric stove) and for the oven (if these are devices independent of each other), special power sockets are installed, designed for a maximum current of 32 - 40 A. The same thing if the stove and oven are dependent on each other.
Various models of power outlets for 32 and even 40 amperes - used for high-power household appliances
- If a storage water heater (boiler) with a power of over 3.5 kW is installed in the kitchen, then I remember to connect it also to a power outlet, or to a wall-mounted machine in a protective box. This unit operates in automatic mode almost constantly, and it doesn’t really need an outlet.
- The installation of sockets for other built-in household appliances can be provided at several levels:
— On the wall, at a height of no higher than 100 mm from the floor level - this will allow you to place these fittings behind a standard removable furniture plinth.
- In kitchen cabinets - provided that this piece of furniture does not have retractable or folding elements - shelves, drawers, brackets, etc., which could snag an electrical cable.
- On the walls under the sink - at the maximum possible distance from water and sewer pipes. In this case, the outlet must be sealed with a moisture-proof cover.
— On the wall above the kitchen cabinets. There are usually sockets for range hoods, additional lighting devices, and sometimes for a built-in microwave or refrigerator. The height of the sockets in this case is no less than 50 mm above the level of the top surface of the cabinet.
- To connect tabletop kitchen appliances, the sockets are placed on the wall, approximately 100 mm from the tabletop level (this, as a rule, is at a height of 1150 mm from the floor level (if desired, it can be higher, up to 1400 mm). In this case, the socket blocks never should not be located above the sink or above the hob - they should be removed at least 250 ÷ 300 mm to the side.
Instead of such wall-mounted placement of socket blocks, special retractable or folding modules have now begun to be actively used - in the form of opening “books” or “columns” with sockets that slide up to connect.
Hidden socket block in the form of an opening “book”
It’s very convenient - the wall surface is “clean”, and the socket appears only when needed, and even when using the device, the connection point is removed from the table surface.
Another option for hidden placement of sockets is a rising “column”
What other principles should be taken into account when placing sockets:
- A socket for built-in equipment can never be placed directly behind an installed device - it must be moved to the side, up or down.
- The distance from the device to the power socket must not exceed 1000 mm.
- All, without exception, lines going to the kitchen must have their own circuit breakers and RCD devices.
When planning the installation of power lines in the kitchen, of course, you should proceed from the actual characteristics of household appliances. It would probably be better to contact an electrical engineering organization - specialists should help draw up a project taking into account all the nuances and safety requirements. Based on this diagram, it will be possible to draw up a drawing with the placement of sockets “on the ground” - to determine the places for making sockets in the wall and cutting out grooves for them.
It is possible that it will be possible to save some money on laying lines. For example, if the total power of the washing machine and dishwasher does not exceed 4 kW, then they can be “placed” on the same power line with a wire with a cross-section of 2.5 mm². Often one line is enough for a refrigerator and a specific outlet group. However, conclusions should still be drawn by a professional in this matter.
Video: not an easy task - the correct placement of sockets and switches in the kitchen
SP and GOST requirements
Correct placement of the outlet follows from following these rules:
- One socket is installed for every 4 m of the perimeter of the living room;
- The owner of a private or one-room house himself determines how many sockets need to be installed;
- One socket is placed for every 10 sq. m of corridor area (it is better to install switches at both ends of the corridor).
Main options
There is no such thing as officially accepted standards. There are only recommendations and requirements on how to install sockets and switches regarding communications (gas, water, heating pipes). Otherwise, the main thing is that the operation of electrical equipment is comfortable and safe.
Whether you install the switching devices yourself or seek help from a professional electrician, keep in mind that there are two most common options for how high from the floor they can be mounted:
- installation of sockets and switches according to the so-called “European standard”;
- "Soviet" installation system.
All these concepts are conditional; in fact, European standards and Soviet systems do not exist, it is simply more convenient to distinguish and determine what the installation height of sockets and switches should be.
The first option became widespread relatively recently, when in the post-Soviet space it became fashionable to carry out repair work in homes and offices and call it “European-quality renovation”.
But it so happened that good and high-quality repairs were associated with punctual and neat Europeans and received the prefix “euro”. And the one that wasn’t very good was identified with everything Soviet and earned the corresponding name.
The “Euro” version assumes that the height of the socket from the floors is 0.3 m, and the switch is 0.9 m. According to Soviet standards, the switch was mounted at the level of the shoulders and head of an average person (1.6-1.7 m), and the sockets – 0.9-1 m from the floors.
Option for placing sockets for a TV in the video:
It is impossible to say which of these two options is preferable; everything here is purely individual. In the “euro” version, to control the lighting there is no need to raise your hand up to turn on the switch; it is located at the comfortable level of the lowered human palm. In addition, such a switching device can be turned on and off by a child.
Placing the switch at a distance of 1.6-1.7 m is beneficial when it is necessary to install some furniture under it (wardrobe, bookcase, refrigerator).
A “Euro” socket located almost right next to the floor is dangerous for a small child who has just learned to crawl and is interested in everything that catches his eye. In this case, of course, it is preferable to install sockets according to the Soviet version at a level of 1 m from the floor.
But as for sockets in which some kind of equipment is constantly plugged in, such as a TV, computer or stereo system, it is better to mount them as close to the floor as possible so that the wires do not stretch across the entire wall and spoil the appearance of the room.
Location of lighting points
Lighting control points in the house are divided into three main groups:
- This includes classic switches - these are devices of different types, often with one or two keys. But thanks to three-key switches, you can simultaneously use three different groups of lighting installations.
- This group includes switches, which, when activated, control several lighting sources from different places at once.
- This group includes devices in which lighting control mechanisms are already built into the lighting tools. These include a table lamp and a floor lamp/
In the apartment, almost all rooms are equipped with one- or two-key switches, which is considered justified and, most importantly, comfortable.
The category of general lighting often includes lamps placed under the ceiling, providing uniform diffused light
For example, for a bathroom, an additional light source can be a lamp above the mirror. But regulation for such a device is carried out using a built-in switch
The bedroom has its own unique switch system. It allows you to adjust the light source simultaneously from different places. Let's look at convenience using an example.
Each sleeping place must be equipped with a lamp in the form of a night light on a table, bedside table, wall sconce or floor lamp
Every time you need to turn the light on or off, you have to get out of bed, since the switches are located quite far from the bed. The solution is obvious. Three switches are installed in the room at once. One is at the exit from the room, and the other two are on both sides of the bed. As a result, it has become very easy to regulate the lighting in the bedroom, and access to switches will be at hand.
Posting rules
Hallway
Any apartment includes a room called a hallway. This is where a person first enters. And you also need to be able to correctly place electrical installation devices in it. As a rule, two sockets are quite enough for such a room. After all, in the hallway they mainly use a shoe dryer or connect a doorbell or vacuum cleaner.
The diagram shows how to position the sockets and what distance from windows and corners should be:
Each apartment is individual. Therefore, a separate plan should be developed for each room - a diagram of the location of all electrical installation mechanisms. After all, in each house the number of household appliances is completely different, but during the project it is better to install electrical points with a reserve, so that over time you do not have to redo everything again or use extension cords.
Finally, we recommend watching a useful video that discusses errors in the placement of light switches and sockets in an apartment:
Corridor
Each apartment has a small hallway, where switches also need to be placed correctly, since this is the room that a person enters first. Usually in a corridor two or three sockets are considered necessary.
It will also be useful to place a distribution panel, a switch (or block of switches), an electric meter, and so on in the hallway.
Living room
In the hall or living room, there are four options for placing sockets. These zones include:
- Doorway. Installation in this place is necessary in order to be able to connect minor household and electrical appliances. For example, a heating radiator or a vacuum cleaner. The location of the device must comply with the standards, namely 10 cm from the door and 30 cm from the floor.
- TV area. In this case, the placement of the device will be as follows: either near a hanging TV on the wall, or behind the TV, so that the equipment can hide them and so that the wires are not visible.
- In the sofa area. Sockets in this area should be located so that it is possible to connect chargers for phones and laptops. It is worth remembering about the placement of electric fireplaces, lamps, floor lamps and other small and necessary parts. A connector for the air conditioner is also needed.
- At the desktop. There are times when the living room is used as an office. Then it is necessary to increase the number of power connectors. There should be sockets for a table lamp and for a computer or laptop. The figure shows the distance from the tabletop to the electrical accessories.
The master talks about the convenient placement of sockets behind a wall-mounted TV in a video lesson:
Sofa area
To correctly place sockets, along with planning the electrical network, you need to immediately think about the placement of furniture in the room. Otherwise, it will turn out that they are located behind the sofa or closet. Most of the electrical appliances in the living room are always on, for example, air conditioning, TV, set-top boxes, router, telephone. Sockets for them can be obscured by a chair or, for example, a decorative flowerpot. Free points must be easily accessible.
TV zone
If the sockets for all electronic gadgets in the living room can be left at a level of 30 cm from the floor, then the socket for a TV hanging on the wall or an air conditioner requires a separate approach. In this case, provide a place directly behind the TV screen or near the air conditioner so that hanging wires do not spoil the picture.
Kitchen
The kitchen has many appliances, both large and small. Therefore, it is necessary to start designing devices with the location of all household and electronic appliances in the room. The main part of the equipment is located on the kitchen unit. There are several rules for placing sockets on a kitchen apron:
- For built-in appliances, it is better to place sockets behind the walls of adjacent cabinets. It is prohibited to place the device directly behind electrical appliances.
- For a hood, such an element is installed at a distance of 60 cm from the top of the kitchen cabinet.
- Placing sockets above the countertop is necessary for connecting small household appliances. This convenient position allows you to connect a blender or electric kettle. As a rule, they are installed at a height of up to 30 cm from the working surface.
At the same time, do not forget about the placement of sockets for the refrigerator, oven and hob. It is not allowed to use a double socket to connect the hob and oven, because it simply won't withstand the load. You can place one or two elements close to the dining table.
The video below clearly demonstrates the correct location of electrical points in the kitchen:
Hob and oven
Nowadays, the hob and oven are often connected separately. The power consumption of these electrical appliances is high and turning them on at the same time as another device can break the plugs, for example in an old house. Therefore, special three-phase 20-25 A sockets are produced for electric stoves. The best models are those with built-in
RCD = Residual current device.
As a result, the number of sockets: 2.
Fridge
Where to place the outlet for the refrigerator is an important question. Although the wire length is usually within 1 meter, it is not advisable to connect the device through an extension cord. Therefore, we make the connection at the point where the cord exits. Approximately 5 cm from the edge. In order to provide free access to the outlet.
It happens that the refrigerator and freezer are built in different places. This means you will need 1 more socket.
Built-in appliances: dishwasher, washing machine and others
Let's give it special attention. Do not place the socket directly behind them, preferably nearby. Otherwise, the built-in devices may not fit into the niche in depth.
It is also better to start calculating the number of sockets with such equipment, then for free-standing devices.
Hood
The connection method depends on the model. An open hood is most often connected directly. Where should I place the socket for the hood? The correct location will depend on the dimensions of the hood and installation instructions. For example, slightly above the level of wall cabinets by 5–6 cm.
Working surface
Mentally arrange the appliances, think about where it will be most convenient to connect a mixer, food processor, kettle and other utensils. Add 1-2 sockets in reserve, it won’t hurt.
It happens that there are several scenarios and it is not clear where to focus. The solution is this: place several groups of sockets of 3-4 pieces at even intervals above the work surface. Don't forget about the nests on the island.
Bedroom
You can arrange sockets in the bedroom in several zones, into which any bedroom can be divided. First of all, they are installed near the bed and bedside tables. This arrangement is explained by the fact that there should always be a lamp or sconce near the bed, under which you can read a book or newspaper at night. The diagram shows the approximate layout of the elements and at what distance they should be from the furniture.
If the bedroom has a desk, then you will need two sockets: one for the computer and the other for the desk lamp. It is better to place them around 20 cm from the table surface. And if you plan to install a TV in the room, then you need to place 3-4 more connectors at a height of 130 cm from the floor. To keep the wires out of the way, it is better to hide them with a TV. Read our article about how to hide wires in an apartment.
Don't forget about the doorway. The location of outlet points at the doors is also necessary. They are needed to connect a vacuum cleaner or heating radiator.
The video shows how to properly position sockets in the bedroom:
Bathroom
Having an outlet in the bathroom is not only comfort and convenience, but also an absolute necessity. According to the Electrical Installation Rules, sockets must be located at a distance of 60 cm from the bathtub or shower stall. Since this room is the wettest, it is necessary to place devices here in a minimum quantity.
In the combined bathroom you can place sockets for a hair dryer, razor or curling iron. As a rule, they are installed near the sink, next to the mirror. Unfortunately, it’s also near water. Therefore, the usual design will not work here; it is necessary to install a moisture-resistant housing, as in the photo below:
It comes with a cover that can cover the contacts. The degree of protection of the electrical installation device must be at least ip44. It should also be taken into account that it is prohibited to use sockets with a connection diagram without a residual current device (RCD).
The correct placement of electrical points in the bathroom is described in this video example:
Maybe
Features of installing switches in public buildings
The installation height is regulated in kindergartens and preschool institutions. In other rooms it is also necessary to adhere to general recommendations:
- For public catering buildings and retail chains, it is necessary to install sockets at a height of 130 cm from the floor. Switches are installed at a distance of 120 to 160 cm.
- It is prohibited to install sockets and switches in rooms where explosive substances are used or stored. All work is carried out outside the rooms or warehouses.
By adhering to all the rules and recommendations, you can think over the location of sockets, as well as make a diagram for installing devices. In public areas, this is done by professionals from hired contractors.
Rules for selecting power supply devices
First of all, you need to figure out what and where the furniture will be located, as well as electrical household appliances in the room; for clarity, it is optimal to draw a plan diagram in the correct proportions, on which to indicate all the pieces of furniture and electrical equipment that need to be connected to the electrical network.
Then indicate all the sockets (electrical, television, telephone and computer), it is advisable to make a small reserve. It is preferable to install sockets for devices that do not change their location (TV, system unit, etc.) so that they have constant access, but at the same time, it is better if they are hidden behind this equipment.
Sockets for non-permanent use, installed in open areas of wall structures, should be optimally placed at the same height - thirty centimeters from the floor surface; their number must be selected taking into account that a household vacuum cleaner can reach any room.
Sockets located above a computer desk, chest of drawers, bedside table, etc. are optimally installed at a height of 10-18 cm from the furniture surface. In order to correctly select the installation height of the switch, you first need to determine in which direction the door leaf will open in this room and install the switch on the edge of the door frame where the handle is located. At a height from the floor of approximately 75-95 cm, depending on your height, that is, this distance is determined in practice.
The position of the switches is strongly tied to the type of room, for example, in a narrow corridor or on a flight of stairs, they are usually installed at the start and finish, in the bedroom or living room; it is optimal to install switches near the entrance to the room, as well as at the bedroom places to control lighting while lying down.
Select the height of the switches according to the same rules, taking into account from what position they will be used more often, in other words, if it is at the exit from the room, then we take a height of 75-95 cm, taking into account your height, and if near the bed, then a switch is needed Place it at such a height that it can be easily reached with an outstretched arm.
In those areas where you do not yet know how furniture or electrical devices will be arranged, we recommend installing sockets at a height of thirty centimeters, and switches ninety centimeters from the floor surface; most often this is the most optimal height for switches and sockets.
By putting into practice these simple recommendations, common sense and not forgetting about basic safety, you can find the best location and height of sockets and switches in your apartment. Don’t forget a simple rule: it’s better to calculate and determine everything well in advance than to redo everything all over again later.
Recommendations for the bathroom
The bathroom is a place with almost permanently high humidity. Therefore, for maximum safety, it is necessary to install the electrical outlet together with a splash-proof cover. The minimum height for the socket is 15 cm to prevent water from getting inside. All safety precautions and common sense must be followed during installation.
For ease of use of various devices, you can use the following socket height parameters:
- For hair dryers, razors and other small electrical appliances, it is recommended to install the socket at a height of 1.1 m;
- Washing machine – 1 m;
- Water heater – 1.8 m.
Installation height of switches and sockets in the apartment: standards for the kitchen
At what height should sockets be installed in the kitchen? This is a frequently asked question when building the most technologically advanced part of a living space. He should be given special attention.
Designing electrical wiring is necessary for the installation and convenient operation of numerous kitchen equipment. A modern detailed diagram takes into account the location of furniture, the arrangement of electrical appliances, the entrance group and the entrances themselves for the supply of electricity.
Electrical wiring rules
When laying wiring to sockets and switches, certain rules must be followed:
- The wiring around the room is carried out strictly horizontally, at a distance of 20 cm from the ceiling.
- From the mounting box the wire runs vertically upward.
- The wires are connected in a junction box
Approximate height of sockets from the floor in rooms.
Why such strictness? So that in any conditions you can understand where and how the wiring goes. If you lay it arbitrarily - obliquely, along the shortest path, etc., in a few years no one will remember where and how the wires go and when hanging, for example, a new shelf, you can easily get into the wiring. By following these simple rules, you will always be able to visually determine where the wires run - above the outlet or switch, regardless of their height from the floor.
A few tips on how to choose the height for switches
Despite accepted standards, people tend to crave individuality. If there are any non-standard solutions for installing switches, you should not immediately implement them, you need to think carefully about everything.
Some tips for making a decision.
- Draw on the walls a plan for the location of switches around the entire perimeter of the apartment. Play out the scene in your mind, what it would look like to turn the light on and off. You may find that it is better to move the switch to the other side of the door or lower it a little higher so as not to bend your arm.
- Consider where the furniture will be located so that the light can be turned on without obstruction.
- You can ask friends and relatives if the height of the sockets at home is convenient for them. What would they like to redo, change. Take note of their answers and try not to repeat the mistakes.
- For safety reasons, you should not install electrical structures near sources of heat and water.
- The most common height for installing a switch is at the level of a person’s lowered hand.
You definitely shouldn’t lower the switch too low to the floor so that you don’t have to crouch when turning on the light. Also, do not lift it up to the ceiling so as not to stretch.
Bathroom and toilet
There is no standard position of electrical appliances for these rooms; here, first of all, the so-called “humidity zones” are taken into account, that is, places where the risk of getting wet elements located on the wall, including electrical appliances, is greatest.
Therefore, the distance from the floor to switches and sockets is determined by the location of the plumbing equipment.
As a rule, the distance from the floor to the center of the socket or switch is about a meter, and the electrical appliance must be moved at least 50...60 cm away from the source of splashes (as in the kitchen).
If the bathroom has a separate switch for the hood (forced ventilation), the switch for it is located as close as possible to the hood (fan) itself. The same applies to an electric heated towel rail.
Height of TV sockets on the wall
In the hall or living room, TV is most often watched while sitting on the sofa or in an armchair. For the average person, about 175 cm tall, it is most convenient to place the TV at a height of 120 cm from the floor to the center of the screen. Sockets are made behind the TV, along its vertical axis, closer to its upper edge. The specific installation height of the socket depends on the diagonal of the TV. We also bring out the antenna cable here.
Recommendations for the bedroom
In the bedroom, sockets are installed on both sides near the double bed to connect electrical appliances to the network without getting up. It is also recommended to place switches nearby.
At a height of 30 cm, a socket for a vacuum cleaner is installed, the cord from which should be able to stretch freely in any direction. Near the table there are sockets for a computer or other equipment.
All that matters is the height relative to the floor, ceiling, and eye level. And even the dimensions of the furniture in the room
If we are talking about illuminating the work surface and a lamp with a low suspension, the diameter of the lampshade is important. There should be at least 30.5 cm from the edge of the lamp to the edge of the table.
Advice:
Combine the furniture arrangement plan and the lighting plan if you are doing the project yourself. Apply the actual dimensions of the furniture and lighting fixtures, check whether you will hit your head on the lamp when getting up from the table.
At what height should the lamp be placed?
1. Dining room
Here the position of the lamp depends on the purpose of the room. Above the dining table, the distance from the tabletop to the lamp should be within 71 - 89 cm.
Tip: Pay attention to the size and shape of the table. If it is large, then hang the chandelier higher. For oblong tables or bar counters you will need several lamps in a row
To ensure optimal lighting, place them no further than 1 m apart
For oblong tables or bar counters you will need several lamps in a row. To ensure optimal lighting, place them no further than 1 m apart.
2. Kitchen
Above the kitchen countertop you need to maintain 180 cm from the floor to the lamp and 71-86 cm from the work surface to the lamp. The distance between the lamp and the top of the head of an adult in the house should be in the range of 46-70 cm.
3. Corridor
In corridors and hallways, lamps are hung so that there is at least 210 cm between the floor and the lamp.
Advice:
Check whether the lamp interferes with the opening of the cabinet (this happens in the case of built-in furniture: swing doors of the upper tier). Again, a furniture plan with the trajectory of the door opening, combined with a lighting plan, will help. The same applies to the entrance area, where a person gets dressed, that is, he will wave his arms, raise them - check whether there is a risk of touching the lamp or the cord of a hanging sconce.
5. Bedroom
The standard height for placing a lamp in a bedroom is 210 cm from the floor. If the lamp is hanging directly above the bed, make sure that if you kneel, the distance from your head to the lamp is at least 152 cm.
Important: In rooms with suspended ceilings, the requirements for the height of the chandelier are special. The canvas material is sensitive to high temperatures and can be deformed. Here it is especially important to maintain the distance between the ceiling and the lamp
It is generally not recommended to use overhead models with a closed lampshade, as they become very hot. Exceptions are lamps with LED bulbs. The best option for suspended ceilings in rooms with low ceilings is chandeliers with crystal pendants or with open shades directed in different directions.
Here it is especially important to maintain the distance between the ceiling and the lamp. It is not recommended to use overhead models with a closed lampshade at all, as they get very hot
Exceptions are lamps with LED bulbs. The best option for suspended ceilings in rooms with low ceilings is chandeliers with crystal pendants or with open shades directed in different directions.
7. Hall with a high ceiling
The optimal height in the hall is 200 - 210 cm from the floor to the chandelier. If the hall is double-height, the chandelier should hang no lower than the second floor level. If there is a window in the hall on the second floor level, the chandelier should be hung in the center of the window so that it can be seen from the outside.
IN YOUR CITY... Turn to the Pros
for Rewiring and Fixture Replacement - Electrical Installers on Houzz
Where should the switch be placed?
The location of the switch depends on the purpose of the room. In any case, for main lighting it is installed immediately next to the front door on the handle side. You should not place the switch behind an open door, as this will complicate its operation and lead to accidental presses.
Also, it should not be partially or completely covered by furniture and interior items. The installation height of the switch should be comfortable for all family members, both adults and children. To make it comfortable to press the key, consider the average height of the hand lowered down for all adult family members.
Where is it better to install a switch for the bathroom (WC): at the entrance to the room or inside? In rooms such as bathrooms, toilets, saunas, and storage rooms, light switches should be installed outside, that is, in front of the entrance. Why outside and not inside?
Usually, when a person enters the bathroom or toilet, what is the first thing he does? That's right - he closes the door (possibly even with a lock). Now imagine that you are closed and it is dark around, where to look for this switch? Therefore, for convenience, it is better to control the lighting in such rooms from the outside: when you come in, the lights are already on, you can see everything around you, when you go out, you turn them off.
In living rooms, kitchens and corridors the opposite is true. In such rooms, switches are installed inside. We went into the room - turned on the light, went to bed - turned it off. That is, here all control occurs inside the room and there is no need to open the doors for this.
Moreover, to increase comfort, for example in the bedroom, it is advisable to install special (pass-through) switches for the main lighting, which allow you to control one chandelier from different places. For example, one switch is placed near the bed or sofa at arm's length of a lying person, the other at the entrance near the door. This makes it possible to turn off the lights before bed without getting out of bed.
Don’t forget about additional lighting – lamps, sconces, LED strips. Their switches are installed depending on ease of use and aesthetic appearance of the interior.
Have you noticed in which position the switch is on and in which position it is off? And it should. This is necessary in order to install all equipment in the apartment equally correctly.
| Advice! At the finish line, install all switches in the same order, that is, so that all keys are controlled in the same way throughout the entire apartment (house). In practice, as a rule, the pressed key up is the on position, down is the off position. |
From the above we can conclude that the location of the switches is chosen based on the purpose of the room and ease of control. The generally accepted location is at the entrance to the room at a distance of 10-15 cm from the door. Here is what is said about this in State Standard SP 31–110–2003, paragraph 15.34.
Tips for choosing the height for switches
How high should the switch be from the floor? In addition to existing standards, individual factors influence the choice of location. As a standard, it is suggested to choose the distance of the hand lowered down. This height is convenient because turning the light on and off can be done automatically without bending the limb. Walk around several times, simulating pressing a switch, and mark the position on the wall that is comfortable for you.
The second factor influencing the location is the design features of the renovation. You should decide in advance where the furniture, sockets, main and additional lighting will be located.
Visually imagine where the switch will be installed for a particular room, mentally try to turn it on several times. Perhaps when driving it will seem to you that it is too high or, on the contrary, low. This way you can not forget anything and choose the optimal location.
Check out the idea! Pay attention to the location of switches in the apartments of your friends and relatives. Are you comfortable using them? Perhaps this way you can avoid mistakes in your repair by changing the selected position in advance
Switches are not installed near sources of heat and water (radiators, sinks). These restrictions are set for security purposes. Also, do not place the devices too low or too high.
The optimal height is at the level of your hand down. If set too low, you will have to squat or bend over. When positioned high, the arm must be raised or bent, which also causes, albeit minor, inconvenience.
The height at which switches are installed must be such that there is no risk of mechanical damage, water ingress and other negative factors.