The possibilities for using LED strips are enormous: they can illuminate the kitchen work area, highlight the interior, and create a romantic or festive atmosphere. Self-adhesive LED strips allow you to implement the most daring interior lighting solutions.
How to choose a suitable LED strip? Let's figure out what types of LED strips exist. There are several parameters in which they differ, and each of them is reflected in the labeling.
Glow colors
They are marked with the first letter of the color name in English, which stands immediately after the abbreviation LED and before the letters SMD (designation of element type).
Based on the color of the tape, they are divided into:
Monochrome - LEDs use only one type of crystal, producing only one color. There are white (W), red (R), green (G) and blue (B).
Universal. Designated as RGB, each element contains a red, blue and green crystal. They allow you to get different colors, but the intensity of the glow is lower than that of monochrome tapes. For their operation, a controller and a control panel are required.
Most often, monochrome strips are used in the interior, allowing for more calm and unobtrusive lighting. But the question of which LED strip is better needs to be decided based on the tasks that you want to achieve.
Staircase lighting
Staircase lighting also performs protective and decorative functions. When arranging it, it is important that there are no dark areas where you can stumble. Backlight options:
- Illumination of each step. For this, LED strips or spotlights built into the lower part of the wall are used. Additionally, you can highlight the railings with light.
A lamp near each step. - Wall lights. Models with light-diffusing shades are suitable. They will illuminate the room well throughout its entire height.
Lower wall lights.
There are several requirements for temperature and brightness. The light should not blind a person and warm lamps are better suited . If the staircase in a wooden house is made of metal, then cold light will do.
LED sizes
On the marking, the diode sizes are indicated immediately after the abbreviation SMD with a four-digit number. For example, LED-B-SMD3528.
The most common sizes are 3528 with dimensions of 3.5 by 2.8 millimeters and 5050 with dimensions of 5 by 5 mm. There are also other standard sizes.
Size determines how much light energy an element emits per unit time.
The larger the crystal, the more energy they can emit. The numbers for monochrome elements are:
- chip size 3528 allows you to get a flow from 0.6 to 2.2 lumens;
- size 5050 - 2-8 8 lumens.
Indicators for universal LEDs are below:
- for 3528 – from 0.3 to 1.6 lumens;
- size 5050 - from 0.6 to 2.5 lumens.
Data are given for crystals without protective coating. Its presence reduces the intensity of the meaning.
The total brightness is obtained by multiplying these numbers by the number of elements in the segment.
Organization of electrical wiring
Since wood is highly flammable, there are special requirements for electrical wiring. It must be protected from the influence of external factors and have protection in case of emergency situations.
Laying the input cable
As the PUE standards state, the electric cable is introduced into the house (including wooden buildings) at a height of no less than 25 cm from the ground level for SIP cables, and no less than 27.5 cm for non-insulated cables.
The input cable enters the house through the wall; circuits with input through the roof are also sometimes used. Entry is carried out through a through hole with a slight slope towards the street. According to SNIP standards, a wire is inserted through a section of steel pipe.
Entry through steel pipe.
The pipe must be sealed after installation, which will provide protection from rain and wind. Compaction must be carried out both from the street and from the inside of the house.
Supply voltage and power
The supply voltage required for the tape is indicated by a separate number on the label. Most often it is 12V, sometimes 24V. To connect, you need voltage converters from the general network.
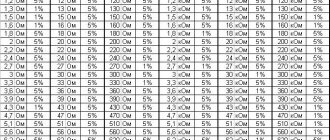
The power of the converter is calculated based on the power consumption per linear meter of tape, which can be found on the packaging. You can calculate it yourself.
3 LEDs of size 3528 provide a current of 20 mA and a power of 0.24 W; for type 5050 the values are 60 mA and 0.72 W respectively. By dividing the number of diodes per meter by 3 and multiplying the resulting value by the values for the triad, we obtain the original values.
So, for SMD3528-60, the current consumption is (60/3)*20= 40 mA, the power is 4.8 W.
The resulting calculated numbers must be multiplied by 1.2 so that the tape has a safety margin. Then power surges and current surges will not damage your lighting.
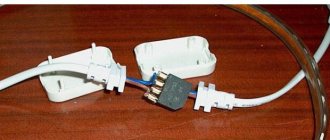
To connect a universal LED strip with your own hands, purchase a special controller in which each color has its own output.
Pass-through switch - how to connect and why such a switch is used (70 photos)- Electrical wiring in a wooden house: how to properly and safely implement electrical wiring (105 photos)
Solar panels - building a power supply based on photovoltaic cells (95 photos)
If a tape length of more than ten meters is required, additional control units will be needed. Otherwise, the voltage on the tape will drop, which will lead, at best, to deterioration of lighting, and at worst, to failure of the tape.
Assembly and installation
I assembled a frame measuring 290x190 cm from timber - a rectangular frame with two lintels. To connect the parts I used corners and self-tapping screws.
I covered the frame with clapboard 300 cm long, alternately nailing the boards one after another. The first plank was attached to the frame so that it extended beyond the outer border by 5 cm. The result was a shield measuring 300x200 cm.
Important!
The first crossbar must be leveled to avoid distortion, since then the entire structure may turn out to be uneven.
I took a pan of a suitable diameter and, placing it on each corner, drew circles. I rounded the corners along the line with a jigsaw.
I marked out places for spotlights on the board, cut out holes for them and installed the devices.
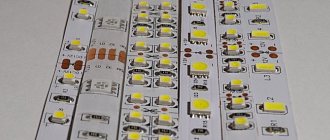
Build quality
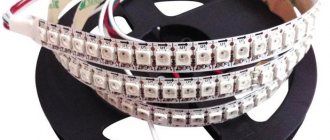
When purchasing, it is impossible to determine the quality of the LED strip components: LED components are not visible to the naked eye. However, by external signs it is quite possible to determine poor-quality assembly.
If the tape's elements are unevenly positioned or, worse, there are no marks for cutting, rest assured: the product is of poor quality.
Please note the manufacturer. It is better to choose time-tested products. Also be sure to ask about the warranty.
Selection of lighting fixtures
In houses made of laminated veneer lumber, you can install lamps of any type:
- massive pendant chandeliers for large halls, living rooms with second light;
- LED strips for highlighting furniture elements and steps;
- Spotlights;
- decorative lighting, festive decoration;
- table lamps, sconces and other individual elements.
Lighting devices can work individually or be assembled into a “smart home” system, when the equipment is turned on according to scenarios and controlled from the application.
Adviсe
The choice of LED strip for the interior is determined by what functions you want to assign to it. Photos of various LED strips in the interior, many of which are available on the Internet, will help you understand what exactly you want from additional lighting.
White light with bluish tones will highlight the appliances in the kitchen and complement the lighting, while red ribbons will help create an intimate atmosphere.
Remember that colored light can visually distort the colors of objects. This effect is strongest for blue ribbons. Take this factor into account when selecting lighting.
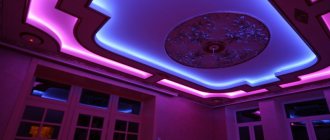
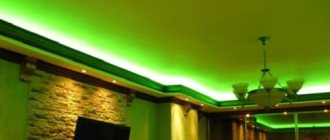
LED lighting looks impressive on the ceiling ledges, and liquid wallpaper will help to disguise the stripes.
Choose your LED strip wisely and pay careful attention to its installation, and your lighting will bring you aesthetic pleasure, as well as last a long time and reliably.
We begin installation
Initially, you must understand how to connect an LED strip from a 220 Volt network; we have prepared a whole article for you. There is nothing complicated, but remember, you must always maintain polarity when connecting.
Installing LED strip on wood
Here you can highlight several main stages; how and where to do what depends only on you.
- We make calculations based on length.
- We connect everything together.
- Don't forget to isolate.
- We bring the tape to the tree and begin to fasten it, we recommend using ordinary clamps, they come in different sizes, so you can pull it on any branch.
- We connect everything.
How it all looks in the end.
We answer the question: is it possible to glue LED strip to wood? – under no circumstances should this be done, any tape on the street will fall off over time, use other methods of fastening.
We connect the LED strip to the house
Here the connection method is similar, however, with fastening the situation is more complicated; ordinary clamps will not save us here. An interesting article that you will like: how to illuminate bicycle wheels with LED strip.
There are two options for attaching the tape to your home:
- If the house is sheathed with plastic, you can make small holes and secure the tape.
- If the house is brick, the situation becomes more complicated. In this case, do not use glue, it will not do any good. You must first install the LED strip in the corners of the house and stretch it to the limit, here you need to be careful. Next, we make small holes in the wall and secure the tape. A simple example: if the wall is 3 meters, you need to make three fastenings, every meter, and remember to tighten it. This is what the mount looks like.
Related article: How to connect polyethylene pipes
LED strip for outdoor use at home photo
LED lighting for advertising and banners
In this case, use all the tips presented above; this is the selection of ready-made photographs we decided to make for you.
Related article: How to choose a power supply for an LED strip.
CONNECTING THE TAPE
I connected the power supply to a 220 V network. I connected two wires from it to the controller. In the latter, a four-core wire was fixed, and its free end was soldered to the contacts of the tape. I fixed the diode strip on the resulting “shelf” between the ceiling and the shield (photo 1).
By the way
1. The power supply must be 25% more powerful than the current consumed by the tape.
2. To connect the controller you will need a four-wire cable, but if you don’t have one, you can use two pairs of telephone wire.
3. For a uniform glow, it is better to take a strip no longer than 5 m. A large strip may have an uneven glow. If necessary, you can take several pieces.
Related link: Changing lighting to LED - pros and cons
LEDs in the house: strips, lamps, panels
LEDs in home interiors are a fashion that is spreading literally by leaps and bounds. Initially, they were used in emergency and local lighting, but today they are widely used for interior decoration, and, increasingly, for basic lighting of home premises.
LEDs captivate with their efficiency, reliability and environmental friendliness, endless scope for design ideas and ease of installation: a home craftsman is quite capable of realizing his “lighting” fantasies on his own, without the help of specialists. Many FORUMHOUSE users have long appreciated these possibilities and successfully use LED lamps, luminaires and strips not only for illumination of plants and outdoor lighting of the house and area, but also as decor and main lighting in their homes. It's time to summarize their experience.
Advantages of LED lighting:
• Reliability and safety of use.
• Durability, high service life.
• Resistance to vibration, humidity and temperature fluctuations.
• Energy efficiency.
• Wide possibilities for design and decoration.
• Ability to adjust lighting intensity and color changes.
• No harmful ultraviolet radiation.
The main disadvantage of LEDs is still their high cost. And although they are becoming more affordable every year, using LEDs as the main light in large rooms is an expensive pleasure that will not pay for itself in energy savings. However, is this really necessary? Like any fashion trend, even the most useful one that makes life more comfortable, the use of LEDs for home lighting should be treated with caution. Inspired by the properties of “magic crystals” and encouraged by sellers, many householders strive to install LED lamps and strips everywhere, even in a bathhouse with a sauna. From the point of view of comfort and economy, this is not justified in all cases.
The LED strip, popular today , is intended primarily for decorative lighting and only secondarily for lighting. Making basic lighting using LED strips is expensive and uneconomical due to high power consumption. Tapes on the ceiling and walls are placed in niches, profiles, behind cornices, etc., and therefore have a very low efficiency of light use: basically you will only see reflected light, several times less than the tape produces. Everything else remains in the niche.
Many people are inspired by the idea of a “glowing” suspended ceiling. But to implement it using LED strips, you will have to spend a lot of money. Firstly, expensive high-quality components will be required. Saving on them may later turn into a loss if you have to dismantle the ceiling due to the tapes failing. In addition, installing such a ceiling from tapes in a high-quality manner is not an easy task. To obtain a uniformly luminous surface, the LEDs must be positioned in such a way that in any axis the step between them is the same and less than the distance to the scattering plane, explains forum member Egor Kirov. If these conditions are not met, the ceiling will glow unevenly, in stripes. Therefore, the tapes have to be brought close to each other, and you will need a lot of them: up to eight or nine lines per meter. This type of lighting obviously cannot be called economical and inexpensive.
EgorKirov:
– The characteristics of the tape do not exceed 50-60 Lm/W, whereas even for Chinese consumer goods lamps it starts at 80 Lm/W, and for good lamps – 100-120 Lm. Manufacturers often overestimate the declared parameters of the tape in terms of luminous flux. And the economic sense of the tape with an output of 750 lm/meter is, to put it mildly, incomprehensible.
Even in small spaces, for example, in a corridor, when using strips as the main light source, you will have to use them brighter and more powerful: 9.6, or better yet, 14.4 watts per meter.
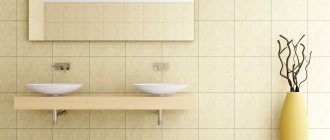
Another thing is the lighting of individual interior elements. This is where LED strips will come in very handy. By placing the tape around the perimeter of the ceiling of a small room, you can visually expand its size. In a large room, in combination with the main light from the lamps, strips illuminating different levels of the suspended ceiling will work effectively. In the kitchen, LED strips are used to illuminate the work surface or bar counter and interior spaces in cabinets.
The power of the strip's power supply must necessarily exceed the total power of all its LEDs, preferably with a margin. The power is calculated using the formula: tape footage * power of 1 meter of tape * 1.3 = minimum required power of the power supply. So, for a meter of tape with a power of 14 W/m, a power supply of at least 1 * 14 * 1.3 = 18.2 W is required.
A lot of useful practical information about the features of installing LED strips and advice from experienced users can be found in this section of FOREMHOUSE.
Another option for LED lighting that is rapidly gaining popularity is LED panels . They are available in various colors and sizes, have low energy consumption with high light output, and therefore can be successfully used for basic lighting, especially in small and medium-sized rooms. LED panels can be very thin (8-25 mm), and therefore are good for use in apartments with low ceilings.
The panels can be mounted on suspended systems, built into a suspended ceiling or wall niches. The versatility of installation allows them to be successfully used to visually divide rooms into separate functional zones. Panels of different shapes and different color shades are suitable for emphasizing individual interior details. In the hallway, corridor, or bathroom, several panels with a power of 12-15 watts placed on the ceiling at a distance of 1.2-1.5 meters from each other can be a good option, advises forum user Dale85. For basic lighting, you should not choose panels with a cold glow (White marking).
When choosing LED lamps and luminaires, it is important to understand that if in traditional incandescent lamps there was a direct connection “higher power - more light”, then with LEDs the situation is different. Choosing an LED light based solely on its power consumption would be a mistake.
The efficiency criterion of an LED lamp is luminous efficiency, which shows how much light a lamp or luminaire absorbs for each watt of its power. It is measured by the ratio of luminous flux to power - lumens/watt (these two parameters must be indicated by the manufacturer on the lamp packaging). The higher the luminous efficiency, the brighter the lamp.
Modern LED lamps have, on average, a light output in the range of 90-130 Lm/W. For comparison: a traditional 100-watt incandescent lamp “produces” a luminous flux of a maximum of 1200-1300 lumens, that is, its light output is only 12-13 Lm/W.
Manufacturers often place information on the packaging of LED lamps
that the power of a given lamp is equivalent to the power of an incandescent lamp of the same brightness. It would seem that this helps the buyer make a choice, focusing on the usual parameter - power. However, in reality such information can be misleading. For example, if on the packaging of a 4-watt LED lamp with a stated luminous flux of 280 lm it is written that it is equivalent in light parameters to a 50-watt incandescent lamp, this is obvious deceit. The luminous flux intensity of a 50 W incandescent lamp is twice as high - 500-600 Lm.
When choosing LED lamps, you must also keep in mind that the brightness of the lamp will in fact always be slightly lower than the brightness of the LEDs that are used in it, declared by the manufacturer, since the efficiency of power supplies usually does not exceed 80-85%, and about another 10 percent of the luminous flux can “get lost” due to the reflector and glass.
Egor Kirov:
– If typical modern LEDs have a light output of 110-130 Lm/W, then in a spotlight (lamp) made from these same LEDs, the ratio will be, due to losses (efficiency) of the driver, at the level of 80-100 Lm/W.
When choosing LED lamps and accessories for them, do not forget to check with the seller about the terms of the warranty, and ask whether the lighting device can be repaired. And you shouldn’t chase cheapness: an unreasonably low price for LEDs is a sure sign of low quality. Lamps with cheap crystals most likely will not “give” the declared parameters and may fail at any time. It’s easier to save on chandeliers and lamp bodies.
Dale85:
– Many comrades buy, for example, a housing for a recessed lamp for 1500-2000 rubles (although they are not visible when the light is on, and no one looks at the lamps), but they want to buy a light bulb for these lamps for 100 rubles, so that they will last forever. Saving on housings allows you to buy a normal LED lamp.
For examples of using LEDs as lighting, tips and recommendations for choosing and installing LED lamps, look in this and this section of the forum. Here is a discussion of the experience of using LED panels. Members of the forum share their experience of using LEDs in crop production in this thread. This video is a story about how to make a simple but effective LED lamp for growing seedlings on a windowsill with your own hands.