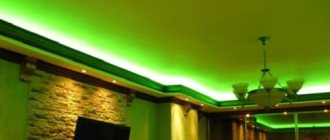
Installation technology
Fastening the baseboard
The instructions for installing the lighting begin with a description of the technology for installing the plinth.
It is attached in the same way as any ceiling fillet, but it must hold more firmly, so the technology must be followed very strictly:
Skirting board option for installing contour lighting
- It is highly advisable to attach the plinth not to wallpaper, but to a concrete base or, at least, to a durable plaster layer. So before installation, we determine the level at which the lighting will be located and carefully remove the wallpaper from the wall.
- The cleaned strip intended for installation of the ceiling fillet is treated with a penetrating primer. Instead of primer, you can use an adhesive solution.
Base primer
- At the same stage, you can install a special profile for LED lighting on the wall. The use of such a profile is at least desirable: during operation, powerful LEDs get very hot, so it is better to stick the tape on an aluminum base, and not on wallpaper or polyurethane.
We attach the open profile directly to the wall
- Then we trim the fillets. The most difficult thing here is to correctly join the outer and inner corners, so to form the edges we must use either a miter box or cardboard templates.
Corner cutting scheme
- Immediately after trimming, we join the corner on the wall without glue, adjusting the planes with a knife if necessary. The need for additional trimming arises quite often, since the corners in our apartments, especially older ones, are far from ideal.
Installation diagram
- Then we apply glue to the base of the fillet and attach it to the wall. Press firmly, making sure that excess glue does not get on the wallpaper.
- Hold the baseboard for several minutes until the glue begins to polymerize. After this, we continue gluing, carefully joining the following parts.
Glue the baseboard to the ceiling
After completing the work, wait a few hours and then seal the gaps between the baseboard fragments with sealant. It is better to lay the LED strip the next day, when the glue has completely polymerized and the plinth is securely fixed to the base.
LED system installation
Now we are left with the most painstaking work - installation of the lighting system.
We assemble the structure from LED strips as follows:
Correct and incorrect connection diagram
We cut the tape of the selected type using scissors into fragments no more than 5 m long.
The tape can be cut using these marks
- Then we put a heat-shrinkable insulating tube on the wire (two-wire for regular tapes, four-wire for RGB). We strip the ends of the wires and solder them to the contacts on the edge of the tape.
Product with soldered wires
- After soldering the wires, we move the heat-shrinkable tube to the contact point and heat it with a hair dryer. Thanks to this, the insulation is as reliable as possible.
Insulation with heat shrink tube
- Instead of soldering, you can use a special connector to connect: we simply put it on the edge of the tape, and attach the wires to the other end.
Using the connector
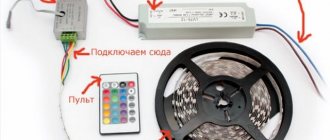
- We connect the second end of the cable to the power supply. When connecting, polarity must be strictly observed. It is also advisable to either crimp the ends of the conductive wires using a special tool, or install special limit switches on them.
Connection to power supply
- After assembly, we check the functionality of the system by connecting the power supply to the network. If the LED strip works, you can begin installing it.
- We fix the tape with a self-adhesive layer on the reverse side, securing it either to the profile, or to the wall, or to the fillet itself.
Tape in a special mounting box
- The power supplies, controller, dimmer and wires are either placed behind the baseboard or placed in a special niche closed with a small door. In this case, a suspended ceiling made of plasterboard is very convenient: you can hide all these elements behind it.
As you can see, everything is quite simple: installing the tape yourself will not take much time, so within a few hours you will be able to appreciate the transformed interior.
How to mount an LED strip under a ceiling plinth
This option does not accept the use of mirror or glossy film, otherwise all the mounted elements that are located behind it will be visible. Often, separate lampshades or an LED strip are used to illuminate curtains or curtains. To do this, a small box is installed on top of the window, and the ceiling is stretched from below.
Installation of tape under a box with a suspended ceiling
Video about installing tape in a niche under curtains:
It is necessary to proceed from the fact that LED strip is used mainly for illumination. Therefore, the multi-level ceiling part is designed in such a way that other lighting fixtures, such as lamps and chandeliers, are placed on it so that there is enough light in the room. A chandelier is usually placed in the very center of the room. Lampshades can be placed anywhere. The main thing is that they look good and are functional.
The backlight can be mounted in different ways. It all depends on the person’s skill, his imagination and capabilities. The main point is that the ceiling must be in harmony with the rest of the room and be completely safe for others from a fire safety point of view.
It must be borne in mind that absolutely all lighting devices heat up to one degree or another during operation. Therefore, the suspended ceiling should be located at some distance from them. This will make it possible to avoid deformation of the ceiling covering and fire.
To be able to remotely control the RGB system, you need to purchase and connect an additional unit. As a rule, the delivery is completed with a special plastic or metal case, which is designed to mount the power supply and control unit. This design is attached inside the box using self-tapping screws so that it is not visible from below.
Strip lighting under a suspended ceiling is installed after preliminary cleaning of the mounting location from dust and dirt. If this is not done, the tape will not hold. Immediately before installation, the protective paper is removed from the tape, but not more than 1 meter. If the strip is completely freed from the protective layer, then dust and dirt will quickly settle on it, and you won’t have to wait for the tape to be securely attached to the surface. During operation, the tape freed from the protective layer may touch other surfaces, and the LEDs may stick together. Then the installation process will be seriously difficult
Therefore, you need to handle the protective layer carefully, without haste, and remove it in small parts as you attach the LED strip to the box
If during the installation process there are extra centimeters of tape left, do not hastily cut them off. It must be borne in mind that the strip can only be divided in those places that are marked in the form of a perpendicular strip, and it passes every 3 to 5 diodes.
After completing the installation process of the diode strip, the end that is equipped with a connector is connected to the power supply. If there are no such connectors in the cut section, you must fill the gap and solder them yourself. Key point: don't get confused with polarity. If the connection is incorrect, the entire system will fail.
To facilitate work related to the replacement or repair of lighting fixtures, it is advisable to place the power supply and control unit in areas of the box where they can be reached without causing damage to the structure. When installing an LED strip around the entire perimeter of the room, certain difficulties may arise in this matter. Then it is advisable to install the blocks outside such a room.
After completing the installation work, it is necessary to check the operating condition of the circuit. To do this, you need to turn on the power supply. If there are no questions about the lighting, the functionality of the remote unit is checked in various modes. If you are convinced that everything is working properly, you can begin installing the stretch ceiling.
Preparing the LED strip for installation
Before installing the LED strip, you should decide on the number of LEDs on it and their density. If there is a need to illuminate certain areas of the room with tape, then use type SMD3528 (60 diodes per 1 meter) or SMD5050 (30 diodes per 1 meter). If the LED strip will be the main source of lighting, then strips with diodes from 60 pieces per 1 linear meter are purchased. (SMD5050) or from 120 pieces per 1 linear meter. (SMD3528).
Once the diode density is determined, the required tape footage is set. The total power of the diode strip is taken into account and the appropriate power source is selected. In the absence of proper experience in this matter, it is best to seek help from a consultant in the store, who will offer the best option based on different power supplies for different tapes.
Power supplies for LED strip
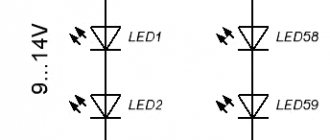
As a rule, the cut points of 3 LEDs are determined on the tape. When using a simple tape, the soldering occurs “+” and “+”, or “-” and “-”.
Soldering LED strips together
If you decide to use RGB tape, then you should solder it based on the labeling requirements. The wires included in the kit are usually soldered by buyers. Preference is given to stranded wires due to their greater reliability. In this case, tips with a 0.75 mm cross-section are attached to the reverse ends. Special clamps are used for this. Experts do not recommend using teeth or pliers for these purposes. The result is that the wires have better contact with the controller, dimmer, and power supply. Afterwards, the contacts inserted into the block are secured with screws.
Connector for LED strips
As soon as the soldering of the wires to the LED strip is completed, a special heat-shrinkable tube is put on it. This will increase the safety of the lighting device, since the contacts will receive additional insulation and the strength of the connections will improve.
Installing heat shrink tube onto tape
The standard length of LED strip is 5 meters. It is rolled into a bobbin. If additional length is needed, the tapes in the reels are cut and then connected to each other. The main point is taking into account the power of the power source that will be used.
How to cut LED strip correctly
The steps to connect LED strips with an amplifier are as follows:
- The amplifier performs almost the same functions as the controller. If the controller does not have enough power and the LED strip is not completely installed, an amplifier is installed.
- The number of amplifiers can be any, depending on how long the LED strip will be installed and how much power is required for its operation.
You can connect the tape to a power source in different ways. The principle of connecting RGB strips to amplifiers and controllers
Useful videos on the topic:
Installation of LED strip under a suspended ceiling
The simplicity of the design of lighting devices based on LEDs opens up a lot of opportunities for realizing ideas and fantasies.
So, the tape can be attached in several ways:
- lighting from inside. In this case, an LED strip is installed behind the suspended ceiling. Place for installation - slab or specially installed profile. Thanks to this method, it is possible not only to illuminate the ceiling structure from the inside, but also to create various images (shapes, geometric shapes);
- invisible ceiling cornice. In this case, installation is carried out on a special cornice. The peculiarity is that the light hits the curtains to a greater extent, and not the PVC film. When installed correctly, it is possible to obtain a “floating effect” of the tension structure;
- plasterboard layer. Here, as a rule, 2-level structures are used. A metal frame covered with plasterboard is installed below, and a tension structure is installed on top.
To install a diode strip under a suspended ceiling (or behind it), you may need: a controller, a power supply, an LED strip, a connector, an RGB amplifier, a soldering iron with a power of 20-40 W, half-square wires, a cable for connecting to the network.
When choosing a lighting source, it is worth considering that the power of the product depends on the number of light bulbs.
Thus, strips with 60 LEDs consume 4.8 W (based on one meter of construction), 120 - 7.2 W, 240 - 16 W.
Many people choose products that are as powerful as possible, but this is wrong.
The air near the PVC film can heat up, which leads to premature failure of the product.
LED strips can be powered by different voltages - from 12 to 64 Volts.
Based on this, it is worth choosing a power supply. The power of the power supply should be a quarter higher than the total power of the diodes.
If the length of the tape exceeds five meters, then you cannot do without purchasing an additional block.
On average, there are five meters of tape per power supply unit. Otherwise, the LEDs closest to the source will overheat.
In addition, you will need a controller, which is necessary to change the color of the device.
When installing the tape, consider the following points:
- prepare a place for fixing the tape. The product can be mounted to a wall or ceiling. The place where the device is attached must be primed and degreased;
- To increase the reliability of installation, it is allowed to use glue or special corners made of polyvinyl chloride. Such forethought will protect you from problems associated with installing the tape on low-quality tape;
- when using several sectors of tape with diodes, it is worth using special connectors or using soldering. The main thing here is not to confuse the polarity;
- after attaching the tape to the ceiling or wall, it is connected to the power supply or controller;
- during operation, the power supply unit and the controller may break down, so they should be installed in accessible places, that is, under a PVC film (for example, near the floor plinth);
- the wires that connect the tape and the power supply can be hidden behind furniture, behind a corner plinth or behind plaster;
- The installation of the ceiling is carried out after the installation of the tape has been completed.
Calculation of ceiling lighting with LED strip
Let's look at the calculation of backlight using a specific example. Input data:
Method I
LED strip SMD 5050 white 60 led per 1 m has a luminous flux of 800 lumens per linear meter (characteristics of popular LED strips are collected at the end of the article). With a room area of 20 square meters, the illumination from 1 meter of tape will be 40 lux (800 lumens / 20 square meters).
For a living room or kitchen, a comfortable illumination level of 150 lux. Let's multiply it by the ceiling height coefficient:
This means you will need the following tape:
150Lx / 40Lx * 1 = 4 meters
But with the length of the tape being 4 meters, it is difficult to evenly position it around the perimeter of the room. Let's use another calculation method, based on a fixed length of tape (along the entire perimeter of the room).
Method II
With room dimensions of 5 by 4 meters, the perimeter length is 18 m. Based on the need for 150 lux, we use the following formula:
Required brightness of the tape (lumens/mp) = required illumination * room area / room perimeter
Required brightness of the tape = 150 * 20 / 18 = 170 lumens/mp.
Considering that this is not a direct light flux, but reflected from the ceiling, we add 10-20% to compensate.
170 * 1,2 = 200 lm/m.p
In total, we need an LED strip with a brightness of 200 lumens/m.p., for example SMD 3528 60 pcs/m. with a brightness of 240 lm/m.p.
The total power of such a tape 18 m long will be 4.8 W/m * 18 = 86.4 W. We take plus 25% of the power reserve:
86.4 * 1.25 = 110 W
All that remains is to select the driver.
Driver calculation for LED strip
Choosing a suitable power supply for an LED strip is very simple. LED power is designed for:
If the current consumption is not indicated, multiply the current of 1 LED 0.02A (SMD 3528) by the number of diodes per 1 m (60 pcs) and by the length of the strip (18 m).
How to install a backlit baseboard
Let's take a step-by-step look at how to complete all stages of the work yourself. Let's consider an option in which the LED strip is located in an aluminum profile at an angle to the ceiling.
What you need
Before installation prepare:
- ceiling plinth with channel;
- LED strip with selected characteristics (total length - no less than the perimeter of the room);
- a power supply designed for a power not lower than the total power of the entire backlight (it is better to take it with a reserve);
- aluminum profile (if necessary with a light-diffusing screen);
- corner brackets (with a side of 3-4 cm);
- fasteners: dowel-nails, screws and plinth glue (Moment Montazh universal is suitable, but it is better to use a special one for polyurethane decor, for example, ORAC Decofix Pro);
- soft wire (about 6-7 meters, a cross-section of 1.5 mm² is sufficient).
Fastening the profile for the tape
The placement of the profile determines at what angle the light will fall to the ceiling. If you stick an LED strip on a wall, all the irregularities and minor defects of the surface will become noticeable. And if you place it opposite the ceiling, you get a narrow strip of light, insufficient for full illumination. Therefore, it is better to mount the profile not directly to the wall, but through brackets. Additionally, they can be slightly bent towards the room.
For each profile 2 meters long, three corners are enough (two at the edges and one in the middle). They are installed around the perimeter at the same height. Dowels are used for installation. Then the profile is screwed to the brackets, the corners are joined at 45 degrees.
Laying and connecting the tape
When the profile is completely installed, LEDs are placed in it. The tape is sold in 5 meter reels and is cut to the required length. This is done according to the marks that are placed along the entire length. The cuts are soldered using them. For convenience, you can use special connectors; with their help, the LED strip is connected without soldering, quickly and easily.
At the bottom there is an adhesive layer covered with a protective film, which is sometimes not completely removed, but only along the edges. Then it will be easier to change the tape in the future. At the beginning, leave a small free area for connection.
If the tape is designed for 220V, a wire is soldered to it, the second end of which is connected to the power supply. For 12 or 24V you will need a special adapter that reduces the voltage.
The profile is then covered with a diffuser. The screen is placed on top and snapped into place.
Installation of skirting boards
The baguette is installed so that the edge slightly covers the profile with tape. Then the light spreads freely, and the technical part of the structure is not visible.
For convenience, mark two points and stretch the thread along the wall. A plinth is placed in relation to the cord. The vertical part is smeared with glue and pressed, and for reliability it is additionally secured with self-tapping screws. The corners are pre-filed at 45° and joined to each other during installation.
Finishing
The glue dries within 24 hours. After this, the joints, screw heads and other irregularities are puttied. Next, the surface of the fillets is sanded. Then the baseboards are painted (with a brush or spray). For painting, use only water-based compounds (acrylic, latex and silicone). The paint hides the putty areas and makes further maintenance of the decor easier.
Selecting materials
So, you have firmly decided to add ceiling lighting in one of the rooms at home.
It doesn’t matter which one - colored, white, or even decided on a luminous ceiling. But in any case, you need to visit a hardware store where you buy the necessary materials
The most important element is the luminous ribbon. It comes in LED and duralight. Duralight is a cord, inside of which there is a mass of small light bulbs, diode or incandescent. It is not afraid of water, very durable and flexible. Duralight can be installed on any surface. Its main drawback is its weak glow.
LED duralight
Duralight
An LED strip is a thin and flexible board where LEDs are located at equal distances from each other.
Its main advantages:
- Possibility of installation on any surface;
- low level of electricity consumption;
- high brightness;
- ease of installation.
Neon lamps for ceiling lighting
Prices for LED lamps
LED lamp
Neon ceiling lighting
It is the strip of LEDs, due to its advantages, that is usually used for installing such decorative lighting.
LED strip under a suspended ceiling - wide possibilities
And it is important to know how to choose the right detail for future lighting.
- First, decide what color your lighting will be. This is an important aspect, not only because the shade of light should suit the interior, but also because certain colors, whatever one may say, affect the human psyche.
Table. The impact of flowers on the human condition.
| Color | Impact |
| Red | An irritating, but at the same time exciting color. It is not recommended for use by people with increased irritability. |
| Blue | It puts you on guard, puts you in a working mood, and makes you collected. |
| Yellow-blue | Capable of causing hysteria. |
| Blue, sea, turquoise | It makes you think and calms you down. |
| Green, yellow-green | Calms. |
| Orange, yellow | Neutral, does not cause any special feelings. |
Color samples
Multicolor LED strip, RGB strip
Look at the density of the light bulbs. It comes in 30, 60, 120 pieces per meter. For contour lighting, experts advise taking a strip with 60 or 120 diodes, but for directional lighting, a strip with 30 is best suited. Decide on the power of the strip - they also vary in this indicator. For directional lighting, buy a 5 W/m model, and for contour lighting it is better to buy a larger one – 8 W/m. To save on controllers (buy cheaper ones), 5 and 7 W tapes are placed on the slopes, and 7 and 14 W are installed on the shelf. Its marking, which has an alphabetic and digital code, for example, SMD 3028, will help determine the power of the tape.
The first two digits are exactly the power value. It is also important to evaluate the total power of the belt, which is calculated over the entire length. Having calculated how many meters of tape you will need, multiply this number by the power of 1 meter
Based on the obtained parameter, select the controller power for the tape.
Types of LED strips
LED strip power
Number of LEDs on strip
By the way, look carefully at how the tape blinks. This type of lighting can also have a psychedelic effect due to this parameter. Do not take tapes that flicker at frequencies of 0.5 Hz, 2 Hz and 7 Hz. They can cause the development of epilepsy.
LED strip 3528 60 LED/M IP20
So, to install ceiling lighting you will need:
- LED strip in the required quantity;
- PVC corner (you will glue the tape on it);
- power unit;
- cornice, drywall (if your ceiling does not already have slopes and shelves for placing lighting);
- network cable;
- controller;
- connectors for connecting pieces of tape.
DIY LED strip installation tool
This is the main list of required materials. Depending on how you plan to install the ceiling lights, you may need other items.
Differences between gas discharge lamps
Daylight, as it is called in everyday life, or white light in luminescent sources is not obtained immediately: first, an electric discharge in mercury vapor creates an ultraviolet flux, and then it is converted into visible light by a phosphor. This light is close to the human eye. But people also habitually call them neon.
Read here: Shelves on the wall - design features, best ideas and design options (120 photos)
Real “neons” have a full range of light, except white - from red-orange to bluish-green. Depending on the gas vapor in the flask: argon, krypton or mercury. Only with the addition of phosphor do they provide daylight. They are more often used as sources of multi-colored glow.
“Gas discharges” have both advantages and disadvantages. They are economical, but should not be thrown into trash bins - mercury vapor is poisonous. Let's talk in more detail about LED strips.
Types of LED backlight
The buyer can choose from a number of types of lighting that can be used to equip a room:
- Contour scattered. Emits soft diffused light. This results in an illuminated outline from the bottom of the ceiling around the entire perimeter. With this design, strip ceiling lighting is placed on a special shelf, and the light is directed onto the ceiling surface. Thus, a continuous luminous stripe is formed.
- Directional glow. LEDs with this design will be mounted on a slope located between two ceiling levels. The light will be directed along the ceiling.
- Spot lighting. In this way you can organize a ceiling with a “starry sky” effect. Illuminated light bulbs for the ceiling are built into the finishing material. This type of lighting is considered the most labor-intensive, since its installation will require much more time.
- Curly. In this case, light sources are installed in small lampshades, which are subsequently built into the finished ceiling. Several of these light bulbs are mounted: one of them, for example, is directed downwards, and the rest are directed to the ceiling, to form rays on its ceiling.
In addition, lighting can be used for targeted, general or design purposes.
Installation of ceiling lighting with general-purpose LED strip is carried out to delimit space in rooms - zoning. For example, in the kitchen you may need to illuminate the work area the most - reducing the emphasis on the rest of the space.
This backlight is also called conventional backlighting. However, often spotlights are used instead of LEDs. True, you can also find solutions using LED strips - in the end you will get an excellent luminous ceiling, no worse than spotlights.
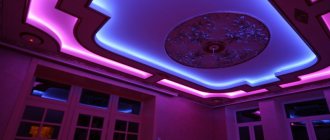
A ceiling with neon lighting can be installed in any type of room. In particular, decorative lighting of a suspended ceiling is possible. In this case, the LED strip is hidden between the rough ceiling and a translucent stretch fabric. After fixing the light source, you will get a beautiful glowing ceiling above your head.
Often, a backlit ceiling is complemented with plasterboard edging. To do this, a small cornice is made around the entire perimeter of the room, and the lighting itself and the canvas are placed between its sides.
A designer type of ceiling lighting scatters a small amount of light, while creating a cozy atmosphere in the room. Perimeter ceilings are equipped with this type of lighting, creating various luminous patterns.
Patterns on the ceiling with LED lighting are formed in the same way as a regular illuminated ceiling. The only difference is that to obtain the required pattern, the tape is laid out in a certain sequence. If you press the switch, the light, passing through the translucent stretch fabric, will form a figure on its surface, created from an LED strip.
Naturally, when creating a ceiling with perimeter lighting with your own hands, the glow can be chosen in any shade, and not necessarily white. This can be a static shade or a changing one (when installing RGB strips). If the colored lighting matches the color of the light bulbs and the interior, it will look great even in the dark, creating a soft glow around the perimeter of the room.
Installation of LED strip in the baseboard on the ceiling
If you want to install LED lighting in a particular room and at the same time make plasterboard structures, then you should choose a material that is thicker and wider. This is quite simple to explain - LEDs are very bright, and such characteristics of drywall will protect human eyes from harmful effects. If the drywall is too thin, the LEDs will shine through too much.
Ceiling lighting with LED strip under the baseboard photo
Lighting the ceiling with LED strips under the baseboard with your own hands will not take you too much time and if you do everything correctly, you will get an excellent result. So, first of all, you need to install a special plinth on the ceiling. Do not forget that you also need to leave a gap where various types of products with LEDs will then be placed. An interesting fact is that the LED strip has a base that allows it to be glued to almost any base. In order to do this, it is enough to remove this protective layer. Thanks to this feature, you can attach the tape in a matter of minutes.
Before installing the LED strip on the ceiling, carefully inspect the baseboard for dust or dirt. If they are present, they must be eliminated without fail. Otherwise, the tape may stick very poorly or, after some time, even peel off from the ceiling. If, in your individual case, the length of the product exceeds what you need, then you can cut off some part of it. It is worth noting that this can only be done in those places that are intended for cuts, otherwise you will damage areas of the product and the LEDs will not work on them.
Illumination of a stretch ceiling with LED strip from the inside photo
In this situation, if you need to connect several separate parts of the LED strip, you should use a special electrical connector. When the tape is installed in the ceiling plinth, it must be attached to the power supply. To do this, use the wiring that is located at the ends of the product, installed at the factory.
At the same time, do not forget about maintaining polarity, which is very important for the full operation of LEDs
Then, using terminal blocks, connect the power supply to the 220V network according to the diagram. The controller, as well as the power supply, must be hidden behind the baseboard so that they are not visible. Please take into account the fact that these devices cannot be installed in places where there is no air access. The lack of oxygen can have a very negative impact on the operation of both the power supply and the controller itself.
How to install an LED strip on the ceiling with your own hands: instructions
LED products are used more and more every day and have become quite popular.
Such lighting, especially in combination with stretch ceilings, can create the illusion that the room is very high and at the same time is reflected quite well. In addition, such lighting looks good when combined with plasterboard structures, as is clearly shown in the photo. To ensure that no difficulties arise during installation, LED strips are attached to a special profile. These products consume little electrical energy and can last for many years. Such advantages are now very actively used directly in the advertising industry.
The process of installing an LED strip on the ceiling with your own hands must be carried out in accordance with the rules. This will guarantee excellent results and the ability to operate LED lighting for many years. If you are not completely confident in your abilities and that you will be able to install the LED strip, then look at the photos and videos on our website, where you can see the entire work process in detail.
Types and criteria for choosing LED strips
Kinds
Depending on the installation methods, LED strips are available in two types:
Pictured is DIP tape
DIP – LEDs are enclosed in a protective housing with double-sided outputs;
Photo of SMD tape
SMD is a surface arrangement of LEDs in which the bulbs are soldered to the board from above.
After the letter designation SMD there are four numbers that indicate the dimensions of the soldered LEDs. For example, SMD 5050 is a duralight with 5 mm by 5 mm LEDs.
To make LED strips, two types of LEDs are used:
- SMD 3528 (3028);
- SMD 5050 (5060).
DIP lighting sources have built-in LEDs in the shape of cylinders. To ensure the reliability and tightness of the device, they are filled with silicone mass. The size of the LEDs is indicated in millimeters. For example, DIP 5 mm means that 5 mm LEDs are used. These types of tapes are chosen for illuminating billboards or car tuning.
When choosing an LED strip, they are guided by the number of LEDs located on one linear meter of the device:
| Tape type | Number of diodes per 1 linear meter (pcs) / Power consumption (W) | ||
| SMD 3528 | 60 / 4-8 | 120 / 7 | 240 / 16 |
| SMD 5050 | 30 / 7 | 60 / 14 | 120 / 25 |
Also, when choosing duralight, take into account the conditions of the room where the device will be used. According to the degree of protection, the LED strip is marked:
- IP 33 – allowed to be used only in rooms with normal or low humidity levels (offices, bedrooms, living rooms);
- IP 65 – wider scope of application. For additional protection, a special silicone fill is used, ensuring impermeability from electronic elements;
- IP 67 and IP 68 are installed in rooms with high humidity. The sealed plastic housing protects the LEDs from moisture.
Based on color, LED strips are divided into:
- single-color, where LEDs of the same type are installed. The color of radiation can be blue, red, white, yellow, but one. There are original tapes on sale with shades unusual for these types of devices. For example, pink or orange. Special ultraviolet or infrared tapes are produced for medical institutions;
- multi-colored (RGB), where three crystals are installed in one chip, giving different colored lights (for example, yellow, red and green).
Criteria for choosing an LED strip for the ceiling
The main advantage of LED strip is ease of installation. You can install the device yourself, because the diodes are built into the tape at the factory.
Thanks to the variety of these lighting sources on the market, you will be able to find a device with the required tonality. Other advantages of tapes include:
- service life (approximately 8 years or 50,000 hours of continuous operation);
- low power consumption;
- safety and environmental friendliness;
- possibility of lighting control;
- compactness.
When purchasing, the following criteria are taken into account:
- radiation color (monochrome or multicolor);
- the presence of a special controller that allows you to change the intensity and shade of radiation;
- number of diodes in the device (30, 60, 120, 240 pcs.);
- power consumption of the device (from 4 to 25 W);
- choice of color temperature. For example, cold temperature (5000 - 6500 K) is suitable for modern kitchens, warm temperature (2700 - 3200 K) - for bedrooms, living rooms or hallways;
- moisture protection level (IP33, 65, 67, 68);
- manufacturers and build quality.
How to correctly install LED strips on plasterboard ceilings: recommendations
Keep in mind that when illuminating a large area, it is irrational to mount a long strip of LEDs on a plasterboard box. This is explained by the rapid failure of diodes located close to the power supply, since they absorb a large amount of voltage. It directly depends on the correctness of the calculations and measurements of the section of the plasterboard box in which the lighting device with LEDs is installed.
To do this, first calculate the area of the room. After this action is completed, the resulting parameter is multiplied by the power consumption of the meter of tape. Plasterboard ceilings are widely used.
They have earned popularity due to the ease of installation of the structure and attractive appearance. And with such ceilings, various types of lighting fixtures are used. Let's look at how to install an LED strip on a plasterboard ceiling yourself. This is a good alternative to tapes. They come in different colors and are between 13 and 15 centimeters thick.
Unlike strips, LEDs are mounted on a profile or strip. On the market they are offered as separate elements or built-in, for example, for suspended ceilings. Such elements, when attached to a profile, can solve the problem of low ceilings. These models are equipped with a device for adjusting the light saturation, which makes it possible to select the most comfortable brightness level.
In the manufacture of tape for plasterboard ceilings, two types of diodes are used: 3528 and 5060. The latter are used as independent light sources and are characterized by more powerful light compared to the former. Often, for ceilings with plasterboard boxes, multi-colored LED strips are used, which are equipped with four outputs.
When connected, one wire goes to ground, and the other three – each to its own color.