- 1 Application
- 2 Advantages of reinforced concrete slabs
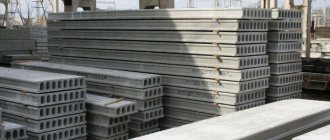
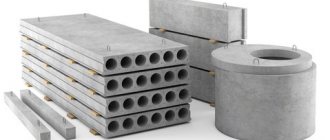
- 3 Types
- 4 Marking
- 5 Production technology
- 6 Installation of reinforced concrete products
- 7 Conclusion
Reinforced concrete slabs are inventions a century and a half ago, the manufacturing principle of which is still used in our time. It all started with the Frenchman Joseph Monier, who became the inventor of this building material. Further, builders improved his initiative, and today we have a material that cannot be avoided in residential and non-residential construction. Reinforced concrete slabs come in various types and have special markings.
Advantages of reinforced concrete slabs
Even before they appeared on the construction market, the slabs gained enormous popularity. Unlike old methods of flooring (for example, wooden beams), they have a number of advantages:
- water and fire resistance;
- moisture resistance. At any level of moisture, they do not crumble or swell, like the same wooden beams;
- durability. They can last tens, hundreds of years;
- they are not affected by changes in temperature;
- don't rot.
They have a relatively low cost and ease of installation, which attracts the attention of builders. The range of applications is varied: from floor coverings to road laying.
Return to contents
Kinds
There are 4 types of reinforced concrete slab:
- Road - they are used to create complex road junctions and are used to build highways. They are used at construction sites, airfields, and training grounds, as there is a constant load due to heavy equipment. Very strong and do not lose their quality even at a temperature of -40 degrees. If they are used, the road becomes more reliable. The release is made in two forms: with non-tensioned and prestressed reinforcement. The density of concrete is about 2200-2500 kg/m3. The top of the slabs is corrugated. More often, slabs with dimensions of about 1750x3000 mm are used.
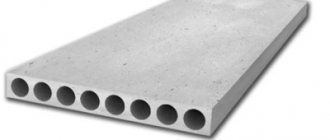
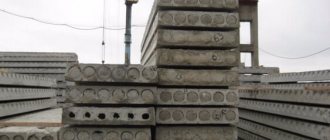
- Hollow - chosen for floors between floors. The thickness is 220 mm, the length can vary from one and a half to sixteen meters. The size of the overlap can be selected individually, but on average it is one and a half meters. Thanks to the voids in the slabs, sound insulation is provided between floors and heat is retained. Voids can be either round or oval. It is thanks to the holes that the weight of the slabs is reduced, which makes installation easier in the future and the overall structure of the building is better preserved. The ceilings are attached to hooks on cables and raised to the required height using cranes. Thanks to modern technologies, it is possible to produce large batches in a short time, and they are made from different grades of concrete. Floors can withstand weights of up to 1250 kg/m2.
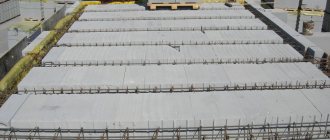
- Flat - this is the load-bearing part of the floors in panel-type buildings. Can withstand impacts up to 7 points. Concrete for the manufacture of flat products is used in light, heavy and medium density. Prestressed and non-prestressed reinforcement is also used; the materials must meet the standards established by the state. To join reinforced concrete slabs together, bevels are used on the edges, which prevents shifts. Flat tiles are transported in stacks, and to prevent damage, special spacers are placed between them. The slab machine is loaded or unloaded using a crane.
- Reinforced concrete slabs - coverings - are used to complete the construction. In most cases, this happens when builders are unwilling to spend the money to install a full attic. Next, the roof is covered with a special finishing material (for example, bitumen or liquid rubber). It is a known fact that such building materials come into excellent contact with thermal insulation materials. Such coatings can be divided into two types: ribbed and standard, which depend on installation methods. Ribbed ones make the roof more durable, and thanks to the shape, the finishing process is simplified. Tensile reinforcement, which is most often used in production, ensures durability. With the help of a metal mesh, which is covered with a layer of concrete up to two centimeters, the reinforcement is protected from the negative environment. This product is transported using trucks and used at the end of the construction of the complex. Possessing high strength and reliability, they are suitable for all types of construction.
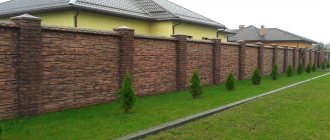
A separate group should include slabs for fences. Heavy reinforced concrete is used for their production, and such a fence becomes a strong barrier. The surface can be flat or faceted. Most often, such fences are made for permanent enterprises. There are also reinforced concrete parapet slabs that protect parapets from atmospheric exposure and destruction.
Return to contents
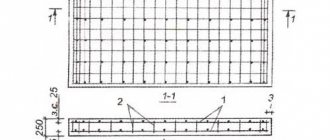
Concrete slab laying technique
Scheme of reinforcement of a monolithic slab.
In order to make a foundation like a Swedish slab with your own hands, the first step is to select a site. At the same time, with the help of stakes and ropes, you need to clearly mark its boundaries. The next stage is preparatory work. Swedish tiles will require a certain shape, for this you need to make formwork. Using a shovel or tractor, the top layer of soil is removed to a depth of at least 30 cm. The depth can be very varied, even reaching 2 m. This is possible if you plan to organize a basement floor in the building. After this, the surface is carefully leveled. Straight beams can be used for this.
Then you need to make additional recesses under the main and internal walls. They will be needed for the construction of stiffeners. The construction technology of the Swedish slab includes laying geotextiles. A layer of sand about 15 cm deep is laid on it. Geotextiles do not allow moisture to pass through, but retain sand. The sand is compacted tightly. It is this layer that serves as the location and location of all the main communications. It contains a sewerage system, water supply, and electrical wires. Their outlets rise upward and are protected from clogging. Then all communications are covered with sand; a layer of slag can be used. The sand is compacted and watered.
Marking
It seems to many that the slabs are absolutely the same and without any differences. In reality, everything is different. The marking has an alphanumeric structure. Let's look at the example of marking PC 57-15-8T. What do these symbols mean:
- PC – name of material/type of board used. In our example, this is a floor slab with round voids.
- 57 – 15 – product size, which is indicated in decimeters. Ours is a design measuring 5682 mm (length) by 1500 mm (width).
- 8- indicates the permissible weight that this building material can support. In our case it is 800 kgf/m2.
- T – grade of concrete. In the example it is heavy. The composition can be light or medium.
In some cases, the marking may indicate thickness. For example, P-27-15-12-8T, a solid reinforced concrete slab having a length of 2690 mm, a width of 1490 mm, a height of 120 mm and withstanding a load of 800 kgf/m2, made of heavy concrete.
Return to contents
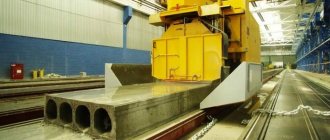
Production technology
There are a number of steps to make a reinforced concrete slab:
- Creation of preliminary drawings and calculations, these are considered the basis for pouring slabs (or design).
- Installation of a frame made of reinforcement in a specially prepared form. Most often these are ribbed rods, which are pre-tensioned when heated.
- After the frame has been formed, the rods are secured to the side equipment, and then concrete is poured using rolled products, a conveyor line and stands.
- Next, the finished composition is sent for heat treatment, where the slab gains 60% strength.
- When the product has become strong, remove the fasteners that were used to secure the reinforcing bars.
- Compressing rods along their length.
As a result of these stages, a design required in form and application is obtained.
Return to contents
Made from concrete blocks
Production of concrete blocks for use in fence construction
An alternative to type-setting panels are concrete fence blocks - hollow rectangular elements. The surface of a concrete block can imitate any type of masonry. Its dimensions can vary widely, as can its weight.
Compared to a panel fence, a fence made of concrete blocks around the house will be more durable, but will require the creation of a strip foundation. Its installation will take much longer than when using panels, but still less than when building a monolithic concrete fence. In all other respects, these two types of fences are quite equivalent.
You can also make concrete blocks yourself. Most often, the method of semi-dry vibrocompression is used for these purposes. It allows you to get the job done in the least amount of time. You will need:
- a collapsible form, the inner surface of which has a certain texture. You can buy the form in a store or make it yourself;
- a steel liner that will be placed inside the mold;
- concrete, which contains M300 cement (1 part), a mixture of sand and fine gravel (3 parts), water (you just need to moisten the mixture with it so that it becomes wet);
- any technical oil;
- trowel, hammer, wooden stick.
All surfaces of the liner and mold that will come into contact with the concrete are lubricated with oil. Next, the form is placed on a flat base (on a vibrating table, if there is one) and an insert is placed inside it in the center. The space between the liner and the inner surface of the mold is filled by a third with the mixture. It is compacted on a vibrating table or using a wooden stick, the end of which is struck frequently with a hammer. So gradually, in several stages with mandatory compaction, the entire form is filled.
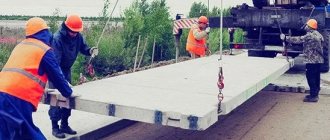
Installation of reinforced concrete products
To install a reinforced concrete slab, it is necessary to follow the rules and regulations, which will allow the structure to be used for a long time. First of all, a scheme for laying reinforced concrete slabs must be drawn up. A calculation is being prepared (for example, to begin with, the design of a house is being considered), which indicates how many slabs are needed for coverings. A crane arrives at a pre-prepared site and carefully begins laying the products according to the pattern, without breaking the bottoms. Construction workers need to step aside to avoid accidents if the cable breaks. The crane must withstand a weight of at least three tons. You need to select two people who will guide and correct the styling. If the work is done correctly, the calculation is made accurately, then the crane driver is given a signal, and he removes the slings.
For example, products are placed on walls, and in order to hold them tighter, the support on the wall should be 12 centimeters or higher. It is advisable to use a solution to strengthen the slabs. Precast concrete slabs can also be joined together with a mortar belt to ensure durability.
Return to contents
How to make concrete panels with your own hands
Forms for pillars and panels
Casting of panels is carried out using the vibration casting method. The highest quality cement, sand, gravel, and sometimes dyes are used for these purposes.
To work you will need:
- a special matrix that can be bought in a store or made according to individual sketches. Matrices can be made of PVC, ABS plastic, fiberglass, polyurethane. Each option has its pros and cons. It is also important when choosing a shape to remember that the thicker the panel, the stronger it is (but also weighs more, and is more expensive, and so on);
- mesh with 5*5 cm cells for reinforcement. Keep in mind that the strength of your fence will largely depend on its quality, and don’t skimp;
- concrete mixture of cement (1 part), sand (3 parts), crushed stone (2 parts), plasticizer, water. The mixture should have the consistency of thick sour cream;
- release paste or any technical oil for lubricating the mold;
- vibrating table If it is not available, replace it with a regular table, and create a vibration effect using a vibratory grinder or, as a last resort, simple blows with a hammer on the surface.
The DIY casting process itself is extremely simple. You just need to prepare the mixture, pour it into the matrix, after lubricating it with paste or oil. Also, don’t forget to place a reinforcing mesh there and vibrate it. Next, the form for a concrete fence should be covered with polyethylene for more uniform hardening. Wait until the concrete reaches the required strength.