Replacing the mixer is required if it breaks down, during a major overhaul, or if you want to update an outdated model. Installing a plumbing fixture for mixing hot and cold water is not particularly difficult. You can do this work yourself without inviting paid specialists. In order to understand how to install a faucet in the bathroom, you should read the instructions and take into account all the subtleties of installation procedures. The correct sequence of actions and accuracy when performing work will ensure long and trouble-free service for the water supply faucet in the bathroom.
Distance between pipes when connecting a mixer
Before installing the mixer, pipes with cold and hot water are installed, and the outlets are supplied to the place where the mixer is attached. At this stage, you should know the distance between the pipes when connecting the mixer; this parameter should be selected based on SNIP standards and usually it is 15 cm, with a deviation of 1.5 cm in both directions.
The size of the pipe connected to the mixer is half an inch, and based on this parameter, if necessary, you should take care of additional adapters
Installing a faucet in a bathroom, shower or kitchen has its own characteristics and nuances that should be paid attention to even at the initial stages of pipe installation
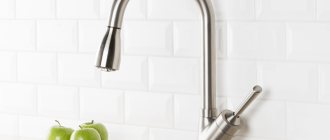
Installing a faucet in the kitchen
When installing a faucet in the kitchen, as a rule, the pipes are laid open and are not walled up in the wall, so it is not so important what the distance between the pipes is on the faucet; it can be easily adjusted if necessary. If the pipes are mounted into the wall, in order to avoid the use of additional elements and adapters, it is worth taking care of the distance between the pipes in advance so that the installation of the mixer goes without any problems.
It is worth buying the mixer in advance and installing the pipeline based on the given dimensions.
Installing a faucet in the shower
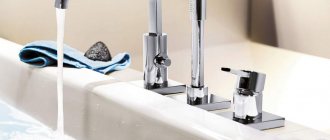
The most suitable for these purposes are faucets designed specifically for showers. Until recently, in this role they used one mixer for both the sink (pictured) and the shower, which did not require large expenses.
A distinctive feature of this type of faucet is the absence of a bath-shower switch, which gives a more modest size of the product. Recently, there has been a tendency to use special mixers that allow you to reveal the functions of the shower at 100%. Installation of such a mixer can be done openly or some parts can be hidden during the installation process for a more aesthetic appearance; it is worth noting that with hidden installation, when repairing the mixer, problems arise with access to failed parts. Shower faucets designed to connect special shower heads or hydromassage elements are becoming increasingly popular.
The distance between the pipes of the mixer in the shower during hidden installation is selected especially carefully, since the complexity of installing the mixer itself will depend on this
When installing the mixer, you should take into account the height to which the mixer should be raised. Also, you should not ignore the height at which the shower head is located, which affects the quality of the mixer’s operation.
Before purchasing a mixer, check all the necessary indicators with a sales consultant.
Installing a faucet in the bathroom
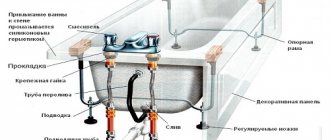
Often, when installing a water supply system to connect a faucet in a bathroom, the pipes are walled into the wall, this saves space in the bathroom. With this type of installation, the distance between the pipes for the faucet in the bathroom plays a big role.
A small error when installing the mixer can be eliminated with the help of eccentrics that come with most mixer models. After setting the required distance between the pipes for the mixer using eccentrics, all the necessary elements are connected.
When choosing a faucet, pay attention to the weight of the product; as a rule, faucets made of silumin are cheaper and lighter in weight than brass ones, but they are usually inferior in quality. When installing the mixer on the threads of the products, it is necessary to wrap tow or full tape, this will prevent leaks during operation of the product
If you carefully choose a faucet and strictly follow the installation tips, then every owner can do this type of repair.
How to change the faucet in a shower stall with your own hands
Faucet replacement sequence:
- move the shower set or box away from the wall to ensure free access and eliminate obstacles;
- on the back panel, unscrew the linings or screws - depending on what the device is attached to;
- at the rear, the water supply and hoses are turned off using the mode switch;
- fix the store accessory and connect it in the same way.
Installing a new device is not difficult; it is important to approach the procedure responsibly and follow all the rules. It is also recommended that you read the instructions that come with the device before the process. Taking into account all the nuances, you can avoid plumbing breakdowns and unforeseen situations.
Calculation of mixer installation height
Consider the distance from the edge of the container to the tap
Despite the established standard distance between the faucet and the bathtub, equal to 200 mm, the faucet is installed at a distance that is convenient for users.
When calculating the installation height, the following requirements must be observed:
- Before installation, you need to try on the mixer at the intended installation location to determine the position in which it will be convenient to use this plumbing equipment.
It is imperative to take into account the distance from the edge of the container to the faucet when there is a need to turn the faucet from the bathtub to the sink
When calculating this parameter, it must be taken into account that the size of the sink is usually 850 mm. In addition, when calculating in this case, you need to take into account the length of the tap itself and the distance between it and the sink
When turning the faucet, it should be in the middle of the sink. The installation location of the mixer should be in places convenient for its fastening, without destroying existing structures and finishing elements. For example, you cannot install fasteners on the edges of the tiles, because they may crack in these places.
The location of the mixer may be affected by additional elements included in the system or installed at the request of the owners.
For example, if there is a water softener or the apartment owner wants to install the faucet higher, so that he can wash his hair.
Approximate parameters for installing mixing equipment can be taken according to the values indicated in the table:
| № | Name of equipment | Installation options |
1 Sink tap 250 mm from the edge of the sink 2 Sink tap 200 mm from the edge of the sink 3 Washbasin tap 200 mm from the edge of the washbasin 4 Bathroom mixer 800 mm from the floor 5 Common bath and washbasin fittings 1000 mm from the floor 6 Shower fittings 1200 mm from the floor
Faucet height above bath
The shower mixer is installed at a height of 120cm from the bottom of the shower tray.
If the pipes are laid before installing the bathtub (and this happens in most cases), THEN the height of the bathtub should not be considered as simply the height of the assembled bathtub.
Almost always, during installation, you have to place stands under the legs of the bathtub, often 8-10 centimeters high.
This is necessary to ensure a sufficient slope of the sewer, otherwise there will be serious problems later. If you measure the height of the faucet 20 cm from the side of the assembled bathtub, and then install it 10 cm higher, the faucet will be at a height of 10 cm from the bathtub. This is not very convenient to use, plus some faucet models simply cannot fit into this gap.
So, it’s better to go to the store and decide on the model of the mixer and its dimensions, or better yet, buy it right away.
If the faucet must also be turned onto the sink, then its spout must pass freely over the sink, so you also need to decide on the sink in advance. For reference, the height of the sink ranges from 820...850 (mm).
We add the height of the mixer X to it. Do not forget about the gap between the “gander” and the sink. In this case, it is better to err on the larger side than on the smaller one.
In this case, the vertical axis of the sink faucet is not made along the axis of the bathtub, but is shifted towards the sink.
Height of standard bathtub assembly: 540…580 (mm)
The height of the faucet also varies: from the minimum to 20 cm. Quite a lot of customers have asked to install the faucet higher, so that they can wash their hair without getting into the bathtub.
It is also advisable that the mixer does not touch the tile border.
It looks more beautiful this way. In addition, most curbs have a textured surface, and the mixer reflectors will not be able to adhere tightly to them.
The border, in turn, should extend above the sink. So we have at least 1 meter of height from the floor.
If the mixer is installed along the side wall of the bathtub, then it is better to place it not in the middle of the bathtub, but with a 1/3 offset towards the feet. This will make it more convenient to sit in the bathroom and use it.
I will add that the standard distance between the hot and cold water outlets is 150 mm along the axes.
Hot water is always on the left - this is a European standard, and all faucets are marked accordingly.
The exception is some faucets with a built-in thermostat.
The installation depth of the fittings is flush with the tiles. Although, to be sure, it is better to immediately buy a mixer, assemble it and measure it. It happens that the fittings need to be recessed a little into the wall.
;
It’s a good idea to use a plumbing template—a level—to install fittings. It allows you to set the water sockets strictly along the axes and level.
Installation of an onboard mixer
Onboard mixer
The position of the mixers is very convenient, makes it easier to adjust the water temperature, and looks impressive. Can be installed not only in sinks, but also in bathtubs. The only mandatory condition is the presence of special technological holes. When it comes to ceramic sinks, they all come with pre-drilled holes. How to make holes in an enamel and acrylic bathtub?
Instructions for drilling holes in an enamel bathtub
The work is quite complex and requires certain skills and care. To make holes you need a marker, a drill bit for ceramics and glass, a screwdriver or drill, tape and plasticine.
Step 1. Mark the location for the hole. Cover it tightly with tape, it is advisable to have a transparent one.
Step 2. Make a small bead from plasticine, approximately 0.5 cm high and with a diameter twice the diameter of the hole. Glue the plasticine firmly to the bathtub, pour water into the resulting container.
Step 3. Using a metal drill, drill a Ø 5–6 mm hole in the center of the mark. The speed of the drill or screwdriver is small, maximum 500 rpm. Do not press the drill with significant force. Drill carefully, the thickness of the bathtub is small, do not allow a situation where the drill suddenly falls through and the chuck hits the bathtub.
Step 4. After a through hole is formed, the water will leave. Clean the surface near the drilling site. Make a small cap out of plasticine and secure it under the hole on the back of the bathtub. The fixation must be airtight and retain water.
Drilling a hole for a faucet
Step 5. Insert a Ø 10–12 mm drill and increase the diameter of the hole. Remove the tape with the collar and clean the surface of chips. Remove the bottom cap.
Finished hole
The main hole is ready, now you need to work with a nozzle made of rubber and emery cloth, the chuck speed is maximum, the pressure is minimal. Make markings for the faucet elements and cover the surface with transparent tape. It will minimize the risk of enamel chipping. The slower you work, the better the edge of the hole. If there are small chips, it doesn’t matter, they are covered by the surfaces of the mixer and become invisible. All work will take approximately 2–2.5 hours.
Video - Drilling an enamel bathtub
Tips for Drilling Holes in an Acrylic Bathtub
There are no problems with this material. You must use a crown of the appropriate diameter. It is recommended to make a plasticine rim for cooling; otherwise, if the technology is violated, the edges may melt or change their original color.
Important. The tool must be in full working order; beating of the chuck is not allowed. The crown is sharp, do the work slowly.
The holes are prepared, you can begin installing the mixer on the side.
Step 1. Buy the necessary mixer, read the instructions for use.
Mixer kit
Devices with small spouts are mounted on the sides of the bathtub and sink; another hole may be needed to install a shower. It is advisable to do the installation work during the installation of the bathtub, in this case it will be possible to hide the pipelines.
Step 2. Insert the mixer into the special hole, select its optimal position.
Markings for on-board mixer
Drilling an acrylic bathtub
Step 3 . Place a rubber gasket and a special shaped washer on the bottom of the mixer, and tighten with a clamping nut. First tighten the nut all the way by hand, and use a wrench to tighten it no more than half a turn.
Step 4: Connect the hot and cold water connections to the corresponding pipes.
Installing a faucet on the side of a bathtub
Step 5. Check the tightness of the connections using a piece of paper.
Install the faucet in the sink in exactly the same way.
How to remove an old faucet
Old faucet
Such situations arise often; ignorance of the dismantling algorithm or incorrect actions can cause unpleasant situations. Dismantling old faucets must be done skillfully, and each device must be approached individually.
- Inspect the faucet carefully. Pay attention to the size and function of all nuts. Prepare the appropriate plumbing tools.
- Carefully remove scale and hard oxides from visible threaded parts. If there are a lot of them, then you can use solvents.
The product is a scale remover.
- Try unscrewing the nuts with a wrench, do not use much force. If the nut is stuck, make half a turn in the opposite direction, and then unscrew it again. Due to such actions, the thread is freed from various solid particles.
- If the mixer is very old, it is recommended to wet all threaded connections with a solution before dismantling and repeat the procedure several times. A toilet bowl cleaner is excellent for these purposes; it contains hydrochloric acid. Hydrochloric acid dissolves most solid deposits.
Technical fluid VD-40
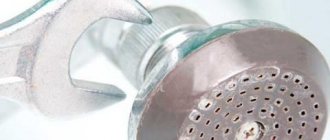
- Check the condition of the eccentrics. If they are working and the diameter of the thread matches the new faucets, then you should not touch them. This will make the dismantling process much easier. In addition, the old eccentrics were made of high-quality alloys; their physical strength properties are much superior to those of today.
How to disassemble a wall-mounted valve mixer
During dismantling, situations arise when part of the eccentric thread breaks off and remains in the pipeline fitting. Let's say right away that the situation is very unpleasant, in some cases you will have to change the fitting. And it can be located under plaster and ceramic tiles - you need to trench the wall, and then return it to its original state.
The eccentric is broken, how to unscrew it?
But don’t rush to hammer the walls, try to unscrew the broken thread of the eccentric. To do this you need to prepare a special device. The internal diameter of the eccentric is approximately 15 mm; the device should be the same width. It can be made from sheet steel 1–2 mm thick. Cut a piece of it 3–5 cm long and 15–20 mm wide. Use a grinder to sharpen one end into a triangle. This end must be inserted into the inlet hole of the broken off threaded part.
Next, the twisting process begins. If you have an assistant, great. Let him gently tap the device with a hammer and press the sharpened end against the part of the eccentric remaining in the thread. At the same time, use a wrench or pliers to unscrew the broken element. If you do everything correctly, then in 90 cases you can solve the problem. You don’t need to make a lot of effort; do all the work slowly and very carefully.
Video - Removing the old mixer
Video - How to change a faucet
Recommendations for installing the mixer
Hot and cold water taps must be located at a distance of at least 15 cm from each other.
For convenient and high-quality use of the mixer in the bathroom, sink, sink or above the washbasin, it is necessary to take into account the experience of specialists, their practical experience and the requirements, wishes and comments of consumers. Their brief description consists of the following points:
- If you plan to install the mixer along the side surface of the container, then you do not need to try to do it strictly in the middle. In this case, it is better to install it closer to the feet - this will make it more convenient to use while taking a bath.
- The cold and hot water supply points must be at a distance of at least 150 mm from each other, and the final installation of all equipment must be done after testing the system and finding the optimal installation option.
- The correct installation of mixing equipment is influenced by the design of the mixer, which can be installed on the bathtub itself, a wall, or a specially made elevation.
- The designs of many bathtubs already include places for installing faucets, the installation of which is quite easy if you comply with the requirements attached to the instructions for the equipment.
- When installing mixing equipment on a wall or a special podium and supplying water to it, you will most likely need the help of qualified specialists.
Regardless of the type of mixer and the adopted method of its installation, it is necessary to comply with the requirements of the installation instructions in compliance with the technological sequence of work operations specified in them. See all the nuances of installing a faucet in the bathroom in this video:
The installation height of the faucet depends on the shape and size of the equipment itself, the bathtub, sink, sink, as well as on the parameters of the room in which these plumbing installations and fixtures are installed.
Types and brief characteristics of mixers
You need to have this information in order to select exactly the device that meets the operating conditions and preferences of the owners.
Bathroom faucets
They vary in installation location and engineering design; they can be fixed on walls, sides and racks.
| Illustration | Description |
Wall mounted | Installed in bathtubs and showers, they can have a long, medium or short spout. |
Onboard | They are mounted on wide sides of bathtubs and have a small spout. |
On special racks | An exclusive option, the leg may have additional decorative elements. They are rarely used and only when creating prestigious interiors. |
In principle, they can be single-lever or double-valve.
| Illustration | Description |
Single lever | Modern models use one lever to set the water pressure and temperature. They have a ball regulation mechanism. |
Two-valve | Classic models. They are distinguished by high reliability and maintainability. |
Modern innovative faucets can automatically maintain the water temperature within specified limits - saving hot water consumption and increasing the comfort of taking water procedures.
Another type of faucets - the water is turned on by sensors. Advantages: increased hygiene and ease of use. Disadvantages - high cost, difficulty in connecting.
Touch taps are a luxury accessible to everyone
Touch mixer power supply
Bath faucets
Shower faucets
There are no fundamental differences. The only peculiarity is the small linear dimensions. Some models do not have a spout, only a flexible shower is installed.
Faucets with shower
Basin faucets
Distinctive features are a short spout, mounted only on the sides. You can choose any options regarding the mixing method and pressure adjustment.
Interesting models of washbasin faucets
After choosing a specific model, you can begin installing the devices. We will not dwell on specific types of mixers based on the principle of operation; this does not matter for installation. We will only tell you about the stages of installation on walls and sides.
Basin faucets
Determining installation height
The height of the faucet above the bathtub is mainly determined by the user independently. However, experts have also developed certain standards based on many years of research.
Standard parameters
The standard for installing a faucet over plumbing equipment is determined by SNiP 3.05.01-85. According to this document:
- the recommended height of the mixer above the bath is 200 mm;
- the height of the crane from the floor must be at least 800 mm;
- if the equipment is installed in a shower stall, then the recommended height is 120 mm from the bottom tray.
Recommended installation height of the mixer
An exception to the rule is the installation of a mixer in medical institutions. If the equipment is installed above the bathtub, the recommended height is 110 cm from the floor. If the installation of taps is carried out in a shower stall, then the mixer is located at a height of 120 cm - 150 cm from the floor.
Self-calculation
The standard faucet installation height is purely advisory and is used only in public institutions. Each user can determine for himself the most optimal installation height. When calculating the parameter, you must be guided by the following rules:
- immediately before installing the faucet in the shower, try on the equipment and check the comfort of use and aesthetic appearance;
- Installation of a shower over a bathtub should be made in accordance with the height of the majority of users. The minimum distance - 120 cm is determined from the bottom of the font or from the tray installed in the shower stall. The height above the floor is determined in accordance with the installation height of the bath;
Determining the installation height of the shower
- if the mixer is used for both a bathtub and a washbasin located nearby at the same time, then the minimum installation height of the plumbing equipment must be increased by 5 centimeters or more;
If the bathtub and washbasin are located at different heights relative to each other, then it is recommended to install the faucet at a height of 25 cm from the sink.
Location of bathtub and washbasin taps
- Determining the location and, accordingly, installation is required after the bathroom has been fully secured, since during the work it may be necessary to level the font to the horizon, which will lead to raising the plumbing equipment and, as a result, reducing the distance between the bathtub and the mixer;
- The installation height of the mixer is also affected by the need to install additional equipment, for example, an aerator or a sprayer with several operating modes. Any device installed on a crane will increase the length of the equipment and reduce the working space;
Bath faucet with aerator
- The mounting height of the mixer tap is also determined depending on the location of the finishing material on the wall. It is not recommended to attach it to tiles, as the fixation will not be durable. Installation, as a rule, is carried out at the junction of the finishing material or the laying of the curb;
It is additionally recommended to calculate the distance between the mixer and the edge of the font
It is especially important to determine this parameter when using a bath mixer and washbasin at the same time. To make the calculation, you will need to determine the overall dimensions of the washbasin, since the water should fall almost into the center of the bowl, the length of the jig of the mixing equipment and the distance between the bathtub and the sink.
For more information about the installation process, watch the video.
The most common mistakes when choosing a faucet location are too high a height and placing the equipment close to the edge of the bathroom.
In the first case, additional noise will occur when water is supplied. In the second situation, it will not be possible to wash large items.
If you take into account all the rules and recommendations of specialists, then independent installation of equipment will be correct and as effective as possible.
Installation of eccentrics
The best option is if the water sockets are installed at a distance equal to the center distance on the mixer. Experienced plumbers recommend thinking about this at the stage of installing water pipes and using ready-made water sockets; all that remains is to secure them level.
A ready-made water socket will help you install the mixer evenly.
If the distance between the pipes is less or more than required, you can center the eccentrics. It is better to do this before winding. At the same time, remember the number of turns and orientation in space; it is better to mark it with a marker. This operation can cause you to lose a level. If the mixer deviates slightly from level, it will not be very noticeable. But moderation is important here. The device must not be installed too crookedly.
Next, the eccentrics need to be wrapped with FUM tape, flax or thread and screwed in. The part should fit tightly with force. First, screw in the eccentric by hand, then with an adjustable wrench.
It is better to check the tightness of the connection immediately rather than after installing the mixer. To do this, you will need plugs with rubber gaskets. You need to screw them onto the eccentrics and open the tap; if water does not drip, then the connection is reliable and you can continue working.
Plugs for checking thread tightness.
Before installing the mixer itself, it is necessary to seal the gap between the tiles and the water sockets with silicone sealant. This is important so that water flowing down the wall does not get behind the tiles.
Areas that need to be sealed.
Eccentrics can have different lengths; it is best to choose them so that after installing the mixer, the eccentric thread is completely hidden under the body of the device. If necessary, the eccentric can be shortened with a grinder, but only on the side that is screwed into the pipeline.
For some types of eccentrics, a hex wrench may be useful; instead, you can use a bolt with a suitable head and a gas wrench.
Types of eccentrics.
Location of the tap in the bathroom according to SNiP
Despite the fact that each consumer independently decides at what height to install the faucet above the bathtub, regulatory construction acts specify very specific requirements for the installation height of faucets. According to documents SNiP 3.05.01-85, the following standard is specified - the distance from the bathtub to the tap must be at least 200 mm, and the height of the mixer in the bathroom from the floor must be at least 800 mm.
However, according to regulations, the recommended parameters can be changed. So, for hospitals and medical institutions, in order to install a faucet, you need to measure the distance from the floor and install the tap at a standard height of 1100 mm. And in the shower version, the distance between the mixer and the bottom of the container should not be less than 1200 mm and no more than 1500 mm.
Modern builders and plumbers, especially in private households, do not comply with SNiPs, and the installation height of the bathtub mixer depends on the personal preferences of the consumer. In this case, specialists adhere to the installation rules specified in the instructions for the device.
Installation Standards
When deciding at what height to place the mixer above the bathtub, keep in mind that this device is included in a single water supply system, becoming its integral element. The comfort of using the bathtub and the service life of plumbing fixtures depend on the correct installation of equipment and compliance with installation standards. Requirements for installing faucets in bathrooms or toilets are regulated by SNiP 3.05.01-85. The regulatory documentation specifies the following installation parameters:
- The height of the faucet above the bath. This parameter indicates the distance from the top edge of the bath to the mixer; it affects the noise level during the collection of water into the washing container and the amount of splashes that occur during this process. If the distance from the bathtub to the tap is small, then it will be inconvenient to wash large objects in the bathtub, as well as to collect water in buckets or other containers.
- The height of the bathroom faucet from the floor. Also, the standard for installing plumbing equipment also regulates the distance between the faucet and the floor of the bathroom. The pressure in the plumbing system and the water pressure in the tap depend on this parameter.
Installation methods
The height of the bathroom faucet is not the only installation parameter that needs to be taken into account during installation. A large range of plumbing equipment makes installation methods more diverse
The most common options are:
Installation errors
Experienced craftsmen note that an incorrectly chosen installation height can have a significant impact on the comfort of using the bathroom
Therefore, it is so important during installation to take into account the recommendations of SNiP according to the type of device and the manufacturer’s instructions. Often inexperienced craftsmen make the following mistakes:
- If you install the device too high from the bathtub, then when water is drawn into the washing container, a loud noise is created, which can be very annoying for household members. This effect is especially pronounced if the bathtub is thin-walled.
- Too large a distance from the bottom of the bowl to the taps leads to the fact that the stream during the fall is divided into streams, forming splashes. Because of this, the finishing of the walls in the bathroom and the surface of the furniture often suffer, and humidity increases.
- Due to the too small distance between the edge of the bowl and the tap, it may be difficult to wash large items.
- Due to the installation at a high height, the mixer may be inconvenient to use. Often, people reach for a faucet and slip on a wet, smooth surface, which leads to serious household injuries.
How to correctly calculate the installation height
Practical experience does not contradict the standards and instructions for assembling faucets - the mechanism is installed at a distance of 20 cm from the tank. But the practice is not strict regarding the location of the tap - you can install it at a suitable point, at a convenient distance from the bath or shower, you just need to follow the main points when installing:
- before installing the device, measure it according to its elevation and evaluate the convenience of the position of the tap;
- if we are talking about a shower, then the device is installed at a height of 120 cm from the shower. The presented figure must be measured from the bottom of the container;
- A frequent mistake in calculating at what distance the device should be installed above the container from the floor appears because the height of the bowl is taken as the reference point even before installation. This is wrong - because sometimes you need to provide a bathtub with great durability by installing special stands. It may turn out that the calculated installation height of the structure above the bathtub of 20 cm at the end of the work will turn out to be 10 cm, the faucet will hang above the capacity, and will not only look ugly, but will be very inconvenient to use. Moreover, not all types of cranes can be placed at such a small distance;
- installing the structure from the end of the container is a parameter that must be measured and calculated first. This is especially necessary when the tap is supposed to be turned from the bathroom to the sink and vice versa. Remember about the size of the sink - it is usually more than 850 cm. And to this parameter you need to add the size of the mechanism itself, as well as the distance between the gander and the sink - here it is better to make an error on the positive side than on the negative side;
- The installation indications are also influenced by additional parts that are often supplied with current faucets - for example, water softeners, as well as the desires of those who will use the bathroom, many who want the faucet to be installed above the container at a high elevation - so they can wash their hair, without the need to take a shower or draw large amounts of water;
When installing the mechanism on the wall, you must try to avoid attaching the structure to the tile, to its edges - a rigid application of material will not allow the faucet reflectors to be firmly fixed. Therefore, the height of the installation of the crane can be firmly connected with the height of the curb (it is usually laid at a height of a meter from the floor).
How to calculate the installation height of a bathroom faucet
When calculating at what height to install the faucet above the bathtub, a distance of 200 mm is taken as the standard, but practical experience shows that the installed faucet can be located at any distance convenient for the consumer. However, during the installation calculation process, several basic rules should be followed:
1. Before installing the faucet in the chosen location, place it against the wall, try it on in height, see if the spout will interfere, and evaluate the convenience of this arrangement of the device.
2. Remember that if you want to install a shower stand with a mixer, then the distance from the bottom of the bowl in this case must be at least 1200 mm.
3. Many people, when calculating the final height of the faucet above the bathtub, make a serious mistake, taking the height of the bowl itself before its installation as a starting point. This is wrong, because in order to ensure greater stability of the bathroom, sometimes you have to resort to placing special supports. As a result, it may turn out that the mixer height of 20 cm, verified by previous calculations, will “fall” to 10 cm, as a result the faucet will hang over the bowl, which will not only spoil the appearance, but will also create some inconvenience during use. In addition, not all models of plumbing faucets can be installed at such a short distance.
4. It would also be a good idea to take measurements and calculate the distance of the mixer from the edge of the bathtub in advance. This will be useful for those who in the future plan to turn the faucet from the sink to the bathtub and back. Consider the height of the sink itself; models with a height of less than 850mm are extremely rare. To these parameters you need to add the dimensions of the mixing mechanism and the centimeters between the sink and the spout - here it would be better to make a plus error than a minus one.
5. The volume of installation is also influenced by additional accessories that are often included with modern faucets - for example, water softeners, as well as the wishes of those who will use the bathtub; some prefer that the faucet above the bathtub be located a little higher - this allows you to wash your hair without filling bath with water or take a shower.
6. When installing the faucet on the surface of the bathroom wall, you must avoid attaching the structure to the tiles, namely to its borders - in this case, the rough texture of the material coating will not allow the faucet reflectors to be tightly fixed. Because of this, the installation height of the crane is often related to the height of the curb (most often this is 1 meter from the floor level).
Follow these simple rules, and your mixing device will serve you for a long time.
How to Actually Calculate Faucet Installation Height
The height of installation of the mixer in the bathroom used in practice corresponds to the recommended standards for the placement of water fittings in a given room. Typically, the distance to the location where the faucet is attached is determined based on the standard 20 cm. However, strict adherence to the rules in the location of these devices is not practiced in practice. You can install the faucet in the place where you like, but before you finally fix it, you should definitely try it on in height and evaluate how convenient it will be to use.
Installing a floor-standing faucet in the bathroom
If we are talking about a mixer for a bathtub with a shower, then the height of its installation should be determined from 120 cm, and the measurement should be taken from the bottom of the container. Some home craftsmen, when calculating what the final installation height of the faucet above the bathtub should be, often make mistakes because they take into account the height of the bowl that has not yet been installed. This is incorrect, because during the installation process it is often necessary to place stands under it (their thickness can be 8-10 cm). After all, if you do not provide a slope, then draining the water will be difficult. And it may happen that the value you calculated, equal to 20 cm, upon completion of all work will decrease to 10 cm. Such an “overhang” of the faucet over the bowl will not look aesthetically pleasing, and it will be inconvenient to use. In addition, some of the models simply cannot be secured so low.
You also need to measure and calculate in advance the value of such an indicator as the distance from the corner of the bowl to the place where the water socket is attached. This must be done if you plan to supply water to both sanitary containers, turning the spout in the desired direction. And keep in mind that the sink is always located higher, at a distance of 85 cm from the floor. To the value of this indicator we must add the size of the device itself and a few centimeters for the free passage of the gander over the sink. Agree, a “plus” error will not be as dramatic as a “minus” one.
Floor standing bathtub mixer
The location of the water collection point will also depend on the availability of additional accessories, which are often equipped with modern plumbing fixtures, for example, a water softener. In addition, when thinking about how to install a faucet in the bathroom, you need to take into account all the preferences of future users. Some people want the faucet to be located higher, then it will be possible to wash their hair without getting into the shower and without filling the bathtub. Others, on the contrary, like it when the water outlet is located as low as possible, because the longer the path of falling water, the more noise and splashes it makes. And this, of course, makes them uncomfortable. And it will not complicate taking a shower, because the length of its hose is enough for the tallest person.
When installing the device on a tiled bathroom wall, try not to attach it to tiles, much less to curbs. It is very difficult to achieve a tight fit of the faucet reflectors to the rough coating of the cladding. Therefore, you should choose the location of the plumbing fixtures taking into account the curb laid on the wall (usually it is laid a meter from the floor). In order for the decorative cup to completely cover the connection point, the inlet fittings must be recessed into the wall, and their ends must be flush with the front surface of the tile.
https://youtube.com/watch?v=-wfy1e6wm0A
How to choose the right bath faucet
You need to choose faucets from models of popular manufacturers and, if possible, do not skimp on them. The more expensive the water intake fittings are, the longer they will last. Due to poor quality, the device quickly becomes unusable, and the most common problem with cheap faucets is corrosion. You need to select it according to the following criteria:
- Weight. A high-quality mixer has dense walls. It shouldn't be easy.
- Material. Reliable devices are made of brass, cheap ones are made of silumin (silicon + aluminum). Brass ones are heavier and bulkier.
- Size and technical characteristics. Selected based on personal preferences and the location in which the model will be installed. When choosing, the fixation to the side of the bathtub or wall, the length of the hose and faucet spout, and additional fasteners in the kit are of great importance.
Final Tips
Before starting installation, it is recommended to completely assemble the mixer and study its operation. It is necessary to understand not only the principle of operation, but also to find weaknesses. And every device has them.
A high-quality mixer should be easy to use
Examine all the elements of the mixer, try to disassemble it. You will need these skills if repairs are needed. If the water in your area is hard, do not install a faucet with plastic cartridges and a swivel arm. After wet joints dry, solid calcium forms on them; over time, the thickness of the layer increases, the nose cannot be turned, it is tightly “welded” to the body.
The best faucets will serve you for at least 10 years if installed and used correctly.
Buy a mixer “by weight”; the heavier it is, the more reliable the design, the better the alloys used by the manufacturers. But there is one nuance here - heavy mixers need to be mounted only on durable eccentrics. Unfortunately, kits with high-quality mixers often come with weak eccentrics. As a result of prolonged exposure to a static load, they develop microcracks, which increase over time and become the cause of leakage. Types of bathtubs and their sizes and prices can be found here.
Overview of the main manufacturers
Useful tips for the correct placement of taps in the bathroom
Recommendations for the location of faucets in the bathroom
If you plan to install a tap on the side of the water tank, do not try to position it clearly in the center. It is better to move the structure closer to your feet - in this case, it will be more convenient for you to use the mixing device when taking a bath.
The distance between the hot and cold water outlets must be at least 150 mm in the axial directions, and the installation depth of the fittings is best determined after a complete trial assembly of the structure.
The easiest way is to correctly install a mortise mixing device - the modern design of bathroom bowls provides special technological holes for installation. If the holes were cut out on the container yourself, then the process still remains quite simple - the mixer is connected to the water pipes by connecting flexible water supply pipes to it. The tap itself is secured in the hole with a fastening nut, sealed with washers and special gasket material. The water supply tubes are secured in a similar way. If their size is a little longer than necessary, simply cut off the excess and sand the cut areas.
Installing a faucet on a stand or podium without professional help will be quite difficult - you will need a specialist not only in plumbing, but also in construction work, since when installing such a structure, you need to connect water pipes directly to the stand.
Work order
If you need to install a water socket in an old and not very strong wall, it is necessary to carry out preparatory work. To do this, all weak areas and seams are cleaned, defects are eliminated, and weak spots are strengthened with a special cement-based compound. Pipe installation begins only after the wall has completely dried.
Most mixers have a center-to-center distance of 150 mm. This length should be taken into account when installing water sockets. But there are faucets that are slightly narrower or wider than others. There should be no problem here, since almost any mixer can be installed on a standard outlet using an adjustable offset of the eccentrics.
On a flat wall, holes for fastening water sockets are marked and drilled (at least 3 pieces, regardless of the material of the system). A small rubber gasket 3–4 mm thick and 7 x 7 mm in size must be glued to the installation surface on the back side of each water socket.
After this, the water sockets are attached to the wall, leveled according to the recessing depth and slope using self-tapping screws. The resulting gap between the installation platform and the water socket is filled with thick polyester putty.