One of the main components of a chandelier or lamp is an electric socket, through which not only the light bulb is fixed and current is transmitted to it, but also the lampshade and other elements for controlling the light source are attached.
The design of the product consists of the following elements:
- cylindrical body;
- internal threaded sleeve;
- ceramic insert;
- a pair of brass or copper contacts;
- bottom;
- fasteners.
The design of the product body eliminates the possibility of electric shock when screwing in the light bulb. This is due to the fact that when the central contacts touch, the base is inside the cartridge.
Types of cartridges
Structurally, several types are distinguished according to the method of attaching the light bulbs:
- Screw with thread (the incandescent lamp is screwed inward). Suitable for standard incandescent lamps.
- Pin (fastening is carried out using fastening tabs or pins located on the outer surface of the product). Used for fluorescent, halogen and LED lamps.
The material used to make the case is:
- The use of lamps with a power exceeding the maximum value leads to overheating of the socket with subsequent deformation.
Ceramics. Products made from this material are resistant to high heating temperatures. It should be noted that during prolonged use, exposure to temperature causes the sleeve to stick to the base, as a result of which, when replacing the lamp, the sleeve is unscrewed along with it. Their cost is quite high.
- Heat-resistant plastic. The products are intended for incandescent lamps with a power of no more than 60 W. Consequently, the use of lamps with a power exceeding the maximum value leads to overheating of the socket with subsequent deformation. During use, the original color is often changed. They have a short service life (due to prolonged exposure to high temperatures). Low price.
The principle of operation of all cartridges is identical, the only differences are dimensions and design. All products are designed for operation in a 220V power supply.
The following types are distinguished (the value “E” with a number is used for designation, where the number corresponds to the diameter of the sleeve):
- E5 and E10. They are rarely used due to the consumption of a considerable amount of current with insignificant light output.
- E14. The product is small in size, used with decorative lamps, so-called “minions”, of identical diameter. Their power does not exceed 60 W.
- E27. The most commonly used threaded socket designed for use with conventional, energy-saving fluorescent, LED and halogen lamps.
- E40. This type is intended for street lighting, where powerful large lamps are used.
Types and markings of chandelier sockets
Currently, several options are used, each with its own characteristics. Two main groups can be distinguished: screw (marked with the letter E) and pin (marked with the letter G).
Requirements for threaded cartridges are specified in GOST R IEC 60238-99. There are three main types:
- E14, also called “Minion”. Diameter 14 mm, designed for connecting low-power incandescent lamps and almost all LED light sources, since they consume little electricity. The main option in most modern chandeliers and lamps. The maximum permissible power is 440 W at a load current of up to 2 A.
Technical requirements for pin-type cartridges are specified in GOST R IEC 60400-99. All products of this type must comply with the technical regulations from the document. Main varieties:
- G4, G5.3, G6.35, G8, G10. All modifications of the pin cartridge have the same design, only the distance between the contacts differs. The number indicates the distance in millimeters, which allows you to navigate the design features. The maximum power of the light bulbs should not exceed 60 W, the load limit is 4 A.
For suspended and suspended ceilings, they produce a special cartridge GX53 of small thickness, which is suitable for limited space.
Chuck selection
When choosing this product, first of all, you should give preference to a well-known and trusted brand.
To avoid difficulties with fastening, the design of the new socket must correspond to the type of product previously used in the chandelier. It is better to give preference to a ceramic product due to its reliability during operation.
Basic selection requirements:
The cost depends on many factors, in particular the type of product and its manufacturer. Today the market provides consumers with a wide choice of both Russian and imported brands.
The price range is quite large:
- Type E27:
- domestic production – 25 rubles;
- China – 45 rubles;
- Italy – 130 rubles.
- Type E14:
- domestic production – 20 rubles;
- China – 20 rubles;
- Italy – 90 rubles.
- For halogen lamps:
- domestic production – 15 rubles;
- China – 30 rubles;
- Italy – 150 rubles.
Plastic holders: as the most common
Different types of plastic that are produced and used for the manufacture of cartridge cases have differences in properties. Therefore, they are marked with a marking corresponding to the maximum power of the lamp, which can be screwed into the holder and used for a long time when switched on. In this case, the cartridge heats up and gradually collapses due to a change in the properties of the plastic. But this process, if the parameters of the lamp and holder from a reliable manufacturer match, lasts longer than the warranty period. You can extend the life of a plastic cartridge by lowering its heating temperature.
The most popular domestically produced plastic holders of the E14 and E27 series are standardized in accordance with GOST 2746.1-88. Their design differences are related to the method of fastening. He can be:
- suspended from the ceiling (by the nipple), including with threaded washers (one or two);
- with a straight flange that allows you to fix the cartridge on the surface;
- with an inclined flange for surface mounting.
Attaching the holder to the nipple
Fastening the socket with washers under the lampshade or lampshade by the nipple
If the lampshade is attached to the support, washers can be used to mount and secure the holder to the lampshade.
Chucks for mounting on various flanges
Holders for attaching to a nipple may have minor differences in the assembly method. In some models, clamps are made for this instead of threads. This method of connecting the parts of the cartridge provides more freedom in choosing connecting wires. If the wires attached to the socket fit tightly into it, the threaded connection will require the holder part to rotate around the wires. This will affect the insulation of the conductors and the load on the terminals, which is highly undesirable. A detachable connection with clamps does not have this drawback.
Therefore, it is not necessary to use terminals with threaded connections. It is much easier to disassemble a cartridge with knife-type terminals and connect wires to them. But the detachable connection is less durable. It can be damaged when disassembling the holder. Before disassembling, protruding parts must be pryed off, for example, with a screwdriver. And over time, plastic can become brittle due to heat and break off during disassembly. Therefore, clamps require more careful handling, especially in chucks that are used for a long time. Due to the required elasticity of the clamps, their material can only be plastic or metal. If the clamp breaks off, a “prosthesis” made of a metal plate can be installed instead.
Refurbished holder with clamps
How to change the cartridge in a chandelier
Replacing the product is not particularly difficult and does not require electrical experience, but it does require caution and compliance with all rules and recommendations.
Reasons for replacement
First of all, the need to change the product is indicated by the lamp not glowing when the switch is activated. This is due to rusting of the sleeve or central contact. As a rule, stripping does not have a positive effect.
Replacement is required if:
- The presence of cracks and other defects on the outer part of the body;
- When internal elements come into contact, a short circuit occurs.
- Exit from the operating state of the terminals.
- The service life is 5 years.
Required materials and tools
During the work you will need:
- replacement product;
- terminal blocks for connecting electrical wires;
- indicator mini-tester (screwdriver);
- insulating tape;
- construction knife with replaceable blades.
Step-by-step replacement guide
Replacing the socket in a ceiling lamp is carried out in the following sequence:
- Turn off the input circuit breaker in the apartment or entrance electrical panel to de-energize the room. This work should be carried out during the daytime.
- The chandelier switch is turned off if turning off the input circuit breaker is unjustified.
- Using a mini-tester, check the absence of voltage on the terminal block, through which the wiring of the lighting device is connected to the power line inside the apartment. This is necessary due to the fact that the switch is mounted on the phase line before the chandelier. In this way, the presence or absence of potential is checked at all terminals.
- Unscrew the fasteners securing the lighting fixture. If it is attached to a hanging hook, remove it from it.
- Using a screwdriver, disconnect the terminal fasteners and remove the electrical wires from them.
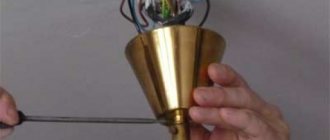
- Place the chandelier on a table or other convenient surface , disassemble it, removing all the shades and unscrewing the bulbs so as not to break them.
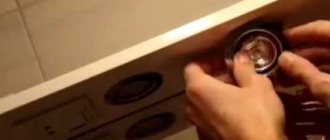
- Unscrew the socket from the ceiling lamp housing. To do this, you must first unscrew it, then disconnect the wires from the ceramic insert. After this, remove the lower part. It should be noted that fastening is carried out in various ways depending on the design features of the chandelier.
- A new one is placed in place of the dismantled cartridge , after which it is clamped.
- The lighting device is installed in its original position , and a wire from the ceiling is pulled through the hole in the housing, supplying current.
- Before connecting the chandelier, you should strip the wires. To do this, use a knife to remove a layer of insulation 5-7 mm long.
- To tie the electrical conductors, first unscrew the clamping parts of the terminals on the ceramic insert , then place them inside and firmly fix them with a screwdriver.
- The insert is placed in the internal recesses and fixed with a cylindrical body.
- The final step is to attach the ceiling lamp to its original place.
Safety precautions when dismantling lampshades
Whenever there is a need to unscrew and disassemble the lampshade, you must remember and be sure to follow the safety rules when working with electrical appliances:
- Do not allow any work when the power supply is turned on in the room. Check during operation that there is no voltage on the wires.
- Do not touch exposed wires.
- Wear insulating gloves.
- Do not twist the wires together; use special terminals for this.
- Particular attention to unmarked wires - an error in connection will lead to a short circuit and possible failure of the entire electrical distribution system in the house.
Removing any lampshade is not difficult if you know how it is attached. If it sits on a thread, we unscrew it, on bolts, we loosen the bolts, on antennae, we compress them. The main thing is to remember safety precautions, act confidently, but carefully and accurately.
Checking work
After attaching the chandelier to the ceiling, a lamp is screwed into the socket and electric current is supplied. If the replacement work is done correctly and all contacts are connected, the lamp will glow.
If, after replacing the product, any problems are detected (flashing of the lamp or its burnout), their causes should be found. Alternatively, it could be an incorrect connection of the current supply wires.
The most common malfunction of lamps is burnt out lamps. This is especially true for cheap incandescent bulbs. Such a breakdown can be easily fixed, but if the problem is in the cartridge, it is more difficult to deal with. You need to figure out how to notice the malfunction and replace the failed cartridge. Sometimes this is required not only in connection with repairs, but also to improve the functioning or aesthetics of the chandelier.
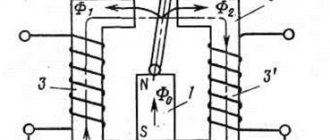
Design and principle of operation of an electric screw chuck
The design of this cartridge is quite simple: it consists of three elements - a cylindrical body, where the sleeve with Edison thread is located, a ceramic liner and two copper or brass contacts for supplying electric current to the lamp. The connection of wires to the cartridge itself can be carried out in three ways: a screw connection to a ceramic insert with brass contacts mounted on it, using terminal blocks and a screwless method (for plastic cartridges).
Important! When connecting wires to the socket, the phase must be connected to the central contact of the light bulb base. With this connection, when screwing in and unscrewing the light bulb, the likelihood of electric shock is minimal.
Figure 2. Diagram of a threaded cartridge
Lamp socket with E14 base, the second most common lamp socket after E27. It is especially often used for miniature incandescent lamps, which are popularly called minions. Lamps for this socket come in various shapes - spherical, candle-shaped, drop-shaped, pear-shaped. Depending on the type of surface, they can be transparent, mirror, or matte. The power of lamps for such sockets is usually limited to 60 Watts.
The E27 screw chuck is the most common of all screw chucks. It should be noted that in addition to incandescent lamps, this socket can also be used with other types of lamps, such as LED, halogen, compact fluorescent, gas discharge and others. Such omnivorous nature of this cartridge allows you to painlessly switch, for example, from an incandescent lamp to an economical and durable LED lamp, just by unscrewing one lamp and screwing in another.
Screw sockets for E14 and E27 sockets, depending on the material from which they are made, come in three types: ceramic, plastic and carbolite.
Figure 3. Types of threaded cartridges
When should you change light bulb sockets?
The main reasons why it becomes necessary to replace the socket in a chandelier are:
- crackling or buzzing in the lamp when turned on;
- flickering of a lamp, including a new one after replacement;
- the smell of burning;
- lack of contact (the light does not turn on).
Most often, a malfunction occurs due to a manufacturing defect. Other factors may be high humidity, voltage surges, sudden temperature fluctuations, etc.
Important! Breakdowns often occur due to overloads if a light bulb of too high power is inserted into the socket.
How to replace the cartridge in a chandelier yourself
By means of a socket in a chandelier, the light bulbs are screwed in or inserted into the lamp.
The device ensures contact of the lamp with electric current.
Often, cartridge failure is manifested by a lack of electricity at the light source. That is, if after replacing the light bulb the light does not appear in the chandelier, it is worth checking the socket first.
Both the elimination of minor faults and even the complete replacement of the socket in the chandelier can be done independently without special professional skills.
Design
Electric cartridges have different designs, depending on the series of the device. Most often in everyday life, a model range equipped with Edison thread is used. It has a cylindrical body, inside which the remaining elements are contained.
Core
This is the bottom part of the cartridge, which has a wide base and holes for fastening. It may have various bushings and inserts in its design for removing the wire. Most often it is attached to the body of the chandelier.
Screw clamp
They look like threaded mounting strips. With their help, electric current is supplied to the core.
Pressure contact
Made of brass, most often it is a non-separable part of the device. Also responsible for supplying current to the light bulb.
Thread
The presence of a thread allows the use of various types of lamps - both incandescent and LED. It is most universal in the e14 and e27 cartridge models.
Frame
The cartridges can be equipped with a body made of various materials. Their characteristics and application possibilities depend on this. To figure out how to remove the cartridge from a chandelier, you need to know its design, including the type of housing. The following varieties are available for sale:
- Ceramic - made of heat-resistant ceramics, thanks to which they are able to withstand heating to high temperatures. As a rule, they are non-separable. Screw terminals are built into the base, with which connections are made. This is done using a regular screwdriver. The disadvantage of such cartridges is low strength.
- Plastic ones are unable to withstand high temperatures, which is why they are much inferior to ceramic ones. Designed for use with light bulbs no more powerful than 60 W. The design is usually collapsible, the contacts are located in the inner part. Connection to the lampshade is made using self-clamping terminals.
- Carbolite - characterized by increased strength and resistance to heat. They have a collapsible design; connection to the network occurs using brass contacts and a screw connection.
How does a regular cartridge work?
The electric cartridge is an integral component of any lamp and chandelier. The element is used for detachable connection of light bulbs and other lighting sources to the wiring. All types of cartridges function on the same principle, and their differences lie in dimensions, design features and material of manufacture. As a rule, the device body contains markings indicating all technical parameters.
A compact socket marked E14 is most often installed in lighting fixtures with decorative light bulbs of the appropriate diameter. Since the power of such light bulbs does not exceed 60 W, in addition to the chandelier, additional devices are used in the premises. This solution allows you to provide complete and comfortable lighting.
The universal screw type E 27 is suitable for screwing in standard light bulbs, as well as halogen and energy-saving fluorescent light bulbs. Thanks to their universal characteristics, there is no need to take into account a number of nuances when choosing and purchasing light bulbs.
The E40 variety is suitable for large high-power lamps that can illuminate spacious rooms. In terms of dimensions, this type is larger than the others, which is visually noticeable and simplifies the choice for beginners.
The G9 pin socket is used for mounting halogen and LED lamps. Based on the material of manufacture, elements marked G9 are classified as follows:
- Ceramic. This option is protected against short circuits and is recommended for use in devices that need to be turned on for a long time. When exposed to temperatures for a long time, ceramics retains its strength and does not crumble.
- Plastic. The difference is light weight and preservation of integrity when dropped. As a rule, plastic varieties are used for LED lamps.
Compared to other models, the cartridge marked G9 has a number of advantages. These include:
- the design of the G9 variety allows for mounting with screws or threads;
- the element is protected from moisture, dirt and dust;
- the presence of a spring mechanism ensures strong fixation of the lamp;
- heat-resistant braiding in ceramic versions eliminates the possibility of burning and can withstand high temperatures;
- It is allowed to use an adapter for light bulbs with other models of sockets.
The G4 marking indicates the possibility of using auxiliary lighting systems when installing. The main areas of use include decorating space, installing in suspended ceilings, installing lamps in specialized models, decorating signs, organizing illumination of paintings.
Screwing light bulbs into G4 bases does not require professional skills. A light source with pins is placed in a special cartridge. You can make sure that the light bulb is selected correctly if the dimensions and cross-sectional shape of the protruding elements match the existing holes.
Bayonet element
The bayonet model is equipped with guides and fastening slots for placing and fixing the light source. To hold the lamp you need to insert it and turn it to the side.
Step-by-step replacement instructions
To replace the cartridge, you will need the following:
- terminal blocks designed for connecting wiring;
- insulating tape;
- screwdriver;
- construction knife with several different blades;
- indicator mini-tester;
- new base for replacement.
The replacement process is carried out in several stages. Below are step-by-step instructions using the example of a model for base E14.
Turning off the light on the dashboard
This needs to be done first. Since power outages are necessary, replacement should be done during daylight hours. If the breakdown occurs in the evening or at night, you can try to disconnect only the ceiling line. As a rule, wiring has such a distinction. If the input circuit breaker is turned off, the room is completely de-energized. In this case, you will need to either reschedule the repair until the morning, or arrange for illumination with a flashlight. If there is an internal shield, shutdown is performed by pressing one button.
Important! Turning off the power should only be done at the panel, and not at the switch that controls the lamp.
Disconnecting wires
According to electrical installation requirements, the circuit breaker must be installed on the phase line, in front of the chandelier. Then you need to check the voltage at the terminal block of the lamp with an indicator.
Remove the chandelier from the ceiling
It is possible to replace the structure without removing the chandelier, but such work will be very difficult. Moreover, you only need to disassemble the mounting of the lampshade to the socket. Most often these are terminal blocks or twisted wires. The procedure is as follows:
- It is necessary to remove all fragile components from the chandelier (shades, glass decorative elements, light bulbs).
- Next, disassemble the decorative cap and unscrew the locking screw that closes the wire twist under the ceiling.
- If the lamp is secured with a hook, it is necessary to disconnect the wiring and move it in different directions, after which the structure can be removed.
- If there is a strip under the decorative cap, use a screwdriver to loosen the bolts.
- After removing the chandelier, three strands of electrical wires will become accessible. You need to spread them apart and apply a layer of electrical tape to each.
Note! On suspended and suspended ceilings, lamps are usually secured with disposable fasteners. It is recommended not to remove them when disassembling the lighting fixture.
Disassembling the lamp
This is necessary to gain access to the cartridge. There are numerous designs and shapes of chandeliers, but each of them is equipped with a shade. It is this that needs to be completely removed to facilitate further work.
Security measures
To change the design yourself and avoid an emergency, you must follow safety regulations. They include the following:
- It is forbidden to carry out replacement without first de-energizing the network. If you neglect this rule, the risk of an accident is very high.
- If damage to the wires is discovered during dismantling, be sure to replace them (partially or completely).
- If the new cartridge is equipped with lead wires, you need to pay attention to the material they are made of. It is likely that the device has an aluminum conductor, and the lighting device is connected using copper (or vice versa). To connect such wires, it is advisable to use specially designed terminal blocks. As a last resort, it is permissible to carefully twist it and wrap it securely with electrical tape.
- Before removing the chandelier, you need to sketch or photograph its installation diagram. This will avoid incorrect connections and fasteners (which could cause a short circuit).
- Be careful when working with glass and ceramic elements. To avoid cuts, it is recommended to use gloves.
You can replace or repair the socket in an electric chandelier yourself. This does not require any special skills. It is enough just to follow safety precautions when handling wiring and electrical appliances, as well as perform consistent actions. When assembling the structure after completion of the work, you should responsibly approach the process of connecting conductors. If the work is completed without errors, the electrical appliance will emit light again.
When a light bulb burns out in the house, and replacing it does not bring results, then it is necessary to change the socket in the chandelier. This breakdown is the most common; it can be easily fixed with your own hands without special knowledge and tools.
Repair of electric cartridges
Electric chucks E and G series differ from each other and in terms of maintenance capabilities. If the first ones are repaired, in most cases, if the second ones break down, the socket in the chandelier needs to be replaced.
Repair of dismountable electric socket E27
The cause of frequent burnout of light bulbs and changes in brightness during operation of lighting fixtures may be a breakdown of the electric socket. This is also indicated by extraneous sounds heard when the product is turned on.
Unscrew the light bulb from the base and inspect the internal cavity of the element. If you find blackened contacts, you need to not only clean them, but also figure out the root cause. Often the formation of blackening is preceded by poor contact at the point of contact between the cartridge and the electrical wires.
Disassemble the socket, inspect the wire connections (pull lightly on the cable to ensure it is securely seated) and clean the contact plates. In some cases, for better contact, the plates need to be bent in the direction of the light bulb base.
There are often cases when, when trying to unscrew a light bulb from the socket, the bulb comes unstuck from the metal base and the latter remains inside. If this happens, disassemble the housing and bottom to remove the light bulb base. Another option is to take a pair of pliers with insulated handles, try to grab the edge of the base and turn it counterclockwise. Be careful not to damage the internal threads of the chuck.
The main reasons for replacing the cartridge
It is necessary to replace the socket in a chandelier not only due to manufacturing defects, but also due to design features. If the lamp is closed, the temperature inside the bulb increases greatly. Sometimes this leads to melted wiring.
In old sockets, contact with the lamp deteriorates over time. This can cause frequent breakdowns of the latter. After incandescent lamps burn out, sometimes fumes form on the terminals, which leads to poor contact. Simple cleaning rarely brings positive results, so the holders are replaced.
Another reason for replacement is the desire of people to switch to energy-efficient LED lamps. Since they are produced with a smaller base, there is a need to change the seat in the lamp. All holders have an identical design. They differ only in the diameter of the thread.
Reasons for replacing the cartridge
Work should be carried out in the following cases:
- If the element has visible damage or cracks. Another option is that the plastic has become brittle and is showing signs of severe overheating.
- When the light is turned on, the light bulb does not work, despite the fact that everything is in order with it. This is usually due to severe corrosion of the center contact or threaded part. There is no point in cleaning them; it is wiser to immediately install a new part.
- The lamp base is stuck and will not come out of the threaded part. It is better not to apply excessive force, as the light bulb may burst. It's easier to change the cartridge.
- Damage to the terminals, their deformation, which leads to short circuits in the structure.
By the way! Experts advise changing cartridges for preventive purposes at least once every 5 years. This will prevent any problems and ensure the safety of the equipment.
How does a standard cartridge work?
To replace the cartridge in a chandelier, you need to understand its structure and types. For a 220 V network there are 3 types of this product:
Depending on the lamp base used in the lamp, you need to choose one type or another. There are such parts of the cartridge:
- cylindrical body;
- bottom;
- ceramic liner.
The first contains a sleeve with an Edison thread into which the lamp is screwed. The holder body, depending on the model and purpose, can be made of the following materials:
Older models were made of ceramic. But at high temperatures they crumbled and deteriorated. Nowadays the most common material is plastic. Products should be used according to the labeling, since exceeding the power of electric lamps during prolonged use will lead to a change in the properties of the plastic, and consequently, to its destruction. Even in modern ceramic cartridges, contacts burn out at high temperatures.
The most common types of holders used in everyday life are E14 and E27. Their differences lie in the method of fastening, which can be:
- suspended from the ceiling with threaded washers;
- with a straight flange, which allows you to fix the product on the surface;
- with an inclined flange for surface mounting.
When the lampshade is attached to the support, washers are used to mount and secure the holder. The holders for attaching to the nipple have clamps instead of screws. This allows you to connect conductors without violating their insulation. Although threaded holders are easier to use, they are less durable. This is especially true for cartridges used for a long time.
How to properly disassemble a cartridge
When the threaded part is stuck, the easiest way is to unscrew the socket sleeve along with the light bulb, this will significantly simplify the process. If everything is in order with the unit, you need to inspect the fastening and carry out work based on its type.
Most often, you just need to unscrew the top part from the base, then carefully pull out the ceramic liner and disconnect the wires. There are options with a nut that presses the element to the lamp body; it is carefully unscrewed after disassembly.
In new lamps, there is an option when the socket is pressed with a screw on the side; in this case, you just need to unscrew it and remove the part out.
From the video you will learn: How to properly disassemble a plastic cartridge with a snap-on lid.
Replacing the cartridge with your own hands is easy. The main thing is to follow safety precautions and carry out work according to simple instructions. It is important not to damage the seat in the chandelier; there are no other restrictions.
Source
The process of replacing a cartridge in a chandelier
To replace the socket in a chandelier, you must perform the following steps:
- turn off the electricity supply at the panel;
- disconnect the electrical wiring;
- remove the chandelier from the ceiling;
- disassemble the lamp;
- remove the faulty cartridge;
- set whole;
- After replacement, install the chandelier.
Turning off the light on the dashboard
Before replacing the cartridge, you need to turn off the power supply to the room. To do this, the circuit breakers on the panel that provide power to the ceiling chandelier should be switched to an inactive state.
Disconnecting wires
All wires that supply power to the lamp are insulated and routed to each side to prevent a short circuit.
Removing a chandelier from the ceiling
To remove the chandelier, you need to take an indicator screwdriver and a stepladder. First you need to check the switch to make sure there is no electricity. Then do the following:
- remove such fragile parts from the chandelier as the lampshade, decorating elements, lamps;
- unscrew the fixing screw and the cap that covers the wire connection under the ceiling;
- if there is a hook under the hood, the wires are disconnected and separated to prevent a short circuit;
- if there is a strip, loosen the clamping bolt or, if necessary, remove it.
The chandelier is fixed to suspended ceilings using disposable butterfly fasteners. Therefore, it is advisable not to remove them. Otherwise, you should purchase a new mount in advance.
Disassembling the lamp
Most chandeliers have 3 or 5 seats for lamps directed in different directions. If the chandelier was working before dismantling, you need to wait until the temperature inside the lamp drops. First, the lampshades are removed. In old-style chandeliers they are fixed by means of threads. Others are held on with special latches or small bolts.
A plastic threaded ring is most often used to secure this element. It is screwed onto the external thread of the holder, so you need to be careful not to break the insulating part of the element.
Removing the cartridge
The method of dismantling depends on the type of structure and method of fastening in the housing of the lighting fixture. Most often, fixation occurs with several bolts. The part is removed immediately or it is disassembled, removing the core. In this case, remove the cartridge latch, take out the middle part and disconnect the wires. The last thing to unscrew is the nut securing the housing.
When the screw terminal socket needs to be replaced, the screws should be loosened and the wires pulled out. Some E14 type holders have terminal blocks. In most cases, they are disposable, so they need to be replaced.
The ceramic cartridge is dismantled as follows:
- the plates are pressed out from the central contact;
- unscrew the bolts from the plate, which is located opposite the ceramic base;
- The central terminals are bent to the level of the side contacts.
Sometimes it is enough to clean ceramic products and tighten the terminals to ensure high-quality operation of the cartridge.
Installing a new cartridge
To replace the socket in the lamp, you need to connect all the wires. They are wound through the bottom of the product, and rings are formed from the stripped ends. They are installed on screws, fixed with plates and clamped. If fastening is carried out using terminals, the bare ends of the wires are twisted so that the hairs do not bristle. Then they are inserted into the clamps and clamped with pliers.
The phase is supplied to the central contact.
It is important to ensure that the fasteners are secure to prevent short circuits or poor contact. Otherwise, the wires will begin to spark, which will lead to damage to the cartridge.
Additionally, check whether the cross-section of the wires matches the power consumption of the chandelier. Upon completion of the replacement, the lamp is assembled and installed in the reverse order.
How to replace the cartridge in a chandelier yourself: step-by-step instructions
How to change the socket in a chandelier:
- turn off the electricity in the apartment (it is necessary to turn off the current on the panel, since the switch can open not the phase, but the zero contact);
- remove the chandelier if necessary, if there is no other way to replace the failed cartridge;
- unscrew the light bulbs and disassemble the lamp;
- pull out the visible part of the cartridge, disconnect the wires;
- remove the ceramic base;
- replace the cartridge;
- Assemble the chandelier in the reverse order, install it in place and mount all decorative elements.
Each step must be performed observing safety precautions.
Turn off the light on the dashboard
Before replacing the cartridge, be sure to turn off the electricity supply to the room. To do this, you need to put the machines on the dashboard into an inactive state.
It is strictly prohibited to work when the electrical wiring is not de-energized, otherwise there is a risk of electric shock!
Disconnect the wires
The wires necessary to supply voltage are connected to the chandelier. They need to be insulated and separated in different directions, otherwise a short circuit may occur.