Why change Soviet machine guns to modern ones?
I was planning to do some electrical upgrades in the apartment, but I was afraid that an unintentional short circuit might cause a big bang. After all, even manual shutdown occurred with great effort and creaking. Therefore, I was not at all sure that during an overcurrent the shutdown would occur exactly where it was needed - inside the circuit breaker (AB).
In addition, according to generally accepted safety standards today, installing AVs with a rated current of 25 A on socket groups (and even more so on lighting groups) is bad form. Indeed, with such AB ratings and wire cross-sections (2.5 mm2 for aluminum), the operation of electrical wiring becomes unsafe. The wires will be periodically heated, which will not improve their properties.
In addition, the condition of the twists, terminals and contacts over more than 30 years of operation is, to put it mildly, not very good. In other words, the transition resistances in this electrical installation are increased uncontrollably.
And this, in turn, leads to a low short-circuit current, which I recently measured using improvised means. The current in the apartment turned out to be very low - about 170 A. Why low short-circuit current is dangerous, read my other article.
There were no plans to change all the wiring, so to increase safety, it was decided to install new AVs with lower ratings.
A few more links if the topic is interesting.
- Everything about the characteristics of circuit breakers, with examples and GOST standards.
- How modern circuit breakers work from the inside.
- Everything related to the installation of machines and other devices
- All articles about power supply - meters, generators, stabilizers, etc.
How to remove a machine gun from the rack
Almost all modern modular machines are mounted on a DIN rail. It may differ in size and profile, but the principle of installing any switching devices on it is the same.
Locate the U-shaped eyelet on the bottom of the switch. Insert a small flathead screwdriver into it and pull down.
If you have a two- or three-pole circuit breaker, an RCD or a differential circuit breaker, there may be two such eyes. Each of them will have to be pulled back.
Next, without removing the screwdriver, use it as a lever to make a slight upward movement and release the lower part of the machine from the Din-rail.
Then lift the machine body itself up and completely remove it from the fasteners.
It seems that everything is simple and elementary, but in the cramped conditions of a small switchboard, all these fragile eyes often break. This is not a problem on old switches, but a new one is worth taking care of.
Another caveat is that some of the lugs are spring loaded. Once you pull the screwdriver out of them, they immediately come back.
This is especially inconvenient on two and three-pole models. You have to show miracles of dexterity.
In addition, the above-described dismantling is easily carried out on single machines or devices connected both from above and from below using a regular single-core wire. But there are switches that are located inside the whole assembly, powered through the so-called phase comb.
This is a very convenient and reliable thing that all electricians have been using for a long time. So, if you need to change the machine in exactly this row or chain, you will have to unscrew all the contacts, all the switches where this comb goes.
Then pull it out and only after that dismantle the desired switch. You won't be able to do this any other way.
If you have an old-style machine gun, which is tightly attached with threaded screws directly to the metal base, then the main problem here will be related to unscrewing these same screws.
Over a long period of time they may rust. Therefore, stock up on WD-40 in advance. You may even have to drill them out.
Instead, it is recommended to install already modular instances. To do this, attach a short piece of DIN rail to self-tapping screws, and then install a new switch on it.
Changing Soviet machine guns
I don’t know why it was necessary to install 25 A automatic machines in Soviet apartments? This only added more work to the electricians from the housing office during short circuits, who were present quite often, and there were no particularly powerful consumers in the apartments. What did you have to load this machine with in order for it to knock out? Should we include 10 refrigerators? Or several stoves? The wires will melt before this old guy can break them off!
The paradox is that there were almost no overloads (there was nothing special to load), but short circuits occurred quite often. But the AB25M automatic machine, which is discussed in the article, saves only from overloads, but not from short circuits - it simply does not have an electromagnetic release! But I got ahead of myself, let’s continue in order.
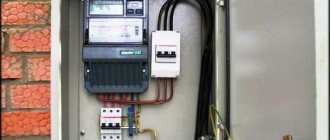
This is what the electrical panel on the landing of a standard Soviet 9-story panel building looked like over 30 years of work:
Electrical panel in the entrance of a panel house. I think this is a painfully familiar picture to many of my readers...
Closer view of the area where you will be working:
Vending machines in a panel at the entrance. Mine are top left, AB25M
Closer - the upper terminals of my machines and the “zero bus”:
Upper terminals of Soviet AB25M assault rifles
Bottom view:
Bottom terminals of Soviet automatic machines and input switch
My area of responsibility is 3 AB25M automatic machines and a batch input switch (on the left).
Please note (although many people are aware, I know) - there have been no handles on switches for many years, and this situation is everywhere. The fact is that the design is very inconvenient - to get to the machines, you need to remove the cover, and to do this, remove these handles from the switches, and to do this, unscrew 4 M4 screws (not to mention the screws holding the cover). Screws are lost, handles are thrown away, and shutdown is usually done with pliers, which does not contribute to efficiency and safety (((
Step by step guide
First of all, open the switchboard door. And we act sequentially:
- We de-energize the shield by turning off the input machine, switch or packet switch.
- We check with an indicator screwdriver to make sure there is no voltage.
- The wire going to the load must be unscrewed and set aside. If the contacts heated up and melted, there will be problems with unscrewing the screw. This is not uncommon on aluminum wiring. Cut the wires in a clean place with pliers or a side cutter, move the wiring to the side and continue dismantling. A clean place on the insulation is where there is no blackening or traces of melting.
- We eliminate the unifying comb responsible for powering the group of machines. If you remove the comb, first unscrew all the contacts of all the switches where it goes.
- For all ABs, loosen the bolts on top using a Phillips or flat-head screwdriver; you can use a universal electrician’s screwdriver with a Ph/sl or Pz/fl profile.
- After this, remove the comb. If there is a homemade jumper made from pieces of a suitable conductor, remove only a couple of jumpers that are in contact with the machine that needs to be replaced.
- We pull off the lower fastening latch (or a pair of latches if you have a three-pole device) with a thin flat dielectric screwdriver. Depending on the type of latch, it can be in the open/closed position, or spring back and close on its own.
- Pull the lower part of the switch towards you and remove it with a slight upward movement.
- Next, we replace the machine in the panel with our own hands. We start by putting the upper part on the rail, then use a screwdriver to pull out the eyelet and press the bottom of the device, snapping it into place.
- We return the comb-combiner to its place.
- We connect contacts. The stranded wires crimped with lugs are simply inserted into the clamps and tightened. To avoid deformation, bite out the wires without a tip and strip them again. Clamp the fresh conductor, but only without fanaticism. A professional torque screwdriver will come in handy at this stage.
Please note that the circuit breaker in the plastic mini-box already has a DIN rail, so there will be no installation difficulties.
Installation of new circuit breakers to replace old ones
I will say right away, responding to the claims of beauty enthusiasts. This is not Instagram, where the main thing is the picture. In my blog I show not gloss, photoshop and beauty, but real life. But in real life, anything can happen - crooked, askew, dirty, and dangerous.
Those who are spoiled by perfect Instagram pictures are definitely not for me. Come to me for real life without embellishment.
So, we don’t throw away the old AVs yet (they will be useful for the review), but we start installing the new ones from the DIN rail:
DIN rail for new machines in the panel
You can see one suitable wire (after the meter) 4 mm2 from below, and two going into the apartment.
I install new AVs, Schneider Electric Easy 9 with a rated current of 16 A and shutdown characteristic “C”:
New Schneider Electric assault rifles to replace the old Soviet AB25M
Why are there 2 wires, and the third one is wrapped with electrical tape? The third wire is intended for a powerful kitchen outlet, and is walled up somewhere under the tiles and kitchen units in the apartment. I installed the third AB, one might say, in reserve, especially since it was purchased in advance.
New Schneider machines, connection from above
Why Schneider and not IEK or ABB? I believe that 90% of the success and duration of operation of an electrical panel depends not on components, but on correct calculation, quality of installation and proper operation. This is exactly what I answer when people ask me “which brand should I choose?”
By the way, recently there was an article on the blog about how I went to Moscow at the invitation of IEK. The article is a detailed report of what was shown and told there.
Look at the ABB machine to the right with a rating of C25 - two wires are connected to its upper terminal. When the aluminum starts to burn, and this will definitely happen, bewilderment will arise: “How so, this is ABB! Probably fake!” Reasons why this terminal will light up?
- The current can be 25 x 1.45 = 36 A for an hour, taking into account the time-current characteristics and the fact that the temperature in the entrance drops significantly in winter.
- The wires are most likely not stripped and are not pulled through periodically.
I carefully clean the wires and make a loop to increase the contact area. In addition, the current through the contact (and through the wire, of course) is limited by the rating of the machine.
CS-CS.Net: Laboratory of the Electroshaman
Old automatic plugs on the dashboard
Another order has turned up, in which you can even try to write a meaningful article about how, with little expense, you can replace old Soviet traffic jams with modern machines in an old Soviet five-story panel Khrushchev building. I also changed the live input circuit breaker in the floor panel , about which I made a short review in the middle of the article.
In this version of the house there were two panels on the stairs: one for low current (TV, telephone, Internet) and the second for apartment circuit breakers that limit power and turn off meters in apartments. By the way, I’ll note a funky joke in passing: now everyone is returning to exactly this scheme: everything except one machine is removed from the staircase/floor panel, and the meter, like in the old days, is brought into the apartment, where a new panel and new wiring are installed.
In our case, it was only necessary to replace the plugs with automatic machines, since the plugs themselves had long since run out, the owner was tired of buying them, and they continued to knock them out: only 10Amps remained, which were screwed in instead of 16Amps. And the shield remained from the old 220/127 system, when two phases entered the apartment, and each had a plug. Now, with a single-phase power supply, separate circuit breakers in the zero circuit are prohibited.
So, first I examined the floor panel (unfortunately, at such moments there was no time for photos), and replaced the old AEshka with ABB, although slightly increasing the rating to C32. I hope they don't kill me for this. Or at least they will kill you quickly. In any case, this was the most important part of the work, since it had to be changed under voltage and among a bunch of old wires. I’ll try to talk about this and give some advice to those who engage in such extreme sports.
Replacing a live input circuit breaker
In any case, at the moment I’m talking about such rare cases when it’s sooooo necessary to replace the input circuit breaker in the floor panel with single-phase power supply to the apartment. There can be no talk of any replacements for industrial three-phase machines! Usually, a “household” replacement comes down to “take out a phase, insert a phase, tighten it up,” but there are a lot of nuances, the first of which - think about it!
Zero. NEVER do this if you can help it! If you can’t, look for a way to turn off the riser/shield. If this is not possible, then do nothing. But, if you are a potential suicide or do not value your life, then go ahead!
First. The most important thing: you MUST have a partner ! Or the one who insures you or knows what to do if he gets fucked! I advise you to immediately think through the work scenario, based on the worst case scenario - what your partner will do, and what you will do, for example, if something falls off and shorts out.
Second. Means of protection . Electrical protective gloves, and normal ones!
Electrical protective gloves: top view
Without Kulibinism and inventions. In the worst case scenario, a couple of rubber medical ones, and a regular construction cotton one on top. But in this case - no extreme sports and climbing with your bare hand in the shield and touching exposed wires! In this case, rubber gloves serve as at least some kind of electrical insulator, and cotton gloves somehow protect them from breakthroughs.
Electrical protective gloves: view of the fingers
Stepladder , or whatever you will be working on. It should be extremely strong, not wobble and stand absolutely straight so that your hands don’t tremble in surprise at the most crucial moment. If there is anything electrically insulating, even like a household shoe mat in front of the apartment, place it under the feet.
Third. Action plan . Think through everything down to the smallest detail - how and how you will unscrew the phase wire from the machine. Where to put it when changing the machine. How will you remove the machine, how and on what will you mount the new one (often you need to install an additional DIN rail), what tools will be needed. You need to prepare everything, lay it out nearby so that it is convenient to take, or your partner will serve it to you. Usually I come across the need to install a DIN rail. Then I inspect the shield for any holes where this rail can be screwed, or very carefully drill them with a hand plastic drill so as not to hit anything. If possible, I leave the phase wire in the old machine. If the old machine is in the way, I take out the phase wire from it, insulate it with a piece of PVC tube, additionally secure it with electrical tape, bend it and work.
Fourth. Replacement operation . Yes Yes. All this is reminiscent of a medical operation: not a single unnecessary movement, all the tools and materials are ready, let's get started. To begin with, we release the mount of the old machine, remove it from the seat or DIN rail and, holding the wires, bend it. Attention! If there are aluminum wires in the shield, be very careful! They can easily break off and, in the worst case, shorten. They must be held with the other hand.
Replaced input machine in the old panel
Next, we have some empty space around where the old machine was. We fasten the DIN rail to taste, carefully. This is one of the dangerous stages - since you can’t drop anything into the shield: a fallen screw can get on other machines and cause a serious short circuit: from particles of metal melted by the arc getting into your eyes to turning off the riser. Or something burning somewhere.
Then you need to switch the phase conductor to the new machine and/or snap it onto the rail. This stage varies for me: sometimes, if I see that the phase conductor is held firmly and does not spring or slips out behind the shield, I unscrew the old machine, remove it and immediately screw in the new one. And then I put the new machine with the wound-up phase conductor on the DIN rail.
After that, you can breathe easy, check the work, connect the contacts, make sure again that everything is fine, lay the wires and congratulate yourself on the endless luck of an asshole like you. But I repeat once again - if there is any doubt (the strength of the conductor, contacts, insulation) - it is better not to do this! The description may have turned out to be chaotic and more reminiscent of shamanism, but I repeat it again and again! Take care of your nerves and life! This is worth more than money!
Now let’s take a closer look at the entire order plate. So, the riser is three-phase, made on old porcelain insulators: the insulator is attached to the shield, on which, in turn, a plate is attached, onto which incoming and outgoing conductors are clamped under M4 screws. The riser is mounted seamlessly, which is a plus for the installation.
Old floor panel of Khrushchev
The neighbor’s machine gun, above which “ours” was, is slowly burning and melting. I tightened up my contacts - we'll see what happens. Potentially candidates for replacing the machine.
Neighbors are the next candidates for replacement!
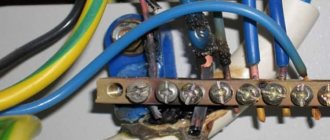
And as a bonus - the worst thing - working zero ! This is complete ahtung! A twisted aluminum drain (light white thick wires) with a bunch of waste crap (also copper) is hanging out just like that! Traces of the old terminal block are visible under it - it seems that it was on the switchboard body (let's say the zero was like PEN with some stretch in the cross-section).
THIS is a zero tire!
This is a potential candidate for burning out the twist and delivering 380 to the apartments of the lucky ones! The owners were warned - apparently, they would have to call the housing office electrician for a complete overhaul. It would be good to screw a non-insulated brass bar directly to the body of the shield using metal screws, cleaning the contact area under it. There will be a tire, and screws, and contact with the shield.
Dismantling the old apartment panel
Apartment panel with automatic plugs
After the input circuit breaker on the stairs was replaced, and I could vouch for its quality and switchability, I boldly turned it off and went to fight apartment traffic jams.
Removing traffic jams with marked lines
Old connections to traffic jams
I marked the outgoing lines, the phasing of the conductors, and began to remove the plugs and their holders, marking the ends (L, N) with colored electrical tape. I was lucky in that the ends coming from the meter were of sufficient length, which made it possible to immediately insert them onto the comb and onto the zero bar without adding or replacing. The fewer connections, the better for contact.
Marked and disabled outgoing lines
Marked incoming lines from the meter
Wall with wires (behind the shield)
The DIN rail on panels of this type fits perfectly along the top line of the holes from the fastening of the old plug holders; it was only necessary to slightly adjust one of the holes of the rail.
New DIN Rail in place of the old plugs
New machines, connection on the comb from below
The input to the machines was from below; the voltage was distributed to the machines themselves using a piece of comb, which immediately makes the installation convenient and beautiful.
New zero tire
The outgoing lines were brought under the shield, brought out from above and connected to automatic machines. The zero bus also ended up on a DIN rail - this made installation easier, but gave it a certain ugliness, for my taste in this case. I tried to lay the ends beautifully so that it looked more or less even and neat. In fact, there is one tricky mistake in the installation, which is visible to the naked eye in the photo below on the right. Try to find him - I’m waiting for angry and scary comments!
Ready panel with new machines in operation
New installation and zero bus
Replacing a doorbell
New call
I also needed to replace the doorbell, and therefore I will also write a little about the security of bells in general. Since the client lives on the first floor, their bells and buttons are often broken. In this case, the question arises of the safety of the one who breaks (although let him be shocked!) and the fire safety of the apartment in the event of a jammed bell button from the outside. Naturally, the consumption of a doorbell is so low that an automatic machine, even at 1A, will not help in principle!
Rare old transformer type bell
In the old Soviet calls, this problem was solved in an incredibly simple and harsh way. The bell had two coils that formed a transformer. Its primary winding was designed for 220 volts and was constantly connected to the network. The secondary one had (according to my guesses the idea of such a call) 6 or 12 volts and was connected to the button. There was a rotating striker inside the core.
It worked like this. When the transformer is not loaded, the magnetic field created by the primary coil is weak and is not enough to cause the striker to oscillate. If you close the secondary winding, a short circuit current flows through it, causing an increase in the magnetic field in the magnetic circuit. In this case, the striker oscillates and rings.
From the physics side, it looked like an ordinary transformer with a special gap in the magnetic core and a short-circuited secondary winding. With a certain calculation, such a transformer can operate in short-circuit mode forever. Therefore it is fireproof.
Modern calls either have an electronic circuit (good ones), which is powered by 220 volts and can also work forever (nothing will overheat or burn out), or a weak coil, powered by 220 volts and designed for short-term operation. In this case, if the button on the ladder gets jammed, the coil will overheat and burst into flames. So choosing a call is also not an easy matter, considering these issues.
PS I said that you need to take care of your nerves?! When I was changing the machine, a screw from the DIN rail kept falling off, almost between the phase insulator and the panel body. I thought I would turn grey, but everything turned out fine - the wiring obeys me! But as soon as I went out into the street - into an ordinary fucking street - in the evening darkness I fell on a shallow hole and severely sprained my leg. Take care of your nerves, gentlemen! And.. I definitely need a bodyguard!
What's up with the neighbors?
In such cases, I try to touch less wires that are not relevant to my business. Otherwise, an unpleasant incident may occur. Adding spice to the work are the curious grannies-neighbors, who strive to ask stupid questions and make pessimistic forecasts.
The neighbors' wires and automatic machines are complete chaos and inconsistency.
The lower terminals of the machine are burning
Here the contact will soon disappear completely, for the reasons described above.
View of the same machines from above. Almost untouched Soviet rarities. Twisting under PPE - total zero(((
The terminals are burning, I can’t look at this mess
Masterpiece. Zero tires. The main thing is not to touch anything!
The general working zero was done “coolly” - twisting wires of all kinds through PPE. I remembered my article about the differences between the consequences of a zero break in a single-phase and three-phase power supply network.
Please note that TDM circuit breakers are equipped with PVS3x2.5 to power new loads. This was done during a major renovation in a neighboring apartment. Despite the fact that here, too, one can pour negativity, everything is strategically correct - when the load increases and powerful appliances appear (such as an electric stove, air conditioner, boiler), the best solution is to lay a new line and connect it through a separate machine.
Replacing machines and plugs in the dashboard
Service: Replacement of machines in the electrical panel
Cost: Cost of services from 50 rubles. minimum order from 800 rub. (more details below)
Warranty: 1 year
How to order: Call, describe the required work (or the nature of the problem), indicate the desired time for the work to be completed.
AB25M circuit breakers made in the USSR - what's inside?
To be honest, I put off writing this article for a long time, until I was prompted to do so by a reader from Zen, who left a comment on the article about Crash and trash in the electrical panel of a Taganrog dorm:
– The modern ones are losing to the old Soviet ones. The only plus about the new ones is good clamps. Here the new ones win.
– In what ways do the new modern ones lose to the Soviet ones, who worked for 30 years?
- In many ways. Live parts are iron. The contacts are scanty, we haven’t seen any silver. When turned on, there is no clear and quick turn on (click). Those. the contact is made slowly, under the action of the operator’s finger, and is not thrown by a spring. It ends up burning. The arc chamber is funny and small. The distance between the contacts in the off state is also small. Not for inductive loads. The body is not thermoset plastic, but regular meltable plastic. The ebbs in it for fastening the mechanism elements are weak. Also, mechanics with plastic parts are unreliable. Already when buying in a store you come across defective ones. Switching on fails. As a result, the resource is low. In general, we saved on everything.
This hurt me, and I decided to carry out my plans, having received such a peculiar kick)
I already wrote about the disadvantages of modern circuit breakers in the article Automatic and fuse - what's the difference?
So, AB25M assault rifles. Such switches were previously used in all Soviet apartments, except that Siemens installed them in elite ones.
AB25 M Soviet circuit breakers
Isn't it very brutal?
Terminals, bottom view. The rating is very low((
AB25 25A side view of the nameplate. I wonder why the release characteristic is not indicated? )))
The year of manufacture is the same as mine. I came across 3 machines, but it seems that one of them was made using different molds. The only obvious difference was in the degree of protection - IP10, IP20. I took apart both of them - I didn’t see any differences in IP.
The lower terminals are nonsense, they burn and rust, which is basically the same thing
As you can see, the terminals are the weakest point of these AVs.
I wonder where they copied and pasted them from? The Germans?
Above the bottom terminal there are screws for adjusting the thermal release. I talked about these on my Zen, in an article about regulation in modular circuit breakers, which no one knows about.
By the way, here is a screw with the same functionality in the AB Schneider, which I installed as a replacement:
Release adjustment screw, under the terminal
Let's look at:
Disassembling AB25M
The rivets (bushings) are very powerful, made of thick metal. Drilled it out with a 4.5 drill.
The mechanism is on:
Soviet machine gun from the inside
Now this is crazy, but there is no electromagnetic release inside at all! This suggests that even with a short circuit with real values (hundreds of amperes), the shutdown will take several agonizing, hot, fiery seconds! During this time, everything that is possible will burn out and melt! Conclusion – there is zero fire danger!
I removed the arc chute. Closed contacts visible
AB25M, arc chute closer
We completely disassemble, spare parts are in sight:
We look at the AB25M contacts - they say they are made of silver! didn't check.
It can be seen that this machine hardly had to open during overcurrent - the contacts are almost clean. For more than 30 years of work! By the way, they say that AB25 assault rifles have a fairly high content of precious metals, and those who know are being hunted for them. I don't know, so it all went in the trash.
On the bimetallic plate it is written: “NICKOVAR”. Who knows what this means? Where is the bimetal produced?
How does this fire-hazardous miracle of Soviet electrical engineering work? Explanatory picture:
Operating principle of the Soviet circuit breaker AB25M
The bimetallic plate bends under the influence of current (movement 1) and disengages the lever (2), at the other end of which there is a moving contact. By the way, when manually disengaged, disengagement does not occur.
The lever rises under the action of the spring and pushes the getinax indicator plate (3) out.
In this case, the lever remains on, as in the photo. There is not even a “Trip” position, as in some powerful machines. To cock and turn on this machine, you need to guess! click that invisible brown flag. Then the bimetallic plate and the movable contact lever will engage, and the machine is ready for operation. But it is not exactly)))
Honestly, there may be silver in the contacts of Soviet switches, but after this analysis I still trust modern machines more than ancient ones!
Therefore, my advice to you is that if you wanted to change the Soviet machine guns in your dashboard, let this article be for you at the same time a push, a magic kick and a sign from above!
Replacement of machines. Installation of circuit breakers
Replacement of machines.
The main devices in the apartment's electrical panel that ensure the safe operation of the electrical installation are automatic switches and RCDs. The average service life of the machines is 10 years, after which they must be replaced. In many homes, the machines have not been changed since the building was built and thus pose a potential threat because... may not work if an emergency occurs in the electrical wiring.
We carry out the following work in electrical panels:
- Replacement of automatic machines
in electrical panels. - Reconstruction of the shield in the old building - replacement of traffic jams with automatic machines.
- Replacing the bag with a two-pole machine.
- Electrical panel repair - replacement of circuit breakers in the panel.
- Installation of an RCD to protect people from electric shock.
- Installation of automatic machines
for connecting the washing machine to the electrical panel.
In addition to such services as: installation of automatic machines and replacement of automatic machines, we provide: connection of an ouzo, we carry out installation and replacement of an electricity meter, wiring in an electrical panel, as well as installation of electrical panels of various designs.
Installation of machines.
In houses built before the 2000s, as a rule, there is no possibility to connect the ground. Therefore, in addition to replacing circuit breakers, we also recommend installing an RCD for additional protection against current leakage. In a typical apartment electrical panel, a common package switch (packet), an electricity meter, and 2-3 automatic machines are usually installed. Thus, the power supply is divided into only two groups and when one circuit breaker is turned off, half of all sockets and lighting are de-energized. For this reason, when completely replacing the wiring or electrifying a new room, a larger number of circuit breakers are installed in order to increase the reliability of the power supply.
Replacement of machines in the panel.
Automatic switches can be installed in a panel on the staircase or in an interior panel.
Let's consider replacing automatic machines in the most common standard apartment panel; these were installed in Khrushchev-era buildings and some nine-story buildings from the 60s to the 80s. If you have the same electrical panel as in the picture, then there are three options for upgrading it: 1. In this case, only the circuit breakers are changed (if necessary, additional ones are installed). The meter and wires remain the same. A batch switch of the PV type (located between the circuit breakers), which turns off the entire panel, has extremely low reliability - its internal contacts often burn out, which can lead to a short circuit. Therefore, if possible and the standard wires are of sufficient length, it can be replaced with a two-pole circuit breaker with a rating of no more than 20-25 A (limitation on the cross-section of the input wire, as a rule it is aluminum 4 mm2).
2. All machines, the package box, and the electric meter are replaced, but the mounting panel itself does not change. Please note that for any work on opening the terminal box of the meter and removing the seal, you must first obtain an order from PetroElectroSbyt.
3. The entire panel with the old equipment is completely dismantled, a new plastic panel with protection devices and a compact modular meter is installed.
Selecting a circuit breaker.
From the table you can find out what rating the machine is needed for a specific type of load:
You can buy materials for reconstructing the electrical panel in Hardware, ETM, Minimax stores or construction supermarkets in the city. The most reliable manufacturers of automatic devices and RCDs are ABB and Legrand. You can find out more detailed information about the cost of work, clarify what materials you need to purchase, and also leave a request to call a specialist daily by phone
from 10:00 to 20:00.