20.10.2018
Protected 18650 lithium-ion batteries have a special control board that protects them from overcharging, critical discharge and short circuit. Therefore, the algorithm for charging protected 18650 batteries is much simpler than the technology for recharging batteries that are not equipped with a protection board.
It is enough to install the battery in a standard charger (observing the polarity) and connect it to the network. Most modern chargers have an indicator indicating charging status. Typically, a red light is on during charging, and a green or blue light is on when charging is complete. On average, recharging time varies from 2 to 4 hours, with most of the capacity being replenished in the first hour. After this, the charge current decreases and the voltage is slowly brought to the limit value of 4.2 V.
How to charge a 18650 battery with protection: important rules
In order for protected Li-ion batteries of size 18650 to remain operational longer, you need to:
- Charge them with suitable chargers (ideally original ones) - constant voltage sources of 5 V, which deliver a charging current of 0.5 to 1.0 battery capacity, automatically start the charging process from 0.05 V and stop it at 4. 2 V.
- Carry out charging indoors at temperatures from +15 to +25 °C. After entering a room from frost, the battery must first be kept at room temperature and only charged after a few hours.
- Store with a charge level of about 40–50%, checking it periodically.
Introduction. Lithium batteries, characteristics, features.
Lithium batteries (Li-Io, Li-Po) are the most popular rechargeable sources of electrical energy at the moment. The lithium battery has a nominal voltage of 3.7 Volts, which is indicated on the case. However, a 100% charged battery has a voltage of 4.2 V, and a discharged one “to zero” has a voltage of 2.5 V. There is no point in discharging the battery below 3 V, firstly, it will deteriorate, and secondly, in the range from 3 to 2.5 It only supplies a couple of percent of energy to the battery. Thus, the operating voltage range is 3 – 4.2 Volts. You can watch my selection of tips for using and storing lithium batteries in this video
Alex2019-11-11T00:50:11+03:00
Serial connection of Li-ion batteries
When connecting batteries in series, the “+” terminal of the 1st battery is connected to the “+” of the electrical circuit. The “+” terminal of the 2nd battery is connected to the “-” terminal of the 1st battery, etc. At the end, the “-” terminal of the last battery is connected to the “-” block. A battery assembled according to this scheme has a capacity value, like that of an individual battery, and the voltage corresponds to the total value of the voltages of all elements included in the battery.
If, when compiling the battery, cells with equal voltage values were used, then the total voltage of the battery is calculated as the voltage of one of the elements multiplied by the total number of cells in the assembly. The energy of the battery, regardless of the format of the connection of the elements, corresponds to the total energy value of the cans included in the battery.
How to charge series connected Li-ion 18650 batteries?
A 18650 lithium battery cannot simply be connected to a power supply. It is necessary to equalize the charge current on each cell. Balancing is carried out during recharging, when it is possible to use passive dissipation of “excess” electricity without significant energy losses.
If banks connected in series are powered through the terminals at the ends of the block, it will not be possible to monitor the charge of individual batteries. A link with a slightly higher resistance or lower capacitance will quickly reach the maximum voltage of 4.2 V and, while the voltage of the entire battery reaches this value, will have time to reach the exceeded value of 4.3 V or even higher parameters. With each subsequent charge cycle, the capacitance characteristics of such units will decrease, and in the worst case, the lithium-ion battery may explode due to overheating.
To avoid such problems, you need to use a balancer - a voltage limiter in the form of a comparator that compares the voltage on the lithium-ion element with a limit value of 4.2 V. When the voltage reaches the limit value, the switch-transistor installed in parallel with the element opens slightly.
It passes the lion's share of the charging current and converts the energy into heat. The charge of the can itself is practically suspended, while neighboring cells have the opportunity to finally charge. Voltage equalization is carried out at the end of the charging process, when the elements reach the limit value of 4.2 V.
Now let’s touch on the question of how to charge parallel-connected 18650 batteries. In a parallel connection, like poles are connected to each other: “+” with “+”, “-” with “-”. The voltage remains unchanged, and the capacitances are summed up. Balancing is not required for a purely parallel connection (without series connected parts).
Nowadays lithium batteries are gaining more and more popularity. Especially finger-type ones, such as 18650 , at 3.7 V 3000 mA.
I have no doubt that in another 3-5 years they will completely replace nickel-cadmium. True, the question about their charging remains open. If everything is clear with old batteries - assemble them into a battery and through a resistor to any suitable power supply, then this trick does not work here. But how then can you charge several pieces at once without using expensive branded balancing chargers?
Contents
This is the method Sony uses in all of its chargers.
When connecting five batteries in parallel, we get a capacity equal to mAh.
Firstly, there is an assortment of specialized microcircuits.
Charging with a laboratory power supply If you have a power supply with current limiting protection, then you are saved! That is, the indicator will light up simultaneously with the battery turning off at the moment of discharge.
As the battery capacity increases, the currents also increase. To get 11.1 V you need to connect three batteries in series. If your battery has a built-in protection board, which was discussed just above, then everything becomes simpler.
Here's how: To set up the circuit, we connect an adjustable power supply instead of batteries and select resistor R2 R4 to ensure that the LED lights up at the moment we need. To avoid unacceptable discharge, connect indicator circuits after the power switch or use protection circuits that prevent deep discharge. Here the current is set by a resistor connected to the 5th pin of the microcircuit. If you charge 3s, take three phone chargers and connect each to one module.
The diagrams presented in the article only indicate low voltage on the battery. Well, the TIP41 transistor can be replaced with any other one with a suitable collector current.
In such cases, a parallel connection of batteries is used to complete the battery. The disadvantage of the circuit is the complexity of selecting zener diodes to obtain the required response threshold, as well as the constant current consumption of about 1 mA. The cheapest way to charge batteries with balancing
Rule 6. At this stage, the charger maintains voltage 4 on the battery.
There is a pre-charge function, see. The USB charging option can be assembled, for example, on such a printed circuit board.
Obviously, a battery with 2 times smaller capacity at a current of 2 amperes will take the same amount of energy as batteries with a larger capacity, but the voltage on it will increase approximately three times faster. For LEDs, you should use only red LEDs, since they have the lowest forward voltage during operation. TP4056 — Li-ion battery charging module with charge controller
However, coverage of the issue of charging lithium batteries would be incomplete if one more stage of charging was not mentioned - i.e.
It works very simply.
Guyver made a video about this, so don’t waste your time, watch it, it’s about this in as much detail as possible.
Before using any of the analogues, check the datasheets.
Theory
To connect batteries in series, usually the positive terminal of the first battery in series is connected to the positive terminal of the electrical circuit. The positive terminal of the second battery is connected to its negative terminal, etc. The negative terminal of the last battery is connected to the negative terminal of the unit. The resulting battery in series connection has the same capacity as a single battery, and the voltage of such a battery is equal to the sum of the voltages of the batteries included in it. This means that if the batteries have the same voltage, then the battery voltage is equal to the voltage of one battery multiplied by the number of batteries in the battery.
The energy accumulated in the battery is equal to the sum of the energies of the individual batteries (the product of the energies of the individual batteries, if the batteries are the same), regardless of whether the batteries are connected in parallel or in series.
Lithium-ion batteries cannot simply be connected to a power supply unit - the charging currents on each element (bank) must be equalized. Balancing is carried out when charging the battery, when there is a lot of energy and it can not be saved much, and therefore, without any significant losses, you can use the passive dissipation of “excess” electricity.
Nickel-cadmium batteries do not require additional systems, since each link, when its maximum charge voltage is reached, stops receiving energy. Signs of a Ni-Cd being fully charged are an increase in voltage to a certain value, and then a drop of several tens of millivolts, and an increase in temperature - so that the excess energy immediately turns into heat.
The opposite is true for lithium batteries. Discharge to low voltages causes degradation of the chemistry and irreversible damage to the element, with an increase in internal resistance. In general, they are not protected from overcharging, and you can waste a lot of extra energy, thereby dramatically reducing their service life.
Tests
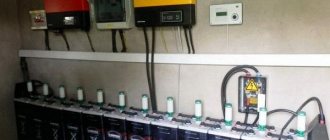
Immediately 6 pieces of balancing blocks were needed to simultaneously charge 6 18650 batteries. The elements are visible in the photo below.
Read also: Valvoline 5w30 engine oil
All elements were charged exactly to 4.20 volts (the voltage was set by potentiometers), and the transistors became hot, although there was no additional cooling - charging with a current of 500 mA. Thus, we can safely recommend this method for simultaneous charging of several lithium batteries from a common voltage source.
Discuss the article SIMULTANEOUS CHARGING OF SEVERAL BATTERIES
Lithium batteries (Li-Io, Li-Po) are the most popular rechargeable sources of electrical energy at the moment. The lithium battery has a nominal voltage of 3.7 Volts, which is indicated on the case. However, a 100% charged battery has a voltage of 4.2 V, and a discharged one “to zero” has a voltage of 2.5 V. There is no point in discharging the battery below 3 V, firstly, it will deteriorate, and secondly, in the range from 3 to 2.5 It only supplies a couple of percent of energy to the battery. Thus, the operating voltage range is 3 – 4.2 Volts. You can watch my selection of tips for using and storing lithium batteries in this video
With a series connection, the voltage on all batteries is summed up, when a load is connected, a current flows from each battery equal to the total current in the circuit; in general, the load resistance sets the discharge current. You should remember this from school. Now comes the fun part, capacity. The capacity of the assembly with this connection is fairly equal to the capacity of the battery with the smallest capacity. Let's imagine that all batteries are 100% charged. Look, the discharge current is the same everywhere, and the battery with the smallest capacity will be discharged first, this is at least logical. And as soon as it is discharged, it will no longer be possible to load this assembly. Yes, the remaining batteries are still charged. But if we continue to remove current, our weak battery will begin to overdischarge and fail. That is, it is correct to assume that the capacity of a series-connected assembly is equal to the capacity of the smallest or most discharged battery. From here we conclude: to assemble a series battery, firstly, you need to use batteries of equal capacity, and secondly, before assembly, they all must be charged equally, in other words, 100%. There is such a thing called BMS (Battery Monitoring System), it can monitor each battery in the battery, and as soon as one of them is discharged, it disconnects the entire battery from the load, this will be discussed below. Now as for charging such a battery. It must be charged with a voltage equal to the sum of the maximum voltages on all batteries. For lithium it is 4.2 volts. That is, we charge a battery of three with a voltage of 12.6 V. See what happens if the batteries are not the same. The battery with the smallest capacity will charge the fastest. But the rest have not yet charged. And our poor battery will fry and recharge until the rest are charged. Let me remind you that lithium also does not like overdischarge very much and deteriorates. To avoid this, recall the previous conclusion.
Let's move on to parallel connection. The capacity of such a battery is equal to the sum of the capacities of all batteries included in it. The discharge current for each cell is equal to the total load current divided by the number of cells. That is, the more Akum in such an assembly, the more current it can deliver. But an interesting thing happens with tension. If we collect batteries that have different voltages, that is, roughly speaking, charged to different percentages, then after connecting they will begin to exchange energy until the voltage on all cells becomes the same. We conclude: before assembling, the batteries must again be charged equally, otherwise, when connected, large currents will flow, and the discharged battery will be damaged, and most likely may even catch fire. During the discharge process, the batteries also exchange energy, that is, if one of the cans has a lower capacity, the others will not allow it to discharge faster than themselves, that is, in a parallel assembly you can use batteries with different capacities. The only exception is operation at high currents. On different batteries under load, the voltage drops differently, and current will start flowing between the “strong” and “weak” batteries, and we don’t need this at all. And the same goes for charging. You can absolutely safely charge batteries of different capacities in parallel, that is, balancing is not needed, the assembly will balance itself.
In both cases considered, the charging current and discharge current must be observed. The charging current for Li-Io should not exceed half the battery capacity in amperes (1000 mah battery - charge 0.5 A, 2 Ah battery, charge 1 A). The maximum discharge current is usually indicated in the datasheet (TTX) of the battery. For example: 18650 laptops and smartphone batteries cannot be loaded with a current exceeding 2 battery capacities in Amperes (example: a 2500 mah battery, which means the maximum you need to take from it is 2.5 * 2 = 5 Amps). But there are high-current batteries, where the discharge current is clearly indicated in the characteristics.
An intermediate option is to switch batteries from a serial connection to a parallel one (for charging), which is discussed in detail in the video below, and you will find all the diagrams and links to the switches here https://alexgyver.ru/18650/
Author: Alexander AlexGyver
(positioned by the seller as a module for one 18650 can) can and will charge any lithium battery, regardless of shape, size and capacity, to the correct voltage of 4.2 volts (the voltage of a fully charged battery, to capacity). Even if it is a huge 8000mah lithium package (of course we are talking about one 3.6-3.7v cell). The module provides a charging current of 1 ampere, which means that it can safely charge any battery with a capacity of 2000mAh and above (2Ah, which means the charging current is half the capacity, 1A) and, accordingly, the charging time in hours will be equal to the battery capacity in amperes (in fact a little more, one and a half to two hours for every 1000mah). By the way, the battery can be connected to the load while charging.
Important! If you want to charge a smaller capacity battery (for example, one old 900mAh can or a tiny 230mAh lithium pack), then the charging current of 1A is too much and should be reduced. This is done by replacing resistor R3 on the module according to the attached table. The resistor is not necessarily smd, the most ordinary one will do. Let me remind you that the charging current should be half the battery capacity (or less, no big deal).
But if the seller says that this module is for one 18650 can, can it charge two cans? Or three? What if you need to assemble a capacious power bank from several batteries? CAN! All lithium batteries can be connected in parallel (all pluses to pluses, all minuses to minuses) REGARDLESS OF CAPACITY. Batteries soldered in parallel maintain an operating voltage of 4.2v and their capacity is added up. Even if you take one can at 3400mAh and the second at 900, you will get 4300. The batteries will work as one unit and will discharge in proportion to their capacity. The voltage in a PARALLEL assembly is ALWAYS THE SAME ON ALL BATTERIES! And not a single battery can physically discharge in the assembly before the others; the principle of communicating vessels works here. Those who claim the opposite and say that batteries with a lower capacity will discharge faster and die are confused with SERIAL assembly, spit in their faces. Important! Before connecting to each other, all batteries must have approximately the same voltage, so that at the time of soldering, equalizing currents do not flow between them; they can be very large. Therefore, it is best to simply charge each battery separately before assembly. Of course, the charging time of the entire assembly will increase, since you are using the same 1A module. But you can parallel two modules, obtaining a charging current of up to 2A (if your charger can provide that much). To do this, you need to connect all similar terminals of the modules with jumpers (except for Out- and B+, they are duplicated on the boards with other nickels and will already be connected anyway). Or you can buy a module ( link to Aliexpress ), on which the microcircuits are already in parallel. This module is capable of charging with a current of 3 Amps.
Read also: Lada Vesta crash test euroncap assessment
Sorry for the obvious stuff, but people still get confused, so we'll have to discuss the difference between parallel and serial connections. A PARALLEL connection (all pluses to pluses, all minuses to minuses) maintains the battery voltage of 4.2 volts, but increases the capacity by adding all the capacities together. All power banks use parallel connection of several batteries. Such an assembly can still be charged from USB and the voltage is raised to an output of 5v by a boost converter. A SERIES connection (each plus and minus of the subsequent battery) gives a multiple increase in the voltage of one charged 4.2V bank (2s - 8.4V, 3s - 12.6V and so on), but the capacity remains the same. If three 2000mah batteries are used, then the assembly capacity is 2000mah. Important! It is believed that for sequential assembly it is strictly necessary to use only batteries of the same capacity. Actually this is not true. You can use different ones, but then the battery capacity will be determined by the SMALLEST capacity in the assembly. Add 3000+3000+800 and you get an 800mah assembly. Then the specialists begin to crow that the less capacious battery will then discharge faster and die. But it doesn’t matter! The main and truly sacred rule is that for sequential assembly it is always necessary to use a BMS protection board for the required number of cans. It will detect the voltage on each cell and turn off the entire assembly if one discharges first. In the case of an 800 bank, it will discharge, the BMS will disconnect the load from the battery, the discharge will stop and the residual charge of 2200mah on the remaining banks will no longer matter - you need to charge.
The BMS board, unlike a single charging module, IS NOT A sequential charger. To charge, you need a configured source of the required voltage and current. Guyver made a video about this, so don’t waste your time, watch it, it’s about this in as much detail as possible.
«>
Simplified diagram of a balancer for a battery
Here is a simplified circuit diagram of a current balancer based on the TL431. Resistors R1 and R2 set the voltage to 4.20 Volts, or you can choose others depending on the type of battery. The reference voltage for the regulator is removed from the transistor, and already at the border of 4.20 V, the system will begin to open the transistor slightly to prevent exceeding the specified voltage. A minimal increase in voltage will cause the transistor current to increase very quickly. During tests, already at 4.22 V (an increase of 20 mV), the current was more than 1 A.
In principle, any PNP transistor operating in the range of voltages and currents that interests us is suitable here. If the batteries are to be charged with a current of 500 mA. The calculation of its power is simple: 4.20 V x 0.5 A = 2.1 V, and this is how much the transistor must lose, which will probably require some cooling. For a charging current of 1 A or more, the power loss increases accordingly, and it will become increasingly difficult to get rid of the heat. During the test, several different transistors were tested, in particular BD244C, 2N6491 and A1535A - they all behave the same.
The voltage divider R1 and R2 should be selected so as to obtain the desired clamping voltage. For convenience, here are a few values, after applying which we will get the following results:
- R1 + R2 = Vo
- 22K + 33K = 4.166 V
- 15K + 22K = 4.204 V
- 47K + 68K = 4.227 V
- 27K + 39K = 4.230 V
- 39K + 56K = 4.241 V
- 33K + 47K = 4.255 V
How to properly charge a lithium-ion battery: how to assemble a lithium battery with your own hands
Initially, lithium-ion batteries were intended for mobile devices, be it phones, cameras, video cameras, laptops, but in the last decade, the production of lithium batteries has also been launched by most automakers.
Then why assemble it yourself if you can buy a ready-made battery? There are enough reasons:
- factory-assembled lithium batteries are unreasonably expensive;
- it is very difficult to find a battery of suitable dimensions for a motorcycle or car;
- If the assembled battery fits into the installation space with a margin, then it will have a lower capacity.
With your own hands, you can assemble a battery from individual elements, which will be limited only by energy density and price per watt-hour, depending on the type of elements selected:
- NiMH - nickel metal hydride;
- Li-ion - lithium ion;
- Li-pol - lithium polymer;
- LiFePO4 - lithium iron phosphate;
- Lead-Acid - lead-acid.
Danger of overcharging lithium cells
Lithium cells must be handled with care because they concentrate a lot of energy into a small area when fully charged. Therefore, protected Li-ion and Li-pol batteries have been on sale for a long time.
Back in 1991, Sony drew attention to the explosion hazard of Li-ion cells. Nowadays, all batteries without exception are wound with a two-layer separator between the plates to eliminate the risk of internal short circuit.
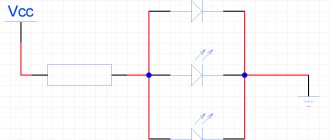
Diagram of a device for balancing batteries
This is an analogue of a powerful zener diode loaded with a low-resistance load, the role of which is played here by diodes D2. D5. Microcircuit D1 measures the voltage at the plus and minus of the battery and if it rises above the threshold, it opens a powerful transistor, passing all the current from the charger through itself. How all this is connected together and to the power supply - see below.
The blocks turn out to be really small, and you can safely install them directly on the element. You just need to keep in mind that the potential of the negative pole of the battery arises on the transistor body, and you must be careful when installing common radiator systems - you must use insulation of the transistor bodies from each other.