Why is a concrete mixer made from a washing machine?
From the point of view of expediency, the working capacity of a homemade concrete mixer in the shape of a cylinder is most convenient for mixing and unloading ready-made concrete: there is no unused solution left in the corners of the tank, which builds up over time, reducing the internal space.
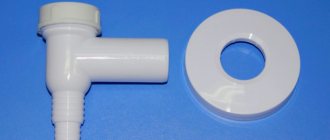
To prevent the concrete mass from pouring out of the tank during the mixing process, one plug on the drain hole is enough, which is practically only possible using the body of a simple washing machine when making a concrete mixer using a homemade method.
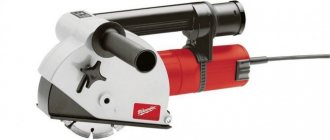
The motor is one of the most vulnerable parts of the concrete mixer, since the mixing cycles are quite long. Older washing machines are equipped with a fairly powerful motor that will not overheat the first time you use it. In addition, if you use the entire washing machine as a concrete mixer, the electrical parts of the motor will remain protected from the ingress of random particles and there will be no need for additional protection.
Advantages of a homemade concrete mixer from a washing machine
Some people believe that there is nothing better than branded equipment. However, a homemade concrete mixer also has its advantages:
- In addition to the fact that you use old spare parts that are uselessly lying in the garage, you will save money on the purchase of new equipment.
- Having your own concrete mixer, especially in the private sector, is always useful. If you need to update the path or patch up the foundation, you won’t have to look for equipment again.
- You can make a concrete mixer according to your own drawing. This will make it easier to repair it if it breaks and calculate the dimensions for transportation in transport.
- The quality of mixing in a concrete mixer cannot be compared with manual mixing, especially when the volume of work is large.
From a milk flask
The simplest manual concrete mixer can be made using an ordinary metal flask (milk used to be sold in these). You will also need pipe cuttings or other scrap metal. The design is simple, such a concrete mixer can be built with your own hands in a couple of hours. The main thing is to weld the frame. Assembling the concrete mixer itself will take a couple of tens of minutes.
Design of a manual concrete mixer made from a milk flask
You make a frame and bend a handle from a round pipe. In the upper part of the frame, weld two water couplings (for example). Their internal diameter is slightly larger than the diameter of the pipe used for the handle. The pipe is passed through the flask and welded to the body.
How to find the center of gravity
In order for the barrel to spin easily, you need to find the center of gravity. To do this, you can put it on some thin object, and move it forward/backward to find this very center. This is where you will need to pass the handle. Having passed the handle, it is attached to the walls of the case. This is where complications can arise: flasks are usually made of aluminum alloy, and the handle may be made of steel.
It will not be possible to connect them by welding. The only available solution is cold welding. He is quite real. The remaining modes - with bimetallic gaskets or argon-arc welding at home - are not implemented. Another way out is to weld plates onto the handle, which are riveted to the sides of the flask.
To prevent the handle from playing too much and falling out during operation, nuts are welded to it on both sides of the coupling.
In general, this is all about making a manual concrete mixer with your own hands. For one batch in a 40 liter can you can get 2.5-3 buckets of solution. For use in a country house or on a plot near a house (without construction) it is more than enough.
READ MORE: Electrolux underfloor heating: reviews of Electrolux systems, advantages and disadvantages
If there is no can, you can adapt a barrel (thick-walled). Then the problem with welding the handle disappears, but you will have to come up with a system for fixing the lid. You can make something similar to the one that the can has.
The video shows an example of a handmade homemade concrete mixer made from a milk flask. The design is a little different, but not too different. There is an interesting idea - dividers are welded to the pipe inside the container, which speed up mixing.
Making a homemade concrete mixer
To make a good concrete mixer with your own hands, it is important to understand the requirements for a unit of this kind. These include:
- uniformity of work,
- stability and safety of operation,
- mobility reserve,
- Convenience of unloading the finished cement mortar.
If, as a rule, no questions arise regarding most items on this list, then the reserve of mobility can be appreciated after large-scale work has begun: it is easier to spend a little time putting a self-made concrete mixer on wheels than to tie labor operations to the location of a stationary monument of a much-needed apparatus.
To meet the requirements for a concrete mixer, pre-stocked consumables and tools should serve.
In addition to the used washing machine, you will need:
- grinder saw;
- machine with electrodes for welding;
- corners 45 mm on each side;
- drill;
- soldering iron;
- wide metal strip;
- wheels.
If necessary, the corners are replaced with channels, and a hacksaw for metal will cope with the functions of a “grinder”. You may also need bolts and nuts and a couple of wrenches.
Purpose of the equipment
The working process is that the device mixes the solution to give it the desired consistency.
Cement, water and sand, to which other fillers used in concrete production may be added, are poured into a tank and mixed. In addition, with the help of a concrete mixer you can maintain the quality of the mortar mass during construction work. After all, concrete has the property of settling, which has a negative impact on its quality. And the work of a concrete mixer will help maintain concrete in the desired condition, preventing water from rising up and fillers from sinking to the bottom, turning into a set of materials laid out in layers.
In order not to waste money, many make such faucets themselves. Let's look at how to construct a concrete mixer from a washing machine with your own hands, constructed on a summer cottage.
Nuances you need to know about
Many craftsmen make a number of mistakes when creating a homemade concrete mixer. It’s better to find out about them in advance so that you don’t have to redo the work later.
- Use only high-quality containers. Make sure that it is not full of holes, rusty, or damaged.
- Follow the instructions strictly. Any deviation from the instructions will result in inconsistency of actions, which will affect the quality of the unit.
- Do not weld metal frames to cast iron under any circumstances - this is a complex and unreasonable job.
- Do not overload homemade concrete mixers. Stick to the selected volume, otherwise the device will soon become unusable.
READ MORE: 2021 ranking: Best electric toothbrushes
As you can see, making a concrete mixer with your own hands is not so difficult. This will save you money on buying things you need in your household. The main thing is to have the necessary minimum of building materials and tools at hand. With proper care, the concrete mixer from the washing machine will serve you well; believe me, you will use such concrete mixers for a really long time. It’s better to get to work with an assistant - extra hands never hurt!
How to make an inexpensive concrete mixer from a steel barrel and an electric motor from a washing machine
When building the bathhouse, I mixed concrete by hand in a trough. This method is suitable for small volumes, but not for building something larger. Too much effort is wasted on “hand-to-hand” mixing of concrete. I didn’t want to buy an expensive concrete mixer, but spending money on a cheap but short-lived one would be a waste of money. I looked on the Internet what homemade concrete mixers are made from. I liked a couple of mobile structures made from ordinary 200-liter metal barrels. I bought a used oil container at a car depot and, based on it, profile pipes, a Bendix with a crown from a Volga, and an old engine from a washing machine, I assembled a cheap concrete mixer.
The following is placed in the concrete mixer:
- 4 buckets of enriched sand and gravel mixture;
- 1 bucket of cement;
- 1.5 buckets of water;
- 1 bucket of sand.
Read also: How to remove a spring from a strut without ties
Close-up of a concrete mixer drive.
The drive is protected by a tin cover.
The second concrete mixer, made from what was at hand, was made by AfanasievichRUS.
I didn’t want to spend 12 – 25 thousand rubles on buying a concrete mixer. and made it myself from various rubbish, a barrel and an electric motor from a washing machine. I have been using a homemade concrete mixer for several years now. In principle, everything suits me. The metal of the barrel is of course thin, but everything can be fixed by welding. Blades for stirring the mixture are welded inside the barrel. To make a concrete mixer I needed:
- two hundred liter barrel;
- engine with a power of 0.45 kW at 3400 rpm;
- pulley from the seeder;
- a wheel from a children's bicycle;
- rim from a bicycle wheel for adults;
- chain from an Izh motorcycle;
- bearing with bushing from the rear wheel of an Izh motorcycle.
We invite you to watch a video showing the operation of this concrete mixer.
One option is to use an old washing machine
Believe it or not, it makes a good mixer for concrete mortar, the performance of which is quite acceptable in home construction. For this, various models of machines are suitable, in which the activator element is located at the bottom of the body.
But you still have to work hard - we remove the activator, and in its place we install a new shaft of a suitable size. On the threaded part that goes into the washing tank, brackets in the form of U-shaped shapes, made of metal strips turned in the form of blades under a straight line, are fixed to the nuts angle.
Another important element is the motor from the washing machine. It can be used as a motor for another container. For assembly work you will need:
- old top-loading washing machine;
- Bulgarian;
- welding machine;
- soldering iron and electric drill;
- metal corners, maybe old ones;
- small wheels.
Having prepared the base, you should check it for strength and stability. If there is no old metal, use wooden beams fastened together with tenons or self-tapping screws. Consider arranging rotary mechanics, with the help of which it will be easy to control the kneading container.
Instructions for assembling a forced-action concrete mixer
The difference from the previous scheme is the presence of blades welded onto the working shaft, ensuring uniform mixing of components with any density. An old washing machine is used for work; the main steps include:
- Preparing a frame from thick wooden beams or metal. In the first case, a system of grooves or self-tapping screws are used to connect individual elements; in the second, they form a rigid frame using a welding machine. At this stage, the location of a rotating mechanism is also provided to facilitate the process of unloading the solution.
- Removing the motor from the washing machine and replacing it with a shaft.
- Cutting blades from a thick sheet of steel and screwing them to the axle using bolts. The thicker the metal, the better; due to the high degree of wear, the recommended minimum is 3 mm.
- Sealing the tank drain hole.
- Fixing the container on a rigid base.
- Connecting an electric motor, the best option would be a gear drive.
- Installation of the protective casing.
Read also: What temperature can cold welding for metal withstand?
Professional homemade concrete mixers are assembled according to ready-made drawings; their distinctive feature is the shape of the working container in the shape of a pear (with tapering edges). You can make it yourself from a simple barrel, but the best indicators of the quality of the solutions and the strength and reliability of the unit itself are achieved by cutting out cone-shaped elements from a single sheet of metal and welding them together. At least two symmetrical blades are welded inside, the shaft is mounted on bearings first, and only then the engine and gearbox are installed.
Nuances of assembly technology, tips and tricks
The main problems are related to organizing the correct transmission of torque to the shaft and ensuring convenient unloading, tightness and stability. When planning frequent use, preference is given to models that rotate in different directions with a mechanism for fixing the working container in a certain position (rotary gear limiters). To simplify the mixing process and ensure safe and long-term operation of a homemade concrete mixer, we recommend:
1. Maintain alignment and symmetry when placing blades or teeth inside a barrel or welded tub. Their shift relative to the center of gravity or each other leads to poor mixing of the solution, lateral runout, additional loads on the walls of the bowl and rapid failure.
2. Clean metal parts from rust and treat them with anti-corrosion primers. Upon completion of assembly, the mixer is painted again.
3. Install additional stiffening ribs to improve the stability of both stationary and mobile units. In the second case, wheels from an old wheelbarrow are welded to the bottom of the base.
4. Make two handles when assembling a manual concrete mixer. This will allow you to rotate it from any convenient side yourself or use the strength of two people.
5. Monitor the condition of pulleys and similar elements connecting the gearbox and engine. They should not be too loose or strained; the belt, chain or gear drive is fixed on the same plane as the ring mounted on the main working shaft.
6. Connect the power cable to the engine via a starter with a button.
7. Use homogeneous types of metal.
8. Provide protection for the engine from splashes of mortar; such a casing is easiest to construct from a coarsely perforated tin or steel sheet.
9. Periodically check and tighten the connections of the concrete mixer bolts.
Are you planning a construction project? Then you will need a concrete mixer to mix the cement mortar. But where can I get it? It’s expensive to buy, especially since you may only need it once.
The solution may be a homemade concrete mixer from a washing machine. If you have an old washing machine with a working engine, then you can make your own equipment for household needs.
Advantages and disadvantages of the design
At home, especially in summer cottages, work always involves mixing the solution. Making a homemade device for mixing concrete has its advantages:
- a homemade concrete mixer is cheap;
- The size of the device can be manufactured to any parameters;
- The concrete mixer is easier to repair because it is made by hand.
In addition to the positive aspects, there are also disadvantages. These include:
- high production time costs;
- skills required to handle iron;
- To make a manual concrete mixer, you need a drawing. You need to have an understanding of design.
Homemade manual concrete mixer
It won’t be difficult to make a manual concrete mixer from a barrel with your own hands. The drawing is prepared at the preliminary stage. Then you will need materials:
- a barrel with a volume of 100 or 200 liters, which acts as a pear;
- corner for the bed;
- 2 pieces of bearings;
- steel pipe;
By selecting such materials, you can make a simple concrete mixer without an electric drive.
The homemade technology is as follows:
- A rectangular hole for the lid is cut in the middle of the barrel. Corners are welded on the inside and rubber is laid for tightness.
- Powerful hinges are welded on and the lid is installed.
- Blades for mixing the solution are welded from sheet metal 2-3 mm thick on the inside of the barrel.
- Hubs with bearings are installed in the center and an axle is inserted.
- The structure is mounted on a metal base.
- A handle for rotation is screwed onto the side. If you install them on 2 sides, then two people can work at the same time.
READ MORE: ♂The best wall bars for children and adults - types and selection rules
https://www.youtube.com/watch?v=X5N0NeyQBe4
A homemade concrete mixer made from a barrel can be painted on the outside. There is no point in doing this from the inside. The concrete will peel off all the paint.
A simplified version of the concrete mixer design
It is not necessary to remove the tank and motor from a washing machine that is not too worn out and has a safety margin. The drain hole is sealed, the stirrer blades are installed in place of the activator. In this case, the device body itself serves as the working capacity. However, there is no turning mechanism in this version of the homemade concrete mixer, so you will have to unload the solution manually. But other elements of the device are protected by the case, which increases the reliability and durability of the structure.
A homemade concrete mixer is not as difficult to make as it might seem, especially since there are enough videos on the global network demonstrating step by step how to make a concrete mixer with your own hands. With some manual skills, time and tools, it is quite possible to make a worthy analogue of a purchased concrete mixer.
What is a concrete mixer made of?
First of all, it should be noted that making this type of equipment is quite simple. There are many options for this, so you don’t have to worry about the result.
It is difficult to fully reproduce the device of the factory version, but it is possible to get as close as possible to the original sample. To complete the work you will need:
- container in which mixing will be performed;
- axis for rotation;
- reliable motor, drive and base on which everything is mounted.
There is nothing complicated. You just need to have skillful hands and good ingenuity, and a set of professional tools won’t hurt.
Device with motor and gearbox
The design of a homemade concrete mixer with a washing machine engine consists of 3 components: a motor, a container and a base.
Milk cans are used as containers. If a larger size concrete mixer is planned, then a washing machine tank is used. To manufacture a forced-action concrete mixer, a motor is installed, which is taken from the same washing machine.
Before you start assembling a concrete mixer with your own hands from a washing machine, you need to prepare the following materials:
- capacity. A washing machine drum is used for this purpose;
- motor from the same washing unit;
- metal corner 50×50 mm. It is needed for the future base of the device;
- 2 wheels from a wheelbarrow. They must withstand the heavy weight of the equipment;
- hardened steel wheel metal rod as axle;
- strips of metal 50 mm wide and 4 mm thick;
- pipe with a diameter of 30 mm.
Instructions: homemade concrete mixer with a washing machine engine
There are two types of concrete mixers:
- Mechanical. The container is driven by force. This is almost the same as mixing concrete in a regular container. How much effort and time will it take you to work with a manual drive? Therefore, it is better to go with the next option.
- Electric. The tank is driven by an electric motor.
The manufacturing technology of a concrete mixer is quite simple. But before you get started, think about whether you can connect the engine yourself? If the answer is yes, then prepare everything you need.
Accessories
- A 200-liter barrel from an old washing machine (preferably top-loading). This volume is enough to mix the optimal amount of concrete for work.
- Electric motor (power 200 W).
- Pulley, drive belt, washing machine switch.
Due to the fact that most of the washing machine is used, there is no additional need to spend money on spare parts.
- To make the base you need a metal corner measuring 50x50.
- Wheels. Two wheels can be taken from an old stroller, wheelbarrow, or cart.
- As an axis you will need a strong metal rod of 4.5 cm.
- Gearbox.
- Fittings.
- Metal strip.
- Ball bearings.
- The wire.
- Washers and bolts.
Read also: Esr meter on a microcontroller
Tools
- Bulgarian.
- Hacksaw for metal.
- Drill.
- Soldering iron.
- Welding with electrodes.
Why is it profitable to make a concrete mixer from an old washing machine? Because the tank of the machine is quite suitable for mixing the solution, its drain hole can be closed. The motors of old washing machines are quite durable and reliable.
The integrated use of all elements protects the engine from foreign objects during operation. This will save you from having to do protection.
Step-by-step execution of work
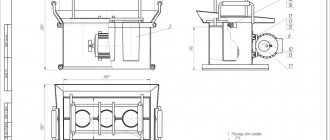
Before you start, you can prepare drawings to help you assemble the structure. One of the drawings is shown below:
Make a frame (base)
This is an important point, since the entire structure will rest on the frame. The base must be strong and stable.
- From the prepared 50x50 corners, cut two pieces of 60 cm and four pieces of 80 cm. A piece of 60 cm serves as the basis for the support triangle, pieces of 80 cm are its edges. Fold and weld the triangles. Place them opposite each other.
- Now weld two 50 cm corners to the edges of the triangles. This creates a stable structure.
- Two nuts need to be welded to the tops of the triangles. The diameter of their hole must be larger than a pipe with a diameter of 30 mm. Then this pipe needs to be pulled through the holes of the nuts and the ends are pressed in. The pipe should rotate freely, but not jump out of place.
- Make the top part. Take two corners 1.4 m long and three 40 cm long. Place those 1.4 meters long opposite each other. Place the rest crosswise at an equal distance, like a ladder. Weld the parts together.
- Weld the bases of the finished structure to the movable pipe. It must be placed across the pipe in the center.
Frame
Attach the wheels to the base of the frame with reinforcement.
Now it's the tank's turn. Remove the activator from the tank and close the drain hole. Install a shaft or axle of the appropriate size in place of the activator. Make homemade blades from a strip of metal that will mix concrete. They can be further tightened using pliers. Weld the blades onto a metal strip and attach them to the shaft.
To install a large barrel with your own hands, place it on the ladder of the frame. Make sure that most of it is in contact with the corner. Weld the barrel to the base for a secure installation. In this case, the bottom of the tank should face the tops of the triangles.
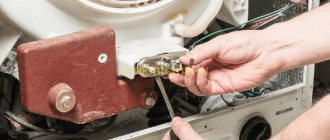
Motor connection
The motor is connected to the back of the tank. To do this, drill two holes in the corners. You will also notice holes on the motor body, attach them to the corners and secure with bolts and nuts.
To prevent the engine from breaking due to bad weather, make a casing from a car inner tube. Provide holes on the sides to prevent overheating.
The motor is connected to the axle through a flange. In this case, the distance between the axle and the motor should be 2-3 cm.
All that remains is to connect the motor to the mains voltage and check the operation of the homemade concrete mixer. The convenience of this design is that the ladder tilts like a swing. Therefore, the prepared solution can be easily poured by tilting the tank.
Note! If instead of a central axis you connect the motor directly through the shaft, then the tank will not be able to tilt. Concrete will have to be unloaded manually.
Knowing how to make a concrete mixer from improvised materials, you can save a lot and acquire your own equipment. Act consistently and everything will work out.