How to make a cinder block machine
First, let's decide what goals we set for ourselves. If we need to build a small utility room, a barn, a summer kitchen or a temporary shed, this is one thing. In the same case, if we are going to sell cinder blocks, then the approach to its production should be completely different. Firstly, mass production of cinder blocks requires stability of the recipe, otherwise it will be simply impossible to produce high-quality cinder blocks. Secondly, the machine for making cinder blocks with your own hands, the drawings of which we have given right here, is not intended for large-scale production for obvious reasons.
The reliability and performance of a machine assembled from just about anything cannot be compared with a machine made in production conditions, where there is at least a hint of a quality guarantee. However, making a couple of hundred cinder blocks is not prohibited for anyone yet, so we present drawings with dimensions for a vibrating machine.
Manufacturing of vibration machine
To ensure the best quality of the resulting products, special equipment is used for the production of cinder blocks at home. This is the so-called vibrating machine. It allows you to create vibration after pouring the solution into the mold, which helps to compact the solution and increase the strength of the product. Let's look at how to make a homemade vibrating machine yourself. Its scheme is quite simple.
Vibrating machine for the production of one block
By its design, the vibrating machine consists of the following elements:
- A metal box (shape) designed for the simultaneous production of 1–3 cinder blocks with your own hands. The box is made of metal sheets. Its dimensions correspond to the dimensions of future products.
- Cylinders for forming voids. For this purpose, pieces of metal pipes are used, which are processed with a grinding wheel to form a taper. The cylinders are connected to each other by a metal bridge along the long side of the mold and attached to the side walls. The distance from the bottom of the cylinders to the bottom should not be less than 3 cm.
- A slotted lid that fits over the cylinders.
- Handles on the sides for removing the mold from the blocks.
- Electric motor with a power of 0.5–0.8 kW. It is bolted to one of the walls of the mold.
Eyelets are welded on the back side of the mold for attaching the cylinders. If it is necessary to make solid blocks, the cylinders can be easily removed from the eyes. The finished equipment for making cinder blocks is cleaned and painted.
With the help of such a machine, a cinder block at home is very durable and has the correct geometry.
We suggest you read: How to fold a stove with a water heating boiler
After making the cinder block molds, you can begin the actual production process.
You can make slag blocks at home using a special vibrating machine, which you can also make yourself. The main component of such a device is the vibroform for the solution itself. Such a machine is a steel box in which parts with voids (or without them) are fixed. The matrix itself is already a machine. It is allowed to be used by performing some steps manually.
To make a vibrating machine yourself, you need to purchase:
- welding machine;
- grinder;
- vice;
- tools for carrying out metalwork.
As for materials, you will need:
- steel sheet 3 mm - 1 sq. m;
- pipes with a diameter of 75-90 mm - 1 m;
- 3 mm steel strip – 0.3 m;
- electric motor with a power of 500-750 W;
- nuts and bolts.
Do-it-yourself cinder block manufacturing technology
You can make a cinder block in a chicken coop, depending on what quality requirements you place on it. The general principles and technology for making cinder blocks are no different from industrial ones. Cinder block has standard sizes, shape and characteristics. We can achieve the shape ourselves, depending on the level of skill and degree of proficiency in welding, lathe, grinder and basic metalwork tools.
Be that as it may, the cinder block should measure 39x19x188 and have three holes in the body. These are linear characteristics only. If we talk about physical and technical issues, there is no guarantee that a garage cinder block will meet the standards. In any case, it will be different from the industrial one, for better or for worse.
To make a mixture for cinder block, the following materials are used:
- Slag.
- Sand.
- Cement.
- Modifying additives.
The correct cinder block can only be obtained using the vibration pressing method, which is worth familiarizing yourself with in more detail.
Production of cinder blocks using a split mold
Forms have any dimensions. The standard dimensions of the structure are 90x190x188 mm; in private construction, other sizes can be used, for example, 40x20x20 cm. In order to save material, it is better to use forms with cells of 4-6 blocks and cylinders (squares) to create cavities.
Read also: DIY wood cutting saw
A homemade metal form (detachable) looks like this.
Cylinders for holes
Block mold
Let's look at the step-by-step process of making cinder blocks.
Step 1. Mix the solution in a concrete mixer.
Step 2. Pour the mixture into our mold with a shovel. In this case the mixture is thick. You can also use a liquid solution.
Step 3. Be sure to ensure that the solution fills the container evenly. To do this, compact the filled solution. We control the filling of the form to the brim. Level the top layer using a spatula.
Step 4. If the solution is dry, then you should use a special lid, the holes in which will block the bayonets in the mold. This device will help compact our cinder block. This type of lid is not used for liquid solutions.
Step 5. We move our block to an open area for further storage. After 30-40 minutes, remove the bottom, sides and top cover. To better remove the cinder block, we use a regular hammer to hit the top of the wall and a longitudinal strip with cylinders.
Step 6. It will take us at least a day to dry completely.
What is a vibropress
Roughly speaking, a vibropress is a powerful table, the tabletop of which is suspended on springs or in another way. The vibration of the tabletop occurs due to a shift in the center of gravity in the eccentric, which is attached to the output shaft of the electric motor.
There are several types of suspension of a vibrating plate - spring suspension, on rubber cushions, or cables. A strong frame must stand securely and steadily on the ground while the vibrating plate compacts the cinder concrete mixture. In industrially manufactured machines, a balancer with a shifted center of gravity is installed directly under the vibrating plate and is rigidly attached to it. Homemade vibrating tables use different balancer drive schemes, but basically it is a belt drive, and this design has the reliability and quality of cinder block manufacturing.
How to make a matrix with your own hands
The mold for making a cinder block is the most important thing in the process and the most important thing in the configuration of the machine. Without the correct shape, the whole point of making a cinder block yourself becomes a useless circle of Skillful Hands. The more irregularities and voids there are in the cinder block, the longer the wall will take to build, and the poorer the quality of the masonry will be. During the manufacturing process on a vibrating table, slag concrete tends to shrink, and this is quite natural, since the whole point of the vibrating table is to compact the solution as much as possible, driving all the air out of it.
If the matrix does not take this into account, the cinder blocks will be of different sizes, and it will be very difficult to make normal masonry from them. Therefore, professional machines also use a press to quickly stabilize the mixture. The matrix drawings and the step-by-step process of its manufacture require no explanation. Everything is clearly visible in the photo, and by observing these dimensions, you will get the perfect cinder block.
Composition of the mixture for cinder block
There is no single universal composition. The most important component of cinder concrete is cement. The slag can be any material:
- coal ash;
- blast furnace slag;
- expanded clay;
- granulated slag;
- boiler slag;
- processed sawdust.
As well as a wide variety of mixtures of these slags. As a rule, the cement used is M400 grade, and sifted quartz sand is preferable. It is mandatory to add plasticizers to the solution, modifying additives that change the properties of slag concrete depending on specific circumstances. It is recommended to follow the following mixing proportions:
- slag - 7 parts;
- cement M400 - 1.5 parts;
- sand - 2 parts;
- water - as needed, but no more than 3 parts.
As you can see, making a cinder block with your own hands is not so simple, but if you try and show patience and skill, everything will definitely work out.
Cinder block machine for 2 blocks
I wanted to build a workshop, a barn, and a lot more. I’ll say right away that I have nothing to do with construction and therefore I’ll start construction with a barn for training. I decided to make the cinder block myself. I own a GAZ 53 dump truck, the quarry is really far away, but the car runs on gas, so it’s not expensive. Well, to make cinder blocks you need a machine. You can, of course, stupidly buy it (as well as the blocks themselves), but it’s not interesting. Moreover, one machine has already been assembled, albeit for a sawdust block and for one piece, a monolith. So let's start with the material. The troika metal sheet was left over from a kind client for whom I welded a metal door to the veranda. Profile 50x50x2.5, 40x40x2.5 and 20x20x2.5 leftovers from other works. Pieces of pipes with a diameter of 20, 25, 32 lay in a pile of metal, where I put all the iron in like buns, and then use it for work. Replenishes with local bruises. The Siberia washing machine was bought from them for 500 rubles for the sake of the electric motor from which the vibrator is made. Well, as well as a stainless steel tank, an aluminum tank. All of it will go into action. Act one. Making a matrix for two blocks. The drawings of the machines were taken from the Internet and adjusted to fit our materials and thoughts. The cutting was done with plasma.
Pay attention to the piece of wood. This is not just a wooden ruler. It is ground to size on a jointer. The ceramics lie on its surface, and there is always a stable gap of 1 mm between the nozzle and the metal, so I change consumables very rarely. And I can cut at least a million of these wooden rulers on a woodworking machine.
All seams are thoroughly cleaned and sanded. Especially inside the matrix, where the block will be formed.
We make voids.
We also sand everything very carefully, since after we install them, this will be problematic. They can be made removable, but I didn’t.
We weld the voids.
We make a punch. It should have gaps. I made 5mm gaps on all sides. Well, let’s measure the height more precisely, otherwise the blocks will be of different heights.
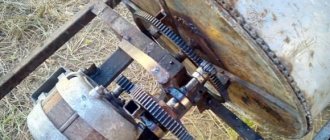
The main work is done. Act two. Making a vibrator. We disassemble the washer and take out the motor. In this case, I took it from a centrifuge.
Next, we cover everything with a galvanized casing.
Act three. Manufacturing of frame and levers.
Now all that remains is to make a normal concrete mixer. This one doesn't suit me. Since the solution is almost dry, it does not mix it well. Therefore, an active one is needed so that the barrel stands and the shaft with blades rotates. I started collecting pieces of iron, but that's another story.
Competition work No. 8 , Technical category of the Welding Competition “Do It Yourself” The general sponsor of the competition is everything for welding and cutting. Winner in the category “Best Supplier” of the ESAB concern in Russia 2014.