For light auto-tuning, ice strips are used - this does not contradict either the law or the principle of practicality, durability and durability of the product. However, to do this you need to know the basic nuances, methods and rules of installation.
Let's consider how to choose the right LED strip according to the type of matrix and protection class, what materials and tools will be needed for the work, what the installation diagram looks like, how to connect it in a car using a cigarette lighter, through a resistor, using a linear and pulse stabilizer, as well as what precautions are needed observe during installation.
Choosing a belt for the machine
To correctly connect an LED strip in any car, you need to choose it based on two main criteria. This is the type of matrix and its technical characteristics, as well as the class of protection from external factors. Let's look at them in more detail.
LED Matrix Type
Among the main parameters characterizing the LED strip matrix for a car are:
- Ice crystal size. For example, in the marking it is designated as SMD3528, where the first three letters are the type, and the next four numbers are the size in millimeters, that is, 3.5 mm by 2.8 mm.
- Diode density. Determines the brightness and uniformity of lighting in a specific area of the machine. The number of LED elements varies from 30 to 240 per 1 meter of strip. In this case, the crystals can be arranged two in a row.
- Color of the luminous flux. LED strips can be either monochrome or three-color - RGB type. For the first options, the shade varies over a wide temperature range - from warm white to cold blue.
- Power. Depends on the type, size and density of the crystals. For example, 30 diodes with an SMD5050 matrix consume only 7 W, and 240 similar elements consume 57 W per meter of tape. This parameter determines the strength of the power supply.
- Operating voltage. Ice strips used to illuminate a car are available in 12 and 24 volts.
Recommendation! It is better not to use LED strips with crystals of sizes from SMD 5050 and above in the interior and trunk of a car. Despite their good brightness, they generate too much heat and require the installation of a heat sink, which does not fit well with the interior decoration and causes installation difficulties. Another thing is the external design, for example, illumination of the underbody of the car. Here you can use aluminum profiles as a radiator.
Protection class
It is important not only to install the LED strip correctly in the car and connect it according to the diagram, but also to protect it from dust and moisture. To do this, it must be selected in accordance with operating conditions in the following three categories:
- IP20 and below. The surface of the strip does not have an insulating layer, therefore it is intended for use only in dry, ventilated areas - in the cabin.
- IP65. It has a good level of protection against dust and condensation. The outside is covered with a silicone layer. However, it should not be used under direct flow of water or rain. It is permissible to install the optics outside, inside the trunk, or under the hood of a car.
- IP68. It has a sealed waterproof coating that allows the device to be used submerged in water. Mounted on the body, bumpers, rims and underbody of the car.
LED strips are available for sale in 5-meter rolls. Often sellers indicate the density of ice elements for the entire length, and not for one meter. Such a discrepancy can lead to errors in calculations. This, in turn, will not make it possible to connect it correctly in the car.
We mount the LED strip with our own hands
Outside onto the car
Any external car lighting is an aggressive working environment. We select a protection class of at least IP65, install the tape with glue, with additional fastening with plastic ties.
For LED illumination of the bottom of the car, we choose a tape of the SMD 5050 class or any other with a power of more than 10 W/m. For such power, a heat sink is required. Experience shows that the most reliable installation method is an aluminum profile fixed to the body, onto which the diode strip is already attached with plastic clamps and glue. This installation method eliminates bridging the wiring with fasteners, but adds holes in the car body (if you fasten the profile with self-tapping screws).
The tape cannot be attached directly to the body. You will not achieve a good connection (there will be poor heat dissipation), sagging will appear - and this is before the first branch on the road.
do-it-yourself LED license plate This will allow it to be mounted in the plane of the license plate.
LED strip with side glow
wheels are illuminated along the end of the brake disc. The service life of such LED backlight is limited; the brake discs warm up to 80-130 degrees during operation, quickly killing the LED strip.
The LED strip is mounted on the brake disc only with heat-resistant glue, with the wiring leading out into the engine compartment.
If there is an internal protective casing for the disk, mount it on it; this LED backlight will last much longer.
Inside the car
When illuminating the interior, use low-power LEDs. Excessive brightness causes discomfort when driving. What are the options:
- Glove compartment lighting. If there is a standard backlight, then you can connect to the existing limit switch so that the LED backlight turns on when opened.
- Car dashboard lighting. It is important not to overdo it with power, otherwise the backlight will be in your eyes. Any low-power tape with a minimum protection class will do.
- Illuminated feet under the dashboard. We mount it on the bottom of the dashboard, connect it to the door limit switch so that the LED lighting turns on only when the door is opened.
- Door bottom and door audio pockets. Like the footlights, we connect through the door switch to trigger when the door is opened (about connection below).
Inside the car, the LED strip can be attached to its own adhesive coating. We degrease the installation site and additionally fix the fastening with hot glue, as shown below.
Material and tools
You can correctly connect an LED strip to a car by carefully considering all the stages of the procedure and the location of its installation, as well as preparing the components necessary for the work. These are primarily materials and tools such as:
- Ice strip of a given length, power, brightness and other important parameters.
- Conductors with a cross-sectional surface of about 0.75 mm2.
- Scissors.
- Insulating tape.
- Connectors.
- Soldering iron, rosin, solder and other consumables for soldering.
- Construction hair dryer/lighter.
- Heat shrink tube.
- Moisture resistant profile.
- Clamps.
- Glue.
- A power supply that matches the power of an ice strip.
- Controller with remote control (for three-color tape).
- Phone charger powered by car cigarette lighter.
- Toggle switch/switch.
- Pliers, wire cutters and other electrical installation tools.
Advice! For external connection of LED strip, it is not advisable to use units with a self-adhesive base. Due to the rapid wetness, the strip will quickly peel off from the car and get lost. To fix it in this case, it is better to use a profile and reliable glue or sealant.
conclusions
As a rule, car owners do not have many questions about how to install an LED strip, connect it correctly, as well as any particular difficulties during the installation process. After all, the installation process itself is quite simple and does not require special skills or knowledge of electronics. However, to ensure that everything is connected correctly, reliably and works for a long time, before you begin installation, try to do everything yourself, it is still worth studying in detail the instructions and recommendations for installing and connecting the LED strip.
Installation diagram
Before connecting the LED strip, you need to decide on the choice of its location in the car, as well as the order of installation of the main components.
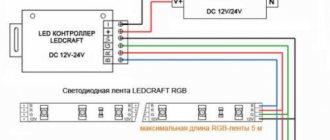
The location of the main equipment in the car may look like the figure below:
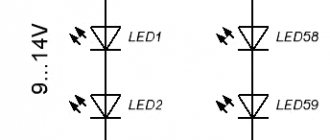
In this case, the LED strip itself in the electrical circuit can be connected in two ways (depending on whether it is monochrome or RGB):
Recommendation! Alternatively, instead of a standard LED flat strip, you can install and connect “flexible neon” to the car - both outside and inside, which is essentially the same ice strip, but enclosed in a flexible plastic tube.
How to connect to the cigarette lighter
To make LED lighting inside the cabin, for example, in the glove compartment, on the dashboard, at the bottom of the doors or in the pedal area, it is not necessary to run wiring through the entire car - the strip can be connected to the cigarette lighter. The algorithm of actions will be as follows:
- It is necessary to remove the cover of the telephone car charger.
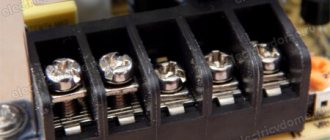
- Next, the core with the “+” sign must be connected by soldering to the fuse terminal.
- The wire with the “-” sign is soldered to the negative contact (metal eye located on the right). All this increases the voltage to the required 12 volts.
- The housing closes.
- After this, the charging plug must be connected to the controller or dimmer.
- The charger is connected to the cigarette lighter.
- The operation of the system is checked.
With this scheme, the LED strip will only work when the car engine is running. In addition, you can connect or disconnect it using the control unit. The main disadvantage of this method is the constantly busy cigarette lighter. Therefore, in order to connect other systems (heating, charger), you will need to turn off the backlight.
Through a resistor
The disadvantage of the above circuit is that in fact the output voltage is more than 12 volts and equal to approximately 14-15 V. Naturally, this will lead to stable burnout of the ice elements and their premature wear, reducing their service life. To prevent this from happening, you need to add a current limiter - a resistor - to the circuit at the input. Moreover, it must be designed for the total load in the assembled circuit. It will be a purchased option or a homemade one - before connecting it, you need to check the compliance of the declared voltage readings with the actual ones using a voltmeter.
Features of including an LED strip in a car
The main feature is that the supply voltage of the LED strip must be 12 V and it must be connected to a stabilized voltage source, not a current source. There are several switching options that are actively used by motorists. Each of them has its own pros and cons, but in general they all find practical application.
As an exception, we will write down a method for directly connecting the LED strip to the on-board network. In this case, the LED current is limited solely by resistors located on the flexible printed circuit board. During voltage surges, their resistance cannot stop the rising current, which leads to overheating of the emitting diode crystals. Therefore, an LED strip for a car must be connected either through an additional resistor or through a voltage stabilizer.
With pulse stabilizer
The pulse stabilizer differs from the one described above in that it is more powerful, does not overheat and is characterized by the following set of parameters:
- Large range of connected voltage - from 4 to 36 volts and set output voltage - from 1 to 36 volts.
- The ability to adjust the current value - from 0 to 5 amperes.
- Automatic protection against short circuit and heating.
- Operating temperature – from -40 to +80С.
- Conversion rate – up to 95%.
- Low price – from 3 to 4 $.
- It is based on the LM2596 chip.
One of the significant advantages of a purchased switching stabilizer is its compactness - it is about 10 times smaller than its linear analogue.
Installation Precautions
When installing an LED strip in a car, it is recommended to observe a number of the following precautions:
- Before starting work with auto electricians, be sure to disconnect the battery by disconnecting the wires from the terminals.
- The ice strip must be selected strictly according to the operating conditions in terms of the degree of protection from dampness.
- It is necessary to place the lighting in the car interior so that it does not blind the driver.
- During installation, LED strips should be bent only within the limits established by the manufacturer, so as not to damage them.
- For soldering, it is permissible to use a low-power soldering iron.
- The total length of the serially connected sections of the ice strip should not exceed 5 meters, otherwise a parallel connection must be used.
- When connecting tapes, it is important to maintain the polarity of the contacts.
- The use of a stabilizer in the circuit will make the backlight work better and extend its service life.
- If a power supply is used in the circuit, its power should be higher by 25% of the total similar indicator for all led elements.
- There must be an insulating gasket between the tape and the metal body of the machine.
- All holes for fastening the lighting in the car body must be treated with an anti-corrosion compound.
- Before starting the power system, you need to make sure that the assembled circuit is correct.
Important! Before installing and connecting an LED strip to your car's headlights, you need to find out how much it will comply with the law. Otherwise, you may be fined by the nearest traffic police department.
Legality of outdoor lighting and fines
In our country, laws are interpreted in favor of the interpreter. The wording is vague and can be interpreted in two ways. What you need to know.
There is no direct ban on installing underbody lighting . But there are a number of points that allow us to find fault with you and, unfortunately, there is nothing to oppose them with.
Making unforeseen changes to the vehicle design
Decree of the Government of the Russian Federation of October 23, 1993 N 1090 (as amended on August 27, 2018) “On the Rules of the Road.” Appendix: List of faults and conditions under which the operation of vehicles is prohibited. Clause 7.18.
Changes were made to the design of the vehicle without permission from the State Road Safety Inspectorate of the Ministry of Internal Affairs of the Russian Federation.
It is impossible to obtain official permission to install lighting (uncertified element). Punishment for violation: warning or fine of 500 rubles .
This is the most loyal point on which they can find fault with you. You will often get off with a warning.
Violation of the rules for installing lighting devices
You will fall under this clause if you install LED car lighting in prohibited colors.
According to the Russian Federation Traffic Regulations, section 3.6. External lighting devices. Installation is prohibited:
In front - lighting devices with lights of any color except white, yellow or orange; At the rear - reverse lights and license plate lights with lights of any color other than white, and other lighting devices with lights of any color other than red, yellow or orange.
In short, the following is allowed:
- The front is just white, yellow and orange;
- at the rear - the license plate is illuminated only in white, the rest - only in red, yellow or orange.
Violation of this clause of the traffic rules entails deprivation of a driver's license for a period of 6 months to a year .
Installation without permission of devices for supplying special light signals
Code of Administrative Offenses of the Russian Federation Article 12.5. Driving a vehicle in the presence of malfunctions... point 4.
Driving a vehicle on which, without appropriate permission, devices are installed to provide special light or sound signals (with the exception of a security alarm).
This is the most dangerous point and, if the evil inspector wishes, any additional lighting of the car can be adjusted to this wording. In practice, it is used very rarely (unless you put a red flashing tape in the radiator, this option will definitely be regarded as a special signal). It is difficult to challenge in court, but it is possible by replacing the punishment with a fine of 500 rubles.
Violation provides for deprivation of rights for a period of one to one and a half years , with confiscation of devices for signaling.
Car lighting design is one of the most popular types of tuning. In most cases, it does not require any special financial costs, but looks very impressive. Glowing wheels or the bottom of the car attract the attention of passers-by. Surely you have come across similar machines more than once. But did you know that creating such lighting is quite easy to do with your own hands. All you need is an LED strip, which can be bought at almost any automotive store and connected without the help of specialists.
Main conclusions
To correctly connect an LED strip in a car, you need to select it based on parameters such as:
- Degree of protection against water and dust - IP index.
- Ice crystal size.
- Density of diodes per 1 meter length.
- Power.
- Shade of luminous flux.
- Operating voltage.
Before you begin installation work, you need to plan exactly how many and what pieces of tape will be installed and in what location. You also need to prepare all the necessary consumables and tools. The easiest way to connect an LED strip in a car is through the cigarette lighter. To ensure the stability of its operation and maintain durability, you need to install a resistor or a linear, or better yet, a pulse voltage stabilizer in the circuit. During work, safety rules must be observed.
If you have information on how else you can connect an LED strip in a car, be sure to share it in the comments.
Previous
Car light How to assemble a 12 V voltage stabilizer for a car with your own hands
Next
Car lightReplacing a low beam lamp on a Lada Largus: selection tips and step-by-step instructions
LED strip for cars - advantages of use
LED strip is a popular device for decorating the interior and exterior of a car. With its help, you can illuminate rims, moldings, license plates and other car trim elements. Its use inside the cabin is no less popular. This tape can be easily laid along the contours of the front panel, steering wheel and gear knob. In other words, it gives unimaginable scope for creativity.
Using an LED strip you can give your car an unusual look.
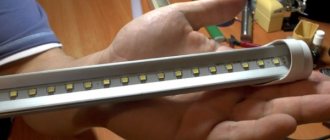
What is this feature? On a metal substrate 1 meter long there are 30 LEDs, grouped 3 diodes per sector, with wires extending from them. There are other combinations, but we'll talk more about them in the next section.
The entire structure is hidden in a sealed transparent shell. Each of the diodes consumes 4 volts of energy, so the tape is powered by a voltage of 12 volts, although in some designs this value can reach 24. Due to the fact that the diodes in the groups are connected in series, the tape can only be cut along the sector boundaries. Otherwise, its work will be disrupted. This tape can be connected to the battery directly.
LED strips used for car tuning are sold in reels of 5–25 meters, but the condition of 30 diodes per 1 m remains unchanged.
LED strip is sold in 5 meter reels.
The use of this particular type of device has a number of undeniable advantages over other lighting sources:
- the ability to repeat various shapes due to the flexibility of the tape;
- ease of installation due to the adhesive layer;
- simple connection diagram to the car;
- the ability to turn the backlight on and off;
- safety during use;
- compactness;
- low power;
- high wear resistance;
- long uninterrupted service;
- no harmful effects on the body;
In addition, they do not require any additional devices, such as a lens, diffuser and reflector. They are easy to find on sale and purchased at a relatively low price. The LED palette includes white, blue, red, yellow and green. You can combine shades according to your creative vision.
There are different colors of LED strips on sale
This type is often inserted into car headlights. They are fine as decoration, but cannot be used as daytime running lights. The lighting angle of the diodes does not correspond to that used in DRLs.