Using an Angle Connector
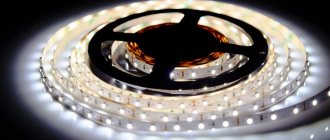
As a rule, LED strip is sold in reels of 3 or 5 meters. In some cases, this length is even enough to assemble the lighting around the perimeter of the ceiling or showcase in one piece. But few people know that the maximum bending radius of the tape is 5 cm. If it is exceeded, the thinnest printed conductors will eventually begin to peel off from the base, and the soldering points of LEDs and resistors will be damaged. To prevent this from happening, the LED strip is cut (only along the cut line!) into two parts, which are first glued at the desired angle, and then the electrical contact is restored.
Perhaps the easiest and most convenient way to rotate an LED strip, for example, at an angle of 90°, is to use a plastic connector. Externally, it can resemble a corner or be made of two separate latches connected by wires. Depending on the shape, connectors can be used to connect two perpendicularly located segments:
Functionally, they are divided into three types:
To reliably connect two LED strips to each other, you first need to prepare them. To do this, use a knife to carefully clean the contact pads located on the edge of both tapes. Then, depending on the type of connector used, the permissible distance between the segments is calculated and their installation is carried out. At the last stage, the prepared edges are snapped into the adapter.
The advantage of this method is that the resulting structure is easily assembled and disassembled in hard-to-reach places. The disadvantage of plastic connectors is their cost, which at retail can reach up to $1.
Recommendations for installation and use
The success of installing an LED strip when installing it yourself depends on compliance with the rules for storage and connection. Here are some tips:
- It is forbidden to apply excessive pressure on the board or bend it too much, as this will damage the conductive paths.
- For connection, you must use connectors and sockets that correspond to the markings.
- Connections should be made carefully to avoid damage.
- To ensure proper ventilation of the diodes, the tape must be secured to an aluminum profile.
Professionals do not recommend using LED lighting when installing glossy stretch ceilings, because the LEDs are reflected in the canvas, like in a mirror, which makes them too noticeable.
With wires
The ends of the wires and contact pads are first stripped and tinned, and then soldered, observing polarity. A separate article on how to solder an LED strip will help you learn how to solder. At the end of the work, to give a pleasant appearance, the frozen drops of flux are removed with a toothbrush moistened with alcohol. To protect the soldering areas from moisture, they are covered with a drop of hot melt glue or hidden in a heat tube.
The advantage of this method is its low cost and high reliability of contact, but the disadvantage is the inability to quickly disassemble a chain of soldered sections.
Source
Connecting power using an LED connector
LED strip is usually supplied wound on spools in lengths of five meters with short wires soldered at the outer end. When preparing an LED strip for installation, a piece of strip five meters long has to be cut into shorter pieces, based on the size of the surfaces or objects on which the strip will be installed. Therefore, there is a need to independently connect conductors to the contact pads. The first method and the easiest and most convenient is to connect wires using a special LED connector. This method is called mechanical. The disadvantage of this method is the investment, since the price of one such connector is quite high. In addition, this method is not characterized as reliable and durable, unlike the next method - soldering.
LED Strip Installation Guide
The basic installation rule is that the segment should not be more than 5 meters long. Each such segment must be connected in parallel. When installed in series, the glow power will decrease.
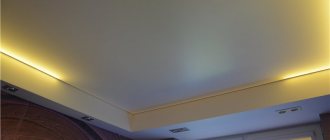
There is no need to be afraid of electric shock when using a tape connected through a power supply. However, you need to remember about fire safety. Even a low-voltage tape heats up to about 70 degrees. If you stick it directly to the wallpaper, the material may catch fire. A special aluminum or plastic profile will dissipate heat and protect the board and LEDs from mechanical damage.
After installation, you need to check again whether the backlight works, since something could have been damaged in the process.
How to connect LED strip
You can cut the tape every 3 diodes, so depending on the density of the tape, you can cut every 5 or 10 cm. It is impossible to make a mistake, since each tape has a designation. If something is done wrong, then you can lose only 3 light bulbs, the rest of the strip will work. You can cut LEDs with regular scissors.
To connect 2 pieces of tape together, you must follow the sequence. But then, at the junction, the quality of lighting may be reduced; the lamps will not shine as brightly as neighboring ones. Therefore, the best option for connecting the segments would be a parallel connection. To do this, you need to prepare a wire with a cross-section of 1 mm and adhere to the following diagram:
How to rotate an LED strip 90 degrees
It is necessary to avoid bending the tape with a radius of more than 5 cm, so it cannot simply be bent if it needs to be secured at an angle of 90 degrees. The board should be cut along the cutting line into two sections, glued together, and then the electrical contact should be restored.
One of the most convenient ways to connect when turning is a corner connector. It is made in the form of a corner element with latches at the ends or in the form of a connector with latches connected by wires. They can be 2, 4 and 5 pin. The first ones are used for single-color strips, the second ones for RGB, and the third ones for RGBW LED strips.
Before connecting two segments, you should clean the contact pads along the edges with a knife, and then install them into the adapter. Such a system is easy to assemble and disassemble, even if it is located in a hard-to-reach place. There is a drawback - the high cost of connectors.
The second installation option will avoid costs. You will need wires according to the number of contacts and a soldering iron. The wires must be stranded copper with a cross-section of 0.75-1 mm2. Installation instructions:
To use heat shrink tubing, it must be placed on the tape before soldering.
This connection method is cheap and reliable, but it cannot be disassembled quickly.
To install the LED strip yourself, just follow the detailed instructions. LED lighting is universal. The tape is often used to illuminate a plasterboard or stretch ceiling, but its scope of application is not limited to this.
Source
Choosing the right glue for LED strip
There is no special glue for installing LED strips. For these purposes, universal multifunctional compositions that are not afraid of exposure to high temperatures are suitable.
The following can be used as glue for attaching LED lighting:
Universal adhesive “Moment Super” is a water- and heat-resistant instant adhesive on a cyanoacrylate base that perfectly bonds a wide range of materials.
Instantly glues different types of plastics; it can be used to glue LED strips to wood, metal, cork, ceramic and other surfaces.
Setting occurs almost instantly, so you should work with the glue carefully.
Liquid nails Titan (Tytan) “Panels & Moldings” is a heavy-duty construction and installation adhesive composition based on rubber. Suitable for quick and durable gluing of LED strip to most types of surfaces (stone, wood, plastic, metal, ceramics, etc.).
After drying, the glue is resistant to temperature changes. You can also use other types of liquid nails, for example, Glue Moment Montazhnazh MV 50, which is excellent for gluing LED lighting to wood, styrofoam, metal, chipboard, laminated chipboard, plastic, ceramics, foam plastic, and plaster.
Hot glue gun. If you have hot-melt adhesive on hand, it is also perfect for installing LED strips. Universal glue sticks reliably stick the tape to a wide variety of materials, such as wood, plastics, metals, ceramics, etc.
Note! Before installing the LED strip, you must carefully prepare the base surface - it must be perfectly clean and dry. Metal and plastic surfaces should be degreased with white spirit or acetone
Painted surfaces can be wiped with a vinegar solution.
Metal and plastic surfaces should be degreased with white spirit or acetone. Painted surfaces can be wiped with a vinegar solution.
How to bend an LED strip 90 degrees?
In the case of homemade LED strips, everything was simple - an assembly of any length was soldered onto wires and packaged in a transparent silicone hose. Industrial light strips are produced by the length, which allows them to be cut in fragments - and to connect the sections together according to the terrain of the premises.
Connecting the LED strip via a power supply
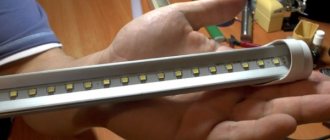
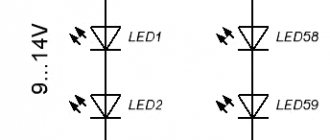
The tape is based on a flexible strip along the length of which LEDs are located. They are connected to each other in a parallel-series circuit by flexible electrical tracks, thanks to which the tape can be cut into pieces of 3 or 6 diodes, depending on the voltage. mowing line possible cuts are marked on each strip. Next to them there are special areas for connecting wires.
Double-sided tape is usually glued to the inside of the tape, which greatly facilitates its installation and fixation to the desired surface.
There is a huge number and variety of LED strips in the construction markets. They can differ: by the type of glow (cold or warm light), by color characteristics (one color or a combination of different colors), and also by the number of LEDs per meter (this parameter affects energy consumption and light output).
How to turn with a connector?
To fit, for example, into a non-standard ceiling, where the design provides for an additional step, multi-stage drops with right angles, you need to bend the LED strip 90 degrees. It is not possible to bend the finished tape - in silicone - so that it follows as accurately as possible the relief of the ceiling, wall transitions and steps on the floor (if the floor is backlit). For small transitions, 12 or 24 volt tape is cut into fragments in places where it is necessary. These pieces are then connected using either connectors or wires.
90 degree connectors are the optimal solution for users who are too lazy to do a little work with a soldering iron at height.
There are connectors for non-standard angles, for example 45 degrees. Adjustable movable connectors are being developed and implemented, making it possible to bend them (one or several times) to any desired angle. Multi-element connectors can be rotated up to several tens of thousands of times - until the thinnest, several micrometers, layer of gold on them is erased, as happens, for example, with USB connectors. The most common are connectors with a fixed angle - they are used as a simple turn of the conductors. If necessary, the tape can be easily disassembled and moved to another location using unfolded (straight) connectors. The simplest connector is latches connected by wires, or a rigid corner element that is not flexible.
If the connector bends due to the wire segments, it will withstand numerous small bends.
Before applying (fastening) the tape, thread one of the pieces of tape cut along the cutting line into the connector. The end of the tape is pressed into the connector with preliminary stripping of the contacts from the protective shell (if any). Stick it on the surface along with this connector. When the glue has set and part of the tape is securely attached to the ceiling or wall, insert another part of the tape into the connector. Glue it to another place. Make sure that all contacts are connected - white and monochrome LEDs have only two of them, three-color LEDs have 4 (one common “minus” and separate “pluses”). If the tape is connected correctly, the light will turn on immediately after power is supplied from the adapter or driver. For 220-volt tapes, the segments reach a considerable length - they can only be bent with a minimum bending radius of 5 cm. A sharper bend can damage the light assembly.
Trimming diode strip for repair
If one diode fails during operation, the entire unit stops lighting. If the strip is 12 V, 3 chips go out, in a 220 V LED strip - 0.5-2 meters. The light source can be restored if the faulty unit is correctly cut off and a new one is installed. You need to cut along the lines located on both sides of the faulty diode.
Attention! To attach a new block, you can use special mounting elements or soldering.
The use of connectors makes it possible to carry out repairs without dismantling. For soldering, a 25 W soldering iron and a wire with a cross-section of 0.5 m2 are required. Acid cannot be used; the wires must be fixed using heat-shrinkable tubing.
How to rotate Yeelight LED strip 90 degrees? How the tape is arranged inside.
How to bend with wires?
Wires, unlike tape, will tolerate almost any bend. They are “not picky” about the bending radius, because they are bent mainly once, when it is necessary to make this bend in particularly difficult conditions. The bending radius can be equal to the diameter of the wire (with insulation). To connect two sections of light tape at any angle, do the following.
For each soldering point, use 1-2 drops of solder and a drop of flux. The flux is required so that soldering takes no more than one second, otherwise the diode strip will overheat and the conductive tracks may lag behind the polymer-foil substrate. Soldering is one of the most reliable methods of connecting contacts; only a contact-bolt connection can “compete” with it.
The disadvantage is the impossibility of quickly disassembling such a connection.
Recommendations and tips on how to connect LED strip:
MANDATORY REQUIREMENTS AND RECOMMENDATIONS Observe the operating conditions: 1. The tape must be powered from a stabilized DC voltage source. Read more about choosing a power source here. 2. The tape is intended for indoor use. 3. Ambient temperature -20… +45 “C. Relative air humidity no more than 80% at +25 “C. 4. The absence of vapors and aggressive impurities (acids, alkalis, etc.) in the air. 5. When connecting a tape with a total length of more than 5 meters, use a parallel connection of the tapes. 6. Check the connection polarity, reliability and correctness of connections before turning on. 7. To extend the service life of the tape, install it on an additional heat sink, for example, an aluminum profile. 8. When installing the tape on metal and other conductive surfaces, to prevent short circuits, insulate the tape from the surface. 9. Do not subject the tape or its components to mechanical stress. 10. Do not damage the conductive paths of the tape. 11. The minimum bending radius of the tape is 3 cm. 12. Avoid moisture and condensation on the tape. 13. Before installing the tapes, visually check the glow and select the BIN. When installing multiple tapes next to each other, it is recommended to use tapes with the same BIN value. 14. You can cut the tape in the designated places, between the soldering pads. Use scissors for cutting. 15. Connect the tape sections using soldering. The wires are soldered to the designated contact pads marked “+ 12 V”, “-12V”. Soldering time should not exceed 5 seconds at a soldering iron tip temperature of no higher than 280″C.
In this article I answered the question How to connect an LED strip? There is also an analysis of the main difficulties of how to connect an LED strip when installing LED strips.
How to connect an outdoor LED strip?
Soldering LED strip
Useful tips
It is not allowed to heat the LED strip with a soldering iron for more than two seconds.
The hissing and evaporation of the flux serves as an additional heat sink, preventing overheating of the soldering area. Don't neglect the flux - it allows you to apply a layer of solder to copper contacts and wires almost instantly.
Do not attempt to bend a connector designed to be at a right angle. Even if you do this and the contact is not broken, if necessary, it will be difficult to straighten it to the same angle. Similarly, it makes no sense to unbend a rectangular connector to a full angle of 180 degrees or bend it in the other direction. For direct connections, simpler adapters are used - or even wires, as is the case with soldering connections.
Make sure that the connectors are used exactly for the type of light tape that you have installed. 2- or 3-pin are not suitable for 4- and 5-pin - and vice versa. If you don’t have a suitable connector at hand, use wires. In order not to spoil the design of, for example, a ceiling, the wires should match the color of the tape: contrast is not always a reasonable solution.
You cannot bend the tape itself “steeply” (under a small bending radius) - it will immediately be damaged. The tape materials are not designed for such use.
What you will need for installation
No complex tools or fixtures are required for installation. A soldering iron is used to connect the tape, but it is also optional. Components required for installation of low-voltage LED strip: controller, power supply, connectors.
Controller
This device is designed to adjust the glow mode of the diodes and change the color of the backlight. By connecting the controller, you can use the remote control to make the LEDs flash or shimmer in different colors. For single-color duralight, a controller is not needed. Before purchasing, you need to check how many soldering contacts the tape has in order to purchase a suitable device.
power unit
For proper and long-term operation of duralight, a power supply is required. It lowers the network voltage. The power of the unit is selected in accordance with the LED strip - a reserve is needed. Connect in front of the controller.
If the tape is 220 V, instead of a power supply you will need a rectifier - a diode bridge.
Connectors
Connectors allow you to connect individual parts of the tape without using a soldering iron. But first you need to select a suitable connector: flat or round.
Optionally, a dimmer is also used to adjust the light intensity level, but it does not have to be used.
When you might need it
The reason for connecting LED strip fragments is usually the same. Typically, lighting strips are sold in rolls of up to 5 m, and this length is not always enough for all areas of the premises. For example, you want to wrap a ribbon around the perimeter of a suspended ceiling for beauty. Will 5 meters be enough? Of course not. The same applies to the decor of the facades of shops, banks, and beauty salons. So the LED filaments have to be extended by connecting individual fragments.
Basic methods of joining pieces of LED filament
The LED strip is connected in two ways: by soldering and using connectors. Which one to choose depends on the end goal. If you need a guaranteed reliable strong connection for years, it is better to use soldering . Connectors also work well to connect fragments, but this method is simpler and faster.
Now about the main pros and cons of each method of connecting LED filament fragments together. Information is presented in the form of tables.
Soldering method
| Behind | Against |
| The tape can have any desired turns and bends | If you have no experience or self-confidence, it is better not to take it |
| High connection strength | A very hot soldering iron is a big threat to the operation of the tape. |
| Contacts will not oxidize | |
| No need to deal with boards | |
| If you have a soldering iron, rosin, electrical tape, you don’t have to spend money | |
| The junction of the fragments is not noticeable |
Connection using connectors
| Behind | Against |
| Connectors are easy to install and remove | High humidity is the enemy of connectors |
| There are many types of connectors for different purposes | Contacts can quickly oxidize |
| The ability to give the LED strip any bends and shapes | If you purchase a connector of poor quality, the tape may simply not turn on. |
| No additional insulation required | The junction of the pieces will be noticeable |
| Connectors are affordable | |
| No super skills required for installation |
Advantages and disadvantages of LED lighting
Duralight has the following advantages:
- Low power consumption compared to other light sources.
- Long service life: if you follow the operating rules, duralight will last much longer than other lighting devices.
- Easy and simple installation: thanks to the self-adhesive layer, the tape is fastened quickly and is quite reliable. It can be cut and connected using a soldering iron.
- Safety. Unlike many lighting devices, LEDs do not heat up very much, and thanks to their installation in a profile, they can be combined with materials that are susceptible to high temperatures, such as PVC sheets, from which suspended ceiling structures are made.
- Possibility to change the backlight color. The shade of the glow is changed using the controller.
The main advantage of the tape is its versatility. It can connect not only to a 220 V network, but also to a car battery.
An important disadvantage of duralight lies in the low intensity of the luminous flux. Therefore, backlighting is used as decorative and additional lighting.
Solder connection
There are two ways to join pieces of luminous tape by soldering - wirelessly and via wire.
Without wires
The first method involves wirelessly connecting LED filament fragments to each other. This is done using the following algorithm:
Important! It is imperative to ensure that the plus goes to the plus, the minus to the minus.
With wire
For the second method, the first 4 steps will be the same. Next you will need a wire. Copper with a diameter of 0.8 mm is suitable, the main thing is that the cross-section matches. The minimum length is 1 cm, but longer is better.
Now the elongated LED strip can be bent in any way and installed in a variety of directions.
Docking using connectors
What are there
Depending on the task, different types of connectors are used:
Step-by-step instructions for switching
All that is required for such an operation is sharp scissors. The algorithm is as follows:
To connect 3 or more fragments of the LED strip, you should use an RGB-type connector. It, unlike standard connectors, has not 2 contact pads, but 4 - 2 on each side. Between the two ends of the connector there is a 4-wire bus of wires of different colors; it can be bent if necessary.
In addition, to connect pieces of a single-color LED strip, you can use a quick connector with two wires. It needs to be turned over so that the wide white stripe is on top, each end of the thread is inserted into the corresponding connector. It is important to ensure that the polarity is maintained. After the box is securely fixed and snapped into place, you can begin checking the operation of the LED strip.
Source
How to cut correctly
Each LED strip contains many short blocks on which the number of chips and resistors is installed, depending on the model. LEDs are transparent or white, current limiters are black. Between the blocks there is most often a mark (a dotted line and an image of scissors) along which the strip can be cut.
Attention! If there are no marks on the front side, you should inspect the back side.
On a thin strip, it is more convenient to make the cut with sharp scissors. The exception is boards installed in a silicone tube. You need to cut between two contact pads. When offset, it is difficult to solder wires to connect to other sections or the power supply.
On the LED strip there are joints every 50 cm in which individual blocks are soldered overlapping. It is not advisable to cut the tape in these places (the contact pads are too small). If you still need to cut, the scissors must be replaced with a soldering iron (unsolder the joint).
RGB color tape
The design of RGB and RGBW LED boards differs little from the design of a single-color LED strip. The difference lies in the number of paths carrying current (there are four or five on a multi-color strip). The pads are marked “R”, “G”, “B” and “-” (on the RGBW stripe “R”, “G”, “B”, “W” and “-”). You can cut a piece from such a strip in the same way as from a monochrome strip - along the dotted lines.
When connecting to a power source and connecting segments, it is important to connect each channel to the corresponding color pad. If this condition is violated, the light source will fail due to the difference in the power parameters of each color.
LED strip 220 volts
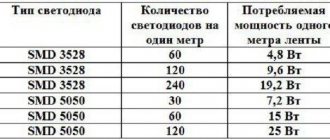
LED strips for 220 volts are made from SMD 3528, 2835, 3014, 5050, 5630 LEDs and come in several types, differing in the chip installation pattern. The main difference from 220 V products is the cutting ratio of 0.5, 1 or 2 meters. The number of diodes on one segment varies between 30-120 pieces. You can cut a piece from such a tape using scissors along the dotted lines.
VLUU L100, M100 / Samsung L100, M100