What is a crown
How to cut an even round hole in drywall of the required diameter? To do this, use a cylinder-shaped cutter with a cutting serrated edge on one side and a tail for attaching the cutter to the drill on the other. A drill is located in the center of this cylinder. This whole structure is called a plasterboard crown, or a core drill. How it works: the drill is the first to enter the drywall and sets the center of the future hole, while the nozzle is fixed in the desired position, the edge of the cutter enters the surface and makes a cut of the circle.
What to use to make holes in drywall for lamps - the issue is resolved
Drywall has proven itself to be a universal finishing material. Thanks to its excellent performance characteristics and comparative ease of use, it can be used to solve a wide range of problems. However, there are some peculiarities in handling it. For example, when you need to cut a round hole in drywall, certain difficulties may arise. How to correctly carry out the necessary actions will be discussed further.
Options for solving the problem
So, if there is a need to make a technological or decorative hole in a sheet of drywall, then you should take into account that the problem can be solved in several ways. The choice of option should be made based on specific conditions and the availability of tools.
Special drill attachment
You can make a round hole in drywall using a special drill attachment on a drill. This option can be considered the simplest and most convenient for independent implementation. To do this, you need to purchase crowns (round drill bits) from a specialized store that will correspond to the required dimensions. The element is clamped in the drill chuck, and the required holes are drilled using pre-applied markings. Such drills are most often sold in sets, so there should be no problems with selecting the right size.
Jigsaw
If you need to drill a hole of a large diameter or it is not possible to purchase a special drill, then you can use a simple jigsaw. To do this, markings are made in the right place. After this, you need to use an ordinary drill, the diameter of which will be slightly larger than the width of the jigsaw blade, to make a through hole on the marked line. Next, using the resulting hole as a starting point, a circular cut is made. If necessary, the inner edges of the resulting hole can be sanded.
Tile drill
Another option for making holes in drywall for lamps is to use a special tile drill. Despite the fact that such use of attachments of this type can be considered inappropriate, there are no difficulties in performing the task. The nozzle can be adjusted within a certain range, so its purchase can be considered a universal solution.
Hacksaw blade
An even simpler solution would be to use a hacksaw blade for metal. Here we will repeat approximately the same actions as when working with a jigsaw. Due to its availability, this option can be considered the most acceptable in most cases. It is important to note that you should be careful when working with the blade, because it is quite possible to get injured when sawing. To avoid this, you can take simple precautions, for example, wrap one side of the fabric in several layers with electrical tape or put heat-shrink tubing over it. If not needed, such an improvised handle can be removed.
Other ways
If for some reason the above methods are impossible to use, the problem can be solved in another way. So, for example, a series of holes are drilled using a regular drill according to the markings. They must be performed at a distance of several millimeters from each other. Next, with a light blow of the hammer handle, the inner part is knocked out, and the remaining irregularities are removed using coarse sandpaper.
In addition, you can use a simple stationery knife. As a guide, you can take a round object of suitable diameter, such as a saucer or bottle. Several passes with a knife are made around the improvised template, resulting in a fairly neat hole.
Thus, it is obvious that there are quite a lot of options for how to make a hole in drywall for a lamp, so every home craftsman can choose the most suitable method for himself.
Types of crowns
Core drills can be divided into two types: solid and split.
- Solid crowns are basically a drill bit with a single metal toothed cylinder on it;
- The collapsible crown device contains a universal disk into which cylinders of different diameters can be inserted. The cylinders themselves have an open shape and come complete with a disk. Like solid crowns, the collapsible edge is serrated.
The diameter of the cylinders can vary from 33 to 150 mm.
Both wood and metal drill bits are suitable for making holes in drywall. There are universal - bimetallic crowns that can be used to drill metal, wood, gypsum plasterboard, of course they are more expensive, but if you use them only for drywall, then we can say that they are eternal. When purchasing a bimetallic crown, you should pay attention to the fact that they are usually sold without a holder and a centering drill. In the assembly this is called an adapter, which will have to be purchased separately.
Making holes with a circular drill
First of all, the “ballerina” is intended for making holes in ceramic tiles, but if it is available, it can be used for this task, since with its help it will be possible to increase or decrease the diameter with an accuracy of a millimeter. Having achieved the correct dimensions, you will be able to drill a slot into which you can install any required fasteners, socket box or lighting source.
The cost of this cutting element ranges from 2 to 10 dollars, corresponding to the price of a set of crowns. The nozzle can be adjusted within certain limits, so purchasing it will be a universal solution.
One of the key advantages is the ability to make holes with a circular drill in drywall that has already been installed, while being glued on a concrete wall or ceiling, although in the second case it is not recommended to make a cut using this attachment. This feature is achieved thanks to the presence of a pobedite tip.
The maximum permissible diameter of the hole produced by the ballerina is limited solely by her shoulder.
Selection of cutter
When you come to the store, it’s easy to get confused by the abundance of crowns on offer. How not to make a mistake with the choice so that it does not break when making the first hole?
- Take the crown in your hands and take a good look at it. If the product is of low quality, you will be able to visually immediately see, for example, elements of careless processing or defective coating. It is worth paying attention to the tail of the crown; if it is too light, it is made of low-quality metal and can quickly break;
- The centering drill and shank must be firmly secured, gaps are unacceptable. Also, if this is a dismountable bit, you need to check each cylinder included in the kit, how easily and evenly each of them fits into the groove of the disc. Make sure that none of the cylinders is loose in the groove, because the quality of the cut will depend on this;
- The element of the crown that bears the maximum load when drilling is the cylinders (glasses) with a serrated edge. The service life of the entire device depends on the quality of the material of this element. The saws should not be too thin and bend easily, the material should be elastic, otherwise you may not get a hole. Saws with hardened teeth are higher quality and more durable. Do not forget - the cutting teeth must ensure a clear and even cut of the material;
- Core drills come in different sizes (cylinder diameter, drilling depth), if you buy a set, make sure it has the one you need.
Crown for installing mounting boxes
The most common need to drill round holes in drywall is to install electrical outlets. The invisible part of the socket, the plastic round mounting box that is mounted in the wall, is called the socket box. There are socket boxes for concrete, wood and plasterboard.
The socket box for drywall is a plastic cup with adjustable plates made of plastic or metal. Thanks to these “claws,” the socket box is fixed to the back side of the plasterboard sheet. The depth of the installation box can be 40, 50, 60 or 73 mm. As for the diameter, for a standard socket box it is usually 68-70 mm.
If you only need to drill holes to mount sockets, you will only need one hole saw. In this case, you should not purchase a set of dismountable crowns. It is enough to buy one special core drill, with a diameter of 68 or 70 mm (depending on the size of your socket boxes).
Today, the diameter of a core drill for drywall 68 mm is the most popular standard size.
Spotlights
Spotlights, so-called spots, which represent a point source of light, have become widespread these days. In most cases, spots are installed in plasterboard ceilings or boxes. For installation, it is necessary to cut a hole with a diameter corresponding to the diameter of the ceiling lamp. Usually, the required diameter for cutting is written on the packaging of the lamp or in the instructions for it, but it happens that there are no instructions, then you should measure the diameter yourself. This can also be done simply to check the specified information, so as not to accidentally make a hole of the wrong diameter, because nothing can be corrected later.
The most common diameters of holes for spots are 60 and 75 mm. To get a hole of the required diameter, you should use a special drill - a plasterboard crown. The main thing when you choose the size of the crown for drilling a hole for a spotlight is that the drilled diameter is smaller than the diameter of the spot, that is, the lamp must completely cover the lamp during installation.
Organization of the drilling process
Everyone uses different bits depending on their needs, but no matter what drill you use, there are general instructions for how to use them.
The whole process can be divided into several stages:
- determining the location of holes on drywall;
- marking the surface material;
- attaching a core drill to a power tool;
- direct drilling.
At the first stage, you should decide where, how many, and what diameter the holes will be. It is better if you already have the elements to be mounted (lamps, socket boxes, etc.), then it will be easier to determine all the required hole diameters and thereby avoid unnecessary mistakes. Ideal if there is a clear layout diagram.
Next, the surface is marked. Measurements are taken and the center points of the holes are marked on the surface of the drywall, where the centering drill subsequently enters. Be careful that the hole does not hit the location of the metal profile, in which case you will be forced to cut the metal as well. If, for example, it is not clear from the heads of the screws where the profile is located, and you did not fasten the drywall, then you should find out where the metal goes before drilling; you may need to ask the team involved in the wrapping in advance to put some marks. There is another way to find out the location of the profile - use a search magnet. If you plan to place several elements nearby, then when marking, you need to monitor the level.
At the third stage, a crown of the required diameter is taken and installed on the power tool. This could be a drill or a screwdriver. To use a hammer drill, you need to purchase an adapter chuck and remember to turn off the impact mode.
Next, after you have made the calculations and markings, you can proceed directly to drilling. The centering drill of the crown is placed on the center of the future hole and the power tool is gently turned on. In this process, large tool power is not needed. The main thing is to hold the tool straight so as not to get a beveled cut. The drilling process can be carried out both on already fixed drywall, and on sheets that are not yet mounted, without using strong pressure on the plasterboard.
Drywall is a fairly soft material, and having a cutter of the right size and quality, it is not difficult to make a smooth hole, but still, if you doubt your abilities, trust the professionals.
Using a blade for metal
Almost every owner has this cutting tool in their home. The cut must be made using a replaceable hacksaw blade. The process itself largely repeats the steps used when using an electric jigsaw.
In the sheet, you need to drill several holes in advance along a marked circle, in one of which you will then need to install a cutting element and make a cut. If there is a need for numerous slots, you can buy a special handle, which allows you to insert the blade and make the cutting process more convenient and simpler.
Note! When using the blade, extreme care should be taken to avoid injury. To avoid this, you can take certain precautions, for example, by wrapping several layers of electrical tape on one side or placing heat-shrink tubing over it.
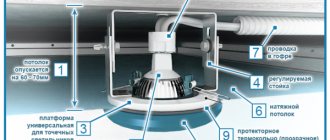
Box for built-in lamps
Modern apartment design involves zonal lighting of the room. One of the options for ceiling lighting and perimeter placement of built-in lamps used for local or main lighting of the room is installed in plasterboard boxes. Boxes are usually installed under the base ceiling along the walls of the room. Built-in lamps are mounted both in the lower plane of the box - for local or main lighting, and in the side plane of the box - for illuminating the ceiling.
There are several different options for ceiling boxes, the frame of which is made: from wooden blocks, PNP guide profiles and PP ceiling profiles, PN guide profiles and PS post profiles.
One of the simplest box designs to manufacture is made from PP 60×27 ceiling profiles and PNP guide profiles 28×27. Having mastered the algorithm for constructing this box, it will not be difficult for you to make a box of your own size and shape. Using the same principle, you can make a box receding from the wall to place window curtains behind it, or an “island in the middle of the ceiling.” A slight improvement in the basic design allows the production of boxes with closed or open ceiling niches.
The sequence of manufacturing a simple ceiling box (Fig. 166).
Rice. 166. One of the options for installing a simple ceiling plasterboard box
1. Marking the box.
Almost all the same operations are performed as when marking a simple plasterboard ceiling: the horizon is drawn out, the zero line of the ceiling is found, from which a distance equal to the height of the box is laid on the wall. The PNP wall guide profile will be installed here. On the base ceiling, measure a distance equal to the width of the box. The second PNP guide profile will be installed here. Let's call it a ceiling guide. The ceiling guide can be installed in the form of a straight line or curved in a “snake”, “wave”, “zigzag” or in some other way.
2. Output of power cables into the box.
Call the electricians! In the junction box, which is usually located under the ceiling, find the ends that go to the existing lamp in the room and to its switch. Disconnect the wires going to the existing lamp or make a branch from them to the lamps that will be installed in the box. The purpose of the operation: to make sure that when voltage is applied by the switch, the ceiling chandelier and the lamps in the box light up, either a separate chandelier, separate lamps, or a separate chandelier, one group of lamps separately, another group separately. When lighting fixtures are switched on in multiple ways, additional wiring to the switches will be required. It will be necessary to groove the walls and run additional wires.
There is no need to ditch the walls for the wires going to the groups of built-in lamps; they will be located in a box. Here it is better to use soft copper wires in double insulation. The main condition: the wires must be located so that you do not catch them with self-tapping screws when screwing the plasterboard sheets to the frame. Do not pull the wires, let them be installed with some slack, then they will not rub against the metal profiles of the frame. When using built-in lamps, the wires connected to each lamp must be longer than required by half a meter, then the lamps can be removed from the box and the wire pulled out to repair or replace the lamp.
Currently, the construction market offers automatic switches from a remote control. It’s similar to how you use a TV: you press a key, the TV turns on, you press another – you switch the program. The automatic switch operates in the same way: press a key - one group of lamps lights up, press another key - another group lights up. There is no need to trench the walls to turn on the light this way; the switch will be located in the box.
Insulate the ends of the wires for the lighting device. If you connected bundles of wires, roll them up and also insulate the ends. The wires should not interfere with the structure of the box frame.
3. Installation of the ceiling guide.
According to the markings, without leveling the horizon, attach the PNP guide profile 28×27 to the base ceiling. The fastener spacing is no more than 500 mm.
4. Installation of the wall guide.
According to the markings, with the horizon leveled, attach the PNP guide profile 28×27 to the wall through the sealing tape. The fastener spacing is no more than 500 mm.
5. Installation of the side shelf of the box.
Cut a strip of drywall slightly larger than the height of the box and attach it to the ceiling rail with self-tapping screws. The pitch of the screws is no more than 200 mm.
6. Installation of the lower box guide.
To install the bottom guide of the box, prepare a PNP profile 28x27. Measure distances on it equal to the installation step of the box posts of 500 or 400 mm. The installation step of the racks depends on how you cut the strip from the plasterboard sheet: if the sheet was cut across, then the installation step of the racks can be 400 mm, if along - 500 mm. In general, it is better to make the step a multiple of the sheet size, so that the joining of the gypsum board sheets falls on the profile of the rack. The main thing is to correctly place the outer posts so that they fall under the joints. The spacing of the intermediate posts is not so important; as a rule, the boxes are small in size and it is enough to fasten the plasterboard on them to the ceiling and bottom rail; in some cases, the intermediate posts are not needed at all.
After breaking out the axes of the racks, measure 30–32 mm from them in both directions (the width of the profile used for the racks is 60 mm), make cuts to the rear flange of the PNP profile and bend the resulting tabs. The profile is ready for installation.
Attach the bottom rail you just made to the side shelf sheet of the box hanging from the ceiling. Before fixing with a level, align the bottom track with the track on the wall. Screw the screws from the outside of the box through the drywall into the bottom guide.
7 and 8. Installation of racks and lower transverse profiles of the box.
Cut short pieces from the PP 60×27 profile to the width and height of the box, shortened from the nominal dimensions by 10 mm on both sides. Insert them into the wall and bottom profiles, and into the ceiling and bottom profiles, respectively. Distribute the lower cross profiles so that the joints of the plasterboard strips fall on them. If the installation locations of the transverse profiles and the profiles used as box racks coincide, then the racks can be shortened, then they will be attached to the “tongues of the lower guide profile.
Using short self-tapping screws, attach the transverse shorts of the PP profile to the PN profiles. Using long self-tapping screws, attach the PP profile posts to the PN profiles through the plasterboard from the outside of the box.
From the inside of the box, trim the gypsum board cardboard with a utility knife, using the bottom guide as a ruler. Crack the drywall and cut the gypsum board on the other side.
What to install first, racks or transverse profiles and at what stage to trim the excess drywall of the front wall of the box, before installing the shorts or after, the work will tell you. Much depends on how tight the work is. Sometimes it is more convenient to fasten the racks earlier, sometimes - the transverse shorts. In any case, first coordinate the dimensions of the racks with the location of the installation of the transverse shorts. In order to cut the required length for the rack in advance, since their lower end can be lowered to the bottom flange of the PN profile, or can be attached only to the bent “tongue”.
9. Arranging the bottom of the box.
Finish the electrical wiring work. Cut out the drywall and attach it to the bottom of the box frame. Holes for lamps can be drilled in advance, but it is better to do them after installing the plasterboard in place - in this case the holes are easier to position on the ceiling. The end of the electrical wire is hooked through the hole with a wire hook and pulled out to connect to the lamp.
10. Puttying gypsum boards.
After assembling the box and before putting it on, you need to wait at least two days. Putty the horizontal and vertical joints of gypsum plasterboard sheets and the places where self-tapping screws enter the drywall in the same way as described.
The outer corner formed by the vertical and horizontal walls of the box is puttied using serpyanka or paper reinforcing tape:
- Sand the cut edge of the drywall using a sanding jig to form the correct angle;
- moisten the corner with water to remove dust from the surface and improve adhesion to the gypsum mortar and apply the gypsum mortar to the corner;
- cut the reinforcing tape to the required length, bend it in half and run your fingers along the fold (that is, make an arrow like on trousers), unfold the tape and glue it to the corner;
- Using a spatula or gloved hands, smooth the tape onto both planes of the drywall, squeezing out air and excess solution from under the tape;
- remove excess mortar with a spatula and smooth it into a thin layer on top of the tape;
- After the mortar has set and dried, sand the corner surfaces with a grinding device;
- Apply a covering layer of putty, stretching it to zero (almost the entire box is puttied);
- After the putty has dried, sand the joints.
If you need to get a perfectly straight edge of the outer corner of the box, then the joint is made using a special corner profile.
The same technology is used as when using reinforcing tape, with the only difference: instead of tape, an angular profile is installed. It is better to install a metal corner, it is thinner than a plastic one.
Cut the perforated angle to the required length. Moisten the surface of the corner with water, then apply gypsum mortar to the outer corner of the plasterboard with a metal trowel. Install the corner by pressing it into the solution so that it protrudes through the perforation. In this case, the corner will take on the curvature of the corner structure. After drying, sand the joint and cover it with another layer of putty, stripping it to zero.
If it is intended to correct errors in the installation of gypsum boards, then when installing a perforated corner, the technology should be slightly modified (Fig. 167). From both joined sheets of plasterboard, cut off the paper and part of the gypsum core with a knife to a depth of 3 mm and the width along the corner flange. Cut the perforated angle to the required length. Moisten the surface of the corner well with water, then apply a gypsum solution to the outer corner made of gypsum plasterboard or gypsum fiber board with a metal trowel. Using a spatula, apply the solution to the inside of the perforated corner. Install the perforated corner by pressing it into the mortar so that the mortar comes through the perforation. Use a spatula to remove excess mortar and trim the perforated corner according to the rule. In this case, the corner flanges fall inside the putty layer, which is bonded to the core gypsum. After the solution has dried, sand the surface of the corner with sandpaper and putty. If the profiled corner protrudes above the surface of crookedly installed plasterboard sheets, completely putty the entire surface of the box.
Rice. 167. Processing the outer corner of the joint of drywall using a PU corner profile
The internal corner formed by dissimilar materials, the wall and the plasterboard shelf of the box, is puttied with reinforcing tape using the same technology as the external corner.
The lamps are installed in the box after the ceiling has been cleaned, that is, after painting or wallpapering. The leveling ceiling between the boxes is done after they are installed, but before the joints are puttied.
Cutting a Rectangular Hole
If you need a rectangular cut on an old wall, you will need a narrow drywall saw. In addition, during the work you will need a number of the following tools:
- construction knife;
- roulette;
- pencil;
- drill with drill bit;
- square
To make holes on new plasterboard sheets, instead of a hacksaw, you can use an electric jigsaw, which is more convenient for this task and allows you to achieve the most even cut. An equally important step to obtain the final result is to take correct measurements and cut accurately. Using a square and a ruler (tape measure), you should mark the left and right sides of the future hole (the distance from its beginning and end to one of the edges of the slab). Next, you need to draw all the lines at the required distance from the other edge of the sheet.
Note! Measurements should be taken and checked at least twice to avoid possible errors in the future.
At the next stage, it is necessary to combine all the edges of the drawn stripes, forming a square or rectangular figure. After this, a drill is used, into which you first need to install a large-diameter drill. Using this tool, you should make 4 holes in the center of the marked stripes in the inner area of the drawn figure, through which you can make the initial installation of an electric jigsaw blade or a hacksaw.
Important! It is necessary to drill in drywall as close as possible to the lines of the rectangle, since in this case it will be much easier to cut along the drawn lines.
After making the holes, you need to remove the resulting debris using a broom or vacuum cleaner. Next, you need to unfold the plasterboard sheet with the front side up and fix it so that it remains motionless while using the tool. The next step is to install a jigsaw blade or a narrow hacksaw into one of the holes made.
During cutting, it is necessary to hold the tool firmly in your hands perpendicular to the plane of the sheet, making a movement in strict compliance with the intended stripes. It is quite difficult to make an even cut of a rectangular shape, moving continuously along the perimeter of the drawn lines, and it is for this reason that 4 holes must first be made using a drill. Having cut to one of the edges of the rectangle, you need to stop cutting to move the blade to another drilled place. There is no need to rush while cutting, being careful, and you will be able to achieve a perfect or close to it result.
Note! When making holes, a fairly large amount of dust is generated, so to protect the respiratory tract and eyesight, it is imperative to wear a respirator and special glasses.
Having become familiar with what and how to make a hole in drywall, you will be able not only to understand the correct principle of performing the work, but also to do it with your own hands in the most suitable way for yourself.
Video: