Metal fence posts
Content
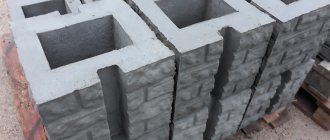
the most common option. All types of metal fences are most often mounted on them: corrugated sheets, perforated panels, welded or forged sections, metal picket fences, chain-link mesh or panels made from angle and welded (perforated) mesh. They are often chosen for wooden and plastic fences. Even brick or stone supports may have a metal pipe inside.
Having a low cost, such poles are easy to install, durable and reliable during operation. And with proper protective treatment and timely prevention, there is an almost unlimited resource.
Metal fence posts - types
There are three types of sections:
round pipe;
two profile options (square and rectangular).
In addition to a new one, you can buy a used tubing pipe (tubing), which will have sufficient strength as a metal support for the fence.
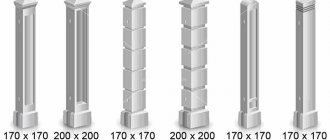
But the differences don't end there. There are ready-to-install metal posts for sale for a square fence.
or round section,
which have top plugs at the above-ground part and welded plates for mounting veins or sections.
It seems like a convenient option - no need to use welding.
Particularly time-consuming and complex for the protective top cap.
But this does not mean that factory-made metal poles are the best solution.
There are techniques and accessories that allow you to do without welding.
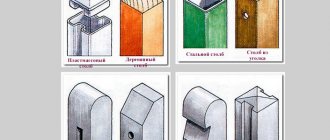
In order to protect the inside of the pipe from precipitation, you can use plastic plugs for round, square and rectangular pipes.
They may have a different appearance, but in any case they are easy to install.
And to attach the veins to a square post, special clamps are produced,
to which you can even attach a metal profile.
Spans of welded mesh are mounted on crimp clamps for square
and for a round pipe.
There are methods for directly mounting metal poles using metal screws directly to the pole itself. For such fastening it is better to use a square or rectangular pipe.
But the main argument in favor of custom-made metal poles is the size.
The length of factory products is not always suitable for the fence height needed on the site.
The most important thing for the strength of the fence is the underground part of the post. For some soils it may be excessive, and this is an extra expense. In some cases, on the contrary, it is insufficient, which will affect the reliability of the fence.
The thickness of the metal walls also matters for the strength of the fence
There are standard design values for the strength of structures to wind loads, depending on its height and the nature of the terrain (for each region of the country and type of relief, they are already clearly specified). They are also available for structures with a height of up to 5 meters.
It is not worth calculating the strength of a beam at a cut near the ground with one pinched end - it is difficult, but we can say that for a span length of 3 m and a height of 2 m with maximum windage (corrugated sheeting), a square profile 80x80x3 or a pipe of similar diameter with a wall of 3 is sufficient mm.
However, it is worth considering that this is a limit value. In real:
- the fence usually has the shape of a closed figure, which has, as it were, supporting walls that take on part of the wind load;
- the wind rarely blows perpendicular to the plane of the fence;
- the standards are given for open areas - without vegetation and neighboring buildings;
- spans with profile veins are usually made 2 meters long, not 3 (standard factory length is 6 meters).
Therefore, for supports, a profile pipe of a smaller cross-section is sufficient - 60x60x2.
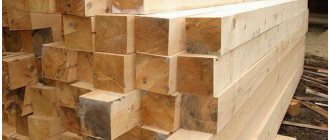
Advantages of tubing pipes:
- Such pipes are seamless, not welded.
- They are thick, reliable and durable, so they will last a long time.
- Much cheaper than new ones, which will help you save money that can be spent on purchasing corrugated sheets.
The only drawback is the lost presentation, but this is easy to fix - you just need to paint the pipes with metal paint, and they will be like new.
Used tubing pipes are the optimal solution; they meet quality certificates, are reliable and durable. The pipes are resistant to corrosion due to their large thickness and high-quality steel from which they are made. Pillars made from such pipes will faithfully serve you throughout your life. You can order and buy materials for building a fence in our online store at very affordable and reasonable prices. You will be satisfied with the quality of services provided by the company.
| Go to choosing fence posts |
How deep should fence posts be buried?
There are different recommendations for the size of the underground part. For soft soils and continuous spans with high windage, about 50% of the height of the overhead part is usually recommended. For heaving soils that can “squeeze out” supports, the installation depth of the pillars should be 20-30 cm below the freezing level. And in some cases this value may be greater than the calculated one.
For dense soils, you can limit yourself to 1/3 of the height of the above-ground part. They often don’t even carry out concreting, limiting themselves to “hammering” the pillar or backfilling with crushed stone. For loose soil, complete or partial concreting of the base of the pillar is carried out, increasing its load-bearing capacity. In most cases, with a fence height of 1.5-2 m, an underground depth of 60-80 cm is sufficient.
For a continuous fence, there is a method for calculating the depth of a columnar foundation, which takes into account the wind load. The calculation of the last characteristic is standardized by SNiP, but for the fence it can be approximately estimated by yourself using the formula from the school physics course - the square of the speed divided by the acceleration of gravity and multiplied by a coefficient of 0.61, taking into account the density of the air.
At a maximum wind speed of 30 m/s, pressure per 1 sq. m will be 56 kg. This pressure is multiplied by the span area of the fence, a constant aerodynamic coefficient of 0.8 (this is for the windward side, and for the leeward side it is 0.6, but the maximum is taken) and the torque is determined. Divide it by the moment of resistance, taken as a constant - 225, and get the depth of the column, capable of compensating for the wind load.
This calculation makes it possible to calculate not only the depth of the underground part of the fence post, but also to optimize the span width using the selection method, taking the height of the fence as a constant.
Distance between pillars
Most sources indicate 2.5 or 3 meters as the maximum permissible distance between supports.
This is very approximate. In principle, this characteristic depends on the wind load, the weight of the structure (including supports) and the bearing capacity of the soil. There are standard values for design soil resistance. It is the highest for coarse soil and dense hard clay - 6 kg/cm2, the lowest for fine sand saturated with water - 2 kg/cm2.
It is better to carry out the calculation for one span, having previously specified a certain length based on the characteristics of the site and the topography. Let's say 2 m.
Based on the height of the fence and the weight of the materials, the total load on one support is determined (it is pressed by half a span on each side plus the weight of the support). Add the wind load, multiply by the safety factor of 1.2 and divide by the area of the columnar foundation in sq.cm. The resulting value should be 10% lower than the standard design soil resistance.
If this is not the case, then there are two ways - reduce the distance between the pillars or increase the area of the columnar foundation.
In the second case, there are three options - choose a pipe with a larger cross-section, weld a “heel” onto the pillar, or increase the area of concreting the pillar.
Then once again you need to recalculate the total load taking into account the increase in the weight of the pillar or foundation.
As a last resort, for very weak soils and a solid fence (for example, made of corrugated sheets), screw supports can be used instead of conventional posts.
Such metal fence posts are significantly more expensive than ordinary ones, but if you have welding skills (a friend or neighbor is a welder), then they can be easily made from an ordinary pipe and a cut ring of sheet steel. According to this example:
Installation of fence supports
Any territory: private property or industrial production, an educational institution or a city sports ground, a recreation park or a poultry house on an estate - have their own fences, made of a variety of materials in different ways. A common property of all fences is the presence of a canvas and support posts on which it will be attached. The service life of the fence will depend on how you dig the fence posts.
Even at the stage of planning the fence and drawing up its drawing, you need to select suitable support posts for it that will meet the requirements of quality, durability, style and cost. The following types of posts are used to install fences:
- wooden,
- asbestos-cement,
- metal,
- concrete,
- brick.
Wood, asbestos cement or metal
Wooden poles are the most environmentally friendly, relatively inexpensive, but extremely short-lived. Even with mandatory treatment with antiseptic solutions, such poles will last no more than 10 years. But if there is a need to use them, then the pillars must be carefully treated with a solution of copper sulfate - it will extend the service life to 12 years. That is why wooden poles are best used for constructing temporary fences, front gardens, and hedges.
Installed wooden pole
Asbestos-cement pillars or pipes are much more durable, reliable, do not rot, and are also affordable. However, it is quite difficult to attach logs to them - you will need many additional elements in the form of clamps and clamps.
Metal pipes as pillars are the best option. They are strong, reliable, you can easily weld any additional element to them, and they are affordable. When moisture gets into such pillars, if they are not protected, they do not burst like asbestos-cement ones, but burst under the ground, which has virtually no effect on the appearance of the fence.
Concrete and brick pillars
Concrete pillars are quite expensive if you install a ready-made factory version. You can make them yourself. But this will require a lot of time and physical effort, although the result will be a cheap and durable material.
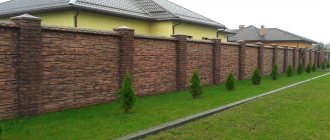
Brick pillars are heavy, very expensive, but beautiful, giving the fence a solid, rich look. To install such pillars, you will need to prepare a good main foundation, and a shallow foundation for tying the pillars together. A brick pillar consists of a metal pipe or bundle of reinforcement lined with brick.
Concreting metal fence posts
After marking the site, determining the type of profile and the dimensions of the underground part of the pillars, they proceed to their installation. As noted above, the most reliable method is concreting.
In accordance with the calculated values of the area of the columnar foundation, the diameter of the hole is selected. It is best to make a hole for a post using a drill. The depth of the hole should be 20-30 cm greater than the underground part - this volume is covered with sand or fine crushed stone and compacted.
Then a post is inserted, a pre-prepared solution is poured into the hole, bayoneted with a piece of reinforcement (to remove air), the post is leveled, fixed in this state and left until the concrete has completely hardened.
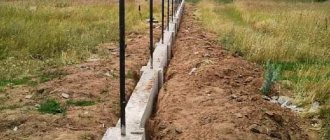
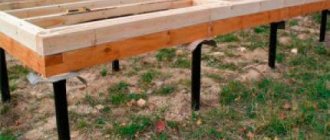
For weak soils and heavy loads, complete concreting of fence posts as part of a strip foundation (with mesh reinforcement) is sometimes used.
For mixed soil, in which the top layer is loose and the bottom layer is dense clay, partial concreting can be used. In this case, the pillar is first driven into dense soil, and the upper part is concreted.
The solution for pouring fence posts is mixed in proportions for concrete grade M300. And to protect it in the ground from the effects of water, they use a “glass” made of roofing material inserted into the hole. It will not allow water from the concrete to “go” into the ground and will ensure normal hydration of the cement mortar.
How to properly concrete pillars
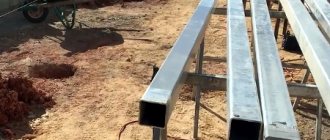
When the work site has been cleared, you can begin preparing for the installation of fence posts. It is important to purchase good and high-quality supports; you cannot skimp on them. A profile pipe with a thickness of 3 mm or more is suitable.
In order for the structure to last a long time and not deform over time, you need to calculate the correct depth of the wells and make the hole deeper than the top layer freezes. It depends on the quality of the soil. The standard option is a depth of 150 cm.
Useful How to make decorative posts for a concrete fence with your own hands
Preparing the columns. The pillars are cut into equal sections according to size; calculating the length is simple: you need to add 150 cm to the height of the fence, this is the depth of the well. Below on the pipe, for reliable fixation, you will need to make a hook.
For convenience, it is better to mark the part of the pipe that goes underground. At a height of 80 cm, leave a bright mark using adhesive tape or a white marker.
Drill a well. The diameter of the pit must exceed the volume of the pipe, usually 250 mm. If water begins to collect at the bottom, you need to remove it with a ladle or make a cushion of sand.
The solution must be poured in small parts and constantly compacted with a stick or other method. To fill, use a watering can or tin groove, which is easy to make yourself. Concrete needs from 1 to 4 hours for complete shrinkage, so the final work with the solution, namely the last pouring to the required volume, should be carried out after this time.
Marking
For correct marking, you need to install corner posts and stretch a string between them. Often builders make markings along the bottom - this is not entirely correct; it is better to pull the guide string along the top. With this arrangement, you just need to mark the distance between the pillars and make pendulums. This way, the markings are even, and it’s easy to install the supporting fence posts correctly and evenly.
Drilling holes
The well is made wider than the support pillar. If you take a profile pipe measuring 50 by 50, then the hole is made 250 mm. The holes are made with a drill. It is better to immediately remove the soil from the well from the site so that it does not interfere.
Choosing the Right Depth
The recommended depth is 150 cm. Depending on the soil, it can be less, but this will require knowledge of the composition of the soil, the depth of underground currents, etc. For regions characterized by severe frosts and winds, it is recommended to make the depth larger.
Installation of supports
If water collects in the well, you will need to make a drainage pad. It is simply made from sand, which is poured onto the bottom, with a layer thickness not exceeding 10 cm and carefully compacted.
In order to install the fence supports evenly, it is recommended to glue two bubble levels to the pipe.
Reinforcement
To increase the strength of the structure and increase the service life of the fence, reinforcement will be required. The easiest way to do this is to use reinforcement along the perimeter; before concreting, a reinforcing structure made of rods is installed.
To reduce the influence of groundwater on the fence post, it is recommended to make a layer of roofing felt between the concrete and the soil. This simple method will protect the cement from cracking.
Will you use roofing felt?
Not really
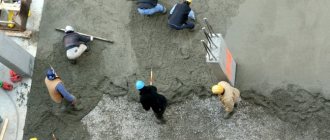
Concreting
You will need to make a solution. To do this you need:
- cement grade 400 and higher;
- crushed stone;
- sand;
- water.
Useful: Suitable mixture proportion for concreting fence posts
You can knead in several ways, and adjust the thickness of the solution yourself. It is better to make the mixture thicker on the bottom of the structure, and fill the top with a thinner solution. The components must be of high quality and meet deadlines, this applies to cement. You can mix by hand or in a concrete mixer.
Expert opinion
Vladimir Ulyanov
I have been involved in fences for over 10 years, answering questions and helping people cope with the installation task on their own.
Ask a question to an expert
When pouring, you must follow the instructions and pour the solution in small portions, compacting each layer. It is important to mix the correct amount and use the solution at a time. It is better to throw away the excess immediately.
Calculation of concrete composition.
Universal mortar composition: three parts sand and one part cement. Water is added to the desired consistency. The volumes depend on the capacity of the concrete mixer and the amount of solution required. To correctly calculate the required amount of materials for the proposed work, it is recommended to use a calculator on the Internet. Such a calculation will be accurate and will allow you to purchase the required number of components for installing the fence.
Removing air
Can be done manually using fittings. To do this, each poured layer is pierced with reinforcement, slightly deflecting the reinforcement to the sides with sharp movements. This process is tedious; it is recommended to use a hammer drill, which will simplify the task and speed up the work. For the strength of the fence, it is important to remove air.
Installation without concreting
For light fences and dense soil, you can do without concreting the pillars.
There are two technologies.
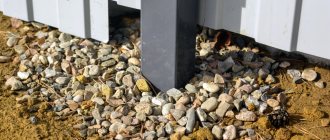
- Butting . The hole is made 100 mm wider than the diameter of the post. A post is inserted into it, fixed to its level and crushed stone of the middle fraction is filled in layers (with each layer being tamped).
- Clogging . A hole is drilled in the ground slightly smaller than the diameter of the post.
Then, using a stepladder, a sledgehammer and the help of a friend, drive the post into the ground.
If it is possible to rent a compressor and a portable pile driver,
then the process can be mechanized.
There is another interesting way to use metal fence posts without concreting.
A special support is driven into the ground, to which the pole is attached.
The same method is reflected in “folk methods”. A metal pole made from a round pipe is made detachable. The lower part with a pointed end and an upper mounting platform is driven into the ground so that it protrudes a few centimeters above ground level. The above-ground part of the pole is attached to the site by welding (or bolts).