In pursuit of a beautiful shot, lighting plays an important role. It can either help in creating a photograph or greatly hinder it. Using different light sources correctly to get the desired shot is an art that needs to be learned. There are many lighting factors that affect the image, which are important not only to know about, but also to be able to apply. In this article you will learn how light affects photographs, which light is best to use in which situation, and general recommendations for working with it.
Lighting
When light hits an object, dark and light areas are created, which are perceived by the camera. The resulting contrast helps to reflect the existing shape. The ratio of shadows and highlights can be different, it all depends on the photographer’s idea. But in order for the object to be read correctly by the viewer, it is always necessary to find a balance. So, for example, when photographing children, it is better that there is a lot of light, and it is directed almost directly, otherwise the picture will not be so airy and gentle. And to create dramatic shots, you can use less lighting and immerse most of the frame in shadow. But at the same time, it is important to pay attention to whether the shape of the object is readable, otherwise the viewer may simply not understand what is shown in the photograph.
Everyone knows at least two types of lighting: natural and artificial. Their most important difference is that sunlight cannot be controlled. This is precisely the main difficulty in working with him. But, on the other hand, this is also an advantage: you just need to learn to adapt, the sun’s rays will do the rest for you. Let's figure out how natural light affects photographs in order to get high-quality results. Depending on the time of day and weather, the sun's rays have different effects.
Studio flash design
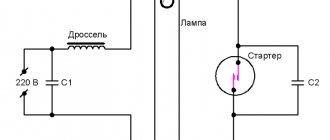
All studio flashes consist of several units. The most important element is the lamp, which creates a short-term pulse of light. Halogen lamps are used, the power and light temperature of which may vary. The lamp is installed in the flash head, which has a reflector. It allows you to create a directional light flow. A transparent element is installed in front of the lamp, which slightly scatters the light flux, making it uniform over the entire surface. You can install various modifiers on it: diffusers, softboxes, honeycombs and light filters.
Studio flashes are also equipped with a modeling light. It helps you evaluate how the shadows fall and the model is illuminated before the main light is triggered. When the flash fires, the modeling light turns off so as not to interfere with the main flash. For modeling light, low power lamps are used.
To control the flash, an electronic unit with buttons, dials and a display is used to display parameters. It allows you to adjust the flash power and pulse duration. You can also adjust the recharge speed, setting the modeling light. Another important setting is synchronization. The flash should fire at the right moment. There are four types of synchronization in total:
- IR sync. An infrared transmitter is installed in the camera's hot shoe. The second device, the receiver, is installed on a tripod. A flash is attached to it;
- Sync cable. In this case, the signal from the camera to the flash is transmitted via wire. It is important to ensure compatibility between the flash and the camera;
- Radio synchronizer. It works the same way as infrared synchronization, only the signal is transmitted by radio waves. In this case, there is no need to place the devices in line of sight. Walls are not a hindrance;
- Triggered by built-in flash. In this case, the studio flash must be equipped with a light trap. She is configured as a slave. When the trap catches a certain light pulse, it will fire the main flash. This method is highly susceptible to interference.
Depending on the model, the electronic unit can be part of the flash and be connected to it in the same housing, or it can act as a separate device and connect to the flashes with a cable. The first version of the flash is usually called a monoblock. When using the second option, the external unit is a generator. The generator can control multiple flashes. The characteristics of flashes with a generator are better than those of monoblocks. The flares are not that severe. They are easier to install in different positions on a tripod.
Monoblock flashes are cheaper and more compact.
All types of flashes can operate not only from batteries, but also from the electrical network.
Each flash has its own cooling system. When the lamp is activated, a huge amount of heat is released. When triggered repeatedly, the heat must be effectively dissipated, otherwise the lamp itself may burn out and damage the electronics. Depending on the flash capability, either radiators or fans are used.
Daytime
During the daytime, the sun is almost perpendicular to the Earth, causing shadows to become harsher. At this time of day, it is important to ensure that the sun is not in front of the camera, as the subject of the photo may turn out to be too dark and the background too light. During the day, the subject should be positioned relative to the sun so that the light flux falls on it from the front at a slight angle. Then the shadows will not contrast much in the picture, since there will be significantly fewer of them than light areas. In this way it will be possible to achieve that same balance. During the daytime you can take a wide variety of photographs. This lighting is suitable for shooting nature, models, portraits, etc. To direct the light flux in the desired direction, you can use a reflector.
Types of studio light.
Fill light Essentially, fill light is general, uniform lighting. In terms of intensity, it should be weaker than the drawing one, as a rule, by two or three levels. It is known that the brighter the fill light, the weaker the pattern, the lower the light contrast, especially if we are dealing with a flat image. Sometimes the role of fill can be played by modeling diffused light. So what is a fill light for? It softens the light and shadow pattern of the photograph and makes the shadows less deep. However, there are situations when its use is not necessary. These are: a dramatic female portrait, a black-and-white male portrait, a light-toned soft portrait. In other cases, fill light works to the benefit of the photographer, so it is worth knowing about its features. To create fill light, soft boxes and reflective panels, light panels, and light disks are used. The fill light source is located as standard: in front or next to the camera, diagonally in front. There is an opinion that the fill light source should only be placed from the front, because otherwise rough double shadows will appear in the photo. But, if the photographer uses a soft box or light disk, placing them close to the model, the risk of additional shadows can be avoided. Back Light As the name suggests, back light illuminates the background against which your subject is photographed. It can be uniform or uneven. Background light has two purposes. It creates additional spatial depth in the photograph, separating the subject from the background, and illuminates the background, emphasizing its texture and color. The intensity of the background light should be lower than that of the painter. The background light source is set so that the light areas of the object are drawn against a dark background, and the dark areas against a light background. Hard light sources are used to create background light. They form a light spot of a fixed shape and size or evenly illuminate the background. Backlight (accent) Backlight is also called contour and accent light. It reveals the shape of the entire photographic object or any part of it. In order to obtain a light contour line, the backlight source is located behind the object at a close distance from it. You can adjust the thickness of the light contour line in a photograph by increasing or decreasing the intensity of the backlight. Backlight serves to highlight the light accent. With its help, the texture of hair, clothing, etc. is emphasized. Key light This is the light of directional lighting devices. The main technical task is to create a black-and-white pattern on objects, figures, and characters’ faces. Key light, clearly separating the light and shadow sides of an object, well reveals volume, shape and texture. The subject of the photo casts a shadow (“falling” shadow) on other objects, the floor, a wall, etc. We observe such lighting in sunny weather, when the sun's rays, illuminating objects, form a cut-off pattern on them. At the same time, with the help of key lighting devices, other lighting effects are created in the pavilion. In our life - indoors or outdoors - there is certainly some kind of light effect. Even in inclement weather, the room feels the effect of cloudy lighting from the window. And this effect is recreated in the pavilion with the help of highlighting light. The flow of this light will be wide, commensurate with the area of the window, and the shadows, for example on a person’s face, will be “softer” than the shadows from the light of a candle or kerosene lamp, the effect of which is also created by key light devices. Modeling light Modeling light is used for the finest light treatment of the face or large details.
By directing narrow beams of light from lens devices onto the actor’s figure or face, you can get small spots and highlights that enhance the sense of volume and emphasize the psychological state of the hero. Such light-tonal modeling is often necessary when shooting especially close-ups. Eye highlighting, light accent on orders, jewelry, tiara, bracelet or even a ring on a finger, highlight on curls of curly hair, etc. — for these purposes, modeling light is indispensable. Background light. The purpose of background lighting is to create a picturesque backdrop for the actors, outline the architectural forms of the set, and reveal the depth of space. The background light is placed in such a way that it is possible to shoot general, medium and close-ups without rearranging the lighting fixtures. Using background light, you can reproduce, for example, the effect of dawn in the window space of the decoration of a spacious front hall with huge windows and a flowering garden behind them. Or the sunset effect.
Dawn and sunset
There are special times of day that many photographers celebrate. The first hours after sunrise and a couple of hours before sunset are considered by some to be the best time to take photos outdoors. It seems so because the sun especially affects the frame at such moments, since it is located close to the horizon. This makes the shadows longer and softer. In this case, the contrast is less pronounced, the transitions from light to dark areas are more subtle. Also, the sun at sunset or sunrise gives a nice golden glow, which gives the photo a warm feeling. This lighting is suitable for more gentle shooting, for example, family photo sessions, girls, children.
Types of lighting
In photography, lighting refers to the way light falls on the subject. When a light flux hits an object, areas are created: illuminated and shaded. Thanks to this, contrast appears, which allows you to display the real shape in the photo. The clarity or blurriness of falling shadows, how voluminous the object will look, and the visibility of small details depends on its type. Each variety is suitable for different purposes and creates an effect suitable for a specific type of shooting.
There are five types of lighting:
- Drawing;
- Filler;
- Control;
- Background;
- Modeling.
Below we will look at how each type is used and to achieve what effect.
Overcast
In cloudy weather you can also take good shots, although it would seem that the sun is not visible at all. In fact, when it is hidden behind the clouds, the light is not concentrated, but becomes diffused and uniform. This means that when shooting you will not see clear shadow contours; the light-and-shadow transition will be very soft. This lighting helps to emphasize the texture, small details will become clearly visible. Cloudy weather is good for photographing colorful subjects because the contrast won't draw all the attention and the main focus will be on the color or tone of the photo. This light is also suitable for a wide variety of types of filming. Unless nature in cloudy weather appears before the camera in all its glory.
Working with natural light is not that difficult; you just need to look at the weather forecast for the right day and go outside at the right time. As for filming indoors, everything is even simpler.
There are two ways to highlight a frame when shooting in a studio:
Lighting
Here, any lighting devices can serve as a light source: lamps, lamps, daylight from windows, as well as special equipment. Taking photographs under artificial light is very convenient, since it provides regulation of the light flux: lamps can be turned on and off, directed in the desired direction, and lamps of different colors can be used. The more lighting devices, the more room for imagination, but it is important to remember about their quality; some devices give an unbalanced flow, which has a bad effect on the photo. With artificial lighting you can create absolutely any effects for all types of shooting. The sad thing is that these photos don't always look natural.
Flash
You can also use a flash as a lighting device. As a rule, the flash built into the camera creates very sharp shadows in a small amount, and the light areas turn out to be very bright and sometimes glare, which is why the object in the photo can lose all its volume. Therefore, if you have the opportunity to take photographs without it, it is better to do so. However, there is also an external flash, which produces better photographs; its use, on the contrary, is advisable when necessary.
Under different conditions, lighting affects the frame differently, so you should know what is best to do in a given case so as not to damage the picture.
Characteristics of studio flashes
Power
Power is the most important flash parameter. This term is not entirely correct. Typically, the power of electrical appliances is measured in watts. When working with pulsed light, it is important to know not how much energy the lamp consumes, but what kind of light flow it creates, so the measurement is carried out in Joules. This parameter characterizes the amount of energy allocated per unit of time (Watt per Second). Most often you can find flashes with a power of 150 to 1000 J. As follows from the definition, the higher the power, the brighter one short-term pulse can be. More powerful flashes are large in size and weight, and also quite expensive.
The power of the modeling light is measured in Watts. In this case, halogen lamps are used, which are quite compact and can produce power from 50 to 1000 W.
Pulse duration
Another important flash parameter is the pulse duration. This parameter indicates the time during which a sufficiently powerful stream of light will be emitted.
When the flash fires, the burst to maximum brightness occurs almost immediately, but then there is a decay period that lasts for some time.
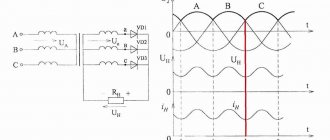
The effective flash duration is the period of time when the flash power is not lower than half the maximum power. Look at the graph and everything will become clearer. It is believed that this period of time should be as short as possible. The thing is that objects in the frame can move. Residual light exposure can lead to blurry images. If an impulse flares up and dies out in one instant, then the motherboard will record exactly this instant. If the light continues to burn for some time, then all this will be reflected on the matrix. Of course, this also depends on the shutter speed, but still the flash must meet the requirements. The pulse duration is measured in fractions of a second. The cheapest flashes have a duration of about 1/800 of a second. Professional devices boast a value of 1/2500 of a second.
Guide number
On built-in flashes for cameras and external flashes for reportage photography, there is a parameter that is used to evaluate the range of the flash. In studio photography, this parameter is less significant. It's just that studio flashes are rarely used one at a time. Typically these are groups of flashes that can be moved freely regardless of the camera's position. Also, studio flashes use various light modifiers, and this affects the guide number. In studio photography, the meaning of this parameter is not important. When calculating the correct exposure, a flash meter is usually used. This is the same exposure meter that measures the intensity of illumination with pulsed light. The guide number in studio photography is only taken into account when comparing several flashes that operate under the same conditions.
Recharge time
To create a powerful flash, the flash must be charged. Reload time plays a big role in reportage photography or when shooting moving models. When using monoblocks in the studio, you can expect a recharge time of 0.6 to 2 seconds. The simplest flash options can recharge in up to 6 seconds. This is a very bad indicator.
It is worth remembering that if the flash does not fire at full power, its recharge time will be reduced.
Colorful temperature
This parameter is also conditional and is of little importance when working in a studio. Almost all flashes have a color temperature of 5500 - 6000 K at maximum power. The flash very rarely works alone, so the color temperature setting of the individual flash has little meaning. Diffusers and other attachments also bring their influence.
When using multiple flashes, care should be taken to ensure that their color temperature ranges are approximately the same as each other. In this case, you can look at the duration of the pulse. The larger it is, the warmer the light from the flash. This may make the color rendering uneven.
Recommendations
Here are some practical recommendations that will help you decide on the placement of the subject and the light flux relative to the subject and the camera:
- When shooting indoors where there is natural light, try using only it first; you may not need artificial lighting at all;
- If the shooting takes place indoors, first use one lighting device, and then add new ones if the result is not satisfactory;
- In most cases, warm light looks better in a photograph than cool light;
- When shooting outdoors, study the surrounding area: where the sun's rays fall in the most interesting way, where they come from, how the camera perceives them. This will help place the object in a good place;
- Don't be afraid to use shadows as an artistic technique. If you want to highlight an object, you don’t need to completely illuminate it, leave some part in the shadow, this way it will look more interesting and mysterious, which will attract the viewer’s attention;
- When shooting indoors, the color of the walls should match the nature of the shoot. For cheerful photographs, light colors are better, which will reflect the light flux, and for gloomy photo shoots, dark colors, which, on the contrary, will absorb it;
- Use different lighting techniques for different objects. For a gentle, feminine portrait of a girl, it is better to use a diffused light flux, and to emphasize the brutality of a man, it is better to use a directed one;
- Don't avoid experimentation, don't settle on one type of lighting for one object, try different incidence, light intensity, different degrees of object shading.
Learning to use lighting is difficult, but possible. The main thing is to practice and not be afraid to experiment. Anyone can take great photographs, both in natural and artificial light, if you understand how light affects photography and use tips. Use afternoon sun to get good contrast; Shoot at sunrise or sunset to achieve soft shadows and a beautiful warm tone; create bright shots with uniform lighting in cloudy weather; use lighting fixtures to create different effects. Anyone can learn this art.
Types of backlights
In photography there is an object, and there is its surroundings. This is because photography is like our view, only captured. And when we look at a specific object, we see both it and the surrounding environment: we have two types of vision - direct, with which we look at something specific, and peripheral, seeing the situation around us.
Therefore, the first division of lighting: foreground lighting and background lighting.
As a rule, the ratio of these two lighting should be shifted to the "spot of attention". That is, the foreground should “outweigh” everything else, but not too much, so that the overall picture appears balanced. Therefore, background lighting is usually more diffuse than foreground lighting.
When we look at objects, our eyes move over the details and evaluate the object or group as a whole. And the visibility of details depends on their contrast, as well as the elaboration of small structures in both light and shadow areas.
Therefore, the foreground light is also divided into bright directional and soft diffused (but still directed at the object, and not at the background). The first is called drawing, the second is called filling.
Types of backlights
The objects we look at have their own volume. Their details are also voluminous. The direction of the shadows cast by objects and their details depends on the direction of lighting. In addition, the various surfaces that make up objects and their parts are differently oriented in space relative to the light and relative to the lens “looking at them.” This also adds information about volume and makes it easier for the brain to distinguish and recognize familiar things, as well as evaluate their extent and relative size ratios. The creation of the most favorable three-dimensional detailed picture is facilitated by modeling lighting. For it, lamps can be placed at different distances from the subject, at different angles and with different degrees of diffuseness or directionality, which, in general, is controlled “intuitively and aesthetically.” For example, not all women may like too much detail in their portrait, so usually a woman’s face is “smoothed out” with soft matte modeling lighting. Although, directed from the side, it outlines the volume and smooth contours of the face.
The entire object can be more clearly separated from the background if the lines delimiting the object are lost in the background. To do this, a sufficiently sharp light can be given from the direction “from the background”, highlighting the details of the object’s border, but “not visible” to the camera. This kind of light is called backlight. It is usually hidden outside the field or behind the subject itself to prevent the lamp from getting into the lens. Or a backlight lamp, narrowly directed, hits only the subject and does not interfere with the process itself. Often, backlight achieves very beautiful effects of luminous halos of hair or the subtle texture of the details of the border of an object. Sometimes the details illuminated through such light turn out to be interesting.