Replacing a sewer riser in an apartment is a very dirty and difficult process.
Usually, the replacement of sewer risers in an apartment building is carried out centrally and simultaneously, across the entire riser at once.
In this case, the work is carried out faster; there is no need to preserve this or that element during dismantling work.
The cost of replacing risers in an apartment is also lower when calculated per tenant, and the crew’s earnings are higher. Therefore, construction companies and teams are happy to take on such contracts. It's hard, dirty, but well-paid work.
Replacing a sewer riser is usually arranged through the house management; this is more convenient than arranging for the work to be carried out privately. In this case, there are legal guarantees of the quality of work.
Sewage device
Before replacing the sewer riser in an apartment, you should briefly familiarize yourself with the design of the drainage system. It consists of receiving devices from sources of water consumption, filters and sedimentation tanks, fittings and fittings, pipes of different diameters.
In an apartment building, a common device is a riser that collects wastewater from all floors of the building. Dismantling the old riser must be carried out taking into account a number of nuances.
Slopes
In five-story buildings, where cast-iron drainage systems still remain, there is a free-flow sewer system. Its principle is based on the movement of liquids by gravity under the influence of gravity. To do this, the pipes are given a slope of at least 3%.
Neighbors and areas of responsibility
Replacing the riser involves temporarily suspending the use of the drainage system at all levels. It is not always possible to agree on this with neighbors in advance. To eliminate possible problems during the repair process, you should submit an application to the service company to replace the riser, indicating the time for the work.
A few days before the installation of sewerage in the apartment, it is necessary to post a notice about this near the entrance.
Blockages
Pipelines become clogged for the following reasons:
- getting rags, cardboard and other large objects into them;
- animal hair collecting at joints;
- formation of plaque on the walls due to insufficient slope;
- settling of fat on the walls.
In order to prevent blockages in the existing sewer system, inspection hatches and check valves are installed.
Repair and replacement
It is better to resolve all issues with sewerage before redecorating the apartment.
The process of dismantling the old drainage system is associated with the formation of a large volume of dust and debris. The cast iron risers themselves deteriorate over time and can cause residents a lot of trouble.
Installation of sewer lines
For wiring in the apartment, a prepared diagram is used.
The laying of pipes begins from the riser, with branches leading to each plumbing fixture. Pipes are fixed in different ways. In some areas, a rigid mount is combined with a floating one. This way it is possible to eliminate internal stress in the system. Attention ! _ Pipes are used of various diameters, with a cross-section of five centimeters connected to appliances, and eleven centimeters to the toilet bowl.
To prevent pipes from leaking, they are laid in the direction of wastewater flow. The pipes are installed with an inclination in the direction of the riser. When installing the system, the shape and dimensions of the parts are not changed. The riser is connected to the outlet pipe only at an oblique angle. After installation of all wiring, the system is tested. To do this, you need to use all the devices, monitoring the rate of decrease in water and the presence of leaks.
Common problems and how to solve them
In an old pipeline, over many years of operation, corrosion develops, plaque and deposits appear. The gasket material loses its quality, the line loses its tightness.
Due to the shrinkage of the building, the pipes crack, chips and through holes appear on them.
Let's consider how to deal with this or that problem.
Bell leak
In such places, the pipes are connected to each other and to the tee. The occurrence of a leak is associated with a violation of the structure of the gasket or its complete destruction.
Elimination of the problem is carried out in the following ways:
- pouring cement mortar;
- adding silicone or liquid nails;
- sealing cracks with flexible rubber tubes.
Before sealing, you should clean the socket as much as possible, remove crumbs and grease from it.
Leak in the ceiling
The cause of this problem is a violation of the integrity of the tee or pipes located in the slab array. Damage occurs due to wear of gaskets, exposure to solvents or damage due to shrinkage of the building. This problem can only be solved by replacing the cast iron sewer tee with a more efficient plastic product.
Blocked riser
This is the smallest nuisance associated with the operation of sewerage systems in apartment buildings. The blockage is removed using a cable with a hook at the end. The cable is inserted into the inspection window below the clogged area and fed upward. After this, foreign objects are removed from the fan fitting.
How and when to change the riser and pipes in an apartment: regulations, at whose expense, features of repair
Reading time: 7 minutes(s) Sewage drains in old multi-story buildings were installed from cast iron pipes. Such a pipeline periodically requires urgent repairs, since with active use it becomes unusable. In addition, replacement of the sewer riser in an apartment is also carried out during major renovations.
Today, there are many sewage systems on the market made from modern materials that have a number of advantages over cast iron. It is for this reason that homeowners prefer to replace cast iron pipes with plastic ones.
When is it necessary to replace the sewer riser in an apartment?
Replacing the sewer riser in a separate apartment is required when:
- The sewer riser is being replaced as planned.
- The sewer pipe leaked and became unusable.
- The tenant or homeowner decided not to wait for leaks and began a major overhaul, including replacing pipes.
Where to go?
Rules for maintaining property in apartment buildings are regulated by the state. The list of state property includes a sewer riser, since the pipe and the outlet from it are the common property of the house.
These rules are specified in the following regulatory documents:
- Government Decree on the maintenance of common property dated August 8, 2006 No. 491.
- Resolution of the State Construction Committee on technical standards. exploitation of housing stock dated September 27 for No. 170.
- Manual on maintenance and repair of common property dated April 2, 2004.
All maintenance, replacement and repair work is carried out by the management company. The owner (tenant) of the apartment just needs to write a statement indicating the reason for the need to repair (replace) the sewer riser.
If the answer is positive, the time for the work will be agreed upon. The owner of the apartment, in turn, must provide access at the agreed time.
Important! Asking to pay for materials or labor when repairing or replacing a sewer riser on the basis that it is located inside the apartment is illegal.
At whose expense is the riser changed?
Since the sewer riser is the property of the management company, its partial replacement or repair is carried out at the expense of the apartment owners.
If the tenants are not such and live in the apartment under a social tenancy agreement, then the owner is the state. In this case, all expenses are covered by the municipal budget.
In addition, the planned replacement of the sewer riser can be financed from the funds that residents pay monthly for major repairs of the house.
If the apartment owner or tenant decides to replace serviceable communications with more modern ones at their own request, then all materials and work are paid for independently.
Such a replacement can be made, for example, during redevelopment or major renovation of an apartment.
Division of areas of responsibility between neighbors
First, it’s worth figuring out who should replace the riser in an apartment in a multi-story building when it wears out.
In Decree of the Government of the Russian Federation No. 354, clause 5 contains a list of elements of the sewer system, which relates to the common property of owner-occupiers.
It includes:
- Risers and branches up to the first butt connection.
- Sewer outlets.
- Cleanings (audits).
- Exhaust (exhaust) pipes.
Important! The riser (i.e. pipes, crosses and tees mounted on a vertical drainage channel) belongs to the area of responsibility of the service company or housing organization, regardless of the type of housing (municipal, state or privatized).
However, there are several nuances here. Housing and communal services have the right to refuse repairs if the tenant does not pay the rent.
The exception is when the situation is emergency and can lead to flooding. But even in this case, the management company can replace the section of the riser with a cross or tee with a smooth pipe, thereby plugging the outlet to the apartment.
If the act states that the defect in the riser is a consequence of its natural wear and tear, all repair costs are borne by the housing and communal services.
If the riser was repaired independently and the management company states in the report that the leak is a consequence of the resident’s intervention in the operation of the building’s utility networks, then all the consequences of the accident and compensation for the flooded neighbors will have to be paid by the owner of the apartment.
If the pipes are replaced independently, all problems associated with their repair are also eliminated by the owner of the apartment.
As for blockages, this is a problem for the management company, since the sewer riser belongs to common property, therefore it is impossible to determine the tenant through whose fault the blockage occurred.
Why can they refuse to replace the riser and pipes?
There are several situations when the management company has the right to refuse to replace the riser in an apartment:
- When the homeowner decides to replace the riser on his own, outside the management company’s work schedule.
- If the applicant has significant debts on utility bills (with the exception of liquidation of an emergency situation). Work can only be completed after full payment of the debt.
- If previously the owner of the apartment changed his part of the riser himself.
Important! Pipe replacement work carried out without the approval and control of the housing and communal services relieves it of responsibility for maintaining this area.
How to make a replacement yourself: sequence of actions
To carry out work on replacing a sewer riser, it is not necessary to involve specialists.
If you have the necessary tools at hand and know the procedure, you can do all the work yourself.
Planning and material selection
In order to replace the riser yourself, you need to acquire:
- Plastic pipes with a diameter of 110 mm.
- Appropriate fastenings (as a rule, simple clamps are used).
- Tees with bends.
- Vertical level.
- Rubber parts (to ensure fastening between the new and old pipe).
- Liquid soap (for smooth insertion of the pipe into the connecting parts).
Important! For installation of a sewer riser, it is better to choose pipes made of polypropylene.
What tools are needed?
You should purchase the necessary tools in advance. To work you will need:
- Hammer. It is used to open interfloor connections.
- Grinder for cutting pipes.
- A section of pipe with fittings.
- Clamps for fastening pipes.
- Hammer, hacksaw, chisel, sharp knife.
- Crowbar, nail puller.
- Sealant and mortar.
Rules for dismantling an old pipe
Before starting work, you need to determine the specific installation location of the riser in the apartment; it may require replacement:
- Pipe sections located between floors.
- Pipes located between the floor and ceiling.
In the first case, coordination with the neighbors is necessary, since some manipulations will have to be carried out in their apartment. However, most often they use the second replacement option; such actions are performed much faster and easier.
When repairing a sewer riser yourself, you need to take into account some organizational points:
- The management company must be notified of the work being carried out, even if the work is carried out at its own expense and independently.
- Neighbors must be notified about the time of work.
- During the manipulations, you will need to turn off the water and ask your neighbors not to use the drain.
To dismantle the old pipe you need to:
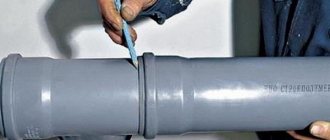
- Measure a distance of 10 cm from the ceiling and 80 cm from the tee. Using a grinder, make several horizontal cuts approximately half the diameter of the pipe.
- Using a chisel and hammer, first hit the upper bridge, and then the lower one. When performing such actions, the cast iron pipe splits and its middle part can be easily dismantled.
- The pipe under the ceiling should be covered with plastic film, after which you can begin to disassemble the lower part of the pipe, where the tees can be placed.
- Using a crowbar and a nail puller, you can loosen the tee fastening. The places where the connection was made with cement are cleared with a hammer drill.
- The remaining pipe cuttings must be prepared for the installation of new pipe elements. To do this, you need to thoroughly clean the ends of the old pipes from any contaminants and treat them with a grinding machine.
If the dismantling work was carried out correctly, then reliable operation of the new riser will be ensured.
Assembly and installation of a new riser
All work on installing a new riser must be performed in a certain sequence:
- You need to put a rubber cuff over the cast-iron piece of pipe, treating the joint with sealant.
- An additional adapter must be installed in the tee located below.
- To accurately measure the riser with the compensator inserted into the tee, you should place it in the position in which it will be located. When cutting a section, you need to retreat no more than five centimeters above the bell and only after accurate measurements can you connect the individual parts into a structure.
- The final stage of installation includes attaching it to the wall using clamps. If this is not done, there will be a risk of it moving downwards, which may cause the entire structure to rupture.
- If it is planned to replace the tee during the pipe replacement process, then the compensator must be installed directly on the tee. If two pipes are used to install a pipe, then the compensator should be installed in the place where they are fixed.
- Regardless of the connection location, sealant treatment is necessary.
In fact, replacing a sewer riser is not that difficult. In this case, attention, accuracy and adherence to the sequence of actions are important.
Difficulties in replacing pipes between floors
When a sewer coupling is destroyed, the repair consists of replacing the section of pipe between the ceilings. For this you will need:
- Compensating pipe.
- A straight pipe (or several pipes) with a total length slightly less than or equal to the length of the section to be replaced.
Important! Plastic pipes can be installed in a gap in a cast iron riser. To properly combine them, you need to clean the rough surface of the cast-iron pipe from rust and paint layers using a wire brush or a sharp knife. Replacing a section of a riser made of plastic with cast iron pipes is impossible.
Action plan:
- Cut the sewer riser in two places and remove the cut section.
- Disassemble the socket connections.
- Place the compensator onto the top tube.
- Insert a straight pipe into the lower socket.
- Place the compensator into the pipe socket.
- Securely secure the necks with clamps.
When the lower bell is located in the ceiling, you don’t have to open it. It is enough to add a sewer coupling to the list of necessary materials.
After dismantling the defective area, it is put on the lower part of the pipe with a previously chamfered. Further manipulations are identical to those described above.
Review of emerging problems and solutions
There are reasons that contribute to repair work on a sewer riser.
Bell leak
A typical problem that arises when a cast iron riser is installed is the destruction of the socket by the mass of the pipe resting on it.
This problem can be solved in two ways:
- Installation of a rubber band. The bandage can be a rubber bandage purchased at a pharmacy or a cut bicycle inner tube. The bandage is installed as follows: the rubber is wound around the defective area, extending 10-15 cm onto the pipe. The bandage itself is tied with a knitting wire.
- Replacing a section of pipe with a socket. The procedure is the same as for replacing the riser between the floors.
Leak in the ceiling
Often the cause of a leak in the ceiling is the subsidence of the lower cast iron pipe under the influence of its own weight.
During the process of subsidence, the upper pipe partially or completely leaves the socket of the lower one, and when the riser is filled with drains coming from the ceiling, it begins to flow.
A sign of such a problem is an unpainted strip of cast iron on the riser near the ceiling.
The reason for the subsidence is due to poor-quality sealing of the technological hole in the ceiling.
The problem is solved like this:
- A clamp made of thick wire or rope is placed on the riser.
- A support made of timber, boards or other material is constructed on the floor of the bathroom.
- Next, the lever principle is used: the pipe or crowbar rests on a support made of timber and is placed under the clamp.
- The pipe is then secured to the wall with clamps. For temporary fixation, you can use wooden wedges driven into the lower socket.
- Next, the socket is re-embossed with an oil seal or cap and sealed with cement mortar.
Blockage
If the water level in the toilet rises when the taps are closed, this is a sign of a clogged sewer riser.
To clean the riser, use:
- For a larger distance, use a special sewer wire.
- At a small (2-3 meters) distance from the inspection to the blockage, use a cable.
The task is to gain access to the nearest tee or revision located above the blockage.
Important! It is not recommended to clean the riser from the bottom up, since when cleaning the sewage will cover everything around with a layer of substance.
It is better to clean the sewer riser together. While one person pulls the wire or cable and rotates the handle, the second person delivers the necessary tool to the blockage. When the water goes away, it is necessary to continue to rotate the cable on the way back.
Replacing a sewer riser is done quite rarely and does not pose a problem. However, if you lack experience, it is better to use the services of professionals, then the quality of work will be guaranteed to be high.
Did this article help you? We would be grateful for your rating:
1 0
Which pipes to choose?
The plumbing market offers a wide range of pipes and fittings for drainage. They are made from different materials, each of which has its own pros and cons.
Ceramics
Ceramic pipelines are resistant to corrosion, aggressive liquids and temperature changes.
They have smooth internal and external walls that do not form plaque. Installation of ceramics is carried out in the bathroom, shower and other places where the aesthetic component is important.
The disadvantage is the fragility of ceramics.
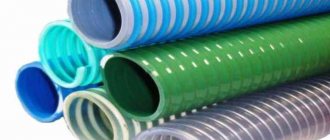
Polymers
Polypropylene products are popular among builders.
Plastic pipes are lightweight, they are easy to join using rubber reduction, the material is resistant to corrosion, vertical and horizontal loads.
The downside is that at subzero temperatures the plastic becomes brittle, and when heated strongly it becomes deformed.
Metal
For the construction of sewers, pipes made of cast iron and steel are used.
As for cast iron, it does not rust, but has rough walls and fragility. Steel is strong, bends easily, but is susceptible to corrosion.
The choice in favor of metal is made when building houses from timber and logs, which shrink strongly.
General recommendations for replacing sewer pipes
To ensure proper functioning of the water discharge system, all spigot points must be located in the direction of flow of water flow. This will provide easy access when connecting new sewer pipes to the riser.
Also, do not forget about safety precautions and use personal protective equipment. Review installation recommendations from manufacturers and professional locksmiths.
Failure to comply with the standards when replacing a sewer riser may lead to undesirable consequences that will lead to additional financial costs in the future. For example, particles of old cast iron entering the water supply system of a house.
It is more advisable to use plastic pipes
If you feel that you cannot do such work yourself, it is best to leave this task to the professionals. If you decide to do everything yourself, then be patient and follow our instructions.
Plastic pipes have proven themselves much better in operation, so all experts recommend using them exclusively. Thanks to their smooth surface, they will not allow impurities and bacteria to accumulate on their inner surface, as is the case with cast iron pipes. Therefore, you will not have to clean the pipeline often.
The materials for the manufacture of such pipes are polyvinyl chloride, polypropylene and low-density polyethylene. They are not only easy to install, but also easy to use.
Work order
Installation of a new riser is carried out in a certain sequence. In order for this process to proceed without complications, it is necessary to provide for a number of points.
Precautionary measures
Carrying out plumbing work involves the use of electric tools, contact with toxic fumes, and sharp and heavy objects.
The following safety precautions must be observed:
- ensure good ventilation of the bathroom;
- use an insulating or filtering gas mask;
- perform work wearing protective gloves, goggles and an assembly helmet;
- use proper electric tools.
You should decide in advance how to secure the riser from above so that it does not fall along with the tee onto the repairman during the repair process.
How to prepare for the replacement process
In order for the installation of a new riser to be completed quickly and efficiently, it is necessary to carefully plan this work. You should check in advance the possibility of dismantling the toilet, draw up a diagram of the location of the tee sockets, inserts, fittings and adapters.
Everything should be at hand so as not to interrupt work to go to the store for missing items.
Devices tools and materials
In order to change the riser, the following tools and materials are needed:
- perforator;
- hammer;
- Bulgarian;
- oil level;
- screwdrivers;
- putty knife;
- chisel;
- pipes with a diameter of 50 mm and 100 mm;
- sealing agents;
- clamps;
- plastic dowels and screws for them.
It is advisable to prepare garbage bags and boxes, rags and buckets to collect dirt and water.
Advantages of using PVC fittings
PVC fittings for sewerage have many advantages that distinguish them from other materials:
- light weight. This advantage is considered one of the main ones, since the low weight of shaped elements made of polyvinyl chloride ensures high-speed installation of the sewer structure without special costs. Installation of PVC products can be done alone. The low weight of these devices makes them easy to transport;
- long service life. The shelf life of such products, as a rule, is at least 30 years (in some cases more);
- high level of resistance to destructive corrosive influences;
- resistance to aggressive chemical compounds;
- high coefficient of moisture resistance;
- smooth inner walls. Thanks to the perfectly smooth inner walls, products made of polyvinyl chloride are not prone to overgrowing due to the accumulation of salt deposits;
- ease of installation. Labor costs when installing a sewer system using PVC connecting fittings are reduced to a minimum. A sewer structure of this kind is mounted like a construction set (the edge of the first pipe is put on the end of the second).
- the ability to mount a structure of almost any configuration.
Polyvinyl chloride products are popular and easy to assemble and, in addition, have high performance characteristics. Reliability and long service life are the two main guarantees inherent in products made from this material.
PVC pipe products are easy to assemble, as they have sockets, and rubber seals ensure tightness
Dismantling the old cast iron system
The old riser will not be reused, and no delicacy is required when dismantling it.
To remove it from the tees, you must perform the following steps:
- disconnect the toilet from the floor and the drain socket and remove it from the bathroom;
- Use a grinder to make first a lower and then an upper cut across the pipe;
- connect the cross sections with vertical cuts;
- insert the chisel into the slots and apply several strong blows with a hammer;
- loosen and remove from the tee first the upper fragment, and then the lower pipe;
- clean the upper bell and wrap it in cellophane.
After this, you need to remove all remains from the riser from the bathroom and wipe the floors.
How to properly dismantle the riser?
Before installing a new section of sewer pipe, you need to dismantle the old one.
There are two options:
- the work does not affect floor slabs;
- replacement is carried out with the capture of the area between the floors.
The procedure for dismantling the pipe itself is no different in both cases. The difference lies in the need to open the interfloor ceiling before dismantling the pipe in the second case.
Algorithm for dismantling the sewer riser:
- At a height of 1 m at least from the adjustable fittings, an incision is made on the cast iron pipe with a grinder and the section is removed from the lower socket.
- If the pipe cannot be loosened using a nail puller or chisel, you can try heating it to soften the old sealant.
- The riser is analyzed from top to bottom, from connection to connection.
We recommend that you read: Using copper pipes in various pipeline systems - pros and cons
The opening of floor slabs between floors will need to be agreed upon with the neighbors. Dismantling of ceilings is carried out either with a hammer drill or using a crowbar, chisel and hammer.
Note! Work should be carried out without strong impacts, using rocking, heating, and gentle tapping. Excessive physical impact on a cast iron riser can split it.
Installation of a new riser
This stage of work begins with cleaning the bells from old plaque, dirt and degreasing the internal walls.
After this you need to do:
- Mark the outline of the new riser section on the wall. Drill holes and secure clamps in them.
- Attach rubber cuffs to the upper pipe and lower bell.
- Cut out the blanks and try them on.
- Insert the bottom of the pipe into the tee. Attach an inspection hatch to it. Secure the riser fragment to the wall with a clamp.
- Assemble the top of the riser using a compression fitting.
This is where the rough editing ends.
Insertion method
Installation of the coupling during the initial assembly of the system does not raise any questions. The only condition will be to place the socket towards the flow (on the riser it is directed upwards, on the deck chair it is directed away from the riser). This is an important point, since the reverse position of the connecting element creates the risk of permanent blockage.
Let's consider how to install a compensator on a sewer system if it has already been assembled and put into operation. Procedure:
- In the place where the fitting is installed, a section of pipe is cut out with a grinder. Its size should be 10 cm less than the full length of the compensator. Usually they cut only in one place, the second end is removed from the tee. This is the best variant;
- the edge of the cut pipeline is cleaned of burrs and treated with sandpaper;
- The coupling socket is placed on the free end of the pipe and shifted upward so that the lower part can be inserted into the tee socket. Move the fitting down all the way, connecting its internal element to the tee.
Some sources recommend applying silicone sealant to the internal surfaces of the bells before installation. If the expansion joint is too tight, you can apply a little liquid soap or shampoo to the pipe - the work will go much easier. Before installation begins, it is necessary to notify neighbors about the time and nature of the work so that they do not use the sewer. Otherwise, all the drains will end up on the floor and you will have to do a general cleaning of the premises.
How to connect pipes
The technology is almost the same for products made from all materials.
The straight part of the pipe is inserted into the socket, inside of which there is a seal.
Sealing
This process is carried out using the following materials:
- tow;
- jute rope;
- automotive lubricant;
- silicone;
- Teflon tape;
- self-adhesive film.
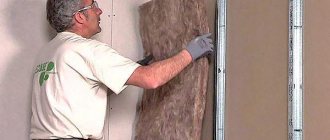
Additional sealing is needed in cases where the riser will be sheathed with a rigid stationary box.
Checking for leaks
This procedure must be carried out to ensure the quality of the work performed. A dense material tied to a rope is inserted into the inspection hole and moved below the tee in the floor. After this, the drain is filled with water and a pause is maintained for 20-30 minutes.
If there are no leaks, then the final installation was carried out efficiently.
After this, the riser can be closed, not forgetting about installing sound insulation.
How to install an expansion pipe?
To ensure that the insertion of the compensator is correct and of high quality, you should:
- take into account the thickness of the pipe walls;
- determine the length of the sewer network in order to calculate the level of pressure on the connected joints.
Important! The best option to increase the tightness of pipe connections with thick walls is to use silicone sealant. This material is elastic and therefore will not interfere with compensatory movements. Sealing network elements is also effective when the sewer system is planned to be used with increased exposure to extreme temperatures.
Algorithm for inserting polyethylene and polypropylene expansion joints into the riser:
- first, a section of the pipeline to which the compensator will be connected is cut out with a metal hacksaw;
- the edges of the cut are processed with a file or coarse emery cloth to remove burrs;
- then silicone sealant is applied to the upper end of the riser (it is better if it is a special plumbing compound);
- after that, the compensation bend is pulled onto the treated side until it stops;
- then the underside of the riser is covered with sealant;
- then the corresponding end of the compensator is fixed in its socket;
- then the riser is fixed;
- After the silicone has dried, the system can be used.
A 110 mm compensator for sewerage made of polyvinyl chloride can be mounted using the same method as polyethylene and polypropylene analogues, that is, by pairing elements in a socket.
We recommend that you learn about the features of furniture sets from Misty.
Find out which lampshades should not be hung in the bathroom.
Installing PVC adapters is quite easy and does not require special preparation. Some tips for installing these fittings:
- It is best to cut pipes with a hacksaw with small teeth, for example, a metal saw, so there will be fewer burrs on the cuts;
- Dry and clean sides of the elements must be sanded and sealed;
- All cavities that appear must be filled with silicone sealant.
The compensator makes it possible to repair the sewer system without dismantling large sections of it. Its plastic varieties are installed simply and quickly. You do not need to be a qualified plumber for this type of work.
Why do you need a compensator?
Compensation pipes can be used in pipelines of internal non-pressure sewer networks in administrative, residential and industrial buildings. In addition, such parts are used in the construction of water conduits and drains. Their effectiveness is especially noted if internal sewerage is located in the floors and foundations of buildings.
The expansion pipe is sold in any specialized store
In essence, a sewer compensator is a fitting.
It is a low cylinder with a bell-shaped device. The main purpose of such a part is the maintenance and repair of the internal sewer system. If a section malfunctions, the pipe cuts into the pipeline to replace it.
In addition, the sewer pipe is needed for:
- Connections of individual elements of the internal sewerage system;
- Compensation for construction tolerances (often during mass construction, floor heights at sites may differ by several hundred millimeters);
- Protection of the pipeline from deformation and destruction due to linear (thermal) expansion.
In addition, such an element greatly simplifies installation work. Thus, the pipe is most often installed in the lower parts of the risers - in utility and technical rooms. This makes it possible to ensure the necessary slope of the pipeline for better drainage of wastewater and simplification of the internal components of the system located in the basements of buildings.
Why is thermal expansion dangerous?
As a result of design errors, when the thermal expansion of the pipeline is not taken into account, sections of it deviate to the sides when heated, creating a wave-like shape. At the same time, the noise level from the flowing liquid increases significantly. As a result of modification of pipes, the following occurs:
- destruction of fastening supports;
- reduction in throughput due to air accumulation at high points;
- drop in temperature of heating radiators;
- formation of cracks at bends and leaks through them.
Which option is better to install on polypropylene?
The range of devices offered by manufacturers allows you to select the right type for polypropylene pipelines for any purpose and installation method. Depending on the conditions of use, the following are used:
- Axial bellows-type expansion joints designed for use in heating and hot water supply systems. They are connected to pipes using couplings. The bellows is made of thin stainless steel and can withstand pressure up to 16 atmospheres at a temperature of 115 ⁰C.
- Shear devices with two corrugations - compensate for thermal expansion in 2 directions simultaneously.
- Rotary - used in places where the pipeline line changes by 90⁰.
- Universal varieties - used in small areas with branches. Compensate for transverse, angular, axial displacements. They are installed where it is not possible to use other types.
- Flanged expansion joints made of soft materials are designed to mitigate water hammer. They will smooth out minor flaws made during the pipe laying process. They are easy to install and replace since no welding is required during installation.
- Compensators in the form of coils.
- Loop-shaped ones are the simplest. They are easy to make yourself from a piece of polypropylene pipe. Despite the simplicity of the design, they successfully perform the same functions as their factory counterparts, but take up more space.
Advantages and technical characteristics of plastic expansion joints
Polypropylene expansion joints for sewer pipes are used most often. Their popularity is explained by a number of advantages.
Advantages of polypropylene pipes
Features of polypropylene adapters:
- long service life: the average service life of products is 30–40 years;
- low weight: due to this, labor costs when installing the compensator are low;
- easy installation, similar to constructor assembly;
- resistance to aggressive chemicals and temperature changes;
- the material is not subject to corrosion;
- due to the smoothness of the inner walls, deposits grow on them very slowly;
- the material is environmentally friendly, which is confirmed by hygiene certificates;
- Such compensators are inexpensive.
Important! Manufacturers produce a wide range of expansion pipes with different cross-sections and shapes. This makes it possible to install sewer networks of any design and complexity.
Technical characteristics of polypropylene products:
- total length - 28 cm;
- outer diameter of the bell - 11.5 cm;
- internal section of the bell - 11 cm;
- wall thickness - 3.2 mm;
- continuous operating temperature limit - +95 degrees;
- pressure in the network in which the compensator is operated is without pressure;
- color - pale gray;
- transported medium - sewage;
- warranty period - 24 months;
- The declared service life is 50 years.
Repairing a leak in the riser
To repair a small leak (crack) in the riser, it is not always necessary to change the damaged section of the pipe; often it is enough to simply install a fixing clamp. In the latter case, a dense material is selected to cover the damaged area.
After which it is tightly tightened with rings so that the material fits tightly over the entire coverage area.
A clamp is installed only if the damage is small (5-7 mm in diameter).
Installation: calculations and requirements
For polypropylene pipes with aluminum reinforcement, the coefficient of thermal expansion is 3×10⁻⁵ 1/°C, and for ordinary pipes it is 15×10⁻⁵ 1/°C. It follows from this that a change in temperature by 10 ⁰C increases the length in the first case by 0.3, and in the second by 1.5 mm. Knowing the length of the pipe and the limits of its temperature change, it is easy to calculate how much it will lengthen.
Suppose the heating system is installed at a temperature of 20 ⁰C, it will heat up to 100 ⁰C. The resulting difference of 80 ⁰C will cause each meter of reinforced pipes to increase by 0.3 × 8 = 2.4 mm, and for conventional pipes by 1.5 × 8 = 12 mm. If their length is 10 m, the total increase will be 2.4 × 10 = 24 mm and 12 × 10 = 120 mm.
For communications intended to operate in conditions of high heating, pipes with minimal linear expansion should be selected. Options reinforced with aluminum or ethylene vinyl alcohol are suitable. To supply cold water, you can use ordinary polypropylene pipes, since the magnitude of the temperature change is small. The maximum difference is 20 ⁰C in the cold season if they pass through an unheated basement.
Warm floors are installed in screeds at 16-20 ⁰C, the maximum heating temperature according to sanitary standards is allowed up to 55 ⁰C. With such a difference, it is permissible to use conventional pipes. Despite the fact that the thermal expansion of products in screeds and under plaster is dampened by the surrounding material, reinforced options are more reliable. It’s better to play it safe so you don’t have to drill into the floor and walls later.
Communications laid under the plaster must be covered with casings made of foamed polyurethane or polyethylene. This method is called "pipe in pipe". Its use reduces heat loss due to heating the walls, and the elasticity of the casing allows the products to expand, thereby relieving internal stress.
Polypropylene communications are attached to the walls on rigid and movable supports. The former do not allow products to elongate during thermal expansion. They are used to divide the water supply into compensation sections. To protect the riser from subsidence, it is rigidly secured under the tees, at the bends and couplings connecting the pipes. In the middle, between the fixed fasteners, compensators are installed.
The second type of fastener does not prevent the elongation of products during thermal expansion. With its help, you can mount communications, avoiding subsidence of the riser. Since with this method nothing interferes with the movement of the pipes, the installation of expansion joints is not necessary.
When laying communications in a shaft or channel, it is necessary to provide compensation for temperature shifts in the branches. This can be done by adding a bending arm if the communication is located further from the wall. Increasing the hole to a size sufficient for free movement of the outlet, or installing an L-shaped compensator also solves the problem. The rigid fastening points of the riser in the shaft and channel should be located at a distance of no more than 3 meters between them. On straight sections of communications made of unreinforced pipes longer than 10 m, expansion joints must be installed on risers and bends.