What is “zero” and why do we display it?
In the construction of houses, the zero level is most often taken to be the level at which the plane of the finished floor of the first floor is located. It is necessary for design, as it serves as a single guideline when calculating the location of horizontal surfaces of other structures.
Section of a house with vertical marks Source belenkina.ru
However, when talking about zero foundation, we mean something completely different. In this case, 0 is a relative concept; it is the mark of the upper edge of the foundation strip along its entire length. It must be unchanged at any point. This applies to foundations of any type. For example, at a pile foundation, the heads of all supports buried in the ground must also be located in the same plane, and this plane must be horizontal.
If you do not think in time about how to display zero on the foundation, this can lead to serious problems during the construction of the building and its operation. And warped walls are not the worst thing. It’s worse if they put an uneven load on the foundation, which will certainly cause stress to arise in it, leading to rapid destruction of the foundation.
One of the reasons for the destruction of the foundation is the uneven distribution of the load on it Source twimg.com
Therefore, the upper plane of the foundation on which the walls will stand must be leveled horizontally. This is done immediately upon installation. But often you have to re-display zero on a ready-made basis.
Zero on the finished base
Often you have to display zero on an already laid foundation. Then the work algorithm is reduced to the following:
- Using a hydraulic level or hose, the original location is marked. The corners should be marked in such a way that the position of each of them is obvious in relation to the other. The board formwork is installed. At the same time, their length parameters must correspond to the thickness of the base. In the corners there are zero points, which are subsequently marked from inside the foundation. The formwork is sawed through, and reinforcement is subsequently installed into it. The finished solution is poured into pre-wetted reinforcement products.
When searching for zero points, a hose is used.
In this case, you should remember about the inertial movement of water inside it. After pouring the solution, it is necessary to ensure that it does not dry out due to cracking. To avoid such consequences, the surface should be periodically moistened.
The most important element of building a house is the construction of the foundation.
In the process of work, you need to know how to correctly bring the base to 0 using a brick. It is important to know what technologies are used. One mistake in work can cost the stability of the future structure, so all stages of the process are carried out completely relying on the instructions.
How to fill a foundation level
There are several ways to bring the foundation below zero when pouring it.
- Construction of formwork, the upper cut of which gives an even horizontal closed line.
The work is very painstaking, requiring accuracy and the use of high-quality formwork structures with smooth edges. These can be edged boards, plywood sheets, OSB, special formwork panels. If you install them correctly, all that remains is to pour the solution to the very edges and level it along the sides of the formwork.
Installation of formwork in compliance with the horizontal level Source blockotoole.com
- Marking the zero line inside the formwork.
In this case, the formwork is made higher than the intended level, and markings are made on its internal walls - a horizontal line up to which the solution should be poured. This could be a stretched cord, duct tape, or a drawn line. But such marks are not very reliable - the cord can move, and the drawn markings can be erased. It is better to screw wooden blocks to the walls of the formwork, the lower edge of which along the entire perimeter is the boundary of the pouring.
Level marking with stretched strings Source cd.bel
For precise markings, use a level, water or laser level. First, mark a point at the desired height in one of the corners, and then transfer it to the other corners and connect it with a solid line.
See also: Catalog of companies that specialize in the design, installation and repair of foundations
How to lay out a zero on a brick foundation?
The most important element of building a house is the construction of the foundation. In the process of work, you need to know how to correctly bring the base to 0 using a brick. It is important to know what technologies are used. One mistake in work can cost the stability of the future structure, so all stages of the process are carried out completely relying on the instructions.
Why put zero on the foundation with a brick?
In practical terms, displaying 0 on the foundation means giving the upper area of the foundation structure an exclusively horizontal location. It is important to take into account the fact that the level of the foundation is entirely located in one single plane. This need is based on the fact that the “cushion” performs important functions of the building, namely, it takes on the entire load of the structure. To ensure that the weight is evenly distributed over the entire plane, the upper level is set to zero, thereby avoiding premature destruction of the house.
Among the existing options, the optimal solution is when a concrete base is formed at the initial stage of pouring the structure. It is much easier to justify everything in theory than to implement it in practice, so in practice it is not always possible to derive a horizontal level that would be considered ideal. Often craftsmen deal with errors in their work, and such issues have to be corrected at later stages of work, after the base has been filled with mortar. Therefore, the method of obtaining the zero level using brick or stone is relevant.
Tools and materials
It is customary to begin work on the construction of the foundation with the preparation of all necessary materials and construction equipment. To lay out the structure during the laying process you will need:
The tools you need to prepare are a hydraulic level.
- trowel;
- shovel;
- order;
- jointing;
- mooring cord;
- hammer-pick;
- hydraulic level;
- construction level;
- trough;
- concrete mixer;
- metal rod;
- work gloves;
- bricks;
- sand;
- cement;
- lime;
- fittings
The complete list of materials depends on the nature of the work on a particular site.
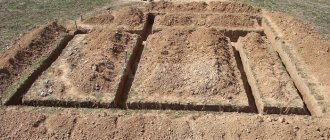
Check before work
Checking horizontality is necessary to identify defects in the base of the structure.
Before starting any construction activities, it is necessary to check the horizontal level of the surface. To do this you will have to use a construction hydraulic level. The check is carried out from the corners and gradually moves to areas of the base of the structure. If there are differences in the horizon, the necessary notes are taken and the orientation cord is pulled. After this, they move on to the main initial work processes.
How to level to zero when concreting?
The first step is to set the zero point correctly. To do this, a mark is made from the inner area of the formwork, preferably in one of the corners, which will be the alignment boundary. Next, we use the hydraulic level to determine the remaining three points.
If such a tool is not available, an ordinary transparent hose will do as an alternative. To mark the corresponding boundaries, the latter is stretched from the marked area to opposite corners, after which water is released. The zero level is fixed at the primary point; in the process of balancing the liquid, a second point is selected and a mark is placed in this place.
The remaining points are located according to a similar principle; no difficulties arise at these stages:
- In the finished formwork, it is necessary to make holes for the hose in the middle section of the planned walls.
- A cord or twine is threaded through the holes, after which the structure is fixed until tension appears.
- The zero level is measured and the concrete solution is poured.
- The construction rule is to level the mixture; it is important to distribute it evenly over all areas of the surface.
The level foundation is ready for the construction of the basement.
After the concrete solution has completely hardened, the ideally flat area of the foundation is completely ready for further construction of a basement or possible basement. In this case, do not forget about regularly checking the compliance of the horizontal and vertical levels of each brick row or building block.
Methods for leveling the finished base
Often builders need to reach zero on an already formed base of a brick surface. The algorithm of actions looks different than in the first case and consists of the following steps:
- The initial location must be marked with a hydraulic level or a special hose. The corners should be marked so that the location of all is obvious in relation to each other.
- After this, the wooden formwork is installed. It is important to take into account the moment that the design parameters coincide with the thickness of the base.
- Zero marks are measured in the corners, which in the future are transferred to the inside of the foundation.
- The reinforcing mesh is being installed in the formwork. The wooden frame is first sawn.
- A solution is prepared if the consistency of the correct mixture is poured into pre-moistened reinforcement rods.
A hose is used in the process of searching for the location of zero marks. However, it is important to remember the point that the water inside the latter moves by inertia. After the solution is poured into the formwork, it is necessary to ensure that the hose does not dry out from cracking. To avoid such problems, you should regularly moisturize the necessary areas.
Source: https://etokirpichi.ru/zdania/metodika/kak-vyvesti-nol-kirpichom-na-fundamente.html
How to level a skewed foundation
Having bought a plot with a ready-made non-ideal foundation or initially poured it out of level, you have to think about how to correct mistakes, how to bring zero to the foundation - with a brick, pouring an additional layer or placing leveling spacers under the lower crown of the frame. The choice of method depends on the magnitude of the deviation from the level. And even if it was initially accurate, before starting construction you need to make sure that it remains so.
Reasons for foundation misalignment
The discrepancy between the upper plane of the foundation and the horizontal level occurs for many reasons. This almost always happens if the master relies only on his eye and does not use measuring instruments.
Marking can be done using a water level Source kabelprovod161.ru
The second common reason is a marking failure: when pouring concrete into the formwork, it is very difficult to maintain a stable position of the string stretched inside it. How to level the solution along the drawn line.
But competent work does not guarantee that the foundation will not warp over time. This happens for two reasons.
- Uneven shrinkage.
Concrete mortar hardens when water evaporates from it. If it was poorly mixed or prepared with an excess amount of water, then in those places where there was more of it, the solution shrinks more strongly. As a result, the surface of the foundation after drying may become uneven, with bumps and depressions.
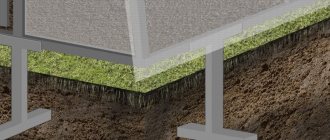
- Change in foundation depth as a result of frost heaving of the soil.
The weight of the building standing on the foundation balances the forces of frost heaving of the soil and prevents them from pushing it out of the ground. If the foundation remains “overwintering” unloaded, its own weight is not enough to counteract these forces. If they act unevenly, the concrete strip may rise in places and its surface will no longer be horizontal.
For the same reason, the concrete tape may crack or break Source blog-potolok.ru
Advice! In order not to think in the spring about how to bring the foundation level to zero, it is advisable to build the walls before frost in order to provide it with the necessary load. But after pouring, it must stand for at least a month.
Regardless of the reasons that caused the distortion, the base must be corrected. To decide how to do this, you need to take measurements and determine the degree of deviation from the horizontal level. To do this, find the highest and lowest point on the concrete strip and calculate the difference between them vertically.
Grinding
According to the standards, the maximum permissible deviation of the foundation plane from the horizontal should not exceed 25 mm per 10 linear meters. In cases where it is not much larger, the plane of the concrete strip can be leveled by grinding the most protruding areas.
Video description
This video shows how to level the foundation using self-made sliding formwork:
Where the difference is particularly noticeable and the thickness of the filling layer is large, it is recommended to reinforce it with masonry or plaster mesh.
Brick leveling
If the foundation is skewed by more than 5 cm, it can be leveled with red ceramic bricks. It must be solid, grade no less than M125.
Before laying a zero on a brick foundation with your own hands, determine the differences in height and level them out during laying, increasing or decreasing the thickness of the masonry mortar.
By changing the thickness of the seams between the rows, the top row of masonry is brought to the horizon Source sdska.ru
Brick can also be used as rubble when leveling the base with concrete mortar. It is laid in areas where the difference in height is more than 65 mm (brick thickness).
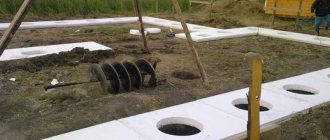
Construction of a monolithic reinforced belt
If there is a significant deviation from the level, the most reliable solution will be to build up the foundation strip with a belt of reinforced concrete. To set it up, a number of activities are carried out.
- Formwork is placed along the entire perimeter of the skewed base, aligning its upper cut horizontally.
- The height of the formwork should not be less than 12-15 cm.
- For better adhesion of the reinforced belt to the base, holes are drilled in it into which reinforcing bars are hammered.
- A metal frame made of reinforcing bars with a diameter of 10-12 mm is mounted in the formwork.
- They are connected to each other and to the rods protruding from the old foundation with 4 mm thick knitting wire.
Formwork with reinforcing frame Source chipmaker.ru
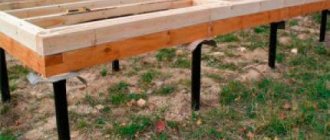
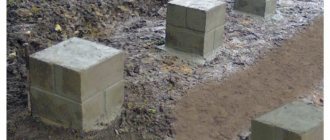
Leveling pile and column foundations
Screw metal, reinforced concrete driven and bored piles are leveled in one way: find a support whose top has the lowest mark, transfer it to the remaining piles and cut them according to the marks obtained.
Trimming screw piles according to markings Source znaybeton.ru
In the case of a columnar foundation, which often serves as the basis for light buildings, proceed in the same way as when leveling a strip foundation. Most often, above ground level, the columns are built up to the required height with bricks or concrete blocks, bringing the masonry of each support to the level indicated by a cord stretched along them.
If there is a slight deviation, formwork is mounted on each pillar and the solution is poured into it.
Briefly about the main thing
Before you start building walls, you need to make sure that the first crown or first row of masonry will lie on a flat horizontal surface. If a significant deviation from the level is detected, mistakes made at the initial stage of construction will have to be corrected and the base leveled. Knowing how to lay out a zero on a brick foundation, by pouring an additional layer of concrete or installing an armored belt, you will select the optimal leveling option. The choice will depend on the degree of distortion: if it is small, you can get by with grinding or plastering the upper surface, but serious differences will require leveling with brickwork or pouring concrete into formwork with reinforcement.
Ratings 0
How to lay out a zero on a brick foundation
The reliable foundation of any building is a properly formed foundation. It is to this part of the building that the entire load created by the structure above is transferred. Proper construction of the foundation of any building provides it with sufficient stability and durability.
How to lay a brick plinth
For any craftsman who plans to build a house with his own hands, the process of constructing a plinth is important - the stages of its construction, the required tools and materials, as well as knowledge of some nuances.
Brick base
The basement of a house is a part of the building, which inherently acts as a continuation of the foundation. The purpose of its design is to raise the main structure higher above ground level. This is necessary, first of all, to protect against freezing of the first floor and flooding with melt water. Some craftsmen don’t bother too much and make a base by raising the foundation higher. There are many supporters of this method, and no less opponents.
The process of constructing a brick plinth
A well-designed plinth should be reliable, durable, and ideally set the architectural tone for the entire structure. Therefore, for its manufacture it is better to use brick, which is superior in durability even to high-quality concrete.
Material selection
The main requirement for the material for the construction of the base is its reliability. Therefore, when choosing it, they start from the fact that this material should be much stronger than the walls of the house. The following raw materials can serve as the starting material:
- Solid brick, fired in factory kilns;
- Acid-resistant brick raw materials;
- Gray Bassoon;
- Combining red granite with regular shaped paving stones;
- Rubble stone.
Brick base
In terms of popularity, brick is the leader of this list due to its mass availability and low cost. If desired, the base can be made of any of the above-mentioned materials; here everything depends on the skill and financial capabilities of the master.
The importance of waterproofing a brick plinth
Even baked bricks can lose their strength over time due to frequent contact with precipitation and groundwater. Therefore, waterproofing of the base is required. The better this work is done, the stronger the foundation of the house will be. Therefore, this cost item is not a reason to save money.
Important: many builders recommend double waterproofing. This will increase the “life” of the entire foundation.
To perform the operation to protect the base from water, the following materials are needed:
- Plaster mixture;
- Ceramic tile;
- Artificial or natural stone;
- Sheets of roofing felt.
Brick laying for the basement
The first layer of waterproofing should be made directly at the junction of the foundation and the first row of plinth bricks. This will protect the entire structure from groundwater. The second waterproofing layer is installed at the transition of the base to the walls of the house, i.e. in the last row of masonry.
Rolled roofing felt can be replaced with aquaizol, while if the first material requires 2 layers, then only one of the latter is sufficient.
Marking a brick plinth
For hydro- and thermal insulation of the base, foamed polystyrene foam (penoplex) can be used, which will create a strong barrier from all atmospheric precipitation. Some builders prefer to coat the surface of the plinth with a mixture of plaster or bitumen-based lubricant. The thicker the layer of these compounds, the higher the level of protection.
Combining several of the above methods of moisture protection will increase the level of waterproofing several times.
Insulation of a brick basement from the outside
Important: when located close to the surface of the water-bearing veins, the base needs vertical waterproofing, when the inside of the structure is also coated or lined.
Stages of basement construction
Construction is carried out from the corners of the future house, while the brick is laid out immediately to the entire required height of the base. It is very important to control the correctness of the lines using a level and plumb line. To lay out the walls evenly, twine is stretched, which is fixed in the corner masonry with nails.