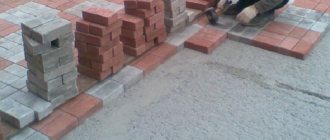
First of all, a sketch is made on paper, and then the marking of the future path is carried out directly on the territory and fixed with a cord and pegs. After which the top layer of soil is removed. Next, formwork is constructed; for this purpose, self-tapping screws and a board as wide as the future height of the sidewalk are used. The outer edges are secured with pegs and additionally secured with transverse jumpers. For waterproofing, the bottom is covered with polyethylene film. It would be useful to create expansion joints; they are created by dividing the formwork space into sections with a lubricated steel sheet for the purpose of free removal from the hardening solution.
Reinforcement
To increase the strength of the base, a metal structure is fixed to the middle of the formwork on supports. It can be wire, pipe, chain-link mesh or welded from thick rods. The optimal cell size is 10x10 cm. The reinforcement not only increases the rigidity of the base and prevents concrete cracking, while increasing its service life, but also reduces the thickness of the pouring layer, reducing the amount of work and materials.
Filling the track
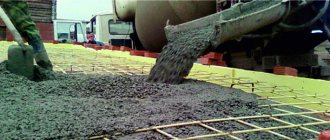
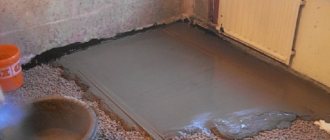
To fill the base for a garden path, you need to additionally make a solution of 1 part cement, 3 parts sand, 5 parts crushed stone, and then add 0.5 parts water. To impart fluidity and viscosity, additives and plasticizers are used, which are added strictly according to the instructions. The main prepared solution is placed into the formwork using a trowel or spatula, achieving uniform compaction by tapping and piercing the mixture. The surface is leveled according to the rule; in addition, a slight slope is formed for water drainage. After pouring is completed, the entire structure is covered with polyethylene. Decorating with drawings can begin after a day, after another two - the path will dry, and after 5 days you can remove the formwork.
After laying the reinforcement, the area can be filled with mortar.
Processing and decoration
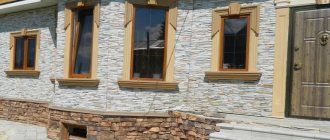
The daily solution can be decorated with a pattern, which is applied with a sharp object, or roughened using a stiff brush. Decorate with decorative embossing with a special stamp with various ornaments or images of animals, birds, plants and others, or create an imitation of brick, tile or stone. An already dry path can be polished, painted or lined with marble or mosaic. Impregnations not only add shine, but also, by filling all the voids of concrete, create additional protection from moisture and wind.
How to prepare the “correct” solution with your own hands for a garden path
It turns out that one of the most important factors influencing the quality of your future garden path to the dacha is a cement mortar that is properly prepared with your own hands.
It is highly not recommended to buy ready-made cement mortar in the store for construction work on your site. There are several reasons that should convince you to start preparing cement mortar with your own hands.
These are the reasons:
- The finished solution will not be able to give you the necessary information about its quality and composition, which can subsequently have a detrimental effect on the condition of your garden path;
- The solution from the store requires immediate use. Since it hardens quickly (this is a property of any cement mortar), you will have to involve several people to lay your path and at the same time provide each with a form for creating a garden path.
If we have convinced you of making your own cement mortar, which you can slowly prepare in small portions, then you just need to know what tools you will need to acquire for these construction works:
- Dry cement;
- Regular sand (preferably river sand);
- Water;
- A concrete mixer (the best option), or a special trough and a drill with an attachment;
- Shovel and hoe.
For your convenience, we present a table of clay-cement mortars:
Cement: clay: sand
For each type of construction work, a specific brand of cement is used. To obtain the desired result, pay special attention to this factor and purchase exactly the brand of cement indicated in this table. An indicator of the quality of cement is its rapid drying and durability in use.
Aluminous cement is very popular because it has such important properties as heat resistance, moisture resistance and quick drying.
Also worthy of your attention are the numerous brands of Portland cement present on the market, which are able to satisfy any buyer with their characteristics - drying speed and strength.
To understand. What brands of cement are the highest quality? Pay attention to the labeling indicated on the packaging. The numbers 500-600 will tell you that you have the highest quality cement in front of you. Medium quality varieties include M300 and M400; everything below M300 has the poorest quality and low drying speed.
It is difficult for an inexperienced builder to understand the many additional markings of cement; a sales consultant can help him with this; here are just a few explanations as an example:
- Cement marked PC D0 or M D0 is Portland cement that does not contain any additional additives;
- The marking on the package D20 will tell you about the presence of 20% additives in the cement;
- The big letter B will tell you that this is quick-drying cement.
If you set a goal, you can easily remember all this and understand it in detail, but this is... IF!
The color of cement can also tell about its quality. The darker the color, the higher the quality of the material!
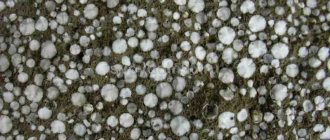
Let's pay some attention to one more material that will make up the solution for the garden path. Attention – this is an essential component of the solution, SAND.
Sand can be fine, medium and coarse. Sand of medium fraction is best suited, as it will not absorb excess moisture and will give the path the necessary smoothness and uniformity.
Before use, clean your sand; there should be no debris in it - this will affect the quality of the cement mortar. If necessary, the sand can be sifted, washed and dried.
What should be the ratio of all the components of the cement mortar in order for the garden path to acquire the strength necessary for the upcoming loads?
As you understand, it is not enough just to purchase quality material. In order for the original product to have all the necessary characteristics, we need to KNOW how much and what needs to be poured and poured in order to give the original product the required strength and quality.
Every owner of a personal plot has a very important device - a BUCKET, and we will use it as a measuring device.
In front of you is a certain container (a trough or a concrete mixer), pour one bucket of cement and three sand into it, mix everything thoroughly. Water should be poured in small portions and stirring constantly. When the consistency of the solution thickens, but still remains fluid, the solution for the paths is ready for use!
Now you know exactly all the components of the resulting solution and can safely judge its quality - which could not be said about purchased material! And since the master is confident in the quality of the material, it means that work at the dacha can be done easily and at the right pace.
Garden path solution
Product Features
In order for the finished concrete path to serve for a long time and not be pressed underfoot, care should be taken to properly prepare the base.
The solution, as a rule, is poured into molds, which can be of different designs: rectangular, polygonal, round, imitating natural stone. There are often molds made of polypropylene on sale, with which you can quickly make whole pieces of a path with a beautiful pattern.
The outer walls of this stencil, which can withstand at least a thousand pours, have a thickness of 6 millimeters, and the inner walls are 3 millimeters. Height – from 5 to 6 centimeters. It is equal to the thickness of the tile.
Read below to learn how to make a strong cement mortar (cement mortar) for a garden path and how to prepare concrete mortar for pouring.
Composition and structure
Ingredients
So, let's try to prepare a high-quality solution for the garden path at the dacha with our own hands. For the solution, classic materials are used - cement, sand, crushed stone and water. They must be of appropriate quality:
Recipe
Now let's talk about the recipe. It may be different. You can, for example, make a solution only from sand and cement (without using crushed stone). Or vary the ratio of ingredients. By the way, it is not advisable to purchase a ready-made solution. It may be of poor quality.
To give the desired shade, coloring pigments-additives can be added to the solution for garden paths. For example, the HLV brand. This pigment, produced in four main natural colors (red, green, yellow, brown), will require about 250 grams per 25 kilograms of dry cement.
The following video will talk about popular mistakes when making garden paths:
Manufacturing
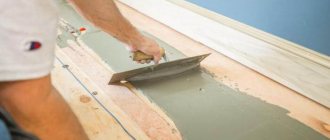
After measuring out the dry ingredients, mix them. You can do this in some clean container using a shovel or hoe. If you have a concrete mixer, then it is better, of course, to use its help. Water must be added little by little so that the finished mixture does not flow, but drips slowly (like thick sour cream from a spoon).
Having prepared the base as described above (removing the turf from above, pouring crushed stone, sand, laying geotextiles and making formwork), you can begin to create a path. The easiest way to do this is using a ready-made plastic mold. It is placed on damp compacted sand and the solution is poured into it. After twenty minutes, the mold can be carefully removed and the process repeated.
While the mixture has not hardened, you can decorate the path. By pressing, for example, pieces of tiles or pretty stones into its surface, laying them out in a beautiful pattern. To strengthen it, within two hours after pouring the solution, you can cover it with cement laitance using a brush.
Decorative concrete
A simple concrete path is a practical and beautiful structure, but sometimes, in accordance with the author's intention, something more elegant is required, for example, introducing color or imitating a paving stone path.
In these cases, use one of the many decorating techniques that you can use yourself. By combining them, you can get interesting decorative effects.
On construction markets you can purchase special pigments of any color for concrete.
Ordinary cement has a gray tint, which remains even when tinted, giving any color a gray tint. To get bright colors, use special super white cement.
Garden concrete path
Many people make paths in their gardens from gravel, brick, paving slabs, wood and other similar materials themselves. Some things are difficult, some require a lot of money, and some are very cheap and take little time.
Concrete is a relatively inexpensive material. It makes durable, beautiful paths. If you get your hands on a special plastic mold, and you can buy it at a construction supermarket or order it from an online store, then you won’t spend much time creating such a path. But the result... Beauty!
Proper design
At the initial stage, a person must think about what the location of the paths will be, and also calculate their width.
It is recommended to draw a plan of the existing site with all buildings and actively used areas, and then draw straight lines (axes) between them. Next, the tracks need to be given the desired shape. This will help make the area beautiful and convenient for people to move around.
READ Types and calculation of reinforced concrete floor beams
If we talk about the width of the path connecting the house and the main entrance, then it should reach 2 m. For auxiliary paths, 1 m will be enough. Inter-bed paths can remain narrow - only 0.5 m; driveway and garage paths must correspond to the width of the vehicle being used.
Necessary materials and tools for making a concrete path with your own hands:
- Plastic form. Can be of different sizes and shapes;
- Sand;
- Gravel;
- Cement;
- Water;
- Personal protective equipment: gloves, respirator;
- Level;
- Long string, chalk or lime;
- Manual rammer;
- Shovel;
- A bucket, another container or a sheet of steel - for mixing cement mortar;
- A drill with a nozzle for mixing cement mortar or a shovel;
- Master OK;
- Machine oil. Can be recycled;
- Brush or old toothbrush;
- Hard brush.
You can prepare the solution using the “old-fashioned method”. Place a 2 x 1 m sheet of galvanized steel on the ground, pour in all the ingredients for the solution and mix thoroughly with a shovel until the required consistency is obtained.
The advantage of this method is that you can prepare the solution in the volume required to fill the entire mold in one go, instead of several batches in a bucket.
Making a concrete path
Preparation of the bridgehead
There is no need to particularly level and ensure that the base under the path is strictly horizontal. It's even better if it has some slope. In winter, this will allow water to drain from it and not freeze in the spaces between the stones.
What you should pay attention to is the hardness or strength of the base. If the concrete path runs along a well-trodden path, this is normal - the soil underneath is moderately compacted. All that remains is to remove the top layer of turf - about 5 cm - and fill it with gravel or sand. To level out unevenness, you will have to remove a little more than 5 cm of soil in the right places, as necessary.
Outline the contours of the future concrete path with a stretched cord. This can be done with chalk or lime on the soil or grass itself.
Now you can start digging.
You should end up with something like this.
Fill the dug trench with gravel and sand, maintaining the desired layer thickness. Level the laid gravel layer, check the slope with a level. Take a compactor and compact the path well.
Where there is not enough gravel, add more and continue compacting. In this case, we used a simple log with comfortable “handles” and a flat base.
Water the compacted trench with water.
Measuring the volume of a mold
Forms for concrete paths come in different shapes. Thanks to one, you can make a path from individual pebbles. It can be supplemented with a low border, but this is not necessary.
In our case, we used a form that involves casting slabs with a solid base and imitation stones on top of it. In addition, the volume of forms may differ. Therefore, it must be measured before preparing the solution.
Pour sand into a plastic mold. The amount of sand that goes into it is approximately the same amount that will be needed to prepare a solution for pouring one mold.
In this case, buckets with tags come to the rescue.
Thus, you will find out the required volume of solution in liters for pouring one element of a concrete path. But you can measure with buckets, scoops or shovels - whatever suits you. For example, to get a solution in a ratio of 3 to 1 (sand and cement), you need 27 liters of sand, 9 liters of cement and approximately 9 liters of water.
The amount of sand for your mold may vary as manufacturers make molds of different sizes. The amount of water also depends on the moisture content of the sand itself. The main thing is that the solution is moderately fluid (like thick sour cream). Only in this consistency will it fill the sharp corners of the mold. In addition, it will be easier for you to work with it.
Once you know how much sand you need, you will also know the required amount of cement. To do this, divide the resulting number (liters) by three, and you will find out the amount of cement for one mold.
You can immediately roughly calculate the amount of sand and cement or concrete mixture to make the entire path with your own hands.
Preparing the form
To ensure that in the future the mold adheres well to the hardening solution, it is recommended to lubricate it with machine oil. Apply oil to an old toothbrush or brush and coat the inside of the mold.
Make sure that the sharp and hard-to-reach corners of the mold are greased with oil.
Preparation of cement mortar
Knowing the amount of ingredients needed, decide how it will be convenient for you to prepare the solution: the “old-fashioned method” or a drill with an attachment.
Remember that after mixing all the ingredients of the solution, they need to be given a few minutes of rest to “ripen”. Then you need to mix everything again and then pour it into the mold.
Filling the mold with cement mortar
Place the form where you want the beginning of the concrete path to be. Press it in lightly and level it, checking with a level. Pour the cement mortar into the mold compartments and, using a trowel or spatula, push the mixture into the corners of the mold, trying to get rid of possible voids in hard-to-reach places. The solution should flow into all the “cracks”.
As it fills the corners of the mold, the overall height of the solution in the mold will decrease. Therefore, you need to add the solution to the mold from time to time until you use the entire portion.
Removing the mold
Depending on how thin your solution is, you will need to wait more or less time before lifting the mold.
After about 20-40 minutes, the mold can be carefully lifted and removed from the solution. During this time, you can prepare the next portion of the concrete mixture for the path. If you have several identical shapes, the task will be much easier.
Move the mold to a new place, next to the first plate, check the position with a level. Prepare the next portion and pour into the mold.
You must not step on the prepared path for at least a day. As it dries out, you can water it several times on hot days.
Finishing details
Once the path dries, fill the seams between the “stones” with sand. Sprinkle the sand on top of the path and spread it out by rubbing it in with a stiff brush or squeegee.
All you have to do is sweep the sand and... you're done!
Don’t worry if the concrete mix path turns out to be a little uneven in some places - this way its “stones” will seem more natural.
Article rating:
Save to:
Mortar for garden path proportionsLink to main publication
What brand of concrete to choose for paths near the house
Pedestrian concrete paths are laid out of concrete 10 cm thick. The solution itself can be chosen cheaper - for example, brand M200. The strength of this brand is enough to support the weight of a person. Some craftsmen recommend mixing the solution in proportions of cement/sand/crushed stone as 1/2/3. However, this proportion has significant drawbacks:
- manual mixing of the solution is impossible, since it will not be homogeneous, and the composition of the solution will vary from one batch to the next;
- you will spend a lot of time and expend a lot of effort, if you take into account delivery, measuring, mixing;
- concrete paths will look different in color and texture on the surface;
- a manually prepared solution cannot be made uniform and smooth.
A standard M200 concrete solution will be sufficient to create beautiful paths, playgrounds and walking areas for many years. You can use shapes to fill. Then you can decorate the surface with patterns.
You can read more about laying concrete paths yourself in the article “Concrete paths”.
If you want to spruce up your concrete walkways, read about decorative concrete.