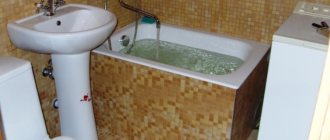
In modern bathroom design, a classic technique is to lift the bathtub onto a special podium. In order to create beautiful curves of lines, numerous steps, bathtubs and other decorative elements, a fairly large bathroom area is required. However, the need to build a podium may also arise in the bathroom of a typical apartment, since this element performs not only a decorative function.
The ability to raise the bathtub higher also ensures ease of use and maintenance of the plumbing fixtures. The need to raise the bath most often arises as a result of the redevelopment of a separate bathroom or combined bathroom, as a result of which the plumbing fixtures are moved a significant distance. It is clear that you can also make a purely decorative podium for a bathtub, serving as an interior decoration, but this is more relevant for spacious rooms. In typical apartments, the question of how to raise a bathtub is more of an applied nature, although the aesthetics of the room also plays an important role.
To create a beautiful and comfortable bathroom, you do not always need to increase the size of the room.
Considering the high level of humidity in the bathroom, as well as its size and purpose, the podium should be designed and installed with particular care.
The podium provides a visual division into zones.
The first stage of construction is the choice of building material
Making a podium for the bathroom is not that difficult. The main thing is to decide on the size, design and purchase the necessary building materials with a small reserve, since during the work many elements will have to be cut off in order to give the final structure the desired shape. You can make such a design from:
- Brick is the most expensive and reliable material. You can use it to make a structure of any complexity and size, but you also need to take into account its weight, since this material is quite heavy and such a structure may not be safe in apartment buildings.
- Foam blocks are a porous building material made from a mixture of cement, water with sand and a foaming agent. This building material is much cheaper than brick and lighter in weight. It is very popular among builders due to its ease of use (it can be easily cut to the desired size - an ordinary hacksaw is enough), it is strong and durable.
How to build a monolithic podium
To construct a monolithic podium, it is necessary to lay the formwork along the outer perimeter of the structure without adjoining the walls. As a rule, masonry is made of brick. If expanded clay concrete is used as a filler, the formwork can be made from metal profiles or boards.
Before pouring concrete into the interior of the podium, you should install a bathtub, completely install communications, and install a drain.
Immediately after the concrete solution is poured, a masonry mesh is laid on top of it and slightly recessed for greater strength. When the structure is ready, finishing work is carried out.
The final stage - cladding and installation
The final stages of construction are the tiling and installation of the bathroom. The market for facing tiles is so large that it will not be difficult for you to choose something that will suit your aesthetic and material preferences. If your podium will have steps, then special tiles with rounded edges are now even sold for this purpose. Most importantly, do not forget to tell the seller that you need material with an anti-slip coating. When laying tiles, use special “crosses” so that all seams are even, and after the mortar has dried, treat them with a fugue so that the surface becomes moisture-proof. Next, the bathroom is installed. The seams around the perimeter are also treated with waterproof material.
Tile with rounded edge
In an era of technological progress, market competition, stress, and household chores, the bathroom has become an excellent refuge for city dwellers. It is in the bathroom that people can be alone for a while, relax, meditate, and enjoy the pleasant aromas of their favorite shower gels and soap bubbles. Therefore, it is so important to make this place beautiful and comfortable. And the bathroom podium will easily help you solve these problems.
Did you like the article? Subscribe to our Yandex.Zen channel
Design features of the podium
Speaking about the transfer of plumbing fixtures, it should be noted that for their proper operation it is necessary to place the sewer pipe at the desired slope. This slope forms a height depending on the distance between the bathtub and the riser. Increasing this distance when moving the bathtub to the wall opposite the riser may require raising the drain by 10 centimeters or more.
To raise the drain to the required height, you need to raise the bathtub. In this case, maximum convenience is achieved if the podium is located not only under the bathtub, but also at a certain distance from it, at least in front. It may seem that there is nothing complicated about this, but for proper functioning you need not only to raise the bath higher, but also to properly connect the sewerage system to it.
You can install a drain before or after erecting a podium under the bathtub. If the pipe is laid before the podium is installed in the bathroom, or during the process of installing it, the podium will hide the pipe, blocking access for its repair or maintenance, so it is better to lay the sewer after lifting the bathtub. To avoid bricking up the pipe, it is necessary to provide a channel in the podium for its installation, the walls and bottom of which are subsequently tiled and covered with a grating on top.
Thus, a podium installed in the bathroom can provide concealment of communications without blocking access to the sewerage pipeline. In the process of renovating a bathroom with remodeling and moving plumbing fixtures, it is always necessary to hide the sewer pipeline coming from the riser. Pipes supplying water to plumbing fixtures can be hidden in the floor screed or under wall sheathing, while drainage pipes usually have a large diameter and require installation at a slope of at least 20 mm per linear line. m length. Accordingly, the podium installed in the room also performs a technical function.
Lifting the bathtub onto the podium
In the case of a small bathroom area, there is usually a need to leave space for a person to pass comfortably, so a fairly compact podium is made, more like a miniature stand or a large step. In addition, designers do not recommend making a podium whose area exceeds half the footage of the entire room. However, even a small design can provide a separate area of the room or a certain element of the furnishings, most often the bath itself.
Many people dream of turning their standard bathroom into an original and beautiful place, such as a Japanese-style bathhouse, which uses a bathtub built into the podium, a small Turkish bath - the design options for the room can be very diverse. The use of modern building materials and technologies in combination with competent design development makes it possible to realize such dreams in practice.
In the case of a wet room, the purpose of the podium changes somewhat: it not only serves to divide the bathroom into zones, but also acts as a structure on which the bath is installed. In this case, it is necessary to build a special box in which the communication wiring will be disguised, and then install the bath itself. The outer surface of the container is installed on the podium, with only the upper parts of the sides usually remaining visible. Such podiums are not suitable for the movement of people, and their dimensions are slightly larger than the dimensions of the bathtub itself.
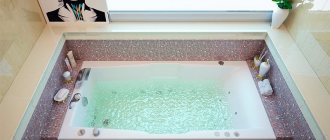
In the case of more spacious rooms, such as country houses, apartments with high ceiling heights or multi-level housing, a special type of podium can be made. It is a fairly small stand (10-30 cm), in which the bathtub is completely recessed. The advantage of this method of arranging a podium for a bath is the imitation of natural conditions and the convenience of taking water procedures, since a person seems to be immersed in a natural depression filled with warm water.
Despite the convenience and aesthetics of this solution, it is quite difficult to implement in practice. This requires the bathtub to be recessed into the floor surface, which must be raised throughout the entire room to the required height by creating a false floor, or special ceilings must be built for its installation. The design of the floors must be changed in such a way that additional supports are located under the bottom of the bathtub, fixed to the surface of the walls.
How to raise a bathtub by lengthening its legs
Most often, standard bathtubs come with legs provided for them, which are attached directly to the plumbing structure itself. At the same time, their length does not always suit users. What can be done if the standard legs for the font are very short? Everything is quite simple: you should purchase new screws that are longer. To do this, you need to assemble one leg at home and go with it to a retail outlet where you can pick up longer screws. After this, instead of the factory studs, screw in the newly purchased ones and install the bathtub in place.
Raising a cast iron bathtub by lengthening the studs on the legs
When purchasing studs, it is necessary to pay attention to their quality, because they are destined to withstand half a ton of weight. This is the simplest method that does not require virtually any knowledge or skills. It allows you to elevate even designer bathtubs without compromising their appearance.
Scheme for attaching legs to an acrylic bathtub
Wall mounted
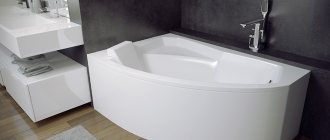
The most common option is wall-mounted bathtubs. An example is the Haiti series models made in Spain by Roca. They are installed on legs, adjacent to the wall and thus saving usable space. From the outside, the bowl is covered with a front panel or a special screen. If necessary, the panel (screen) can be easily removed. Therefore, if sewer connections or any other plumbing under the bathtub require replacement, repairs can be made without unnecessary labor costs. The free space between the screen and the bowl itself is used to store shower accessories, household chemicals and other things.
Accessories and fixtures
A built-in bathtub is intended primarily for relaxation and wellness, but in no case for washing. That is why such baths are often equipped with all sorts of gadgets that can create an atmosphere of complete relaxation and turn your vacation into true pleasure. Let's briefly talk about some of them.
- Health-improving devices. Such a bath may contain hydromassage or air massage devices and devices for back massage. The ozonation function will help get rid of harmful bacteria. The water heater will provide a constant temperature. Many people consider the backlight function to be a designer accessory, but it is not. The effective effect of chromotherapy or multi-color illumination of bath water has been experimentally confirmed.
- Accessories for convenience. The bathtub may have handles for ease of lowering and lifting. Many bathtubs are equipped with armrests and soft headrests. Anti-slip coating is not just a fashion accessory, but also prevents accidents. Both the bathtub itself and the steps of the podium need such a coating. Don't neglect these features when purchasing a bathtub. The annoyance of inconvenience can ruin your vacation, and injuries from a fall can ruin not only your vacation, but your entire life.
- Entertainment devices. These include electronic controls, television or radio. The size of the bath can be designed for one person or for several, so your vacation will be family or with friends.
- Accessories for relaxation. To a greater extent, these accessories relate to the arrangement of the bathroom rather than the bath itself. Candles, an aquarium, a false fireplace, flowers will create a relaxing atmosphere. Near the bathtub on the table, in the niches of the podium or in special recesses of the bathtub itself, you can keep various water additives: bubble bath, sea salt, bags of herbs.
- Bathroom care accessories. These include built-in drainage and disinfection systems.
When purchasing a bathtub, pay attention to what systems the different models are equipped with and choose the one that best suits your preferences.
What is the difficulty in solving the problem of raising a bathtub?
The weight of any bath consists of various components:
- The bath itself.
- Water poured into it.
- Weight of a bathing person.
With even the most conservative estimates, the total weight of a full bathtub with 1-2 people in it can exceed 300-400 kg. In this case, the entire load is distributed over only 4 legs, and their total area of contact with the floor is unlikely to exceed 10 square meters. cm, which is 30 -40 kg per 1 sq. see. This circumstance is perhaps the most important when choosing the option of raising the bathtub. The material from which the bathtub is made also plays an important role.
Conditions for installing a built-in bathtub
To install a bath of any shape, it is important to create all the necessary conditions. Otherwise, such a procedure will not be possible to complete. People living in apartments should forget about a built-in bathroom. This is due to the design of the house, which no one will allow to change. In case of unauthorized redevelopment, the building can be destroyed, it will simply collapse. This bathroom is suitable only for residents of private houses. When building a house, you can initially designate a place for such a bathroom in the project. The frame of the structure for a built-in bathroom can be made of reinforced concrete. But the cost of such an adventure will be very expensive. If you have the funds, then this option is suitable. It is also important to provide a proper sewage system in the house. Here you will need a whole sewage pumping station. This bathroom is similar to a swimming pool, so it is recommended to build in a water purification and filtration system. Built-in bathrooms have a volume of 400 liters or more. This is a fairly large water consumption, so it will be more economical to purify the water.
When installing a built-in bathtub, you cannot do without the help of appropriate specialists. Since doing this on your own is difficult and will not always work. If, for some reason, it is not possible to call a specialist, then we will outline the detailed process of installing a built-in bathtub.
Nuances of booth installation
Assembling the shower cabin with your own hands must be done according to the attached instructions. The main stages of this work are:
- pallet installation;
- connecting it to the drain;
- connecting the shower to the water supply;
- electrical wiring;
- installation of cabin walls and ceiling panels;
- door installation;
- fastening handles, mirrors and other decorative accessories;
- sealing seams.
At the time of final installation, all inputs and outputs must be securely connected to the appropriate components of the structure, and the correct functioning of the electrical system must be tested.
An important point in the process of assembling a shower cabin with your own hands is to achieve full compliance of the design with safety regulations. This is especially true for a hydromassage shower cabin, where pumps and compressors are used for injection. The shower stall should be grounded and equipped with a residual current circuit breaker.
Design and arrangement of built-in baths: useful tips
Like other types of bathtubs, built-in bathtubs have their pros and cons. In this regard, some nuances can be provided.
- You will not be able to shower in a built-in bathtub. Therefore, make sure you have a shower stall if there are people in your family who like to stand in the shower. Currently, it is possible to purchase a combined bathtub with a shower.
- Cleaning a sunken bathtub is a labor-intensive task. If your health prevents you from cleaning, you may have to use the services of service workers.
- A bathtub built into the floor implies an appropriate temperature regime for the floor. Take care in advance about installing heated floors.
- Whatever the shape of the bathtub, it is most convenient to repair the one that is located not in the corner, but in the center of the room. When installing, be sure to provide a technical hatch that provides access to various bath devices: hydromassage, water heating and others.
- Any bathtub is suitable for embedding, but preference should be given to a larger bathtub. If you still decide to build in a small bathtub, think through the design down to the smallest detail so that the bathtub does not seem like a puddle.
- Installing a sunken bathtub is a job for professionals. You can independently build a podium for a bathtub that is not recessed into the floor. For such a bathtub, it is enough to build wide steps that repeat the roundness of the side. The easiest for self-installation is a bathtub built into a niche. The designer's task: to make the bath screen integral with the walls of the niche.
The built-in bathtub is the main element of the bathroom interior; the rest of the space is arranged around it. In general, it can be noted that bathroom design for a built-in bathtub will be expensive. But the custom interior that you get as a result is worth it.
Most design tips for arranging a bathroom are related to the waterproofness of the ceiling, walls, floors and are more related to renovation work when installing a bathtub. A bathtub whose sides are flush with the floor requires a waterproof floor covering and an additional drain in the floor.
There are no general rules on how to design the interior of a room for a built-in bath. Each design solution will be individual. See photos of built-in bathtubs and use your imagination. Let your ideas come to life.
Workflow Description
For simplicity, I divided all the work into 4 main stages, they are very simple, you just need to repeat the work algorithm in the same sequence. I would like to point out right away that podiums are only suitable for fairly spacious rooms; they do not look the best in tiny bathrooms.
The structure should not occupy more than half of the room, otherwise it will clutter the space.
Stage No. 1 – preparation
First of all, you need to decide on a number of important criteria, we will talk about them in this section:
- Dimensions of the structure - here you need to take into account the configuration of your room and think about what parameters the podium should have in order for it to look harmonious and appropriate. Of course, if the area of your bathroom is large, then any idea can be realized, but in practice, most often it turns out that you have to plan almost every centimeter of space;
If desired, you can combine a bathtub and a shower stall in one design
- Next, you need to decide on the configuration of the podium itself ; most often, the design contains one or two steps for convenience, but the design can be without them if space is limited. The shape can also be any, but I advise you to choose solutions with straight lines - they are much easier to implement, especially if you have no experience;
The simplest options can be a rectangle in which the bath is located
Coming up with a project yourself is not the easiest task, but nowadays you can look at a lot of ideas and concepts on the Internet and find the solution that best suits your case. You can take the entire idea, or you can create your own version, taking several successful solutions from different projects.
- Drawing development is an important part of the work; it allows you to clearly imagine what the end result should be, which simplifies the work process. In addition, you will be able to calculate the exact dimensions of each part of the structure and adhere to them during the work process, which is also important.
In addition to all of the above factors, there is one more that also requires attention - the choice of material for the construction, there are two main options, we will consider each of them in detail:
- Brick is a reliable and very durable material from which you can build a structure of any complexity. The only disadvantage of this solution is that the finished structure will have quite a lot of weight, which is extremely undesirable in multi-story buildings;
- Their foam concrete and aerated concrete blocks are lightweight and are much easier to lay due to their large size. In addition, the price of this material is much lower than that of brick, so it is very popular among developers.
Foam concrete can be attached with special glue, which greatly simplifies the work process
Stage No. 2 - purchasing the necessary materials
When you have a sketch in your hands, you have a clear understanding of what is needed for the work. Consider this list:
Ready-made masonry mortar is an excellent solution
In addition to materials, you will also need a certain set of tools:
- The preparation of the composition is carried out in any convenient container; this work can be done either manually or using a power tool - a drill or hammer drill with a special mixer attachment. It all depends on the volume of work;
- The mortar is applied using a mason's trowel; this simple device allows you to quickly and efficiently complete the job.
If you use the adhesive composition for foam concrete in cylinders, then you will not need either a trowel or a container.
- A building level will help you control the position of the structure; without it, you will not be able to make a perfectly level podium. It is better to use options that are not very long, because the design itself will be quite compact.
Level is an indispensable attribute of any masonry work
Stage No. 3 - construction of the structure
In order for the built-in bathtub in the podium to stand securely, and you do not have to redo the work, you must initially do it well and reliably. The workflow looks like this:
The workflow is not complicated
- First of all, you need to remove the surface on which the work will be carried out, after which you need to check the base using a level. If it is uneven, then level it with cement or masonry mortar; this will simplify further work, because you will not have to level the first row of masonry;
- For some reason, many people forget about the need to lay communications even before the construction of the podium begins, and after that they either have to destroy part of the structure or drill holes in it for laying pipes. Don’t repeat the mistakes of others and figure out in advance what elements should be present in the design;
- The solution is prepared in such a quantity that you can use it up in about 40 minutes of work. If you are doing detailed work for the first time, the speed will be very low, so you should not mix a lot of composition;
- Next, the structure is built; first of all, I advise you to make the main part of the podium in which the bath will be located. When carrying out work, do not forget to place reinforcing mesh in the seams; this will make the structure more durable and save you from unpleasant surprises in the form of cracks on the surface. If you use blocks, then you need to lay out a maximum of 2-3 rows, and sometimes you can limit yourself to one;
The internal part of the structure should be of such a size that the bathtub fits tightly into it
- Now let's figure out how to make podium steps, everything is simple: they are made entirely of brick or blocks, and if the height of the elements is large, then they can be laid on their side;
- If you need to fill the base, then use expanded clay as a filler, and fill it with a 6-7 cm thick screed on top. If the bathtub will stand on legs, then the surface should also be leveled so that you do not have to worry about aligning the structure.
Stage No. 4 - cladding the structure and installing the bathtub
This is the final part of the work, on which the appearance of the podium depends, so this stage must be taken with full responsibility.
The workflow looks like this:
- Built-in bathtubs in the podium can be of any shape and size. If you implement an option in which part of the structure is recessed into the floor, then the bowl will be installed at the stage of pouring the base. But more often the option is used in which the bathtub is on the floor, in this case it is better to place it after the cladding, this is both simpler and more practical - if you have to remove the structure, the finishing will remain intact;
- As for the cladding, any tile option you like is used for the job; for steps and surfaces on which you will walk, it is better to use ceramics with an anti-slip coating. The cladding work is no different from ordinary wall finishing, so I will not dwell on this aspect - this is the topic of a separate review;
Requirements for installing a podium
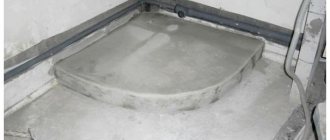
The convenience and comfort that installation of a shower cabin provides is an indisputable fact. But at the implementation stage of this project, certain difficulties may arise. The fact is that the tee on the sewer pipe is most often installed quite high (9-15 cm from the floor level), and to ensure high-quality drainage it is necessary to maintain an inclination angle of the horizontal section of at least 3°.
One solution to this problem is to build a podium.
When calculating the design of the podium, one should assume that the distance from its surface to the drain pipe should be 5-6 cm.
Pallet structure: siphon, screed, outlet, waterproofing.
This is necessary to avoid creating a siphon effect, which will lead to constant stagnation of water in the pan and rapid clogging of the drain.
It is also necessary to provide a minimum distance to the ceiling. Installation of the structure should assume a distance from the ceiling of 20 cm. The distance from the walls should correspond to the structural features of the shower stall specified in the assembly instructions. Taking these indicators into account, the shape and design of the podium is calculated.
Due to the fact that the load on the podium will be quite serious (the weight of the shower cabin is about 100 kg, the weight of a person and water in the tray), the structure must be strong and stable. It is recommended to lay out the surface of the podium with tiles.
Article on the topic: 3D floors: 3D and photos, do-it-yourself self-leveling, Three-D transparent poured floors, step-by-step instructions and photos
Installing a podium with your own hands can be done by using:
- wooden blocks and plastic;
- concrete mortar;
- brickwork.
To create a podium, we will need the following materials and tools:
- brick;
- fittings;
- boards for formwork;
- metal profiles;
- beam;
- tes;
- building level;
- roulette;
- sand;
- cement;
- crushed stone;
- silicone sealant;
- marker;
- tile.