Porcelain tiles, its advantages and disadvantages
This artificial material is made from quartz sand, kaolin, feldspar and clay. The resulting mixture is ground to a dusty state. The pressure under which it is pressed reaches 500 kg/cm so that micropores, cracks, and cavities do not form inside.
After drying in the oven, the material is sent to the press
The resulting slabs are fired at a temperature of at least 1300°C so that all components enter into a chemical reaction and are completely fused into a homogeneous mass. The resulting porcelain granite does not lose its color, since mineral pigments are added to the mixture at the initial stage of production.
This material is strong, durable, and resistant to mechanical damage. Due to the absence of micropores, it does not absorb moisture, therefore it can withstand any negative temperatures and does not collapse under sudden temperature changes.
Ceramic granite is resistant to acids and alkalis, so stains do not appear on it, and a damp cloth is enough to care for it.
This material can be painted in any color and given almost any texture, which makes the composite indispensable for solving various design ideas. It is environmentally friendly and does not burn.
For all its advantages, porcelain stoneware has some disadvantages. The first is the rather high cost. The second is a cold surface that is uncomfortable to walk on barefoot. However, you can use a floor heating system for this.
Types of steps and equipment
Typically, the complete set of the series consists of treads, risers and decorative plinths. The steps can be monolithic or prefabricated.
The length of solid models is 1200-1300 mm, and the thickness is 7-15 mm. The cost of monolithic steps made of porcelain stoneware is higher than the options made of tiles. But this design is much stronger and looks better due to the lack of seams.
For prefabricated steps, modular or solid tiles with dimensions of 300x300, 450x450, 300x600 mm are most often used. The installation can be seamless or with a decorative seam.
Standard slabs
In standard slabs, treads have cuts and relief strips of abrasive material. The shape of the edge of the step can be simple or curly. In some cases, shaped parts are made separately from the slab.
Steps with risers
Under the tread there is a riser with a height of 100-150 mm. By combining this element with horizontal slabs, the staircase will look visually seamless and stylistically impeccable.
Steps with plinth
As finishing in the corners between the wall and the stairs, a porcelain stoneware plinth is used to cover the joining seams.
The use of this element is not necessary, but it helps greatly in cases where the junction of the steps to the wall cannot be made perfectly straight.
Features of steps for stairs made of porcelain stoneware
Porcelain stoneware steps are divided into two types, solid and suture. Regular one-piece products can be purchased in a specialized store in a standard size, and if the size is non-standard, then such steps can be ordered. Seamless steps differ from suture ones in their external effectiveness . Their leading edge can be straight, raised or semicircular.
A set of seam steps includes the following elements:
- ceramic cornice corner;
- seizure (horizontal tile);
- riser (vertical tile);
- plinth.
Such kits are divided into:
- basic;
- frontal;
- corner.
They are also available in different sizes. In solid steps, ceramic corners belong to the monolith, and in suture steps they are used as a separate element. The steps should be installed on a finished staircase base made of concrete, brick or metal.
Tips for choosing porcelain stoneware steps
Different models of slabs for steps have different surface textures. They are classified according to the following criteria:
- Polished plate with specularity above 80%. You can safely lay out a staircase indoors from this material.
- A semi-polished slab with a specularity of no higher than 25% can be installed on both indoor and outdoor stairs.
- The matte slab is roughly sanded and chemically burned out. This surface does not slip at sub-zero temperatures and precipitation. Ideal for outdoor surfaces.
- A glazed board with a high percentage of specularity has high anti-slip properties. This material is used for stairs indoors and outdoors.
When choosing ceramic granite slabs, it is necessary to check the moisture absorption, for which you need to moisten the surface generously with water. It should not be absorbed into the tile. The easiest way to check this is by control weighing the sample before and after wetting.
If you plan to line a street staircase, then it is better to choose slabs with a rough surface to avoid slipping in inclement weather and frost. When choosing external tiles, you need to pay attention to the filling with dye - it should be uniform. Such material has undergone proper technological processing and will be resistant to mechanical and weather influences.
Marching stairs are finished with straight slabs. Beveled slabs, made to order, are laid on spiral and semicircular staircases.
If the room has low traffic, then it is best to lay glazed ceramic granite. In office and other buildings where traffic is high, it is better to use matte, unglazed panels. Installing steps with capinos is a more durable solution, in addition, it will give the stairs an aesthetic appearance.
Kapinos - a rounding at the end of the tile, which takes on the main abrasive load from the feet of a walking person
In order not to spend a lot of money on repairing steps in the future, it is best to make the cladding of the steps with a separate leading edge. In this case, replacing one part will be sufficient.
In case of extreme wear, such capinos can be replaced without removing the tiles from the steps
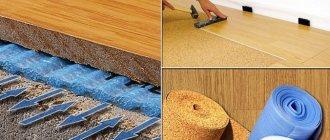
Surface preparation
Laying porcelain stoneware on the porch is done on a flat base. In addition, you need to provide a slope for water drainage. On the steps it is done due to the thickness of the glue.
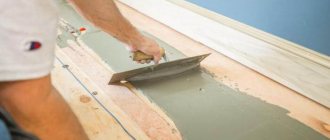
On the site they make a screed along the beacons:
- For lighthouses, you can use tile adhesive mixed with sand. Beacon strips are installed using a level and a rule. The outermost strip should be 1 cm lower to form a slope.
- The screed is made with Ceresit tile adhesive. When using cement-sand mortar, a reinforcement mesh is attached to the floor with dowels. In this case, when the screed thickness is more than 1 cm, the solution and glue are laid in layers.
- 10-15 hours after applying the screed, check the evenness. If necessary, the lumps are scraped off as a rule.
- The surface is cleaned of dust and a primer is applied.
The alignment of the hillocks is carried out using a not completely hardened screed
steps
When leveling steps, special attention is paid to the ends. To create a right angle, a stencil is made - two pipes or two profiles are welded at an angle of 900
One side is moved around the site, and the other side scrapes off excess mortar or glue at the end.
If the tile hangs 3 cm or more above the end, an additional layer of mortar with glue is applied to the side surface.
The ratio of the components of such a solution:
- Cement – 1 part;
- Tile adhesive – 1 part;
- Sand - 3 parts.
For better adhesion to the surface, reinforcement is installed. To do this, holes are made in the end with a puncher, the rods are driven in and bent.
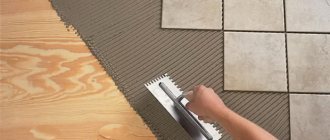
Laying tiles
The cladding of the porch with porcelain stoneware begins from the end side of the platform. First, make a preliminary layout. One row at a time, the tiles are laid dry along and across the site. If, in addition to whole tiles, cut tiles are needed, they are prepared before work begins.
Facing technology:
| Operation | Description |
| Apply adhesive to the back of the tile using a straight spatula. Using a comb (12 mm teeth), grooves are formed. The tile is pressed against the surface. Use a level to check horizontality. |
| To level adjacent rows, use a wooden plank and a rubber hammer. The seams between the elements are secured with plastic crosses. |
| They move on to the steps after the leveling solution has hardened at the ends. It is necessary to ensure that the solution fills the entire inner surface of the ends, leaving no voids. |
| The instructions on the glue packaging indicate its drying time. After this period, the plastic crosses are removed and the seams are rubbed. |
The main problem before entering a building, especially during rainfall, is the slippery surface. Non-slip porcelain tiles for the porch will help you cope with this. You can cover the porch with this material yourself.
To better imagine the work ahead, check out the video in this article:
The non-slip coating ensures safe movement even on wet stairs. Finishing a porch with porcelain tiles is no more difficult than finishing with ceramic tiles. You have learned about some of the features of this technological process.
Technology of facing steps with porcelain stoneware
- To cover steps with porcelain stoneware slabs, preliminary preparation of the base is required. First, an acrylic primer is applied to the surface to improve the adhesion of the slab and the staircase base. After it dries, all unevenness is smoothed out with putty. Then acrylic emulsion is applied a second time to make the primer better.
- Before laying, you need to check the size of the slabs and steps for compliance. If necessary, you can use a water cutter for trimming, which can be used to make an even cut. Thanks to the use of this equipment, the cut edge does not crack, there are no chips or scratches on it.
If such a machine is not available, you can use a regular tile cutter.
3. If the cladding is made from prefabricated elements, then it is necessary to mix all the packages so that the finish is uniform. We first recommend comparing the color markings indicated on the box with the markings on the tile. They must match each other.
4. Prepare the glue. To do this, the dry mixture is diluted with the required amount of water specified in the instructions, mixed with a construction mixer and left for 15 minutes until a homogeneous mass is formed. This time is enough for all components to completely dissolve.
5. Using a notched trowel, apply adhesive to the base and lay the tiles. This tool must be selected according to the size of the step and slab. When applying glue, you need to ensure that the entire surface is completely covered with the composition.
6. Laying slabs, starting from the top step of the base.
After the risers are laid, the treads are faced. The corners are treated with a plastic or metal corner. After this, all seams are grouted and then cleaned.
And once again: a diagram of the correct joining of tiles
For the joint to be perfect, the slab must be flush with the step. It is allowed for the tiles to be slightly wider. If after installation there are protruding places left, they must be cut off. When facing street steps, make a slope of 1-2 degrees so that water flows freely and does not remain on the surface. Professional craftsmen advise leaving a thin channel on the side for moisture to drain.
Choosing porcelain tiles for work
Consumers have two options for laying porcelain tiles on the stairs. There are ready-made monolithic steps or regular porcelain stoneware tiles on sale. Features of choice:
- For standard staircase sizes (15 cm height, 30 cm width, from 120 to 160 cm length), ready-made monolithic steps are used. Their installation is one of the simplest. The elements have rounded ends and anti-slip notches.
- The length of such monolithic elements is 120, 130, 160, 180 cm, and the width is 30 cm. They can be purchased separately or as a set with risers. As for the end, it can be ordinary straight, figured or with a cornice. If the edge is straight, then you can purchase a plinth and cornice for the kit.
- A whole kit for cladding just one step will be expensive. To save money, you can buy only the monolithic step itself, and decorate the riser with porcelain tiles or mosaics.
- If the staircase is non-standard and curved or made fan-shaped, then porcelain tiles for stairs are used for cladding. The optimal thickness is 12 mm no less. In this case, it is convenient to use special tiles with sides or cornices. No additional profile needed.
- The use of an additional profile is required in cases where the tiles are ordinary and have a smooth edge. It can be removable or non-removable. The second one is installed during the installation process. But the removable one is fixed after tiling and grouting the stairs.
- When choosing the size of the tile, you need to draw a diagram of its placement on the surface. Ideally, choose a size so that the porcelain tiles do not need to be cut.
Advice! It is better to make porcelain stoneware steps from relief elements. Thanks to this, the surface will not be slippery.