Non-leakage floors
A bathhouse with non-leaking floors can be used all year round in any region of the country.
The design provides for the installation of an intermediate subfloor and installation of insulation. Non-leakage floors
The work that needs to be done when laying a leak-proof floor is as follows:
- We install a waste water drainage system. To do this, we dig a hole (reservoir). The sizes are shown above. We concrete it;
- we drain water into the drainage ditch. We use a pipe with a diameter of 200 mm for drainage. We install the second pipe. It will be connected to the floor drain. We install a siphon at the outlet of the pipe so that there is easy access to it. It will be needed to clean the siphon from accumulated dirt and debris;
- We are preparing the site. We remove the surface of the soil and fill it with sand. Carefully compact the area. We fill the area with gravel and compact it thoroughly again. You can additionally pour a concrete screed. The thickness of the screed should be no more than 5 cm;
- We lay waterproofing on the resulting floor base. Most often, roofing felt is used as insulation;
- install insulation. As insulation, you can use a layer of expanded clay or polystyrene foam. If the logs are laid on the base, then the insulation can be laid between them. The distance between the logs is 50 cm.
The second option is when the logs are laid on pre-installed beams. In this case, beams made of massive timber with a cross-section of 10x20 cm are attached along the perimeter of the foundation. Further:
- installing an intermediate floor. It is attached to the bottom of the beams, if they are provided for in the design. If not, then we put it on the logs:
- An additional layer of insulation can be laid on the intermediate floor. In this case, waterproofing is installed first. Then insulation is placed on it. Another layer of waterproofing is laid on it.
Now let’s lay out the main finished floor. It must be installed with a slope towards the drain. The board is attached to the joist with screws or nails. We remove the siphon into a pre-prepared hole.
When installing non-leakage floors, planed boards with a thickness of at least 30 mm are used. It is best to use a tongue and groove board. That is, a board that has a groove at one end and a tongue (protrusion) at the other. A beam with a section of 50 x 50 or 50 x 70 mm is usually used as a log. Beam - a beam with a cross section of 100 x 100 or more.
A mandatory requirement for wooden floors in a bathhouse, both leaking and non-leaking, is the presence of ventilation holes in the foundation. They are made so that the wood, as they say, breathes. That is, it released accumulated moisture into the atmosphere. We must not forget that the lower edge of the floor must be no less than 10 cm higher than the upper edge of the plinth.
The service life of non-leaking floors is at least 10 years.
Laying non-leaking floors
For flooring that does not leak, tongue-and-groove boards of coniferous wood are used. Please note that the boards should be laid with a groove inside the bathhouse.
Before you begin laying the floor, you need to complete the subfloor. For this purpose, bars with a cross section of 50 mm x 50 mm are attached to the bottom edges of the logs. Between the joists, a “subfloor” is laid on these bars. For this use:
- cutting boards,
- unedged board,
- third or second grade board,
- croaker
After laying the “sub” floor, a layer of waterproofing is laid on top:
- glassine,
- roofing felt,
- waterproofing film.
Then lay out a layer of insulation. Expanded clay is well suited for this - it is poured between the joists.
Then waterproofing is done on top again.
And now, the “rough” floor is completely ready, you can begin laying the tongue and groove boards of the finished floor. The boards in the steam room and sink do not need to be secured with nails. Thanks to this, you can easily remove the boards and dry them. Such floors are secured at the edges using a block with a cross-section of 20 mm x 30 mm. The bars are secured to the joists using screws. When the floor needs to be removed, the bars are very easy to dismantle.
In the washing room (in the corners), during flooring, it is necessary to leave holes into which pipes will then be installed (asbestos-cement, galvanized steel, or PVC). The diameter of the pipes can range from 50 mm to 100 mm. This way you will ensure good ventilation in the room.
Articles about baths:
- back to the section “Building a house with your own hands”
- Bath brooms
- Bath and sauna in the house
- Ventilation holes in the bath
- Bath ventilation system
- Internal structure of the bath
- Interior decoration of the bath
- Construction of a chopped bathhouse
- Construction of bath walls
- Auxiliary materials for the construction of a bathhouse
- Choosing a place for a bath
- Choosing a stove for a bath
- We make furniture for a bath
- Reducing humidity on the walls of the bathhouse
- Which sauna should you choose?
- Choosing stones for a bath
- Installation of a sewerage system for a bathhouse
- Caulk of a wooden bath
- Operation of hatches and chimneys
- Materials for building a bathhouse
- Installation of a concrete floor in a bathhouse
- Installation of bath doors and windows
- Bathroom ceiling installation
- Lighting in the bath
- Features of choosing tiles for a bath
- Finishing of sauna log houses
- Bath heating
- Cleaning the ash pan
- How to choose the right stove for a sauna
- How to take a steam bath correctly
- Heaters for solid fuels
- Steam room ceiling
- Rules for lighting the stove
- Types of sauna stoves
- Bathhouse repair
- Chimney pipe repair
- Repairing the crown of the chimney
- Bath walls
- Arrangement of the roof of the bathhouse
- Thermal insulation of the bath
- Oven Installation Instructions
- Bathhouse foundation
- Cleaning chimney bricks
- Choosing an electric heater for a sauna
How to fill the floor in a bathhouse with a slope
“Question: How to throw an egg on a concrete floor without breaking it? Answer: No matter how hard you try, you can’t break a concrete floor with an egg.”
Hello, dear readers!
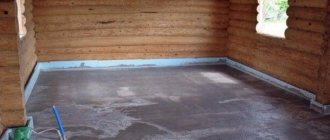
A concrete screed on the floor in a bathhouse is considered the best option. It is durable. No matter how you look after the wood, after 5-10 years the floors need to be re-laid. Do you understand the humidity...
Concrete does not rot, does not deform, does not require special care, and lasts for more than 40 years. Today we’ll talk about how to fill the floor in a bathhouse with a slope for drainage. It is not easy to do the work of arranging such a floor with your own hands, but it is possible if desired.
Pouring the floors in the bathhouse can be done both in the washing room and in the steam room. A concrete floor is essentially a concrete screed on top of which a waterproof, non-slip coating is laid. Typically, tiles are used for these purposes. When laid on the ground, the slope of the floor is ensured by creating a slope of the very base of the ground. For small areas - due to changes in the thickness of the underlying layer.
- Rule and trowel;
- Beacons for forming a slope and thread;
- Tape measure, ruler and level for measurements;
- Buckets with strong handles (which you don’t mind), a shovel;
- Tool for compacting the “pillow” (vibrating plate, etc.);
- A hammer drill with a special attachment or a construction mixer;
- Concrete mixer (and if it is not there, then a container in which the solution will be mixed). Or, as an option, purchase ready-made mortar from a concrete unit.
As for materials, taking into account the specifics of each individual bathhouse, their selection and proportions will depend on the current conditions and construction requirements. The installation of bath floors is usually done on the ground or logs. In addition, the installation of thermal insulation must be provided.
Required materials for an insulated concrete floor with a drain:
- To prepare a concrete solution you will need: cement, sand and clean water. As an option - ready-made mixtures or imported solution;
- Crushed stone or gravel (not small) to prepare the base cushion;
- Additives and plasticizers for concrete. They are necessary to increase strength and resistance to moisture;
- Ruberoid or waterproofing film (thickness more than 200 microns) and bitumen mastic;
- Insulation material*.
*In terms of performance properties, the optimal choice would be penoplex (technoplex), with a thickness of 30 to 50 mm and a density of at least 35 kg/cm². You can make insulation with polystyrene foam (however, here you already need a thickness of 50-100 mm), or expanded clay with a thickness of 150 mm. But mineral wool is an impractical material for a concrete bath floor;
- Reinforcing mesh with cell size from 50×50 to 80×80. A section of 3-4 mm is sufficient. It can be metal or polymer. And to it, knitting wire or clamps;
- Suitable drainage elements (drain, pipe, valves, etc.)
Let's consider the option of a concrete floor, using the example of arrangement on the ground, with a ground water level above 2 meters. The work is carried out in the warm season. It is assumed that the system for drainage has already been laid and backfilled in an appropriately prepared trench, and the sewer pit is located outside the bathhouse (i.e., not under the floor).
At the first stage, you should decide on the type of tilt. The most common options are drainage in two planes or the so-called envelope. So, how to properly fill sloping floors?
- We remove the fertile layer of soil and tamp the cleaned surfaces;
- We install a fence around the drain pipe in the form of a plank box or folded roofing felt. This will be needed in case of an error in calculating the height of the pipe head, for the purpose of its subsequent replacement, longer or shorter;
- Fill the area with sand and compact it thoroughly again. The thickness of the resulting layer should be 10-12 cm;
The sand must be free of construction debris, clay, silt deposits and other impurities. During the compaction process, it is recommended to moisten it with water.
- We fill the sand with crushed stone or gravel, and tamp it so that it is imprinted into the sand, after which we level the surface. The thickness of this layer is ≈ 15 cm;
Main stage
- We dismantle the box enclosing the sewer drain pipe. The space around the pipe is filled with cement mortar, in which foam chips are mixed.
- Lay the roofing material with an overlap of 10-15 cm (it will prevent moisture from seeping out of the solution into the sand and gravel cushion) and coat the joints with prepared heated bitumen mastic. We add a layer of roofing felt and glue it to the wall along the entire perimeter of the room to a height of 15-20 cm. A hole is made in the waterproofing to pass the drain pipe. The lower part of the drain ladder is also mounted here.
A reinforcing metal mesh is laid on top of the roofing material with a cell pitch of 50-80 mm.
It is fastened with knitting wire or polymer clamps (if it is a polymer reinforcement). Instead of roofing felt, you can use “liquid rubber” products or waterproofing films with a thickness of more than 200 microns.
- On top of the mesh we place and attach purchased or homemade beacons, along which the construction concrete mortar will be leveled.
READ MORE: The floor in the bathhouse sink with your own hands
The most practical way to fix the beacons is with plaster, making a slide out of it (this mixture hardens quickly). We maintain the distance between the beacons at 1.5-2 m. Pipes or profile guides can be used as beacons.
- We are preparing a solution for pouring a rough concrete base. To improve quality, special additives are added to the solution. It is recommended to use waterproofing additives (Penetron, Crystal, etc.) in bath floors. They improve the structure of concrete in terms of resistance to damage by water and protection of metal reinforcement from corrosion. We are pouring concrete.
- After the concrete has become durable for walking, we begin to create a heat-insulating layer. For this, there are two options:
a) lay waterproofing on the rough screed and lay insulation on it (if it is expanded clay);
b) attach the insulation directly to the concrete base using tile adhesive (this applies to extruded polystyrene foam (penoplex), polystyrene foam, etc.);
- We put another layer of reinforcing mesh on top of the insulation.
Some craftsmen advise laying plastic film under the mesh.
- Beacons are again installed on the mesh, in the gypsum slides (recommended interval - 1 m), which will be used to control the filling of concrete;
- Next, a leveling screed is poured over the reinforced mesh. It is carefully leveled along the beacons. The layer should be ≈ 50-60 mm. Then the surface is compacted to eliminate voids and create uniform density;
- A deep penetration waterproofing impregnation (for example, Penetron, etc.) should be applied to the surface of the finished dried screed.
- After the concrete has completely “matured”, you can begin laying the decorative coating.
Here is a picture that quite “ideally” fits the description. Of course, you can simplify this scheme and not make a rough concrete base. Here you can compact the sand and gravel cushion well and use modern technologies - use geotextiles. Here is an article about this material. For this option you will need geotextiles, penoplex, reinforcing mesh and concrete itself...
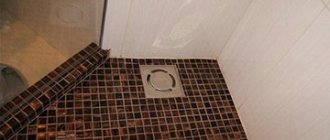
On a bath floor with a slope, it is practical to lay small elastic tiles fixed on a soft backing - a mosaic. It is simply cut and adjusted to fit the drain hole. It’s easy to cut a hole of the required diameter in the middle of its surface and, smear it with tile adhesive, put it on the pipe.
The seams between the tiles are covered with moisture-resistant jointing. It matches the color of the material. Removable wooden flooring can later be laid on top of the tiles or mosaics.
Good luck in your work and peace to your home! Bye.
Wisdom Quote: When a woman is angry, don’t look for common sense in her speeches! (Pierre Beaumarchais).
To ensure that the floor in the bathhouse does not need repair for a long time, the best option is to create a concrete covering. This material is not subject to prolonged influence of moisture and temperature, and is also resistant to stress. You can fill a bathhouse floor even without experience, if you perform all the steps correctly.
Floor level
The concrete floor in the bathhouse can be created on the ground or on a structure made of logs. In the first case, its level will be located significantly lower. The height can be calculated based on the thickness of the sand cushion, insulation and concrete layer. It is worth remembering that the concrete floor should not be located higher than the top of the basement of the bathhouse.
When creating a concrete floor using joists, it is necessary to make holes in the base so that the underground space can be ventilated. If this is not done, the joists may begin to rot. To properly make a concrete floor with a drain, you need to consider each option for creating it.
To pour concrete on the ground, it is necessary that the bathhouse be built on a strip foundation or on a columnar foundation with a grillage, which is located above the ground level.
All work is carried out in several stages:
- Preparatory work. The soil under the bathhouse should not have a plant layer. First, the soil is leveled and compacted, and then gravel is backfilled. This material is also compacted. It is worth remembering that the place for the sewer pipe and placement of the siphon must be prepared in advance. Installation of the pipe and drain hole occurs before the start of work on creating a sand cushion. After compacting the gravel, sand is added. The layer thickness should be 30-50 cm.
- Waterproofing. After creating and compacting the sand cushion, the waterproofing is laid. Roofing felt or other rolled material is often used. To seal the seams, they are coated with sealant. The waterproofing material is laid so that its edges extend onto the walls by about 10 cm. The trim crown is treated with an antiseptic.
- Insulation of the floor in the bathhouse. After the waterproofing material, the insulation is fixed. This material is folded onto the walls in the same way as waterproofing.
- Reinforcement. After fixing the insulation, a reinforcement cage is laid on top. It can be made of wire with a diameter of 5 mm.
- Creation of a concrete screed. A cement-sand mortar is laid on top of the reinforcement. The thickness of the material layer should be approximately 30 mm. The screed is created level, but with a slope towards the drain. The solution is prepared from cement and sand in a ratio of 1 to 3. The resulting mixture after stirring should not have lumps. The composition should have a consistency at which it flows from the tool like dough.
How to drain liquid from premises
In order for the flooring design to be of high quality, you need to know how to properly fill the floor in a bathhouse:
- The thickness of the top layer should be small - approximately 5-6 centimeters. The coating is made reinforced.
- Guide beacons are installed, maintaining a slight slope in the direction of the drainage zone.
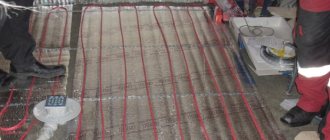
- The screed is poured over a pre-laid steel or aluminum mesh.
- For filling, a cement-sand mixture is used.
- Wait for 10 days until the solution is partially dry, moistening the surface of the screed daily.
The problem of water drainage from the washing room, steam room and dressing room is solved depending on the conditions at a particular work site. May be available:
- a storage pit for wastewater, located at a certain distance from the premises;
- porous, non-freezing soil that can act as an excellent absorbent;
- free space outside the premises where you can arrange a small storage pit;
- space is sharply limited (the construction, for example, is carried out in the basement).
Depending on existing conditions, the problem of wastewater collection can be solved in the following ways:
- lay a sewer line from the water collection point to the drainage pit;
- arrange a cushion that prevents the reverse capillary movement of moisture and direct the water directly into the soil. In this case, it is recommended to equip the water collector with a chemical cleaning system;
- equip a storage pit outdoors, coated with cement or clay, from where water can be pumped out or removed in another way.
The last option is to collect water directly inside the steam room or washing room, where a drainage well is dug for this purpose. It can become an interesting design element, decorated with tiles or natural stone. Water from such a collection is scooped out or pumped out.
In the bathhouse, in addition to water, various debris is collected, which ends up in the drainage system. This could be leaves from brooms, dirt from shoes, or other mechanical impurities. To prevent sewer outlets from becoming clogged (this is especially important for routes buried in the ground), water collection points are equipped with special drains with grates.
Preparations begin with the drainage system to solve the problem of how to fill the floors in a bathhouse under the drain. The pipe is laid, ladders are located, collection wells or pits are made, if necessary. If the drainage route passes through the foundation, a ring with a diameter of 50-100 mm larger is laid in it or a hole of the required size is punched, sufficient for laying a sewer system.
Creating a drain
In different rooms of the bathhouse, it is customary to make drainage devices that differ in design and operating principle. There are three options for constructing a drain in a bathhouse:
- Raised floors with sheer floorboards. Often used in a steam room, where there must be a warm wooden floor to ensure a comfortable stay in high temperature conditions. Whereas the wash compartment traditionally uses tiles with a slope and a shower drain;
- Leak-proof floors. All liquid and dirty water remains on the floor and is washed off from the surface through a standard drain with a bellows into a septic tank or collection container;
- A combined version, used only in small baths or in full-fledged washing departments of baths. In modern projects, baths are used to a limited extent, as they do not comply with sanitary standards.
The choice of a specific scheme depends on the structure of the foundation, the method of insulation and the arrangement of the water seal. For small steam rooms and washing sections of the bathhouse, a double floor system is used, this is convenient, especially when the building is installed on a pile foundation. If you plan to build a bathhouse box as an extension to the house, then the most suitable option would be a non-leakage floor with a drain through a drain. This will simplify the connection of the bathhouse sewerage system to the general wastewater disposal system of the building.
Leaking floors
Similar options for draining a bathhouse with a wooden floor were also called pour-over drains. The essence of the design was that the upper part of the floor consisted of boards laid with a gap of up to 10 mm, so most of the water simply flows through the cracks and collects on the lower tier or is absorbed into the ground.
The gap between the floorboards helps to dry the floor
The advantages of such a device for collecting and draining water include:
- Simple room cleaning;
- No puddles or residual water on the surface of wooden floorboards;
- Durability of joists, insulation and wooden parts of the floor and drainage system.
Important! Despite the fact that the lower tier, on which moisture and dirt accumulated, actually remains closed with finished wooden floors, the entire water drainage system from the bathhouse is well suited for ventilation and drying of the subfloor.
As a rule, ventilation ducts from the stove, located either in the steam room or in the dressing room, go to the lower tier. Upon completion of the bathing procedures, the channels were opened, the ventilation windows in the steam room itself or in the washing compartment were uncorked, and the warm air from the stove quickly dried and removed traces of water, if it was not removed through the drain system.
Non-leakage floor
It is clear that the manufacture of pouring or deck floors requires quite significant costs associated with the manufacture of two levels of water collection, installation of a drainage system and connection of a sewer pipe leading to a pit or septic tank.
It is much easier during the construction process to make classic concrete floors in the bathhouse with a slight slope towards the drain. The concrete screed must be insulated with foam plastic or extruded polystyrene foam. To ensure water flow through the system, a classic version with an elbow and a corrugated pipe is used, or a more modern shower drain can be installed.
Scheme for a drain with a heated floor for a bathhouse - extensions to a house
At the same time, the floor of the bathhouse does not have to be covered with tiles; the surface can quite realistically be covered with wooden floorboards. This solution is most often used for steam rooms. The amount of water discharged through the drain system is relatively small, so you can get by with a small drain pipe installed in the corner of the room.
We suggest you familiarize yourself with How to make a pipe exit through corrugated sheeting
This option for organizing water drainage is traditionally used for large bathhouses with an insulated base and a concrete strip foundation.
The essence of the drainage system is that water is collected in the center of the room in a special gutter or pit. The channel is covered with a protective grating, and the drain surfaces are usually covered with gratings.
A drainage channel or gutter usually has an additional slope along which water flows directly into the ground or into a septic tank located in the underground bathhouse. The design is quite simple, so it is often used for summer cottages of steam rooms and bathhouses built with one’s own hands.
If you are building a system for draining wastewater from a capital bathhouse, then perhaps the best option would be pouring floors with a connection of the lower tier gutter to the drain, and then with the removal of liquid through sewer pipes.
Why this solution is convenient:
- On pourable floors, water drains without delay, all wooden parts dry perfectly, do not rot and are not subject to excessive moisture;
- The drainage channel in the center of the room serves the purpose of a preliminary storage tank, in which small things that fall on the floor remain;
- It is convenient to walk on such a floor without experiencing discomfort, as is the case with a slope; in the center or in the corner you can make a removable lid through which to block the drain hole leading to the sewer and septic tank for the winter.
The design turns out to be much warmer than direct drainage into the underground floor of the room; accordingly, there is no risk of the appearance of moss, fungus, the spread of pathogenic bacteria and freezing of the bathhouse foundation.
Drawings and diagrams
The simplest version of the drain is shown in the sketch below. Directly in the center of the bathhouse foundation you will need to dig a pit, line it with bricks, and fill it with sand and gravel. The walls must be insulated and waterproofed from soil moisture.
A drainage gutter on the subfloor is connected to the drain in the center of the bathhouse.
A sewer pipe will follow through the trench leading to the septic tank. The entrance to the sewer will be insulated, and the drainage systems from the steam room of the shower cabin and washing compartment will be connected to the tee-splitter.
To manufacture a drainage system and connect it to a sewer pipe on site you will need:
- One bellows with an elbow or drain ladder for each bathhouse room;
- Waterproofing film or thin galvanized metal;
- Corrugated pipe 50 mm;
- Gray polypropylene pipe 50 mm - 1.5-2 m;
- Polypropylene corners, straight and with an angle of 60° - two for each drain;
- Adapter 50-100 mm for connecting an external sewer pipe and draining into a septic tank.
The above list is indicative; for each specific case, you will need to specify the number of elements and parts to build a drainage system in the bathhouse. If wastewater discharge is planned to be ensured only through an internal collection gutter, then the number of parts will be reduced by an order of magnitude, but the quality of the drain will clearly deteriorate. In addition, the gutter will freeze in winter, which means it can only be used indoors in the summer.
First of all, you will need carpentry tools, metal scissors, a grinder and a measure. The easiest way to cut plastic sewer pipes is with a hand hacksaw.
If the trays for collecting water in the underground are made of galvanized steel sheet, then you will additionally need metalworking tools for cutting and bending the edges.
Pipes and flanges for collecting and draining water are installed using silicone sealant.
Bath sewer theory
Amateur photo showing the principle of pouring a floor with a slope towards the drain hole
Step by step process
Considering that all such structures are made mainly of wood, it is necessary to take this type of floor as a basis. It is also worth noting that a concrete surface, which can later be sewn up, is best suited for a bathhouse.
It is much easier to make subfloors at the stage of wall construction, since this is not only convenient, but will also provide the support necessary for installation
It's no secret that many owners dream of having their own bathhouse; some of them even do most of the work with their own hands. Below we will describe one of the most important elements of a bathhouse. Namely, how to drain water in a bathhouse without the help of specialists, so that the result is a high-quality design, no fungus forms in the system and no unpleasant odor emanates.
The collection of bath wastewater can be carried out in different ways. Determining the best method usually depends on the type of installation of the future floor. If the floor is leaking, you will need to install a special tank to collect water, from which the waste will move into the sewer.
If you plan to lay a non-leaky floor, you will need a concrete drain in the bathhouse with a slope, equipped with gutters and ladders, designed to drain water. It is worth noting that the slope of the floor in the bathhouse for water drainage must be taken into account.
However, it is worth understanding that the sewerage system must be done before laying the floors.
So, you decided to build a bathhouse. Where to begin? Of course, with planning. Because without planning, the end result is not at all what you wanted at the very beginning.
In order for your bathhouse to please you with its characteristics, you need to write down all the important points before you start building it:
- How many people should the steam room and washing area be designed for?
- How quickly should the steam room warm up and how long should the temperature be maintained?
- In what seasons should the bathhouse be used or should it be ready for year-round use?
These are just a few questions from a large list that you must answer before starting bath construction.
So, what should a bath sewer be like, how should it be equipped - here is a small list of questions that you should answer before you start installation:
- Will you make a bathroom in a bathhouse or will you only have a washing area?
- Will the bathhouse be heated year-round, will there be above-zero temperatures in the bathhouse rooms?
- What materials will be used in the construction of the bathhouse, what will the walls, rough and finished floors be made of, what waterproofing materials will be used?
- How far is the house from the future building site, how far is the septic tank, at what distance from the future bathhouse is the drainage ditch?
- How far is a well, borehole, or any other source of drinking water located from the future bath complex?
- Is there an open body of water near the construction site - a river, lake or pond?
- Will there be a plunge pool installed next to the bathhouse or a swimming pool?
READ MORE: How to waterproof a bathroom floor and how to do it
Having answered the above questions, you can fill the floor with a drain yourself or make a pouring structure, as well as install a water drain in the bathhouse with your own hands.
How is a bath sewer installed, and what theoretical aspects are important here?
Firstly, at the time of the start of the implementation of the bath water drainage system, you must have completed all foundation work. In strip and slab foundations, holes for future sewer pipes are prepared in advance. Columnar foundations do not require such preparation.
Secondly, a place must be selected for a pit with a crushed stone filter for bath water. Many owners build a pit right under the bathhouse, but this is the wrong decision. In this case, the lower crowns of the bath house and the subfloor will constantly be affected by wastewater, even if the base is made high and the waterproofing preparation is not forgotten.
Thirdly, before starting the project, it is necessary to choose what type of floor will be used - solid or poured. This determines how the power structure of the lower floor of the bathhouse will be implemented, how the subfloor will be implemented and, most importantly, how wastewater will be collected from the washing compartment.
In order for your bath furniture to last for many years, you need to study some recommendations for caring for it. The basic rule to remember: after each session in the steam room, the room must be ventilated. This procedure will allow you to quickly remove excess moisture from the room. Sometimes a sauna stove is used for drying, which is turned on for some time after the sauna procedures.
A bathhouse is a room in which sanitary and hygienic procedures are carried out. Therefore, cleanliness in the steam room should be monitored as carefully as in the bathroom. Regular cleaning helps prevent the accumulation of dirt and the development of bacteria on the shelves in the steam room.
The most important rule is the mandatory drying and ventilation of the room after each session in the steam room
After each procedure, it is recommended to wipe all surfaces using a dry towel. This measure will significantly speed up the drying process of wooden boards. It is worth remembering that natural materials cannot be treated with cleaning products containing active chemical compounds. The best option in this case is to use laundry soap.
Self-assembly of bath furniture requires careful preparation. Before starting work, you will need to complete a drawing that includes all the necessary dimensions and data about the room and the structure of the shelf itself. If you are not confident in your own abilities, you can always use the services of specialists.
Step by step process
How to fill the floor in a bathhouse with a slope
Those people who have a country plot at their disposal traditionally have a desire to build their own bathhouse. This task is quite complex and troublesome, but quite doable. In order to carry out all the large-scale work correctly, you will have to “shovel” in advance a lot of information about the construction of this building and the installation of all the necessary communications in it.
One of the first specific questions that arises when planning a building will be - how to make a floor in a bathhouse with a drain? To install such a structure, it is necessary to consider the installation of bath floors, the installation of a drain siphon, the water drainage scheme, the choice of basic materials and some other nuances that will help make the work easier.
The bathhouse consists of two rooms - a steam room (washing room) and a dressing room. Each of these rooms has its own characteristics; floor construction technology takes these differences into account. Let's start with more complex work first - the floor in the steam room, and then we will look at the installation of floors in the dressing room.
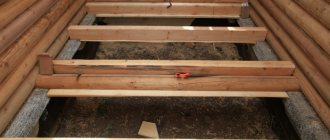
High temperatures, high humidity and direct contact with water require special care when laying floors. Otherwise, washing will be uncomfortable and the floors will have to be changed frequently. So, we have a ready-made log house, why start installing floors and what they are like.
Photo of the floor in the steam room, already finished and laid
Wooden floor in the steam room
Installation of beacons and creation of screed with a slope towards the drain
How to pour concrete floors correctly? It is worth considering that non-leaking floors must have a slope. Otherwise, the water will not go down the drain without “help.” What should be the structure of the concrete base in the bathhouse? To properly pour the cement mortar and make the desired slope in the floor, you should adhere to the following recommendations:
- In the case of arranging the foundation on a strip or pile foundation, first of all, floor joists are laid;
- The subfloor is subsequently attached to the joists. Skull blocks are nailed to the bottom of the joists, onto which boards are thrown;
- Heat-insulating materials (foam plastic, polystyrene, mineral wool) are placed in the sections between the joists;
- Then a sewage system with a siphon is installed in the washing department;
- After installing the hydraulic component of the floor, the wooden sheathing is sheathed with DSP sheets;
- The slope of the base for normal water drainage should be approximately 30 mm per m2;
- Cement mortar is poured onto the prepared subfloor;
- After the screed has hardened, a drain ladder is installed and a finishing coating (wood, tile) is laid.
The technology includes the following stages: preparing the base, laying the logs and installing the flooring.
The preparation method depends on what type of soil under the bathhouse is and how it is decided to dispose of the wastewater. There are two options:
- the soil has good drainage properties (sandy or rocky);
- the soil does not allow water to pass through well (clayey, loamy, sandy loam).
In the first case, it is enough to install a filter under the floor made of crushed stone or gravel, covered with a layer of 25 cm. The soil should be excavated to such a depth that there is a distance of at least 10 cm from the top of the filter to the bottom of the log.
If the soil does not absorb water, do the following:
- A pit about 0.5 m deep is dug in the corner, the walls of which are lined with brick or simply coated with clay, compacted well.
- From the bottom of the pit, in a trench with a slope of 3–4 degrees, a sewer pipe with a diameter of 150 mm is laid, leading to a drain, filtration well or similar structure.
On the ground under the floor, a crushed stone cushion is placed with a 10-degree slope towards the pit, and on top of it - one of two things:
- a waterproof pallet made of roofing felt, the sheets of which are welded or glued together with bitumen mastic;
- clay castle 80–100 mm thick.
To make a lock, you need to soak the clay in water and make a thick solution out of it. When laying it, it must be carefully leveled, and then, when the coating dries slightly, iron it, slightly moistening it with water.
Laying lags
The joists should be laid so that the long side of the cross section is vertical. When installing a leaking floor, they are laid parallel to the shortest wall of the room. The joists should not directly touch the foundation or support posts. It is necessary to lay them on pads made of 2 or 3 layers of roofing felt, coated with dissolved in diesel fuel or molten bitumen.
Laying logs on posts pre-coated with roofing felt
Advice. For those who are willing to spend a little more, we can recommend using a modern waterproofing agent - eurobitumen, as it is more effective.
Flooring installation
As already mentioned, finished flooring boards are laid with a gap of 5–7 mm. It is advisable not to nail the flooring to the joists, but to make it in the form of several removable panels, nailing several boards to two crossbars. The latter are positioned so that when laying the shield they end up between the joists. The removable floor can be taken outside to dry, which will significantly extend its service life.
READ MORE: Options for laying brick paving slabs
Installation of leaking flooring
This is what vents in the foundation look like
Many experts consider installing a concrete floor in a bathhouse to be an economically correct and profitable solution. This method of flooring is supported by the long service life of concrete. A high-quality screed can last more than 30 years. Among the advantages of this floor it is worth noting:
- Resistant to temperature changes and high humidity.
- Doesn't rot.
- Harmful microorganisms and fungi do not develop on concrete.
To care for a concrete floor, you do not need to buy expensive household chemicals. In addition, you have the opportunity to decorate the floor, for example, with tiles.
Drainage arrangement
A lot of water is used in the bath. This suggests the need for drainage facilities. Before concreting the floor, a drainage system should be designed and implemented. To do this, you need to determine the point that will allow you to most easily equip the sewer system. At this point, an intermediate tank should be placed, which can be made in the form of a small pit with a size of 40x40x30 cm. The simplest method of treating a pit is concreting, with a layer of at least 5 cm.
Then a drainage system should be made from this reservoir into a sewer hatch/septic tank. For these purposes, you can use a fan pipe with a diameter of 200 mm.
The soil should be leveled and then compacted. Then fill the floor with coarse gravel 15 cm thick. The gravel can be replaced with broken bricks. The next layer is crushed stone 10 cm thick.
Insulation
To significantly reduce heat loss in a bathhouse, the concrete floor should be insulated. This is done after the first layer of concrete has hardened. Expanded clay can be used as insulation. It needs to be covered with a layer of 5–8 cm.
This is not the only insulation that is suitable for arranging a concrete floor. Often construction felt or mineral wool is used for these purposes. But, it is worth considering the fact that when installing mineral wool as insulation, you will have to additionally waterproof it. Roofing felt can be used as a waterproofing layer.
Another option for floor insulation is pouring cement mortar with perlite (a rock of volcanic origin). It began to be used in this direction relatively recently. The advantages of this component are high water absorption and thermal insulation characteristics.
Mixing is done in a concrete mixer
A second concrete layer should be poured over the insulation or waterproofing (this depends on the insulation material you installed). In this case, it is necessary to lay a reinforcing mesh (this can be wire or reinforced mesh) before pouring concrete. In order for the resulting concrete to be strong, it must be compacted, leveled, and tension concrete poured on top.
The screed needs to be poured in one go, so you need to act quickly. Start pouring from the far corner, leveling the solution with a trowel. You need to tighten it with a rule in a circular motion, which would be directed towards the exit from the room. After the screed must harden, this process takes several days.
With the addition of plasticizers, the hardening process of concrete is accelerated. They, among other things, increase the strength of concrete, reliably connect the components of the mortar together and prevent the possibility of cracks.
The quality of the surface is determined after the concrete has completely dried. If the screed has a uniform gray tint, this indicates its uniformity. In addition, durable and high-quality concrete will not show noticeable marks from a hammer blow.
Finishing
Ceramic tiles are most often used to finish concrete floors in bathhouses. The tiles will also look impressive. A significant drawback of tiles is that when wet, they become slippery, which increases the risk of injury. Therefore, from a practical point of view, it is better to lay Metlakh tiles on the concrete floor.
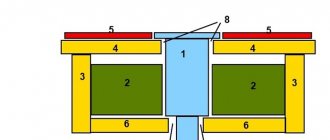
To install internal sewerage in the washing room, we will need gray PVC pipes, as well as joints and adapters.
- The number of pipes depends on the length of the internal drainage system.
- We will also need tees size and angle 110–110–90° - two pieces (highlighted in red in the diagram);
- Elbow adapter - 90° - three pieces (highlighted in black in the diagram).
- Horizontal sewer pipes – Ø11 cm;
- Vertical pipes for installing water drainage receivers – Ø11 or 5 cm.
- To connect pipes of different diameters you will need adapters from 5 to 11 cm.
- For the external sewage system of the bathhouse you will need orange pipes (PVC).
For work we will need:
- Bayonet shovel (special equipment);
- Building level;
- Grinder with cutting wheel;
- Sand;
- Cement;
- Crushed stone.
Basic work on creating a floor
Work on creating a floor in a bathhouse must be carried out carefully, with attention to all details. It should be remembered that in the steam room and washing room there is always a lot of water, and there are sudden changes in temperature. Therefore, a clear knowledge of how to fill the floors in a bathhouse under a drain, with or without a slope, under ceramics or plank flooring will help to do the job so that the coating lasts a long time and does not cause trouble.
- At the first stage, the surface of the rough supporting screed of the bathhouse is carefully waterproofed using a coating method. You can use both bitumen mastic and one-component polymers or special ready-made building mixtures.
- A special construction tape is glued around the perimeter of the room, which is separately coated with a waterproofing agent.
- The second stage is laying roll materials under the floor screed in the bathhouse. Ruberoid and glassine are effective, inexpensive, but have a limited service life. You can use a thick polymer film. Excellent results are shown by bituminous materials based on fiberglass and fiberglass. The strips are overlapped by 10-15 cm. In the case of bituminous materials, the joint area is melted with a construction hairdryer. The polymer film is glued along the seam with wide tape. The waterproofing should extend onto the walls, about 10 cm.
- The third stage is laying insulation. The classic option for bath floors is felt. Basalt, mineral, and glass wool show good results.
- The fourth stage is the creation of a second layer of waterproofing under the floor screed. Rolled materials are laid on the insulation. To save money, it is allowed to use polymer film. If you have some money left over, you can lay a one-sided membrane that will remove moisture from the insulation. The rules for creating a coating are similar to those given above for the first layer of waterproofing.
- The penultimate stage is gluing the perimeter of the bathhouse rooms with damper tape to compensate for thermal expansion of the final screed.
We invite you to familiarize yourself with sewer installation in a private house with your own hands
The last part of the work is creating the top reinforced coating. The rules and procedure do not differ from the process of forming a screed in an apartment or house and look like this:
- Beacons are mounted on the surface of the waterproofing. In the bathhouse, you need to carefully check their level to ensure that the floor screed slopes towards the water collection points;
- a mesh of steel or aluminum is laid, it is located at the level of a third of the height of the future screed;
- a standard sand-cement mixture is mixed, laid out, rubbed and smoothed over the beacons.
Having prepared the tool and purchased the necessary materials, we begin the preparatory work. First we dig a drainage hole. Its task is the reception and subsequent disposal of wastewater. On the outgoing sewer pipe we install a valve, the so-called drain ladder, which:
- hermetically connects the drain and waste systems;
- thanks to the installed grille, it ensures filtration of incoming water, which significantly reduces the possibility of blockages;
- prevents gases from entering the sewer pits into the room, as it is equipped with a water seal located inside the siphon.
Having prepared the drainage pit, lay out the sewer pipes. If the drain is located in the corner of the room, the pipe is laid along the wall. When the drain is located in the center of the base, the pipes are laid diagonally, avoiding bends as much as possible, which lead to the formation of unwanted blockages. The plumbing elements are connected and brought to the cesspool.
Installation of bath floors, usually done on the ground or logs
Upon completion of the arrangement of the drainage and sewer system, we begin to form the foundation for the future floor. For this:
- We create a cushion for pouring concrete mortar, which allows us to limit heat loss. We deepen the soil by 50 centimeters. Three quarters of the total volume is filled with construction waste that is not subject to rotting processes.
- We cover the resulting surface with clay and, after drying, pour a fifteen-centimeter shock-absorbing layer of sand with fine gravel or crushed stone. This level will allow the absorption of moisture that results from temperature changes. We carefully compact the layer, maintaining the slope specified by the project.
- Pour the first layer of concrete mortar. If possible, we use perlite additive - an excellent heat insulator. When working with perlite, pay attention to its properties - especially fine fraction and minimal weight. When mixing the concrete solution, use a room protected from the wind to avoid increased dust formation. The thickness of the first layer of concrete when pouring the base should not exceed 4-6 cm. We isolate the joints between the base and the walls from moisture penetration with bitumen.
- We wait for the solution to dry. It depends on weather conditions, the period ranges from several days to 2-3 weeks.
- We lay thermal insulation material.
To prevent it from being damaged by moisture, it is advisable to additionally use roofing felt for insulation. The most important thing in a bathhouse is the floor, which should be warm - The next stage is pouring the floor in the bathhouse with a second layer of concrete mortar. At this stage of work, a reinforcing mesh is used to protect the cement base from cracking during operation. We compact the concrete, trying to get rid of air cavities as much as possible.
- Leave the surface alone until completely dry. To ensure that concrete sets evenly during the hot season, we moisten the base using a sprayer.
- The final stage is applying the cement mixture to the entire surface and leveling the concrete according to the rule. Make sure that the slope of the covering is correct towards the drainage hole. Apply deep penetration waterproofing impregnation to the finished base.
We would like to focus your attention on the fact that if you do not plan to use the bathhouse during the cold season, then when mixing the concrete solution, you can exclude perlite from the recipe. Use the usual cement-sand composition of one to three, adding 1/10 of lime. This will reduce financial costs without reducing the strength of concrete.
Beautiful examples
A high-quality concrete screed on the floor will go well with wooden walls and ceilings. The materials for the latter can be boards and lining, forming an original combination. A large window, a laconic stove and simple wooden shelves will ideally complement the interior.
The tiled area under the heater can become a bright accent of the steam room and, echoing the washing room, combine two interiors into one. You can add brutality to the room if you replace it with natural or artificial natural stone. He, in turn, will require inserts on the walls of the steam room itself.
The contrast of light wood on the floor and dark wood on the walls will create a very unusual, memorable room. Benches, flooring and the stove must continue this kind of confrontation.
To learn how to properly make a floor in a bathhouse, see the following video.
Finishing screed
To properly fill the floor in a bathhouse with concrete, two screeds are made. After the rough and insulating layers, the finishing coating is poured. The solution is prepared in the same way as for a rough screed; the layer is made up to 10 centimeters, remembering the need for a floor slope towards the water drainage.
Reinforcement
To strengthen the screed, a reinforcing mesh of steel rods with a cross section of 5 millimeters is used. In some cases, it is possible to replace the steel mesh with fiberglass, which is explained by the absence of serious loads on the floor of the bathhouse. The screed is made 7-10 centimeters thick, the reinforcement frame should be located in the middle, and be filled with a layer of concrete of at least 3 centimeters on all sides.
When choosing a brand of concrete for the foundation for a bathhouse (finishing layer of the floor), preference is given to M400 or M500. The proportions are the same as when preparing the mixture for rough filling. It is better to prepare the mixture in a concrete mixer.
You can use a mixture of cement and sand in a ratio of 1:3 for pouring, or ready-made dry mixtures created for use in rooms with high humidity levels.