What is an electrical skirting board?
A plinth with a cable channel is something between an interior element and a mounting tray for laying cables. It is used mainly in residential premises, where it is necessary to hide unattractive wiring, but at the same time leave it within minutes’ reach. It can be used if the walls are already plastered, when at the very last moment you remember that you need to lay an additional wire.
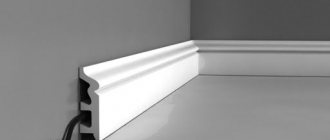
Plastic plinth with channel for wires
Installation technologies
Set of tools
If we plan to install a plinth with a channel for laying wiring ourselves, then we will need:
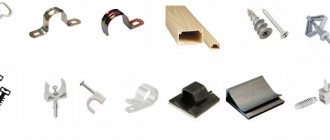
- The panels themselves (made of PVC, MDF or wood).
- Connecting elements (longitudinal adapters, end caps, corners for external and internal connections).
- Mounting clips (for some plastic models and most MDF products).
- Dowels with plastic sleeves and metal locking screws.
Advice! In most cases, the length of the baseboard with cable duct is equal to the length of the perimeter of the room minus the dimensions of the doorways. However, you should always buy one or two more panels, since cutting and installation may result in defects.
The set of tools is quite simple:
- Hammer.
- Screwdriver or screwdriver.
- Plastic saw or grinder with cutting disc.
- Saw for MDF.
- Painting knife with a sharp and durable blade.
- Measuring tools (tape measure, level).
Installation of plastic models
All tools are ready and you can start working.
First, the instructions for installing PVC products are given:
- We take the panel out of the packaging and remove the protective strip from it that covers the wiring channel. We put a cover for the inner corner on one of the ends of the panel.
Drilling holes in concrete
- We lay the plinth along the wall in one of the corners. Using a hammer drill, we drill holes for fasteners in increments of about 60 cm.
Advice! For more precise installation, you can not drill through the baseboard itself, but simply mark the holes using an awl. Then it will be possible to fix the panel with standard fasteners.
- We hammer plastic dowels into the drilled holes. It is advisable to use models with a wide side, as they provide better pressure against the wall.
Attaching the plinth to the wall
- We finally fix the plinth using locking screws. It is best to use models for express installation as they do not require screwing, but can be easily driven in with a hammer.
- To ensure more secure placement of the cables in the channel, we attach a plastic clamp to the head of each screw. In the absence of special clamps, you can simply use pieces of insulated wire.
General installation sequence
Using the same scheme, we install all the finishing parts, connecting them with special elements included in the kit. We install socket boxes in the selected locations, securing them with anchors on the wall and cutting holes for the wires in the baseboard.
Then we lay the wiring in the cable channel, securing it with clamps or tying it with our improvised fasteners. We lead the wires for the sockets into the holes of the socket boxes and connect them to the terminals. We assemble the sockets by snapping the parts onto special fasteners.
Socket box with exposed contacts
Finally, we block the channel by installing the protective panel in place. We check the functionality of sockets and all appliances.
general characteristics
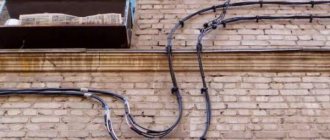
Laying the cable in the baseboard (photo below) is easy and quick to install. When installing electrical communications, the owners of an apartment or house do not always decide to carry out major repairs. In some cases, keeping the existing finish in its original form remains a priority. It is in this case that property owners choose to install the wire in an open way. In this case, using a special plinth is a good solution.
Wall chipping significantly increases the cost of repair work. For example, the cost of creating a linear meter of a groove for electrical communications ranges from 100 to 200 rubles. At the same time, a lot of dust and construction waste is generated in the room. This procedure is carried out only during major repairs.
It should also be noted that not all premises are allowed to run the cable in a hidden way. For example, if the house is very old or it is built of wood, it is recommended to install communications in an open way. The cost of the plinth is only about 80 kopecks. per bar (2.5 m). This makes the presented installation method popular.
Baseboard device
The floor plinth for cable laying is mounted on the base of the wall. One or more cable channels run inside it. This allows you to carry out almost any communications to equipment and lighting fixtures. After laying the wire, the entire system is covered with a decorative panel.
Regardless of the model and purpose, such designs include several main components. These include a frame and a decorative connecting strip. Also, when installing the structure, connectors for external and internal corners are used. The entire system is covered by a decorative outer panel.
The frame must be mounted on the base of the wall right next to the floor. Self-tapping screws are used for this. The remaining structural elements are assembled by hand. You don't need to use a special tool for this. This greatly simplifies and speeds up installation. It’s easy to do this kind of work yourself, even without having high qualifications in the field of repair work.
Types of skirting boards with cable channels
Let's start with the materials. Wall plinths with cable channels are made from several types of material. Products made from PVC plastic are well known, some are made from metal (aluminum and alloys, you can find copper and brass). Not long ago, skirting boards with channels for cables made of polyurethane appeared.
They can be of two designs:
- The recess for the cables is molded into the “body” of the plinth and is covered with a cover made of the same material. These are options for a small number of cables.
Cable laying in a plinth with a cable channel: one of the types - With removable top cover. They consist of two parts: a back plate with formed recesses for laying conductors and a decorative cover. The material does not have to be the same. Sometimes the color is different, sometimes even different materials are used.
This electrical skirting board has a removable front panel.
Both options are viable and are successfully used. But their installation method is different. In the first case, the plinth is attached to the wall through a cable channel, in the second, the back part is fixed to the wall, and the front part is put on after installation.
Skirting design
In design, electrical skirting boards are similar to each other: they consist of a plate that is attached to the wall, a cavity or shelves where the cable is laid, and a front panel. But there are models that contain only one recess where 3-5 cables lie. The outer panel is a protective plate that is held on with latches, meaning you attach it without tools.
You can lay wiring in an electrical baseboard not only in an apartment, but also in a country house or in a wooden house. This is because installation is quick, convenient and cost-effective, while the electrical wiring will be hidden from prying eyes.
How to lay a wide baseboard
There are no particular difficulties in installing wide floor plinths. Laying work is carried out using fastening clips or simple self-tapping screws that need to be screwed into dowels.
If the installation is carried out using clips, the first step is to install a hidden fastener, onto which the plinth strip is subsequently placed until the characteristic clicking sound is heard. Thus, the elements of the product are connected. This method is best suited for use on perfectly flat walls, because on curved surfaces this will be very difficult to do.
In order to install a plastic floor plinth with self-tapping screws, stock up on the necessary tools and materials:
drill;- screwdriver;
- square;
- tape measure;
- pencil or marker;
- stationery knife.
First of all, decide on the exact number of required strips and fasteners: side caps, internal and external corners, connecting strips, which are needed to connect two plinth strips. Such elements can be purchased at any hardware store, as well as at specialized baseboard sales points.
Important!
When purchasing wide baseboards, we recommend that you check the products for color matching, because sometimes differences can occur. If, however, there is no significant difference for you or it is not visible, mount the darker-colored planks opposite the window, this way you will smooth out the difference between the colors.
Laying the plinth should begin from the corners of the room. The joint strips are best located at the points where the furniture will be placed in the future. Markings are made on the baseboard and cut into the required pieces. The wide plastic plinth at the corners is cut exactly without gaps and inserted into the outer and inner corners. The dowels are installed at a distance that depends on how smooth the wall is, and most often it is 30 - 50 cm. To do this, select a thin drill and make a hole in the plinth, then use a six-millimeter drill to drill holes for the dowels. The next step is to screw in the self-tapping screws, which need to be closed with special plugs matched to the color of the baseboard.
The simplest installation is a wide plastic floor plinth with a cable channel and a decorative strip. To do this, you need to remove the strip, hammer in the dowels, tighten the screws, lay out the wiring and cable, and then install the decor strip in place.
Pros and cons of electrical wiring in baseboards
First of all, hidden elements of communication are aesthetically pleasing, especially when it comes to ceilings. However, there are other advantages of ceiling plinths with cable duct:
- easy and convenient access to wires is an invaluable advantage when it is necessary to replace a cable, detect a fault or an overheated area;
- simplicity of the technology - the installation is easy to do with your own hands; laying the cable does not require violating the integrity of the walls, breathing concrete dust and wasting effort on restoring the finish after the groove;
- a variety of design options - from fastening methods to the number of cable channels;
- disguising wires from unauthorized persons - it will be more difficult for an attacker to find hidden alarm lines, video surveillance switching, communications and television;
- a variety of materials, shapes, textures and colors - it’s easy to choose products to match the appropriate interior style;
- ease of repair and maintenance of skirting boards.
The presence of disadvantages is due to the physical properties of some materials:
- the design of some models makes it difficult to open cables without damaging the fasteners;
- budget PVC skirting boards are too fragile and can crack when screwing in self-tapping screws; in addition, they fade over time;
- flexible edges that provide a tight fit to uneven walls can subsequently lose elasticity and move away from the surface, forming cracks.
Materials for hidden wiring
You should clarify what materials will be needed for installing hidden wiring. These include multiboxes, external and internal electrical sockets, and plastic boxes.
Multiboxes
The multibox (plastic cover) will help you install any type of single electrical sockets. There are different overlays depending on the thickness of the baseboard and the cutout for the socket. Each device comes with detailed instructions for use. The advantages of multiboxes are obvious - they make it easy and convenient to run wires without cutting into the plaster, and getting them out for repairs is very simple. This method is ideal if you need to replace old wiring with a new one, but it is not possible to do a full repair.
Multiboxes are used for:
- installation of hidden wiring in a house, apartment, cottage;
- installation of sockets in offices, shops, schools, call centers.
Such devices are universal; inside them you can place television and other cables in the house. There is a large selection of multiboxes; the most popular manufacturers are Rosmat, Marshall, Decorah.
Plastic cable ducts
Instead of multiboxes, many use cable channels with external sockets. It looks like a plastic box with a lid with a latch on it. There are various modifications of cable channels; you can choose the right one in height and width. There are no restrictions on the number of wires - you can install any number.
Some recommendations
Cable laying in the baseboard has several features. Experts strongly recommend that you familiarize yourself with them before starting installation. It should be noted that it is quite difficult to find sockets on sale intended for installation on baseboards. Therefore, most often such structural elements are displayed on the wall. In this case, you will need to either ditch the wall (which you would like to avoid) or route the wire through the baseboard. In this case, the decorative overlay of the structure will have to be cut.
The wire will run along the surface of the wall. By violating the integrity of the decorative overlay, you can end up with a sloppy appearance of the structure. It is best to route wires to create sockets in an inconspicuous place, hidden from view.
Where the wiring will go around doorways, you will need to choose a different method of installing the wire. Here, for obvious reasons, it will not be able to pass inside the baseboard. In some cases, the owners of an apartment or house hide electrical communications under the platbands. Sometimes you can’t do without gating the walls.
Installing a plinth with a cable channel
We have previously talked about installing floor skirting boards. Features of installation of electrical baseboards depend on its design. The one with a built-in gutter is mounted like a regular one - pressed tightly against the floor with its lower edge. When installing models with a removable front panel, you need to know one trick.
Corners and edges are decorated with special additional elements
With removable cover
Pieces of the required length are cut using a regular hacksaw with a fine-tooth blade. It cuts well with a blade on metal. Cut the entire plinth assembly with the lid on.
Before installation, the strip covering the cable channel is removed. Screws or dowels are screwed into a recess, which is the cable channel. If the wall is thin, it is better to place a washer under the cap.
Dowels are used for concrete and brick, special fasteners are used for drywall, and self-tapping screws are used for wood.
To decorate corners, there are special additional elements: external and internal corners, connectors for planks. The pieces of skirting boards are simply inserted into them. But the trouble with such a system is that these “spare parts” pop out. Therefore, it is recommended to seal them with transparent silicone sealant. The system is first assembled, then wires are laid into it.
And one more point about installation. It is not always easy to route cables into an already assembled system. Some additional elements are made inconveniently and make it difficult to pull wires. Therefore, it makes sense to stack them as they are installed. And also, if you are going to tuck cables not only into the recess, but also into the space formed below and above, they definitely need to be laid before attaching the baseboard to the wall.
https://youtube.com/watch?v=AavzJ3NxLyE
Electrical plinth with removable front part
When installing an electric skirting board of the second type with a front part and a “back” that is attached to the wall, the situation is similar. But the point here is that the bar must be fixed at the same distance from the floor. Otherwise, putting on the decorative part will be problematic. The soft bottom edge makes things easier, but it's only one or two millimeters. So the installation has to be really precise. How to be? Use "samples".
- We cut off two small pieces from the front part - 7 centimeters long. And we use them to set the bar at the desired level.
- From the point where we plan to install the fasteners, we retreat a few centimeters and place a piece of decorative strip - on one side and the other. This area is set to exactly the height that is needed.
The second type of electrical skirting boards is with a removable front panel
We place the fasteners in the space between the two “samples”. We move on and so on until we install all the segments.
This method will allow you to screw the plank at the same level relative to the floor covering, even if it is not very level. So there are no problems when installing the decorative strip.
How to insert and remove a cable from a plinth cable channel
When laying cables in an electrical baseboard, it is necessary to insert the cables and remove them. Most plastic ones have a soft edge. It looks more like rubber than plastic. In this case, running the wires will not be difficult. Due to the elasticity, the edge will simply move away.
How to insert and exit a cable into the baseboard
If the edges are hard, try warming them up slightly and bending them back. Another option is to make small cuts. But this looks the worst, since it’s difficult to do everything perfectly. It's easier to heat it up and bend it. But heating not on an open fire is okay. And practice, for starters, on an unnecessary segment - that’s two.
Sockets on the baseboard
Some companies are developing sockets that can be installed between two pieces of strip anywhere. There is no need to cut anything. Everything is designed in such a way that the module is fixed on the strip (until it clicks), and the missing part is covered with a decorative strip of the same type. Usually these are expensive systems that are made in Europe and certified there.
Special sockets can be mounted directly on the baseboard