The nuances of filling the system with coolant
First of all, before starting the heating of the floor covering for the first time, you should organize the circulation of liquid through the heating circuits and remove any air pockets.
The method in which the coolant will be supplied depends on the design features of a particular system. If you plan to use tap water, then a tap is specially installed for this purpose, which opens its supply.
When you need to fill in other liquids, then use the tip with a shut-off valve located in the manifold, in its supply part. Pressure testing equipment is connected to it, which is used, among other things, to fill the working medium into the system. Such devices are produced in manual and automatic types.
You don’t have to purchase a crimping machine, but rent it from a specialized store. But when the coolant is water, it must be used for a heated floor system annually before the start of the heating season in order to replace the working medium. Perhaps then it is better to purchase this device. To start the equipment, there must be a special tap on the output manifold.
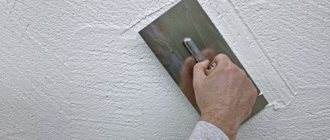
Before filling the underfloor heating system with coolant, it is washed with running water. After completion of the installation work, lubricant and other materials from which the elements of the heat supply structure were made remain inside it. Often small shavings and construction debris get into pipes when they are laid.
For this reason, flushing is a must. For this purpose, the system is filled several times with water and then drained. Once the liquid becomes clear, the flushing is complete.
In addition to the first launch of a warm water floor, this procedure must be performed before each coolant replacement. When using soft or distilled water, this activity is carried out annually.
If antifreeze is used, the manufacturer's instructions should be followed. Some of them indicate the need to replace the coolant every second or third season, and some once every 10-15 years. But it is imperative to flush the system before doing this.
What kind of heated floor requires a screed?
Warm screed is used both under water and electric heated floors. Of course, each of these cases has its own technology features that should be taken into account. However, regardless of the choice of system, the best option would be to use a semi-dry screed.
The question of when exactly electric heating elements should be installed leads to a lot of controversy. In practice, it turns out that its installation is possible both under the screed and into it, and even from above. The installation option depends on the characteristics of the heated floor, as well as the finishing coating. For example, laying a heated floor over a screed is preferable when laying tiles. The main thing is to choose the right specialist who will do all the work. Otherwise, the tiles may crack.
The screed is poured onto the water floor after the pipes are laid directly. That is, the pipes must literally “sink” in the solution. This will allow the heat to be evenly distributed when heated, as well as protect the pipes from external influences. That is, filling the screed in this way allows you to increase the service life of the entire system.
Test run of water floor
After completing the assembly of the system, before pouring the screed, it is checked for functionality. Thanks to this procedure, it is possible to eliminate deficiencies made during installation. The circuits are washed and then filled with coolant that will be in the system.
Before making a screed, liquid should not be drained from the pipes; it should be laid when the pipelines are full so that they are in working condition.
There are three ways to check a heated floor before pouring and identify any shortcomings:
- the system is brought to operating temperatures and left there for several days;
- test under conditions of excess pressure on a cold coolant;
- perform air pressure testing.
The choice of testing method depends on the personal preferences of the property owner, but starting the system at elevated pressure without a concrete screed may result in the pipes flying out of their sockets.
This occurs when using mounting tapes or single fasteners.
To prevent this, before the test run, beacons for the screed are installed with a specific step and secured with small portions of the solution. Pressure testing can be carried out after the cement holding the guides has set. It turns out to be a kind of frame that holds the pipes, and as a result they remain in the nests.
Guides will not interfere with eliminating deficiencies. If during the installation process the pipes were not bent and the coil was rolled out, then the pipelines are intact and there will be no problems with them. Leaks can only appear at the junction of the pipes with the collector or in the piping of the heating boiler.
The frame should be constructed when self-focusing fastening systems were used. If the pipes are fixed to the mesh, problems do not arise.
System testing using each method is performed in a certain sequence:
- The first option is running at operating temperatures .
The system is brought to the desired temperature regime gradually, starting from 20 degrees and raising it to 50 degrees. At this time, observe the contours, joints and connections. If leaks occur, the system is stopped, the liquid is drained, the faults are eliminated, it is refilled and tested again. After bringing the working environment to the required temperature, the heated floor is left for 2 - 3 days. If there is no damage, the screed is poured, having cooled the coolant in advance. - The second option is checking under high pressure conditions . It's easier to do. The structure is filled with a working medium, a pressure is created that is 1.5 - 2 times higher than the working pressure in the underfloor heating system, and they wait 24 hours. If the drop in this parameter in circuits made from PERT or PEX products does not exceed 1.5 Bar, this means that there are no leaks and the screed can be made. If there are deficiencies, a set of measures described in the first testing method is carried out.
- The third option is dry pressure testing , which is used if it is impossible to use a coolant. In this case, air is pumped into the system by a compressor. But in this situation it is necessary to create a pressure 2–3 times higher than the operating parameters. You need to know how to pressurize a heated floor with air, since this method is not considered reliable, especially when antifreeze is used as a coolant. Therefore, experts advise checking with working fluid, especially since the screed is poured with pipes filled with liquid.
When the test is carried out at pressures above 4 bar, the air vent valves must be closed. The fact is that after a while liquid begins to flow out of them.
Each testing method described above is used for a specific type of pipe product. For example, for metal-plastic pipes, a cold water test is used at a pressure of 6 bar. If this indicator has not decreased within 24 hours, this means that the system can be filled with a mixture of cement or base sheets can be installed when the flooring system is being installed.
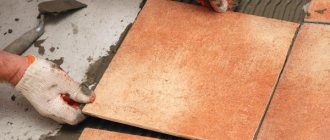
Technology for laying tiles on an electric floor
Before laying tiles on the floor, you need to make sure that the system is working so that you don’t have to open the surface later.
Basically, the technology for laying tiles depends on the installation option: wet or dry. In addition, there are two installation technologies: suture and seamless. The first method is better, since the grout material takes on part of the expansion that occurs under the influence of temperature. With this method, the decorative shell will be smaller.
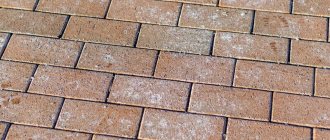
Ceramics are considered a cold coating, but laying tiles on an electric or water-heated floor is a popular solution for both the bathroom or kitchen, and for any room.
Despite the fact that this material does not heat up quickly, it is capable of retaining the accumulated heat for a long time and releasing it well. In addition, the low heating rate helps to heat the surface evenly and does not create excessively hot or cold spots.
The tiles are especially suitable for bathroom floors where there is high humidity. It dries quickly and resists mildew. In addition, the strength of the entire structure increases.
The rules for laying tiles on a warm floor do not differ from the process of working with this material on other flat surfaces.
If you do not want to trust the work to specialists, and plan to lay tiles on a warm floor with your own hands, then you need to follow the following rules:
- the heated floor and other surfaces should be located on the same level;
- the size of the screed is at least 1 cm, otherwise the heat will not spread evenly;
- It is forbidden to place furniture on an electric heated floor, and you cannot cover it, this will lead to rapid burnout;
- the heated floor system after pouring the screed cannot be turned on for 28 days in a mode of heating the concrete above 28 degrees;
- after the concrete has completely hardened, the system must be turned on in normal mode for 2 - 3 days;
- the temperature of the heated floor screed when laying tiles should be 25 - 28 degrees;
- It is not recommended to lay tiles on a working floor, the glue may dry out quickly and the surfaces will not have time to set;
- until all components have completely dried and hardened (14 days), the system cannot be heated to a temperature exceeding 28 degrees;
- Only after the grout layer has dried can you turn on the heating of the room.
It is necessary to start laying ceramic tiles only after checking all systems.
Video instructions
The preparatory process is as follows:
- checking the reliability of fastening the structural elements; they can be secured with tile adhesive;
- checking the evenness and horizontality of the surface using a building level; if cracks are detected, they must be filled with cement mixture;
- pouring the screed, a solution of sand and cement or special glue is used, it must dry, it dries from 3 to 25 days;
- the screed must be primed and dried for two hours, then apply a second layer of primer;
- before laying the tiles on a warm water floor, preliminary marking and gating of channels for pipes is done;
- laying a heat-insulating layer that will protect against condensation and heat loss.
READ MORE: Installing a heated floor thermostat
The average soil consumption standard is 200-300 g/m2.
Setting the markup
Marking is a mandatory step in laying tiles; it guarantees the evenness and quality of the coating.
The method of laying tiles in the classical way has no special features; the long wall is a guideline, markings are made from it. Using chalk and a cord, the first row is marked, from which subsequent rows are measured.
First, it is better to lay out the tiles according to the “dry” laying pattern in order to verify the correctness of the calculation in the amount of material. The choice of pattern does not affect the quality of the system's functioning.
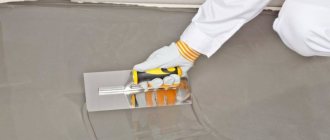
Glue preparation
The next stage is the selection and preparation of glue. All materials included in the heated floor kit are subject to temperature changes, so the adhesive needs to be plastic and well-resistant to all fluctuations.
The standard composition is not suitable; a special one is required. Glue consumption depends on the quality of the surface (roughness). The average amount of glue per square meter is indicated in the instructions, although there are nuances that depend on a number of indicators.
| What affects glue consumption | |
| Base surface | The average cost of glue per 1 m2 is up to 5 kg. If the surface is uneven and porous, then costs increase. |
| Tile size | If it is large, then the glue consumption increases. |
| Air temperature | If the air temperature is high, then the water from the solution evaporates and a new one needs to be prepared. |
- withstands temperature changes from 30 to 90 degrees;
- provides adhesion at the level of 0.8 - 1.0 MPA;
- is compatible with the base and floor covering;
- has an icon or inscription “warm floor” on the packaging;
- ideally contains aluminum cement, it is able to provide maximum strength.
To properly prepare the adhesive mixture, you must follow the instructions on the package. There is no need to dilute all the glue at once; it dries quickly, so it is better to prepare it in small portions.
READ MORE: The best underlay for laminate flooring
The preparation method is simple - you need to pour water into a container and add the mixture, strictly observing the proportions specified in the instructions. Move carefully using a drill. The result should be a mass similar to thick sour cream.
The finished adhesive solution should be left for 15 minutes, moved again, and you can begin laying the tiles on the warm floor.
The quality of the glue is checked as follows: you need to put a little of the mixture on a spatula and tilt it slightly. If the glue does not flow, then the quality is good.
Laying tiles
After completing the preparatory work, you can begin to lay the tiles on the warm floor. Find out how long it takes to turn on the heated floor after pouring the screed.
Technological process of laying tiles on a warm floor:
- The glue is applied to the base with a spatula: regular and comb. With the help of the first, the mixture is leveled, and the second gives the surface ribbing, this contributes to a better connection of the surfaces.
- Apply glue to the floor, 1 square meter each time.
- Glue is also applied to the back of the tile, and it is carefully placed on the floor, pressed down, or lightly tapped with a rubber mallet.
- The surface is constantly checked for horizontalness.
- Plastic crosses are installed in the seams; this will help make the distance between the tiles the same when laying.
- Tile scraps should be placed in corners and under furniture. And to design the area around the pipes, you must first prepare a cardboard stencil on which to cut the tiles.
- After the tiles have been laid on the entire floor, you need to check the surface for curvature, and, if necessary, level out defects, as well as remove crosses. These manipulations must be done before the glue dries, then it will not be possible.
The tiles should be placed at a distance of 1 - 2 cm from the wall. The gap is needed for deformation processes.
Grouting joints
You can start grouting the joints only after the fixing compound has dried; the approximate drying time is two weeks. But each glue has its own drying time, so you should familiarize yourself with it on the packaging in advance.
The seams should be treated with a rubber spatula and a special grouting compound. After 40 minutes, it is washed off if you add cold water. Along the perimeter, the seams should be treated with silicone sealant, and then the baseboards should be installed.
According to the tile laying technology, furniture can be placed on the floor only after 2 - 3 days. After the structure has completely hardened, you can turn on the system, giving it full load.
By following the above rules and the order of work, a person can independently lay tiles on a warm floor and enjoy a comfortable atmosphere in the house.
READ MORE: What is the difference between laminate and parquet, what is the difference
Watch the video
After what time do you turn on the heated floor?
Crimping of cross-linked polyethylene structures is performed differently. First, it is checked 3 times on cold liquid under high pressure. The value of the test indicator should be 2 times higher than the working one, but not less than 6 Bar. It is brought to 6 bar, then it begins to decrease.
After 30 minutes, the pressure in the system is again raised to 6 bar, and after half an hour the procedure is repeated again. This is done 3 times. Next, the pressure is increased to pressure testing (it is 2 times more than the working pressure) and left for 24 hours. If during this period the drop is insignificant - less than 1.5 Bar - and there is no trace of leaks, then the test has been successfully completed.
By the way, according to the standards in force in Germany - it is in this country that there are the most stringent requirements regarding the safety of using construction technologies and materials - after completing pressure testing in cold water, you need to run the system at operating temperatures.
To do this, the heating equipment is gradually brought to the required temperature and left for several days. If all tests are successfully passed, this means that the system is reliable, you can make a screed and start launching the heated floor.
Control block
The underfloor heating system is regulated by an electrical unit. You can turn the heating on and off, control the room temperature, and also adjust the system's automatic on and off periods.
There are several types of electric floor control panels:
- The electro-mechanical regulator is the simplest control method. Its tasks include controlling heating and shutting down the system. The regulator is controlled manually. There is a wheel connected to a regulator that maintains the temperature of the floor covering. Due to its simple design, the electric regulator has the lowest cost and is less susceptible to breakdowns.
- The digital control panel functions in the same way as the previous controller. The only difference is that the control is carried out not by a wheel, but by a button or touch panel. The control unit is equipped with electric sensors that measure the air temperature in the room. Temperature sensors transmit data to the thermostat.
- The programmable thermostat is manufactured using the most modern technologies. There are several temperature sensors available that transmit all the indicators to the controller, which maintains different temperatures in different rooms. You can control such a thermostat via a Wi-Fi network using a smartphone or laptop. When leaving home, you can turn it off completely or turn it on to the required temperature before you arrive.
It is recommended to give preference to modern control panels that can be configured manually. Convenience and practicality in use and different designer color schemes will help you fit them into any interior style.
Coolant refilling process
Before filling the water heated floor with coolant, all valves on the collector unit are closed, and the hose is connected to the inlet tip. When it is planned to flush the system, a hose is installed at the outlet, the opposite end of which is inserted into the sewer system, drainage pit or into a special container.
Filling begins with the first loop, for which the valves on this circuit are opened, and all the others are left closed. The pipes are filled with liquid and air is released, resulting in a hissing sound in the air vent valves.
The pump is turned on for a short period, the noise of the valves is heard again, after which it is turned off. Next, wait until the air is completely released and turn on the pumping equipment again. The process is repeated until all air pockets are eliminated and the second loop begins to be filled.
Before filling the second circuit, the valves of the already filled circuit are closed. The procedure is carried out until all loops of the system are filled. Then all inlet and outlet valves on the circuits are opened, and the coolant is pumped until the air is completely removed. The system is now prepared for testing or launching water heated floors.
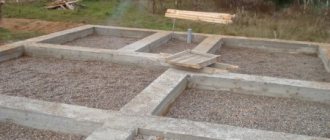
Screed and pouring of heated floors
If the laying of pipelines for a water heated floor, its connection and pressure testing is usually carried out by specialists, then the preparation of the base can be done with your own hands. Dry or semi-dry screed for a warm water floor is not at all that difficult if you follow certain rules and recommendations.
Why do you need a dry or semi-dry screed?
The need for a screed is caused by the following reasons:
- Providing mechanical protection for pipelines after they are laid in a prepared base;
- The need for the most uniform distribution of the resulting thermal energy, especially for houses whose walls are laid with foam concrete;
- As a surface preparation for laying the finishing coating - tiles, linoleum or laminate.
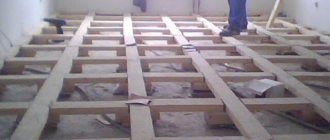
The technology by which the level and layer of pre-coating are formed with your own hands can be implemented in three versions - dry, semi-dry and wet methods. The light (dry) method does not involve the use of concrete and is used in cases where the actual loads on the floors are, for various reasons, limited by the strength of the structures. In other cases, you can use cement-based mixtures (a special dry mixture is often used or it is supplemented with expanded clay, then a semi-dry screed is obtained). At the same time, the technology used for filling does not undergo any special differences and is quite accessible for doing it yourself. The only requirement is sufficient strength, composition and thickness of the original concrete surface. Pre-coating with expanded clay will improve the heat capacity of the floor.
The total thickness of a traditional screed is a multi-component coating, which includes (from bottom to top):
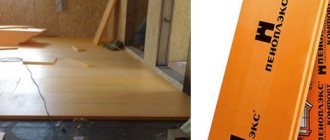
- A layer of heat insulation (for the option with expanded clay, you can use polystyrene foam boards with a density of at least 35 kg/m3);
- A layer formed by reinforcing wire mesh, which increases surface strength and promotes more uniform load distribution. The mesh does not need to be laid if reinforcing glass fiber is added to the mixture forming the base layer;
- A layer of screed using a cement-sand mixture or a ready-made dry mixture with expanded clay as a filler; pipes are first laid on the base of the reinforcing mesh.
If the walls of the house are lined with foam concrete, then you need to lay a layer of vapor barrier on the rough surface with your own hands - this layer will prevent heat from escaping through the pores of the material. The composition of the layer is low-density polyethylene.
Since the thicker the screed level, the lower the height of the room will be, before starting installation it is necessary to correctly determine what thickness each layer will have.
Layer thickness and preparation before pouring the screed
The thickness of the polystyrene foam board pre-coated with expanded clay must be at least 30 mm (for floors installed on the second floor, it can be laid even up to 40 mm high). The thickness of the reinforcing mesh is determined by the diameter of the wire (4-5 mm). The main thing is to correctly predict what thickness the base layer will have. The minimum thickness is equal to the diameter of the pipelines, plus the height necessary to ensure the mechanical strength of the finished coating. For walls equipped with foam concrete, the thickness is usually increased. The last parameter greatly depends on the materials from which the screed is made. Semi-dry or dry screed, in which ready-made mixtures are used, is minimal in terms of its height (60-80 mm). However, when heating is periodically turned on and off, the upper level of the screed may become covered with surface cracks caused by differences in the thermal conductivity of the components (for the option with expanded clay, the likelihood of cracks forming can be reduced). Therefore, it is better to add a solution of any plasticizer (for example, PVA glue, in a ratio of 1-1.5% by volume of the mixture) to the dry mixture.
The plasticizer is introduced during the process of stirring the concrete or dry mixture solution with your own hands.
Two types of work are carried out in advance: leveling the original surface and crimping the installed floor heating system.
The first is done even before installation and consists in the fact that all irregularities, cracks and gaps on the original surface are eliminated, and the adjacent parts of the walls are puttied. The slightest residual irregularities will lead to unsatisfactory coolant flow, since the level of the pipes can differ sharply in different areas. In addition, it is much easier to glue damper tape to puttyed wall surfaces.
Pressure testing of a water heated floor consists of checking the laid pipelines for their ability to withstand the operating pressure of the coolant without losing the tightness of the connections. The technology for carrying out pressure testing is designed for at least a day of continuous testing of the system. After this, expansion joints are made in the pipelines.
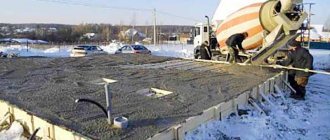
Pouring concrete mixture: composition, technology and sequence
Filling is performed only at room temperature. Laying the working solution is carried out in the following sequence:
- 1A pipe placement diagram is drawn up so that various structures can subsequently be mounted on the floor without damaging the pipelines;
- 2You prepare the solution yourself. The minimum grade of concrete should be 250 (preferably 300). For cement-sand mortar, it is important to maintain the proportions of the components: when using screenings, the proportion is 6 parts of screenings to 1 part of cement; if you use expanded clay or crushed stone filling, the proportions will change to 1:7. To properly prepare the working mixture, use an electric mixer with a shovel attachment;
- 3A level is set for laying the mortar with your own hands, for which they use beacons, and - for large rooms - formwork;
- 4 During the laying process, the mixture included in the concrete pouring must be compacted. If the solution is too viscous, the complexity of this work will increase;
- 5The resulting surface is leveled, and the final level of the screed should not exceed 100 mm.
Advice! A solution prepared with your own hands from a self-leveling mixture will not require subsequent compaction of concrete.
After the concrete screed has completely hardened (at least 36 hours, the dry mixture sets even earlier), the finishing coating can be laid.
openstroi.ru
Startup sequence
Within a few days, the water floor system is brought to operating temperature conditions. First, the supply temperature is set at 20 - 25 degrees and then every day it is increased by 5 - 10 degrees. It is increased by 5 degrees if antifreeze is used, and if water is used, then by 10 degrees.
In addition, the rate of temperature increase depends on the size of the heated area. If the screed has a small array, then it reaches the desired mode earlier. But at the same time, experts advise not to rush, since if it warms up quickly and unevenly, it will become covered with cracks, and if a non-freezing liquid is used, it may overheat and the entire system will fail.
Power calculation
Knowing the power factor of the cable is necessary in order to understand whether the heating of the entire room will be sufficient. In addition, the indicator also plays a role when choosing the length of the material itself.
To calculate the power, use the following formula: P1= P2*S*1.3 (...1.6), while P1 means the power of the cable used for laying heated floors; P2 means heating power per square meter of room; Variable indicators from 1.3 to 1.6 represent the safety factor. Its role is to ensure that the equipment does not operate at the limit of its own capabilities, but has a reserve power reserve.
As a rule, heating one square meter requires power in the range of 120-180 watts; in the case of glazed loggias and balconies, the figure increases to 180-250 watts per square meter. The power may vary depending on whether the system was installed for the purpose of a main heat source or an additional one:
- if the installation of the structure is planned as the only source of heat, then more than 70 percent of the floor surface is covered;
- if the structure acts as additional heating, the cable is laid only on the surface where furniture or household appliances are not provided.
Having calculated the cable power for each individual room, its length is calculated using the formula: h (cable laying pitch) = S (area of insulated surface) * 100/L (total cable length). The cable, depending on the power, has a standard length. It is not recommended to cut it - if necessary, change the step of its installation during the installation process. It is important to remember that such a calculation must also take into account the wire for connecting the entire structure and the regulator from the meter to each element of the system, since the heating floor connection diagram does not allow a direct approach to the outlet.
In the case of laying film heated floors, the calculation process is simplified as much as possible - the total number of heating elements must completely cover the entire area of the room.
Draining water from circuits
The design of a water floor, if installed correctly, will not have a tap or a lower point. For this reason, a compressor is used. Before draining the heated floor, this device is connected to the supply manifold. When it is factory assembled, then it has devices that prevent the reverse movement of the coolant.
At the liquid fill valve located on the supply manifold, remove the air vent and screw the adapter into this place and connect the compressor output. A hose is connected to the drain hole on the return manifold and discharged into a container or sewer.
The shut-off valves on one loop remain open. After turning on the compressor, the liquid begins to drain under pressure. The device is not turned off until an airborne suspension appears. Only then is it turned off, the valves of the first circuit are closed, the shut-off valves of the next loop are opened and the compressor is turned on again. As a result, water is drained from the entire system.
Since the length of the contours can be significant, a considerable amount of liquid remains on their walls. It is removed again, repeating the above procedure after a few hours.
After installation is completed and before operation, you need to fill the system with coolant and start the heated floor for the first time. The working medium is replaced depending on its type. The water is changed every year, and the antifreeze liquid is changed once every 3 to 5 years.
Electrical connection diagram
This part of the installation is the most critical. Connecting electricity requires the following steps:
- Testing cables and wires for system resistance (using a multimeter) and mat insulation (using a megohmmeter).
- Connecting the temperature sensor, thermostat and power cable. This must be done according to the instructions included in the ETP system.
- Additional grounding of the cable and power cord, which is performed by fixing these elements with a protective terminal.
The temperature sensor is connected to the thermostat according to the instructions, after which the heating system is connected to the circuit breaker. The first start of the system is carried out only after the screed has completely dried.
Depending on the model of the electric floor used as heating, the connection diagrams vary. Connecting an ETP is much simpler than connecting a water floor. No extra connections are required (for example, to an electric boiler), but only to the electrical network.
Cabling system connection:
- The temperature sensor is installed in a corrugated pipe and placed in a prepared groove in the wall.
- The electric sensor wire is connected to the thermostat. The cord itself is fixed between the turns of the heating elements.
- At the final stage, the heating system is checked using a tester. Only if, after testing and checking the readings with the instructions, they coincide, you can lay the screed.
Heating mats:
- First, the area where the thermostat is located is determined.
- The mats are laid according to the installation instructions.
- The temperature sensor, placed in a corrugated pipe, is fixed between the turns of the system.
Connecting the film floor:
- First of all, it is necessary to connect all rows of film. You can only use the terminals that came with the heated floor. Film strips are connected in parallel. All contacts must be insulated with overlays.
- A pocket is made in the center of the heat-insulating substrate for mounting a temperature sensor.
- Connecting the temperature sensor and thermal film to the thermostat and the entire system to the power supply via a circuit breaker.
To make sure the system is functioning, you need to turn on the heating at full power and wait a few minutes. There should be no sparks or unpleasant odors. After testing the performance of the system, you can proceed to installation of the floor covering.
Features of ceramic coating
The time it takes to lay tiles on a heated floor system will depend on the area of the room. One person can easily handle a 3*3 meter bathroom during the day. It is very important that you have all the necessary materials and equipment on hand.
There are basic points that you should know before laying tiles on a warm floor.
- The floor level along with the tiles should be on the same level as the floor in other rooms of the apartment. This suggests that all calculations should be made in advance. Much will depend on the pipes that are used in the work, all the components. If there is a threshold, then a slight difference in floor level heights will not be so noticeable. Most often, this will be necessary to level the surface and place all communications at the base.
- The layer of screed or tile adhesive should be at least 10 mm. This is necessary so that the heat is distributed evenly over the entire plane. Otherwise, the heat concentration will be noted only at the locations of the pipeline.
- There should be no covering of the floor during operation, or crowding the area with furniture, plumbing or other equipment. This item is especially important if you need to lay a rug in the bathroom. If you bypass this rule, then the heating elements will burn out under these areas. It is very important to carefully plan the location of all bath components in the apartment in order to save money. After all, in areas where furniture or other appliances are located, installation should not be done.
When the time comes to lay tiles on the heated floor, you should check several times whether the system is connected correctly and the pipeline is laid. Some will think that this can be skipped and will even laugh. The specialists performing the work will not always do everything efficiently. This is especially evident if total control is not exercised over them. The consequences can be the most dire.
In addition, it is worth paying attention to the fact that all communications of the underfloor heating system are hidden. They should not appear or appear anywhere. The surface on the floor must first be leveled with a screed. If the heated floor was recently poured with concrete, you will have to wait until the solution dries completely. Otherwise, you will have to start the work all over again and correct errors.
All that remains is to take steps to select the tiles. It can be completely different. The best option is ceramic. As for the adhesive composition, it must be intended for heated floors. There are plenty of options at any hardware store. Instead of glue, you can choose any analogues. The main thing is that the composition contains epoxy resin. Regular tile adhesive will begin to crack when the system is turned on.
Preparing the base
A properly prepared base for laying an electric floor is an indicator of the quality of the future floor covering.
Work algorithm:
- The base must be clean and level. The foundation is cleaned of contaminants and, if necessary, leveled using a cement mixture. Cracks and gaps are carefully sealed. Concrete and porcelain tiles are leveled using a grinding machine.
- Room measurement. Correctly taken measurements help speed up the system installation process.
- Primer of the subfloor surface. Priming allows you to better bond the base to the cement screed.
- Next, a waterproofing layer is laid using polyethylene, which should extend 10 cm onto the wall.
- Placement around the perimeter of the base of the damper tape. It is designed to distribute heat evenly over the surface.
- Installation of thermal insulation. Insulation is selected depending on the type of floor covering.
- Coated with reinforcing mesh. If you add microfiber or plasticizer to the screed solution, you can do without additional reinforcement.